
Some users find Word’s built-in styles difficult to apply and manage. There are easy ways to access styles, but sometimes the volume and list order are less than helpful. In this article, I’ll show you how to access Word’s built-in styles using the Quick Styles gallery, the Styles pane, and the Apply Styles dialog. Because the Quick Styles gallery offers the quickest route, I’ll then show you how to customize this gallery by adding the styles you use most often.
This article uses Word 2010, but I’ll supply instructions for other versions when significantly different. Most of the features discussed in this article aren’t supported by the earlier .doc versions. There’s no downloadable example file for this article.
Style basics
A Word style is a set of formatting instructions. Word comes with oodles of them, and you can create your own. When you open a blank document and start typing, you’re using a style named Normal. To see what that really means, formatting-wise, right-click Normal in the Quick Styles gallery (in the Styles group on the Home tab), and choose Modify. As you can see in Figure A, Normal claims some of the following format attributes:
- Font is Calibri
- Font size is 11 point
- Alignment is left
- Line spacing is 1.15
- After spacing is 10 point
Figure A
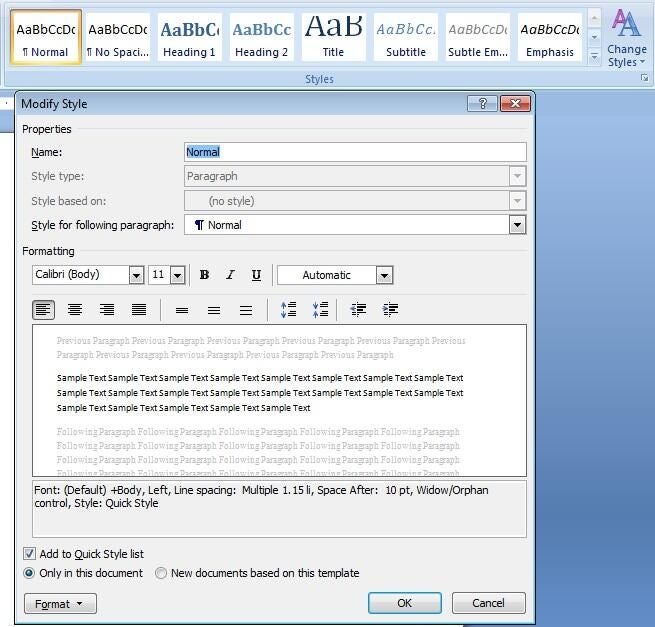
Normal is Word’s default text style.
These attributes change from one version to another, so don’t worry if your Normal style isn’t exactly the same. In Word 2003, choose Styles and Formatting from the Formatting menu to display the Styles and Formatting task pane.
For the most part, you’ll work with two types of styles: character and paragraph. A character style applies only to what you select, whereas a paragraph style formats whole paragraphs. A paragraph style uses paragraph marks to denote boundaries. The default style, Normal, is a paragraph style. There are three other types of styles, but you won’t interact with their advanced features very often:
- Linked: A combination style for paragraphs and characters based on the selected text
- Table: These styles apply only to Word tables and apply shading and lines
- Lists: List styles apply to bullets, numbers, indentation, and other list formats
I mention these three to be comprehensive, but we won’t discuss them further in this article.
Word applies the Normal style (Figure A) as you enter text. You may never need to move beyond Word’s default styles. In a short letter or memo, direct formatting is fine. By direct formatting, I mean selecting text and manually applying italics, bold, or some other format. When working with long, heavily edited documents, styles can help. For instance, let’s suppose you’re working in a long document with many chapter titles, and you want to change the font for them all. Do you want to do so manually by finding (and perhaps missing) each title and then making the change–or would you rather modify a style once? You can do the latter if you apply a title style to the chapter titles.
Beyond normal formatting, if you plan to take advantage of some of Word’s more advanced features–such as outlining, the table of contents, and so on–you need to know that these advanced features rely on proper application of Word’s built-in styles, but there’s more to styles than the formatting you see. (We won’t discuss these advanced features in this article.)
Quick access to styles
There are easy ways to access styles. To use the mouse, select the text or click inside a paragraph. Then, click a style in the Quick Styles gallery in the Styles group on the Home tab. With Live Preview enabled, you can hover over a style and see how it looks in the document before applying it. For keyboard enthusiasts, press [Ctrl]+[Shift]+[S] to display the Apply Styles dialog shown in Figure B. Then, choose a style from the Style Name drop-down. (In Word 2003, use the Style drop-down on the Formatting menu.)
Figure B
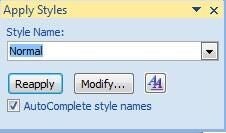
Use the keyboard for quick access to styles.
Most users run into trouble with the interface components; either they can’t find the style or the list is too long to be useful. Because they don’t know how to manage styles, they don’t expand their knowledge and therefore their use of styles.
The Quick Styles gallery (not supported by .doc versions) offers the most efficient route to applying a style if the style is visible. If the style you want isn’t one of the visible thumbnails, click the Styles dialog launcher and choose from the list shown in Figure C. Depending on the pane’s configuration, you stand a good chance of not finding the style you want. You could also display the Apply Styles dialog (see Figure B) and choose a style from the drop-down list. It too can prove frustrating if the list is long, but the AutoComplete feature helps, where you can type the style’s name for quicker access.
Figure C
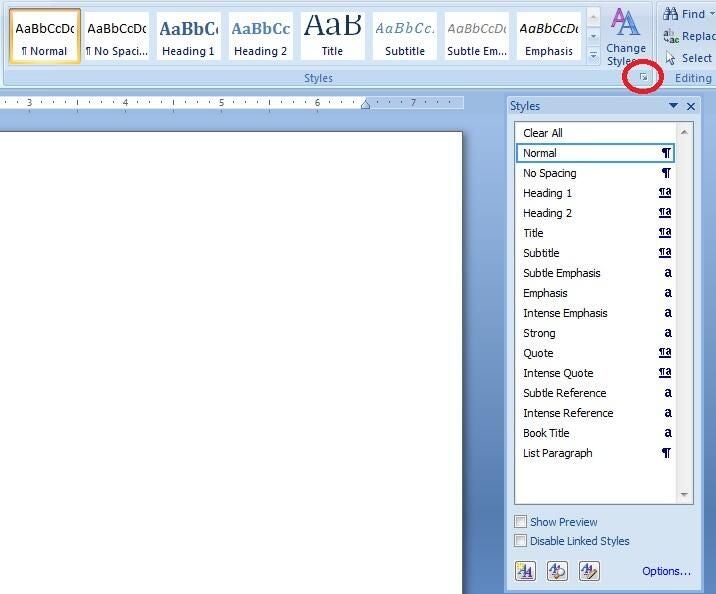
The Styles pane lists recommended styles.
Here’s how to use these components efficiently, without changing the default configuration:
- Use the Apply Styles dialog to quickly apply and modify styles; use the Styles pane to work with the styles themselves.
- When a style is readily available from the Quick Styles gallery, click it.
- If the style isn’t visible in the Quick Styles gallery, and you know the style’s name, display the Apply Styles dialog and start entering the name. By default, the AutoComplete feature is enabled, and the dialog will quickly hone in on your style, bypassing the list search altogether.
You can leave the Apply Styles dialog and the Styles pane open while you work for even easier access. You can even move them around. Click the title bar and drag either to a new position. Double-click the title bar to dock (secure) either, pane style. Word will remember where you left it from one work session to another.
Be careful when using the Apply Styles pane, because it can be a bit misleading. If you select two paragraphs with different paragraph styles, this dialog will display only one, dependent on your selection direction.
Managing the Quick Styles gallery
As I mentioned, you have quick access to styles via the Quick Styles gallery or the Apply Styles dialog. From this point on, it’s easy to get lost. The good news is that you’re not stuck with the gallery’s default settings. With a little customization, the gallery will become your most efficient route to applying styles.
You already know that this gallery allows single-click access to applying a style. For the most efficient use, you want the styles you use the most to be visible. Before you start adding those styles, you might want to remove default styles that you know you won’t use to free up gallery space. To remove a style from the gallery, do the following:
- If necessary, click the More button to display the full gallery.
- Right-click the style.
- Choose Remove from Quick Style Gallery (Figure D).
Figure D
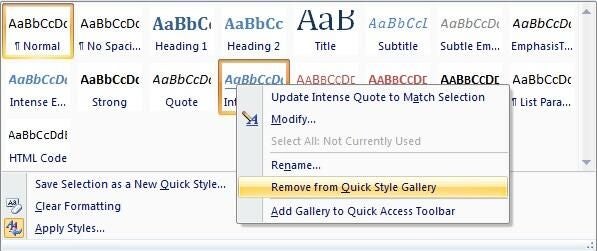
Choose Remove from Quick Style Gallery.
You’re not removing the style from the document (or template). You’re only removing it from the gallery.
The next step to creating a more efficient gallery is to add the styles you use frequently. To illustrate, let’s add the style HTML Code and then move it to the top row. First, display the Styles pane by clicking the group’s dialog launcher (circled in Figure C). With the Styles pane open, do the following:
- Browse the list to find the style you want to see in the gallery. In this case, that’s HTML Code.
- Right-click the style.
- Choose Add to Quick Style Gallery (Figure E).
Figure E
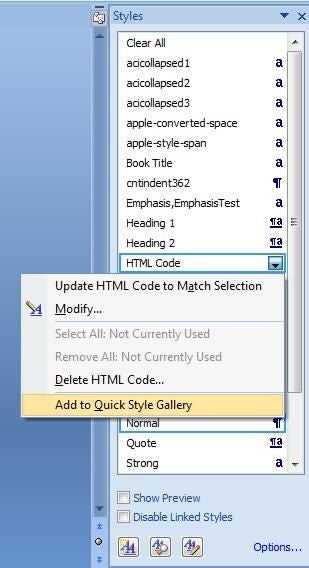
Choose Add to Quick Style Gallery.
Did I lose you at step 2? If so, you’re in good company. Not finding the style in the list is frustrating; many users just stop at this point, because they don’t know how to find styles that aren’t listed. By default, Word displays a list of recommended styles instead of all of them. If the style in question doesn’t make Word’s recommended list, click the Options link in the pane’s bottom-right corner. From the Select styles to show drop-down, choose All styles, as shown in Figure F. This change stays in effect for the current document, until you change it.
Figure F
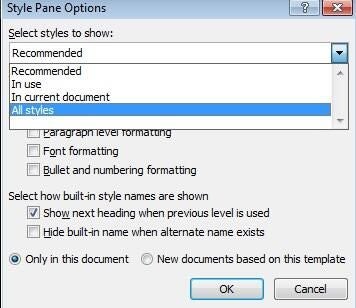
Display all the styles.
Adding your most frequently used styles is really helpful if they’re visible in the gallery’s top row. You can click the More button, but a single click is better. When you add a style, Word positions it at the end of the gallery, but you can move it to the top row, as follows:
- Click the group’s dialog launcher to display the Styles pane.
- Click the Manage Styles button at the bottom of the pane.
- In the Manage Styles dialog, click the Recommend tab.
- Find the style you want to reposition (Figure G). If necessary, you can use the Sort Order option to display the list alphabetically. If you still can’t find it, uncheck the Show recommended styles only option.
Figure G
- Click the Assign Value button and enter a value from 1 to 99 that’s representative of the position within the gallery. To position HTML Code in the first row, enter 4 and click OK (Figure H).
Figure H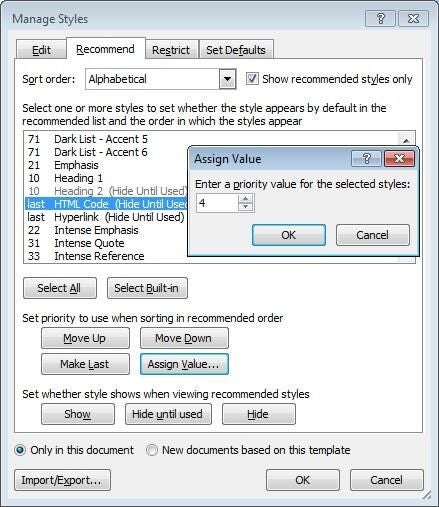
- Click the Show button to be sure the style is visible in the Styles pane. (This step isn’t always necessary, but if it is and you skip it, you might find troubleshooting difficult later.)
- From the Sort order drop-down, choose As Recommended to display the order styles will appear in the gallery (Figure I).
Figure I
- There can be multiple styles with the same assignment value. Use the Move Up and Move Down buttons to promote or demote a style. Clicking Move Up once moved HTML Code to the top of the 4 position list (Figure J). Because there is no 3 position, Word updates the assignment value to 3.
Figure J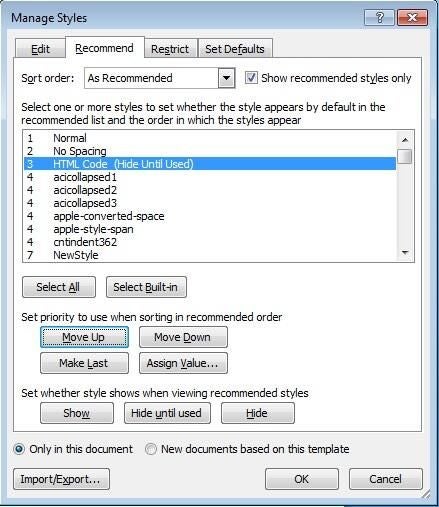
- Click OK to close the dialog. As you can see in Figure K, HTML Code is now the third style in the first row — easily accessible with one click.
Figure K
Best advice
If you have a set of styles that you want to apply regularly in all new documents, don’t change Normal.dot (Word’s default template). Instead, create a custom template and apply it.
Send me your question about Office
I answer readers’ questions when I can, but there’s no guarantee. When contacting me, be as specific as possible. For example, “Please troubleshoot my workbook and fix what’s wrong” probably won’t get a response, but “Can you tell me why this formula isn’t returning the expected results?” might. Please mention the app and version that you’re using. I’m not reimbursed by TechRepublic for my time or expertise, nor do I ask for a fee from readers. You can contact me at susansalesharkins@gmail.com.