
In a previous Daily Drill Down, I explained how slow network printing can decrease the efficiency of an office. After all, if people are standing around the printer waiting for a job to print, then they’re wasting company time. I offered several different ways to boost printing speeds, such as creating a printer pool, getting rid of that old printer cable, and optimizing your server’s print queue. Here, I’ll discuss more techniques to increase your printing speed.
Spooling options
Controlling print job spooling can increase print speeds. To do so, select Settings | Printers from the Start menu. When you do, you’ll see the Printers window. Right-click the network printer you want to work with and select Properties to open the printer’s Properties sheet.
Next, select the Advanced tab. The tab may vary slightly depending on what type of printer you’re using but will usually resemble the one shown in Figure A.
| Figure A |
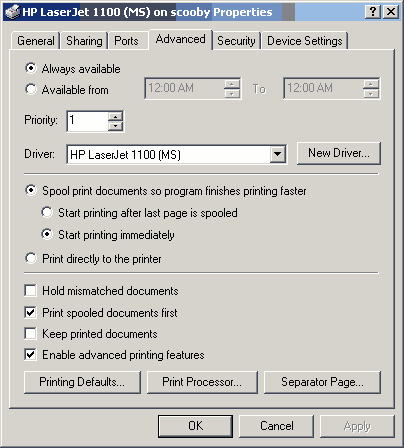 |
| The Advanced tab on the printer’s Properties sheet contains settings used to control printing speeds. |
Notice in Figure A that there are two options about halfway down the page: Spool Print Documents So Program Finishes Printing Faster and Print Directly To The Printer. Unless the spooler is malfunctioning, I recommend always spooling the document rather than printing directly to the printer. The process of printing directly from a program is much slower than spooling a print job because the program sends the print job to the printer at the same time it builds the print job. Having to do two tasks at once can really slow things down. From the user’s standpoint, the big problem with the print-direct method is the program that he or she is using will not let him or her do anything else until the print job finishes printing. By spooling the print job, however, the program will dump the print job to the spooler instead of trying to handle the printing tasks. Sending a print job to the spooler usually completes in a matter of seconds (depending on the size of the print job). Once it has been sent, the program assumes that printing has completed, allowing the user to continue working.
Direct network printing can be tricky
When a user sends a print job directly to a printer, and he or she uses a local printer, the process ties up the computer for a while. However, sending the print job directly to a printer connected to a network can cause other problems.
Depending on what type of print server the printer was connected to, the print job could become mixed with other print jobs. For example, some types of printers treat each page of a 10-page print job that was sent directly to the printer as a separate print job. In one possible scenario, the first two pages might print, and then another user’s print job might pop out, followed by another page or two, and so on. Imagine what could happen if you had a printer pool set up; each page of a multipage document could be printed by a different printer within the pool. The user would have to check each printer for pieces of the document and try to put the pieces in order.
Other options for spooling
In Figure A, there are two more options beneath the Spool Print Documents So Program Finishes Printing Faster radio button: Start Printing After Last Page Is Spooled and Start Printing Immediately. I recommend selecting the option to start printing after the last page is spooled for two reasons. First, if all of the pages have been spooled, the pages are considered one job and the printer won’t print another job in the middle of it. Second, you won’t have to worry about holding up other users with a job that’s slow to spool.
Suppose you select the Start Printing Immediately option and a job spools to the print queue. After the first page spools, the print queue starts printing the job, but the second page contains a lot of graphics and spools more slowly. Other jobs start backing up in the print queue while the slow job spools.
You’ll also notice that in Figure A, you can select the option to Print Spooled Documents First. By doing so, when a job in the print queue is still spooling, other jobs behind it that have completed spooling can go ahead and print. (However, this depends on the type of print server you’re using.)
Printer priorities
Printer abuse happens. My favorite story of such abuse involves a guy who tied up the busiest printer in the office for a full day printing the complete contents of a clip art catalog. One toner cartridge, countless reams of paper, and eight hours later, he finally canceled his print job.
What can you do to prevent such a situation? Say your network printer connects directly to the print server. The print server shares the printer, and each person connected to the printer through the network has an icon in the Printers window that represents that printer. Each of these icons is just that, an icon; it isn’t the actual printer. So any settings applied to the printer from a client’s machine are specific to that machine. For example, earlier, I discussed sending documents to the spooler instead of directly to the printer. If I set a machine to send the documents directly to the printer, that setting would affect only the machine on which the change was made.
Thus, on a Windows NT, Windows 2000, or Windows XP machine, you can set up a printer icon that end users can’t tamper with. Because the icon is just a pointer to the printer and nothing more, you can also set up multiple icons pointing to the same printer. This allows you to assign different properties to each icon. For example, you can set a printer to be available at all times or only at certain times. You can also set the printer’s priority, so a higher priority print job will print before a lower priority job.
Priority printing example
Suppose three people use a machine in an office full of other users who print to a network printer. User A frequently prints small print jobs. User B prints small print jobs, too, but also prints the occasional big document. User C rarely prints work-related content. In such a situation, I would recommend setting up three different printer icons on the machine.
Set up the first icon with a high priority that’s available at all times. This printer icon would be used for the smaller print jobs that user A and user B frequently print. Set the second print icon with a medium priority, so it is available during less busy times, such as during lunch or after hours. User B can use this print icon to send the bigger jobs to print during the less busy times. Finally, the third print icon should be set to the lowest possible print priority and made available only after business hours. You can assign this printer icon to be available to user C. Then, use the Security tab to ensure that only the intended users are allowed to print through each icon. By doing so, you’ve effectively optimized your office printing by making sure that users won’t have to wait for small jobs behind big print jobs or print jobs that are not business related.
Conclusion
A slow network printer can become a handicap to the entire office. There are a variety of methods that you can use to boost network-printing speeds. Some of these methods involve hardware upgrades and changes. Other methods involve software solutions such as setting the way that documents are spooled and handling the priority each print job receives. When you’re faced with long lines of users at the printer, consider your office situation and implement the solution that fits your environment.
