Editor’s note: In the video, Brandon Vigliarolo uses Microsoft Office 365 and walks through the steps of adding colors or images to the background of your Word documents. In the following tutorial, Susan Harkins explains the process when using Word 2010. This article was first published in December 2011 and was updated in March 2019.
Most documents are rather boring–the same black text on a white background. That’s the way it should be though because most documents don’t require special graphics and colors. However, when a document requires more, Word offers many visual possibilities. For instance, you might want to change the background’s color or even use a picture as the document’s background. Both are easy to accomplish, technically speaking, and in this article, I’ll show you how to do both.
Keep in mind that adding a background color or picture to a document is much easier than designing a visually effective document. I’ll share only the mechanical process; how you implement the feature is up to you.
I’m using Office 365 Word (desktop) on a Windows 10 64-bit system, but you can use older versions. You’ll find these options on the Design tab in the Page Background group. (In earlier versions, look for the Page Layout tab.) The browser edition doesn’t support the background feature.
Add color
Adding a bit of color is probably the easiest way to liven up an otherwise boring document. You might decide to add a sedate color to a promotional letter or resume. To add color to a document’s background, you’ll work from the Design tab, as follows.
- Click Page Color in the Page Background group.
- Choose a color from the gallery (palette) as shown in Figure A.
Figure A
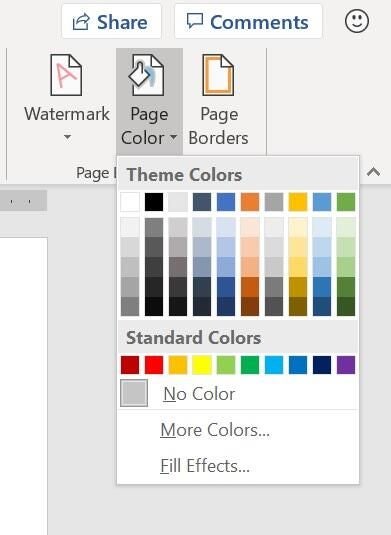
It doesn’t get much easier than that. You can click More Colors to fine-tune a gallery color. Choose No Color to remove a colored background.
Although simple, you could create some ghastly backgrounds. There’s a lot to consider when introducing color into a document. Color-wise, there are several attributes, hue, chroma, and so on.
Your main consideration should be legibility. In that regard, contrast is usually the most important factor: the higher the contrast, the more legible the text. It also adds to the layers of separation, as shown in the illustration in Figure B. The more contrast, the more depth, which improves readability. I’m not suggesting that you take a crayon-box attitude to your documents though. This illustration is just that, an illustration–not a recommendation for these particular colors.
Figure B

Limiting your choices will produce the best results. Limit your color palette to two or three colors. Use different shades (hue) and saturation (chroma) to add variation. And remember, even in digital form, there’s nothing wrong with a white background.
Add a picture
The process for adding a picture to a document’s background is similar to inserting a picture into an AutoShape–you use the Fill Effects option.
Note:This feature has the potential to produce more ghastly results, so just because you can add a picture doesn’t mean you should.
You’ll use the same Page Color option on the Page Layout tab (in the Page Background group) to add a picture, as follows.
- Click the Page Color option and choose Fill Effects.
- Click the Picture tab.
- Click Select Picture.
- Locate the picture you want to insert and click Insert.
- Click OK.
Figure C

Figure C shows an interesting background that might work well with the right subject matter, but it presents quite a challenge. What color font would you use? How much text could you add? Balancing all the requirements takes skill, but most of us can learn those skills with the right training. If you change your mind, it’s easy to remove, albeit not intuitive: Choose No Color from the Page Color dropdown.
As I mentioned, adding color or a picture to a document’s background is easy. Producing a visually effective document takes specialized knowledge.
Send me your question about Office
I answer readers’ questions when I can, but there’s no guarantee. Don’t send files unless requested; initial requests for help that arrive with attached files will be deleted unread. You can send screenshots of your data to help clarify your question. When contacting me, be as specific as possible. For example, “Please troubleshoot my workbook and fix what’s wrong” probably won’t get a response, but “Can you tell me why this formula isn’t returning the expected results?” might. Please mention the app and version that you’re using. I’m not reimbursed by TechRepublic for my time or expertise when helping readers, nor do I ask for a fee from readers I help. You can contact me at susansalesharkins@gmail.com.
Affiliate disclosure: TechRepublic may earn a commission from the products and services featured on this page.