
If you’re a Linux administrator, you know how important it is to be able to schedule the running of various applications and scripts. You might have created a brilliant backup script that does exactly what you want, when you want it. However, that backup script isn’t going to automatically run without the help of cron. Cron is the scheduling system for Linux and without it you’d be hard-pressed to schedule regular tasks on Linux.
For some admins, cron is a simple tool to use. For others, however, editing that crontab file can be a daunting task to get right. The last thing you want to do is have that backup scheduled at the wrong time and it fires up while users are writing data to your disks. What if I told you there was a handy, web-based GUI you could use that would not only make editing your crontab easy, but would also allow you to work, via a web-browser from any machine on your network. In other words, all those GUI-less Linux servers can benefit from this as well.
I’m going to walk you through the process of installing crontab-ui and how to use it from a different machine. I’ll be demonstrating how this is done on a minimal installation of CentOS 7 (aka, no GUI).
Installation
In order to install crontab-ui, we must first install node.js, which will we do by way of installing npm. In order to install npm, we must first install the epel-release repository. To do this, open a terminal window and issue the command:
sudo yum install epel-release
With that repository in place, install npm with the command:
sudo yum install npm
Now we can install crontab-ui with the command:
sudo npm install -g crontab-ui
That’s it. You’re ready to use the tool.
Usage
Normally, crontab-ui would be started with the command crontab-ui. This would start the process and make the GUI available at http://localhost:8000. At this point, crontab-ui is only available from localhost at port 8000. That won’t do us any good on a GUI-less server. To remedy this we have to dictate to crontab-ui what address and port to listen on. So the command to run the tool is now:
sudo HOST=SERVER_IP PORT=PORT_NUMBER crontab-ui
Where SERVER_IP is the IP address of the server and PORT_NUMBER is the port number you want to assign. For instance, if my server IP is 192.168.1.202 and I want to assign crontab-ui to port 8000, the command would be:
sudo HOST=192.168.1.202 PORT=8000 crontab-ui &
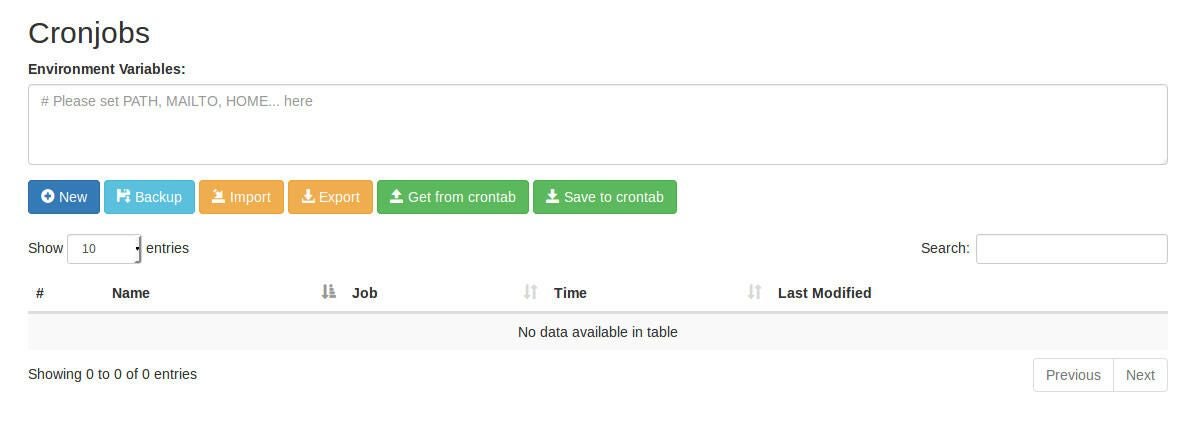
At this point you can point a browser to http://192.168.1.202:8000 and the crontab-ui will be ready to use (Figure A).
Figure A
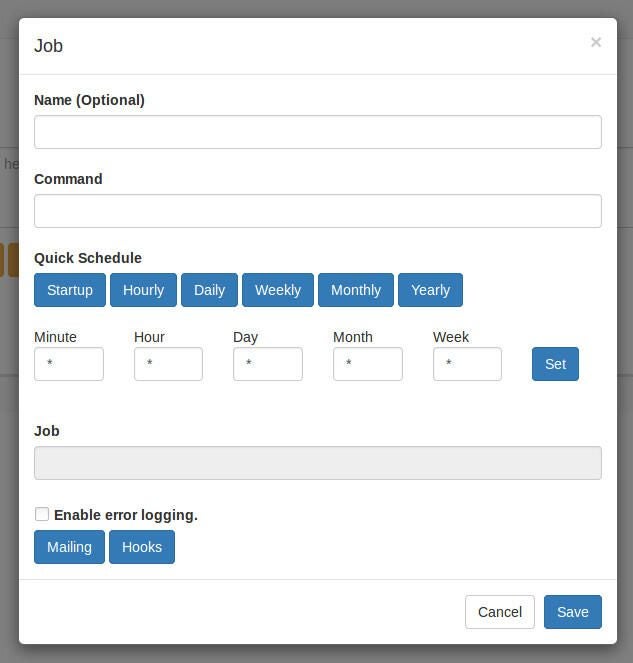
Click New to create a new crontab. In the resulting window ( Figure B), fill out the necessary information for the cron job and click Save.
Figure B
If you find you cannot reach the server on port 8000, you might have to open the port up with iptables. This can be done with the command:
sudo iptables -I INPUT -p tcp --dport 8000 -j ACCEPT
The caveats
Crontab-ui isn’t perfect. First off, when creating a new job, you still have to understand what numerical value represents the entries for Minute, Hour, Day, Month, Week. Granted Minute, Hour, and Week should be self explanatory. But for Day, you have to know that
- 0 and 7=Sunday
- 1=Monday
- 2=Tuesday
- 3=Wednesday
- 4=Thursday
- 5=Friday
- 6=Saturday
Another caveat is that crontab-ui must be run with sudo, otherwise you won’t have write permission to the necessary crontab-ui database. However, there is a way around this. To solve the problem, you must change the ownership of the node_modules folder with the command:
sudo chown -R USER $(npm root -g)/crontab-ui
Where USER is the name of the user you want to run crontab-ui as. Once you’ve taken care of that, you can then start crontab-ui with the command:
HOST=192.168.1.202 PORT=8000 crontab-ui &
Just remember, whatever user you give permissions to the node_modules folder will be the only one that can run crontab-ui, so make sure it’s a user that needs to manage cron jobs.
And finally, apparently there is a way to run crontab-ui as a daemon (with NGINX). However, it seems the proxy_pass directive required for this doesn’t seem to work. That means you must always either run crontab-ui from the command line or as a bash script.
Caveat who cares?
Even with these three caveats, crontab-ui is a very good way to help you get your cronjobs up and running with ease. If you’d prefer to manage these jobs with a GUI, this very well might be what you’re looking for.

Image: Jack Wallen
