Even the simplest mail merge task can benefit from conditional statements. You might use them to clean up an address by suppressing unwanted spaces or adding commas at the right spot. Or, you might store state abbreviations and want to use the entire state name in the address. Perhaps you want to use gender-specific pronouns such as he/she, his/her, and so on. All of the above and more can be tackled by combining Word fields with a mail merge.
In this article, we’ll quickly work through a simple mail merge and then add an IF field to handle membership types–family, friends, and individual–in the body of the letter. Instructions for setting up the mail merge are minimum because that’s not the focus of this article. If you need basic information about the mail merge, read How to use Word mail-merge. We’ll use the same demonstration files (with minor updates).
I’m using Office 365 Excel and Word (desktop), but you can work with earlier versions. You can also work with your own data or download the demonstration files. Mail merge isn’t supported by Word’s online version.
SEE: System update policy template download (Tech Pro Research)
The pieces
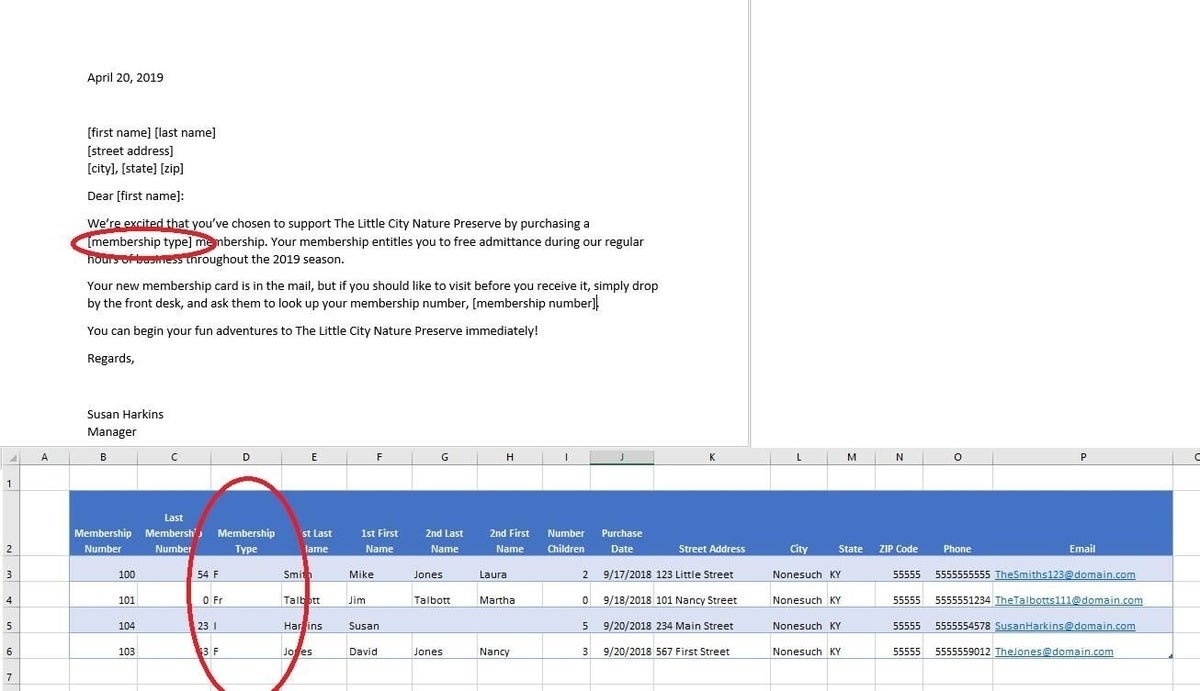
Any merge requires a Word document and information. Our information is in an Excel workbook. Figure A shows both pieces. We’re going to merge new membership details from the Excel sheet into the letter (a Word document). The membership type field contains the conditional data. Specifically, we’ll convert F, Fr, and I into family, friends, and individual, respectively.

The setup
The [ ] characters in the Word document (Figure A) denote spots where the mail merge will insert values from the Excel workbook. Identifying the type of merge is the first step: Click the Mailings tab, in the Start Mail Merge group, click the Start Mail Merge, and choose Letters. Then, identify the recipients: Click Select Recipients, choose Use an Existing List, identify the data source (the Excel workbook file), click Open, identify the appropriate sheet, and click OK.
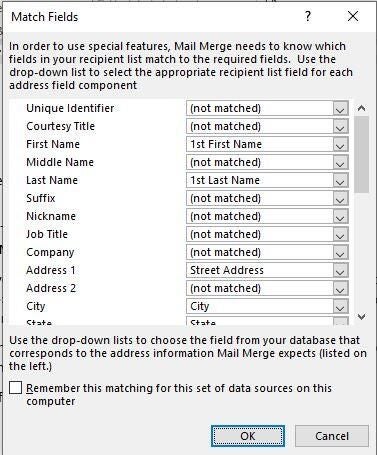
Now that Word knows what type of merge you’re running and where the details are coming from, it’s time to map Word placeholders to Excel fields. To do so, click Match Fields in the Write & Insert Field groups. Word will match a few of the items for you: City, State, and Zip. Continue to match details as follows:
- First Name: 1st First Name
- Last Name: 1st Last Name
- Address 1: Street Address
Use Figure B as a guideline for completing the mapping process.

Now you’re ready to insert the mapped fields into the actual document. I’ll walk you through the first one:
- Select [first name] in the first line of the address element. Include the [ ] characters in the selection.
- Click Insert merge Field in the Write & Insert Fields group and choose M_1st_First_Name from the resulting list.
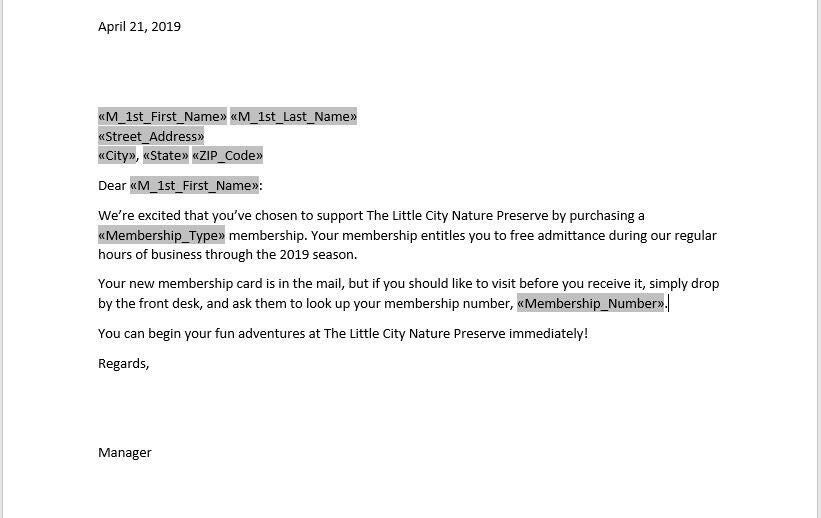
- Continue replacing the text placeholders with the appropriate merge fields until you’re done (Figure C). You can add spaces and commas as you would with regular text.

There are no pre-defined fields for the membership number and membership type, but don’t worry about that. The pre-defined map is a shortcut that you’ll want to take advantage of when possible, but it won’t always have every field you need. You can get around the lack of a pre-defined mapping field by inserting an unmapped merge field–so don’t forget to insert both of those fields before you continue.
At this point, all of the merge fields are in place, and you could run the merge. However, the membership details in the Excel workbook–F, Fr, and I–might not mean anything to the new members. So, let’s replace that merge field with an IF field that can turn that meaningless data into something the members understand.
The IF field
If you run the merge as is, the membership type merge field will return F, Fr, and I, which you’ll probably want to avoid. This next bit might feel like unchartered waters if you’re not familiar with Word fields. In a nutshell, they’re pre-programmed codes similar to the merge fields you inserted earlier. In this case, we’re using the following nested IF fields:
{ IF {MERGEFIELD Membership_Type } = “F” “Family” { IF {MERGEFIELD Membership_Type } = “Fr” “Friends” { IF {MERGEFIELD Membership_Type } = “I” “Individual” } }}
Inserting these fields is a bit awkward–at first. You can use the interface on the Insert tab: In the Text group, choose Field from the Quick Parts dropdown. Or, you can press Ctrl+F9 to insert the {} characters and type the rest yourself. Either way, replace the <<Membership_Type>> merge field with the IF fields above, as shown in Figure D. Then, run the merge as you normally would by clicking Finish & Merge in the Finish group. If you prefer, click Preview results in the Preview results group to review the merge before you commit it to finished documents.

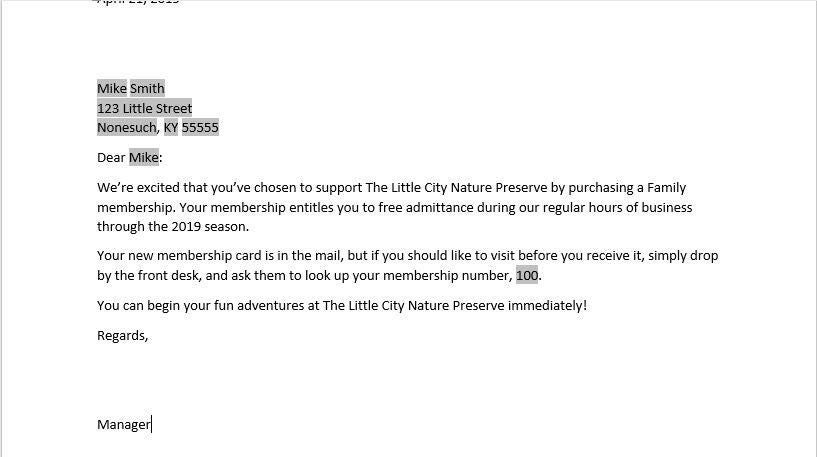
Figure E shows one of four new member letters, ready to save and/or print. Remember: You can not type the {} characters yourself.

The IF field only looks complex, but its purpose is simple:
- If the current record’s membership type value is F, print Family.
- If the current record’s membership type value is Fr, print Family.
- If the current record’s membership type value is I, print Individual.
In this case, there should never be an empty membership type value, but if that happens, you’ll want to accommodate that by adding an additional IF. Notice that the three IF fields are nested, one within another–that syntax is important.
There are other ways we could modify this letter using conditional fields instead of the merge fields. For example, if the membership type value is Fr, you might want to add an additional sentence reminding the new member that the Friends membership includes an additional two guests with each visit.
Word’s fields are a powerful feature. If you’re not familiar with them, considering reading 10 things you need to know about using Word fields.
Send me your question about Office
I answer readers’ questions when I can, but there’s no guarantee. Don’t send files unless requested; initial requests for help that arrive with attached files will be deleted unread. You can send screenshots of your data to help clarify your question. When contacting me, be as specific as possible. For example, “Please troubleshoot my workbook and fix what’s wrong” probably won’t get a response, but “Can you tell me why this formula isn’t returning the expected results?” might. Please mention the app and version that you’re using. I’m not reimbursed by TechRepublic for my time or expertise when helping readers, nor do I ask for a fee from readers I help. You can contact me at susansalesharkins@gmail.com.

