


Image: Getty Images/iStockphoto
Most Microsoft Word users eventually learn how to use styles because it is the most efficient way to apply and control custom formatting. Word styles are not always easy to access, so I will show you two quick ways to access the styles you use the most.
I’m using (desktop) Office 365 on a Windows 10 64-bit system, but you can use earlier versions of Word. There’s no demonstration file because you won’t need one. The first method–arranging style thumbnails in the Quick Styles gallery–isn’t appropriate for the online version, but you can use the Apply Styles dialog.
LEARN MORE: Office 365 Consumer pricing and features
How to rearrange Word’s Quick Styles gallery
Word’s Quick Styles gallery (or Styles gallery) is on the Home tab to the right and provides quick access to several built-in styles. You might hear these styles referred to as quick styles, but that only applies to a style that’s displayed in the gallery; the style isn’t any different regardless of how you access it.
Clicking a style thumbnail is quick and easy, and you’ll want the styles you use most in the first visible line. To access other quick styles, click the gallery’s More button.
Control the order of quick styles by moving the ones you use most to the top row. For example, let’s move HTML Code to the Quick Styles gallery by following these steps.
- Click the gallery’s dialog launcher, and then click the Manage Styles icon at the bottom of the Styles panes.
- Click the Recommend tab in the resulting dialog.
- Select the style you want to move. (Use the Sort Order option to display the list alphabetically, if that’s helpful.)
- When you find the style, click the Assign Value option, and enter a number that represents the position in the gallery in the resulting dialog (Figure A), and then click OK. For instance, if you enter 2, that style will be the second thumbnail in the first row.
- Click Show.
- If you want this change to be available in all new documents, click the New Documents Based On This Template Option.
- From the Sort Order drop-down, select As Recommended.
- Click OK, and Word will move the style into the Styles pane (if it wasn’t there before).
- Find HTML Code in the Styles pane (Figure B), and right-click and select Add To Style Gallery. HTML Code is now second on the first row (Figure C)–only a click away.
Figure A
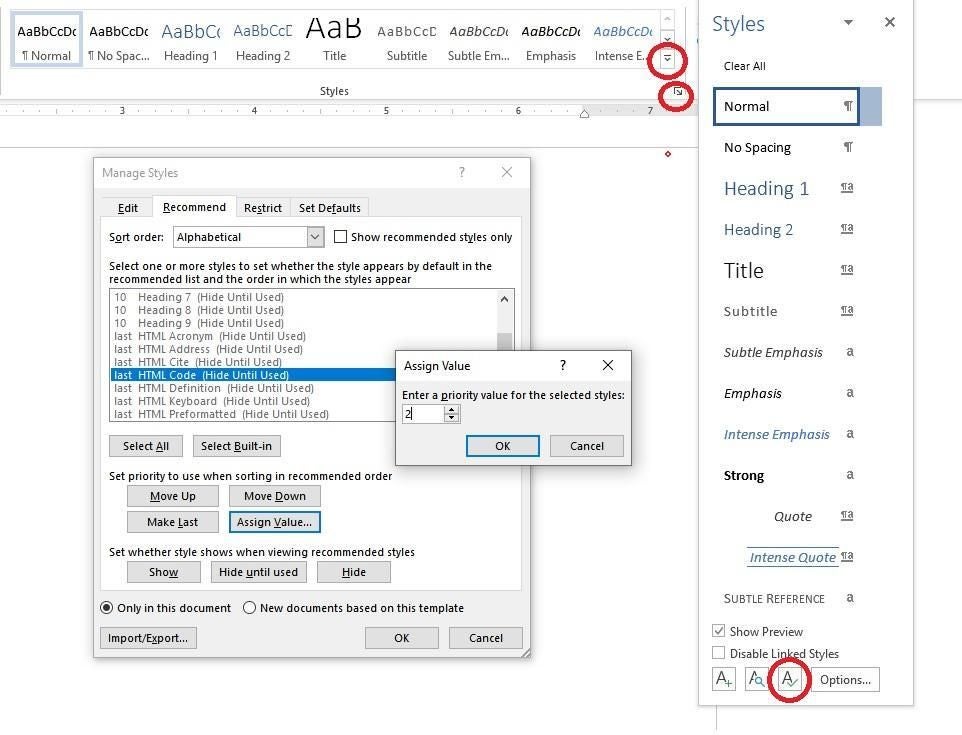
Figure B

Figure C

Out of the box, the Styles pane matches the gallery, which is why I took the long way around–so you can position styles that are not in the Styles pane. If a style in the Styles pane isn’t in the gallery, right-click it and select Add To Style Gallery. You’ll have to access the Manage Styles dialog to position it where you want because Word will add it to the end of the gallery thumbnails. To remove a style, right-click it in the gallery, and select Remove From Style Gallery.
Brian, a reader, mentioned that the Manage Styles option isn’t easy to find. Much of the style interface isn’t user-friendly, and I think that’s why users shy away from exploring it. At the bottom of the Style pane are three options, from left to right: New Style, Style Inspector, and Manage Styles. If styles are still a mystery to you, explore these options to further your quest of using them.
SEE: 20 pro tips to make Windows 10 work the way you want (free PDF) (TechRepublic)
How to use Word’s Apply Styles dialog
The Styles pane interface offers access to many styles and options. To apply a style quickly that isn’t in the gallery, use the Apply Styles dialog instead of the Styles pane. It isn’t quicker than the Styles pane, but all the styles are there. Here’s how it works.
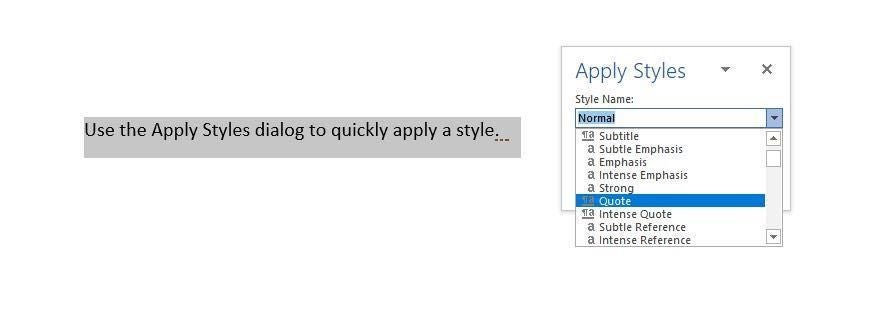
- Enter some text, and select it.
- Press Ctrl+Shift+s to open the Apply Styles dialog.
- From the Style Name drop-down, select a style (Figure D), or–if you know the name of the style, start typing. The control uses autocomplete, so be careful to select the right style as it updates. Click Apply or Enter. That’s it!
Figure D
This dialog lists all styles–not only recommended styles, as the Styles pane does. You can force the Styles pane to display all styles, but that’s a different article.
Stay tuned
In a subsequent article, I’ll show you how to assign a keyboard shortcut to styles for quick keyboard application of your favorite styles.
Send me your Microsoft Office questions
I answer readers’ questions when I can, but there’s no guarantee. Don’t send files unless requested; initial requests for help that arrive with attached files will be deleted unread. You can send screenshots of your data to help clarify your question. When contacting me, be as specific as possible. For example, “Please troubleshoot my workbook and fix what’s wrong” probably won’t get a response, but “Can you tell me why this formula isn’t returning the expected results?” might. Please mention the app and version that you’re using. I’m not reimbursed by TechRepublic for my time or expertise when helping readers, nor do I ask for a fee from readers I help. You can contact me at susansalesharkins@gmail.com.