


This article is also available as a TechRepublic download.
Hundreds
of thousands of organizations turn to SonicWALL
hardware to fulfill their firewall and network switching needs. SonicWALL firewalls also power effective VPN connections,
providing secure remote access for everyone from mobile employees to executive
staff.
Here
are the most common steps required for configuring SonicWALL VPN connections. While
this article describes administering SonicWALL VPN
tunnels using the manufacturer’s popular PRO 1260 series router, the steps are
quite similar for other SonicWALL models, too.
Essentially,
there are three steps to the process: Configuring the SonicWALL
firewall, creating VPN user accounts and installing and configuring the SonicWALL Global VPN Client.
Configuring the router
SonicWALL’sGroupVPN service simplifies
configuring secure remote connections. Enable SonicWALLGroupVPN using the SonicWALL
VPN Wizard by following these steps:
- Log in to the SonicWALL
device. - Click on the VPN button.
- Click the VPN Policy Wizard button; the Welcome To TheSonicWALL VPN Wizard
screen will appear. - Click Next.
- Specify whether you wish to create a Site-to-Ste VPN
(such as you might wish to do when connecting a SonicWALL
wireless router to another SonicWALL device) or
a WAN GroupVPN (to enable incoming VPN
connections to the SonicWALL firewall). In this
example we’re creating VPN connections to enable remote employee access,
so we need to select the WAN GroupVPN radio
button and click the Next button. (Figure
A)
|
Figure A |
 |
| Administrators must specify whether a site-to-site or WAN GroupVPN policy is to be created. |
- The IKE Phase 1 Key Method screen appears. Specify
whether you wish to use a default key or use a preshared
key. Make a note of the preshared key if you
select that option, then click Next. - The Security Settings menu appears. In addition to
specifying the encryption and authentication methods, drop-down boxes
appear for specifying the DH (Diffie-Hellman)
key group (SonicWALL devices support groups 1, 2
and 5) and Life Time. Typically SonicWALL’s
default settings work well for most organizations. - After clicking Next, the User
Authentication menu appears. Administrators must specify whether user
authentication should be implemented. Ensure the Enable User
Authentication box is checked and select Trusted Users to ensure only the
trusted users you specify later can connect to the organization’s network
using the SonicWALL VPN. Then, click Next. - The Configure Virtual IP Adapter menu appears next. The
Virtual IP Adapter is used to obtain special IP addresses when connecting
to the SonicWALL device, enabling the client to
appear to be on the internal LAN. Check the box if you wish to enable the
Virtual IP Adapter and click Next. - The WAN GroupVPN
Configuration Summary menu appears. The confirmation screen reviews the
settings that will be implemented upon clicking the Apply button. Click
the Apply button to finish enabling the VPN settings. - The SonicWALL device will
store the SonicWALL configuration, then display
a congratulatory message stating the SonicWALL
VPN Wizard completed successfully. - While the SonicWALL creates
the VPN, it doesn’t enable it by default. Log back in to the SonicWALL device and click the SonicWALL’s
VPN button, and then check the Enable box to activate the VPN. (Figure B)
|
Figure B |
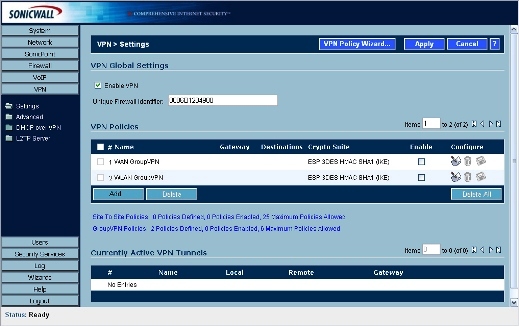 |
| Don’t forget to enable VPN policies from the VPN | Settings screen on the SonicWALL device. |
You
can edit a VPN’s settings and configuration at any
time by logging in to the SonicWALL router, clicking
VPN and clicking the Configure icon (the pencil and paper symbol) associated
with each VPN entry.
Specifying authorized VPN users
The
next step is to specify those users authorized to access the VPN. To do so:
- Log in to the SonicWALL
device. - Click the Users button.
- Click the Local Users button.
- Click the Add button.
- Within the Settings tab, enter the user’s name, a
password and any comments to help identify the user account. (Figure C)
|
Figure C |
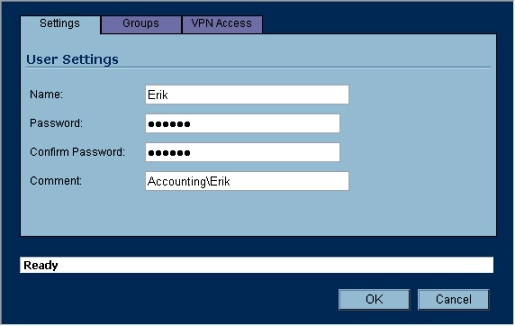 |
| Supply user information on the Settings tab. |
- From the Groups tab, specify group memberships for the
user. - From the VPN Access tab, specify the networks you wish
the user to access. (Figure D)
|
Figure D |
 |
| A wide variety of network options exist; make your selections by highlighting entries and clicking the corresponding arrow buttons. |
- Click OK to complete the user configuration.
|
Figure E |
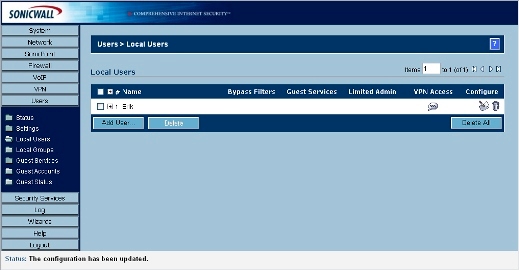 |
| Once a user account is created, the entry will appear within the SonicWALL’s Users | Local Users screen, as shown here. |
You
can make edits to the user’s account (Figure
E) at any time by clicking the Configure icon (the pencil and paper symbol)
associated with each user’s account within the SonicWALL’s
Users | Local Users menu.
Installing the SonicWALL Global VPN Client
Now
you’re ready to install the SonicWALL Global VPN
Client software on the end user’s system. Follow these steps to configure the
end user client:
- Download (from www.mysonicwall.com
or the CD-ROM supplied with the SonicWALL
device) the SonicWALL Global VPN Client
executable. Once you’ve downloaded the file, double-click it to begin
installing the VPN client. - The Preparing Setup window will appear. When it
completes, the Welcome To TheSonicWALLInstallshield Wizard menu will display. Click
Next. - Next you’ll see a warning message indicating that
antivirus and firewall programs must be disabled to install the SonicWALL Global VPN Client. Disable any such programs
and click Next. - Read the license agreement, then select the I Accept The Terms Of The License Agreement radio button and
click Next. - Specify the location of the SonicWALL
Global VPN Client. By default, SonicWALL’sInstallshield will place the files in the C:\Program Files\SonicWALL
Global VPN Client directory. Click Next to proceed (or click the Browse
button, specify the directory you wish to use, and then click Next). - Click Install to install the SonicWALL
Global VPN Client in the directory you specified in the last step. - The Setup program will install the VPN client, tracking
its progress as it completes. When it finishes, it will display the SonicWALL Global VPN Client Setup Complete screen,
which will include two checkboxes (Figure
F). Check the respective boxes if you wish to start the VPN client
automatically when users log in and launch the program immediately upon
completing the wizard. Then, click Finish.
|
Figure F |
 |
| Check the supplied boxes to automatically start the VPN connection when users log in and to launch the program immediately upon completing setup. |
- Windows Firewall may block the SonicWALL
Global VPN Client. If Windows Firewall presents a warning message, click
Unblock. - The New Connection Wizard will appear. Click Next.
- The Choose Scenario menu displays next. Specify whether
you wish to implement Remote Access or an Office Gateway. Choose Office
Gateway if you’re connecting two SonicWALL
devices. Choose Remote Access if you wish to enable secure connectivity
for remote staff. As we’re enabling remote access, we’ll choose that
option and click Next. (Figure G)
|
Figure G |
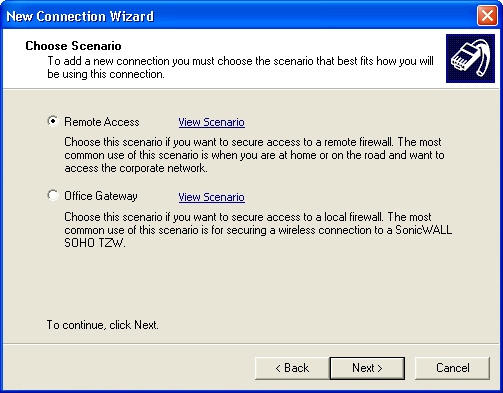 |
| Specify whether the VPN connection is being used to provide remote access or to connect two SonicWALL devices (Office Gateway). |
- Specify the SonicWALL’s IP
address or domain name, provide a connection name and click Next. - The Completing The New
Connection Wizard menu appears next. Check the appropriate boxes to create
a desktop shortcut for the new connection and automatically enable the
connection whenever the end user launches the SonicWALL
Global VPN Client. Then, click Finish.
The SonicWALL Global VPN Client is then created. To connect to
the VPN, end users need only double-click the SonicWALL
Global VPN Client and enter any required credentials. As with configuring VPNs and end users, the end user can edit a VPN
connection’s settings and configuration at any time by right-clicking it from
within the SonicWALL Global VPN Client window and
selecting Properties.