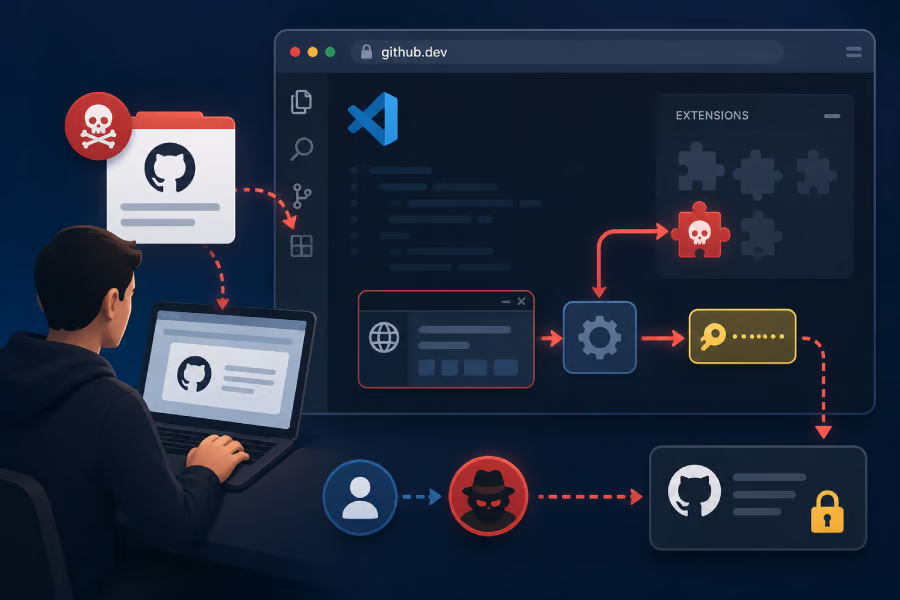
Follow this blog:
RSS
Email Alert

DIY IT Guy

DIY: Installation tips for the Roundup bug-tracking system

Takeaway: The Python-based Roundup bug-tracking system is easy to use — once you manage to install it. Jack Wallen’s tutorial guides you through the Roundup installation process.

In the world of software and web development, a critical but often overlooked chore is bug reporting, which is a shame because there are a number of great tools that make the process much simpler. One of those tools is the Python-based Roundup.

Although Roundup is not nearly as simple to install as the Mantis Bug Tracker, it is a lot easier to use, especially from the end user’s point of view. Roundup’s ease of use will go a long way in getting end users to help participate in the reporting of bugs. For small companies in particular, this could be a serious win if you’re attempting to improve or fix software or web site issues. Since Roundup is a challenge to install, I’m providing a walk-through of the process.

Roundup is available for Windows and Linux. The installation on Linux is actually the more straightforward and is far easier to troubleshoot when things go south. So for this tutorial, let’s install on a Linux server (it also makes more DIY sense). If you choose to install Roundup on Windows, please read the installation notes.

Take Roundup for a test drive

Before starting the install, you might want to take Roundup for a test drive. To do so, download the tar.gz file onto your server (save it in your web server document root, such as /var/www/) and unpack the file with the command:

sudo tar xfzf roundup-XXX.tar.gz

where XXX is the release number. Now, change the name of the directory with the command:

sudo mv roundup-XXX roundup

where XXX is the release number.

Now, change into the /var/www/roundup directory and issue the command:

python demo.py

This will start the demo version where you can then point your browser to:

http://ADDRESS_OF_SERVER:8917/demo

where ADDRESS_OF_SERVER is the actual address of the server. At this point, log in with either:

Administrator

username: admin
password: admin

User:

username: demo
password: demo

You will probably want to log in as the administrative user. With this demo, you can do everything necessary to test Roundup. It will give you a good sense of whether Roundup will meet your bug reporting needs (Figure A).

Figure A

This image shows how easy it is to report a bug using the Roundup Bug Tracking tool. (Click the image to enlarge.)

Roundup installation tips

If you decide that Roundup is the right bug-reporting tool for your small business, here are the installation steps you need to follow. I illustrate installing on a Debian-based distribution, so the use of sudo is necessary.

Step 1: Run the installer
Running the command sudo python setup.py install. This will install everything within /usr/bin. That command will take very little time to complete.

Step 2: Create a Roundup Tracker
A Roundup Tracker is required in order to use Roundup. Before running the command install a Tracker, you must first create a directory by issuing issue the command:

sudo mkdir -p /opt/roundup/trackers

To install a Tracker, open a terminal window and issue the command sudo roundup-admin install; this command will require you to enter the following information:

  • Enter tracker home: /opt/roundup/trackers/support
  • Templates: classic
  • Select template [classic]: classic
  • Back ends: anydbm, mysql, sqlite
  • Select backend [anydbm]: anydbm

Once this is done, you will be instructed to edit the /opt/roundup/trackers/config.ini file, which contains two main sections that must, at a minimum, be configured:

  • [mail]
  • [tracker]

In order to get your site up and running quickly, you can just configure the latter option; however, the notification system will not work unless the mail option is configured. To configure this file, scroll all the way down until you see the [tracker] section. Under that portion of the file you will see the following configuration options:

web =

The above must be set to the address of the Roundup site like so:

web = http://ADDRESS_TO_SERVER:8080/support/

where ADDRESS_TO_SERVER is the actual address of the machine. Notice the trailing “/” — that is required.

The next configuration is to set the address of the administrator. This is in the option:

email = issue_tracker

where you need to change issue_tracker to match the administrator email address for the system.

Now, scroll down to the section marked [mail] (this will be around line 309). The following options must be configured:

domain = NO_DEFAULT

where you need to change NO_DEFAULT to the domain of your mail server.

If SMTP requires authentication, then you must configure the username/password for SMTP authentication; this section is below the domain option. There are a number of other mail options that can be configured, so go through the remainder of that section and configure as needed.

Step 3: Initialize the database
Once everything is configured, it’s time to create the database. This is done with the command:

sudo roundup-admin initialise

When this command is issued, you will be required to enter the Tracker Home; this will be the same directory created earlier (so in this instance, /opt/roundup/trackers). Next, you need to create and confirm an admin password.

Step 4: Start the server
It’s time to fire up the Roundup server with the command:

roundup-server roundup=/opt/roundup/trackers

where you should replace roundup= with whatever you named your roundup instance in the config.ini file. So, if your instance is called support, that command would be:

roundup-server support=/opt/roundup/trackers

Notice the command to start the Roundup server does not use administrative privileges; in fact, it is not possible to start the Roundup server as the admin user. This is by design in order to increase security.

Start using Roundup

You should be able to point your browser to http://ADDRESS_OF_SERVER:8080/support (this will be the same address as configured in the config.ini file under the web= option of the [tracker] section) and land on your Roundup instance. Now you’re ready to start using Roundup. How’s that for smart DIY administration?

Get IT Tips, news, and reviews delivered directly to your inbox by subscribing to TechRepublic’s free newsletters.

Jack Wallen

About Jack Wallen

A writer for over 12 years, Jack's primary focus is on the Linux operating system and its effects on the open source and non-open source communities.

Jack Wallen

Jack Wallen

Jack Wallen is an award-winning writer for Techrepublic and Linux.com. As an avid promoter/user of the Linux OS, Jack tries to convert as many users to open source as possible. His current favorite flavor of Linux is Bodhi Linux (a melding of Ubuntu and Enlightenment).

When Jack isn't writing about Linux he is hard at work on his other writing career -- writing about zombies, various killers, super heroes, and just about everything else he can manipulate between the folds of reality. You can find Jack's books on Amazon, Barnes & Noble, and Smashwords.

Outnumbered in his house one male to two females and three humans to six felines, Jack maintains his sanity by riding his mountain bike and working on his next books. For more news about Jack Wallen, visit his website Get Jack'd.