
\n\tThis screenshot gallery is also available as a post in the TechRepublic Windows and Office Blog.
\n
\n\tIn a recent series of blog posts, I showed you how to use the various tools on the Windows 8 Recovery Drive to revive an ailing Windows 8 installation. To refresh your memory here is a brief rundown on what I have covered so far:
\n
\n\t
\n\t
\n\t
\n\t
\n\t
\n\t
\n
\n
\n\tHowever, there is one more feature on the Recovery Drive that you can use to help you access and repair Windows 8 – the Command Prompt. From the Command Prompt, you’ll find that there are numerous command line tools are at your disposal. In addition, the Recovery Drive Command Prompt allows you to run two GUI based applications: the Registry Editor, which you can use to edit the registry, and Notepad, which you can use to recover data.
\n
\n\tIn this edition of the Windows Desktop Report, I’ll show you how to access the Command Prompt from Windows 8’s Recovery Drive. I’ll then show you how to, use the Registry Editor and Notepad.
\n
\n
\n
\n\tTo boot up your system, just insert a USB Recovery Drive or an optical disc Recovery Drive and restart your system. After your system boots from the Recovery Drive and you are prompted to choose an option, select the Troubleshoot tile as shown in Figure A.
\n
\n\tCredit: Images by Greg Shultz for TechRepublic
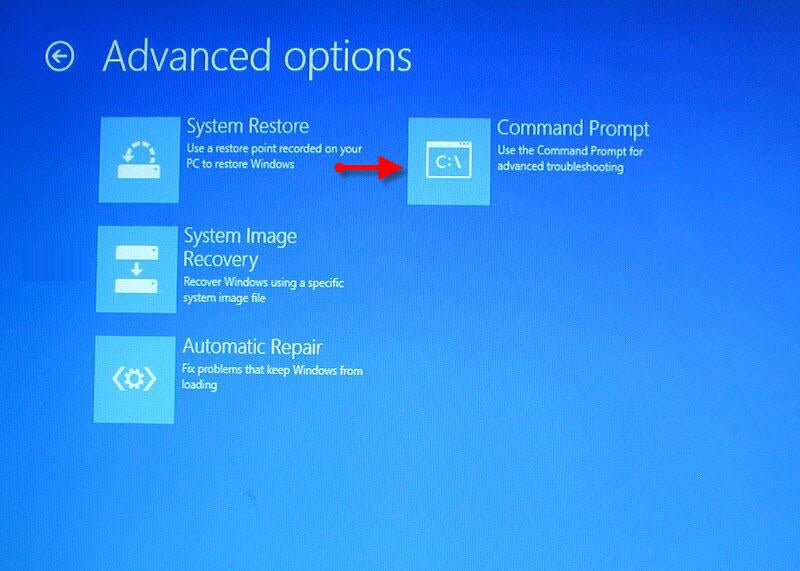
\n\tWhen you see the Advanced options screen, as shown in Figure C, select the Command Prompt tile.
\n
\n\tCredit: Images by Greg Shultz for TechRepublic

\n\tOnce you do, you will see the Command Prompt windows like the one shown in Figure D.
\n
\n\tCredit: Images by Greg Shultz for TechRepublic
\n
\n\tOnce you have the Command Prompt up and running, you can of course access and use a host of standard command line tools to navigate, manage files, and perform certain types of repair and recovery tasks. A list of the most common command line tools is shown in Table A.
\n
\n
| \n\t\t\t\t
\n\t\t\t\t\tCommand \n\t\t\t |
\n\t\t\t\t
\n\t\t\t\t\tDescription \n\t\t\t |
| \n\t\t\t\t
\n\t\t\t\t\tAttrib \n\t\t\t |
\n\t\t\t\t
\n\t\t\t\t\tChanges the attributes of a file or directory \n\t\t\t |
| \n\t\t\t\t
\n\t\t\t\t\tBcdboot \n\t\t\t |
\n\t\t\t\t
\n\t\t\t\t\tBcd boot file creation and repair tool \n\t\t\t |
| \n\t\t\t\t
\n\t\t\t\t\tBcdedit \n\t\t\t |
\n\t\t\t\t
\n\t\t\t\t\tBoot Configuration Data Store Editor \n\t\t\t |
| \n\t\t\t\t
\n\t\t\t\t\tChDir (Cd) \n\t\t\t |
\n\t\t\t\t
\n\t\t\t\t\tDisplays the name of the current directory or changes the current directory \n\t\t\t |
| \n\t\t\t\t
\n\t\t\t\t\tChkdsk \n\t\t\t |
\n\t\t\t\t
\n\t\t\t\t\tChecks a disk and displays a status report \n\t\t\t |
| \n\t\t\t\t
\n\t\t\t\t\tCls \n\t\t\t |
\n\t\t\t\t
\n\t\t\t\t\tClears the screen \n\t\t\t |
| \n\t\t\t\t
\n\t\t\t\t\tCopy \n\t\t\t |
\n\t\t\t\t
\n\t\t\t\t\tCopies files or folders to another location \n\t\t\t |
| \n\t\t\t\t
\n\t\t\t\t\tDelete (Del) \n\t\t\t |
\n\t\t\t\t
\n\t\t\t\t\tDeletes one or more files \n\t\t\t |
| \n\t\t\t\t
\n\t\t\t\t\tDir \n\t\t\t |
\n\t\t\t\t
\n\t\t\t\t\tDisplays a list of files and subdirectories in a directory \n\t\t\t |
| \n\t\t\t\t
\n\t\t\t\t\tDiskpart \n\t\t\t |
\n\t\t\t\t
\n\t\t\t\t\tManages partitions on your hard drives \n\t\t\t |
| \n\t\t\t\t
\n\t\t\t\t\tExit \n\t\t\t |
\n\t\t\t\t
\n\t\t\t\t\tExits the Command Prompt and returns you to the Recovery Drive menu \n\t\t\t |
| \n\t\t\t\t
\n\t\t\t\t\tExpand \n\t\t\t |
\n\t\t\t\t
\n\t\t\t\t\tExtracts a file from a compressed file \n\t\t\t |
| \n\t\t\t\t
\n\t\t\t\t\tFormat \n\t\t\t |
\n\t\t\t\t
\n\t\t\t\t\tFormats a disk \n\t\t\t |
| \n\t\t\t\t
\n\t\t\t\t\tIcacls \n\t\t\t |
\n\t\t\t\t
\n\t\t\t\t\tDisplay or modify access control lists (ACLs) or change file and folder permissions \n\t\t\t |
| \n\t\t\t\t
\n\t\t\t\t\tManage-bde \n\t\t\t |
\n\t\t\t\t
\n\t\t\t\t\tConfigure BitLocker drive encryption on disk volumes. \n\t\t\t |
| \n\t\t\t\t
\n\t\t\t\t\tMkdir (Md) \n\t\t\t |
\n\t\t\t\t
\n\t\t\t\t\tCreates a directory \n\t\t\t |
| \n\t\t\t\t
\n\t\t\t\t\tMore \n\t\t\t |
\n\t\t\t\t
\n\t\t\t\t\tDisplays a text file \n\t\t\t |
| \n\t\t\t\t
\n\t\t\t\t\tRecover \n\t\t\t |
\n\t\t\t\t
\n\t\t\t\t\tRecovers readable information from a bad or defective drive \n\t\t\t |
| \n\t\t\t\t
\n\t\t\t\t\tRename (Ren) \n\t\t\t |
\n\t\t\t\t
\n\t\t\t\t\tRenames a single file \n\t\t\t |
| \n\t\t\t\t
\n\t\t\t\t\tRmdir (Rd) \n\t\t\t |
\n\t\t\t\t
\n\t\t\t\t\tDeletes a directory \n\t\t\t |
| \n\t\t\t\t
\n\t\t\t\t\tRobocopy \n\t\t\t |
\n\t\t\t\t
\n\t\t\t\t\tCopies files or folders to another location \n\t\t\t |
| \n\t\t\t\t
\n\t\t\t\t\tSfc \n\t\t\t |
\n\t\t\t\t
\n\t\t\t\t\tScans and checks the integrity of your Windows files \n\t\t\t |
| \n\t\t\t\t
\n\t\t\t\t\tSet \n\t\t\t |
\n\t\t\t\t
\n\t\t\t\t\tDisplays and sets environment variables \n\t\t\t |
| \n\t\t\t\t
\n\t\t\t\t\tType \n\t\t\t |
\n\t\t\t\t
\n\t\t\t\t\tDisplays a text file \n\t\t\t |
| \n\t\t\t\t
\n\t\t\t\t\tXcopy \n\t\t\t |
\n\t\t\t\t
\n\t\t\t\t\tCopies files or folders to another location \n\t\t\t |
\n
\n
\n\tIf your Windows 8 system is failing to boot properly after a registry tweak or you need to extricate some nasty malware that has infiltrated the registry, you can launch the Registry Editor from the Recovery Drive’s Command Prompt. However, because you have booted your system from the Recovery Drive, the Registry Editor will by default load the registry from the Recovery Environment, not the registry from your Windows installation. Fortunately, once you know how, you can manually load the registry from your Windows installation.
\n
\n\tAs you will notice, the default drive letter for the Recovery Environment is X. However, your Windows installation drive is still available and assigned to another drive letter. Most likely the Windows installation drive is D, but you can find out for sure by typing the following command:
\n
\n\tbcdedit | find “osdevice”
\n
\n\tWhen you run this command, it will display
\n
\n\tosdevice partition=?:
\n
\n\tWhere the “?” is your Windows installation drive letter.
\n
\n\tNow that you know the drive letter of your Windows installation, type the following command to launch the Registry Editor:
\n
\n\tregedit
\n
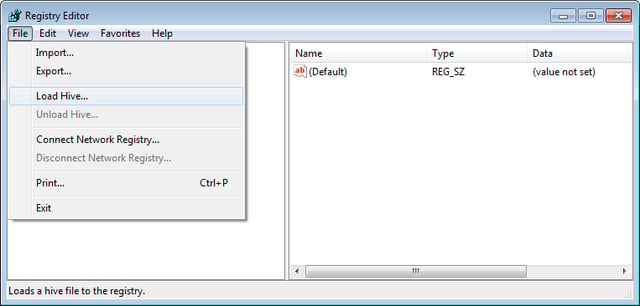
\n\tWhen the Registry Editor launches, select HKEY_LOCAL_MACHINE. Now, pull down the File menu and select the Load Hive command, as shown in Figure E.
\n
\n\tCredit: Images by Greg Shultz for TechRepublic
\n\t
\n
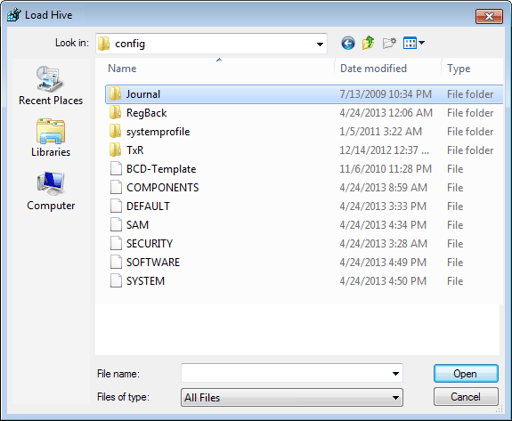
\n\tWhen you see the Load Hive dialog box, use the Look in drop down to select the drive letter of your Windows installation that you found earlier. Then navigate to the Windows\\System32\\config folder, as shown in Figure F. Then, choose the hive that you want to load. Table B shows the available registry keys and the location of the hive files.
\n
\n\t
\n
\n\tFor example, if you suspect that the Run key in the registry is being used to launch malware, you would select the SOFTWARE hive.
\n
\n
| \n\t\t\t\t
\n\t\t\t\t\tRegistry Key \n\t\t\t |
\n\t\t\t\t
\n\t\t\t\t\tPath to hive file \n\t\t\t |
| \n\t\t\t\t
\n\t\t\t\t\tHKEY_LOCAL_MACHINE \\SAM \n\t\t\t |
\n\t\t\t\t
\n\t\t\t\t\t %windir%\\system32\\config\\SAM \n\t\t\t |
| \n\t\t\t\t
\n\t\t\t\t\tHKEY_LOCAL_MACHINE \\SYSTEM \n\t\t\t |
\n\t\t\t\t
\n\t\t\t\t\t %windir%\\system32\\config\\SYSTEM \n\t\t\t |
| \n\t\t\t\t
\n\t\t\t\t\tHKEY_LOCAL_MACHINE \\SOFTWARE \n\t\t\t |
\n\t\t\t\t
\n\t\t\t\t\t %windir%\\system32\\config\\SOFTWARE \n\t\t\t |
| \n\t\t\t\t
\n\t\t\t\t\tHKEY_USERS \\.Default \n\t\t\t |
\n\t\t\t\t
\n\t\t\t\t\t %windir%\\system32\\config\\DEFAULT \n\t\t\t |
| \n\t\t\t\t
\n\t\t\t\t\tHKEY_CURRENT_USER \n\t\t\t |
\n\t\t\t\t
\n\t\t\t\t\t %userprofile%\\ntuser.dat \n\t\t\t |
\n
\n\tCredit: Images by Greg Shultz for TechRepublic
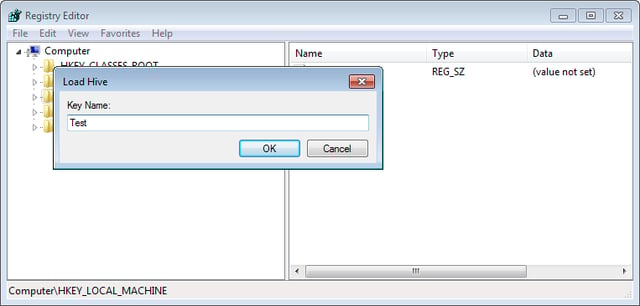
\n\tWhen you select a hive, you will be prompted to give that hive a name. For the purposes of this registry editing session this name is just a temporary placeholder, so you can use any name that you want. For my example, I am going to just use the word Test, as shown in Figure G. To continue, click OK.
\n
\n\tCredit: Images by Greg Shultz for TechRepublic
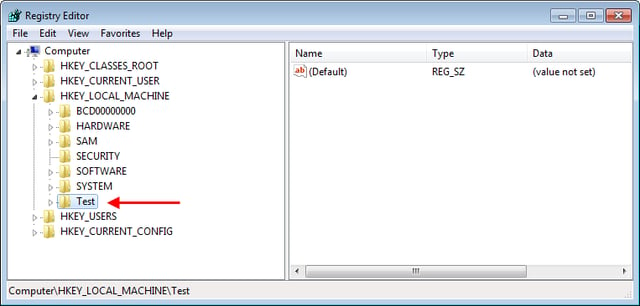
\n\tAt this point, the entire hive is loaded into the Registry Editor so that you can make any changes that you hope will allow your Windows 8 system to boot up normally. In my example, the entire HKEY_LOCAL_MACHINE \\SOFTWARE hive has been loaded into the Registry Editor under the name Test, as shown in Figure H.
\n
\n\tCredit: Images by Greg Shultz for TechRepublic
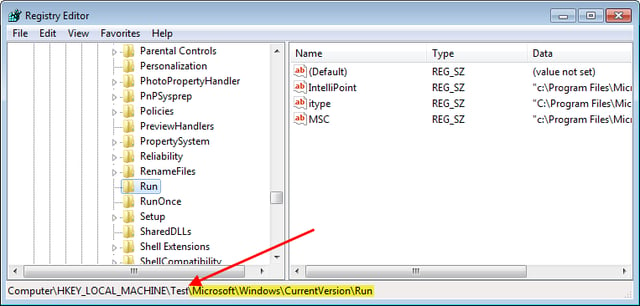
\n\tContinuing with my example, I would open the Test hive, remembering that it is the equivalent to HKEY_LOCAL_MACHINE \\SOFTWARE and then navigate the rest of the way down to the Run Key (Microsoft\\Windows\\CurrentVersion\\Run), as shown in Figure I.
\n
\n\tCredit: Images by Greg Shultz for TechRepublic
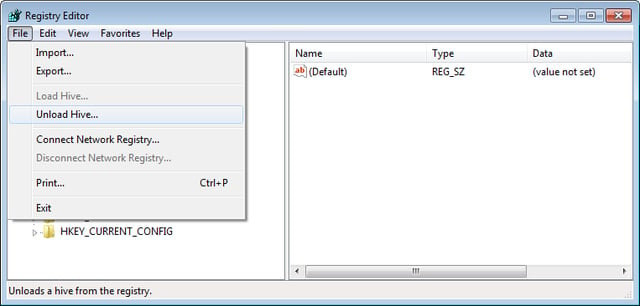
\n\tAfter you make changes, you will then need to navigate back up the tree and select the Test hive, just as shown in Figure H. Now, pull down the File menu and select the Unload Hive command, as shown in Figure J.
\n
\n\tAt this point, any changes that you made are now incorporated in the registry from your Windows installation. To continue, close the Registry Editor and then close the Command Prompt window. When you do, you’ll return to the main Recovery Disk menu where you can select the Continue tile, which will reboot the system and start Windows 8 with the changes that you made registry.
\n
\n\tCredit: Images by Greg Shultz for TechRepublic
\n
\n\tIf your Windows 8 system stopped booting up normally before you had a chance to make a current backup of your data, chances are that the first thing that you would want to do is backup your data files. Well, if you look back at the command line tools shown in Table A, you’ll find several commands that you can use to back up your data: Copy, Robocopy, and Xcopy.
\n
\n\tHowever, if you’re like most users, you’d rather work from a GUI than a command prompt when it comes to copying hundreds of files. Fortunately, the Windows Recovery Environment allows you to run Notepad. How is Notepad going to help you copy files you may be thinking? Well, in the majority of Windows applications, the Open and Save as dialog boxes are essentially pared down versions of File Explorer. As such, you can use the Open dialog box just like File Explorer and will be able to easily copy all of your data files to a backup drive.
\n
\n\tOnce you have booted into the Recovery Environment connect a flash drive or external USB drive to your system. Now, access the Command Prompt window and type notepad.exe on the command line. Once you have Notepad up and running, just press [Ctrl]+O to access the Open dialog box. Leave the File name box blank, select All Files (*.*) in the Files of type list, and just leave the Encoding setting as it is.
\n
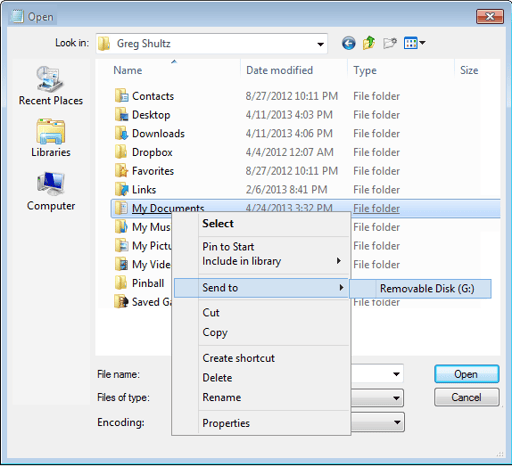
\n\tNow, use the Computer icon to locate your Windows installation drive. (Refer to using the bcdedit | find “osdevice” command as described above.) To continue, navigate to your user profile folder, as shown in Figure K. Then, right click on the folder or folders containing the files that you want to backup and then select the Send to command. When you do, you can select your flash drive or external USB drive. When you do, your files will be safely copied.
\n
\n
\n
\n\tDo you think that being able to edit the registry and backup files from the Windows 8 Recovery Drive Command Prompt are valuable tricks? As always, if you have comments or information to share about this topic, please take a moment to drop by the TechRepublic Community Forums and let us hear from you.
\n
\n
\n\t
\n\t
\n
\n
\n\tCredit: Images by Greg Shultz for TechRepublic

My first computer was a Kaypro 16 \"luggable\" running MS-DOS 2.11 which I obtained while studying computer science in 1986. After two years, I discovered that I had a knack for writing documentation and shifted my focus over to technical writing.


