\n\tWith its BlackBerry PlayBook, Research in Motion joins the growing tablet market and sets its sights on the Apple iPad 2 and Motorola XOOM. TechRepublic’s Jason Hiner was one hand at the PlayBook launch event and snagged one for us to test and crack open. Follow along as we take a peak at the hardware inside RIM’s tablet.
\n\t
\n\tPhoto by: Bill Detwiler / TechRepublic
\n\tCaption by: Bill Detwiler
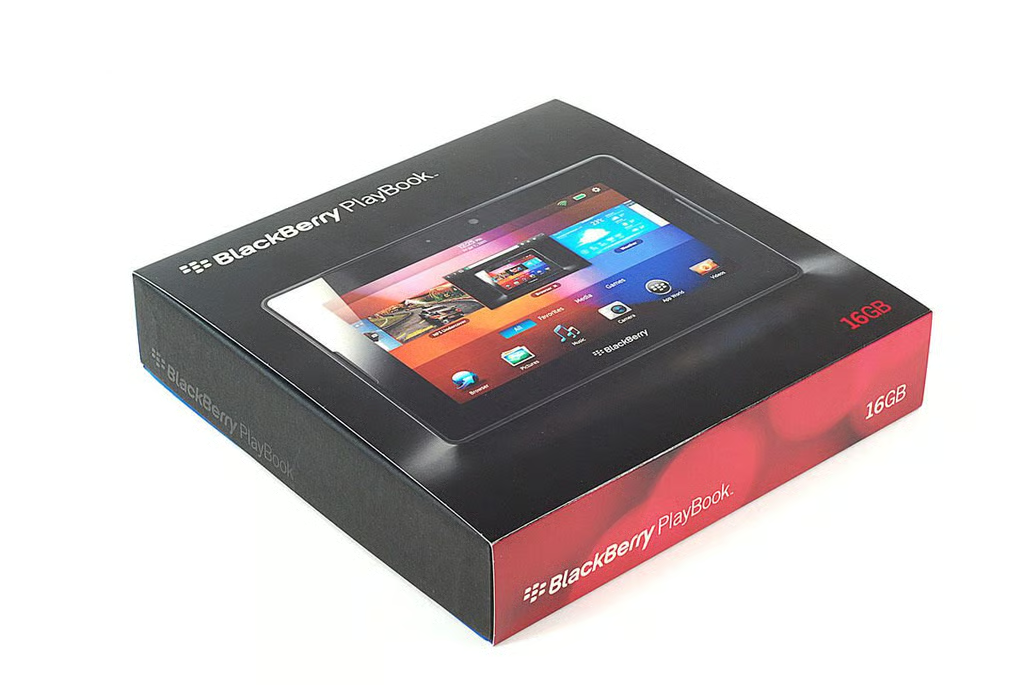
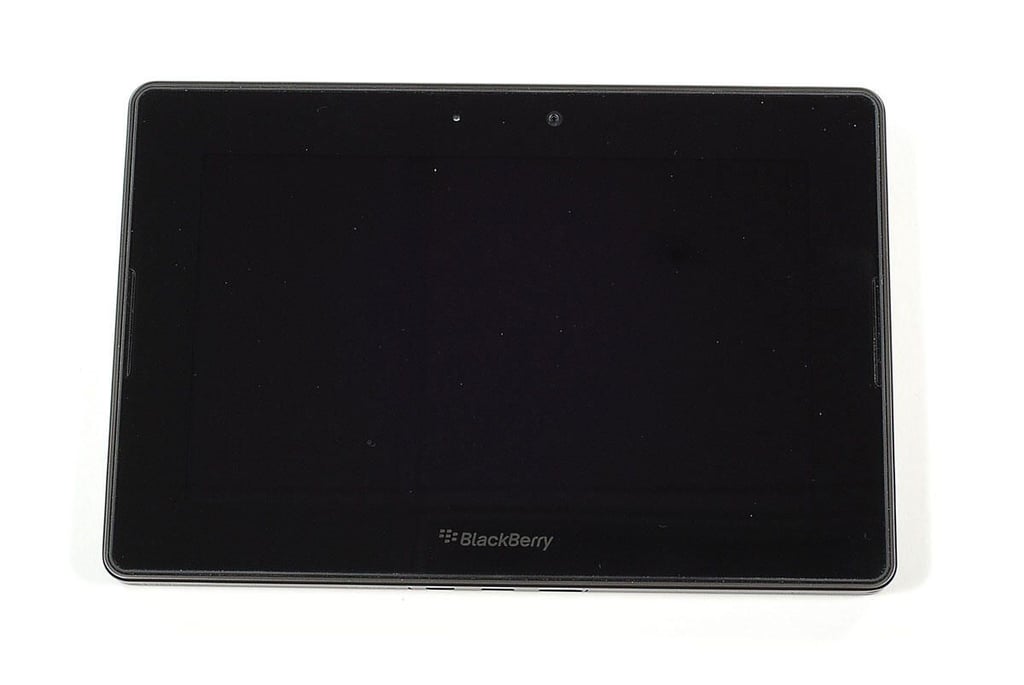
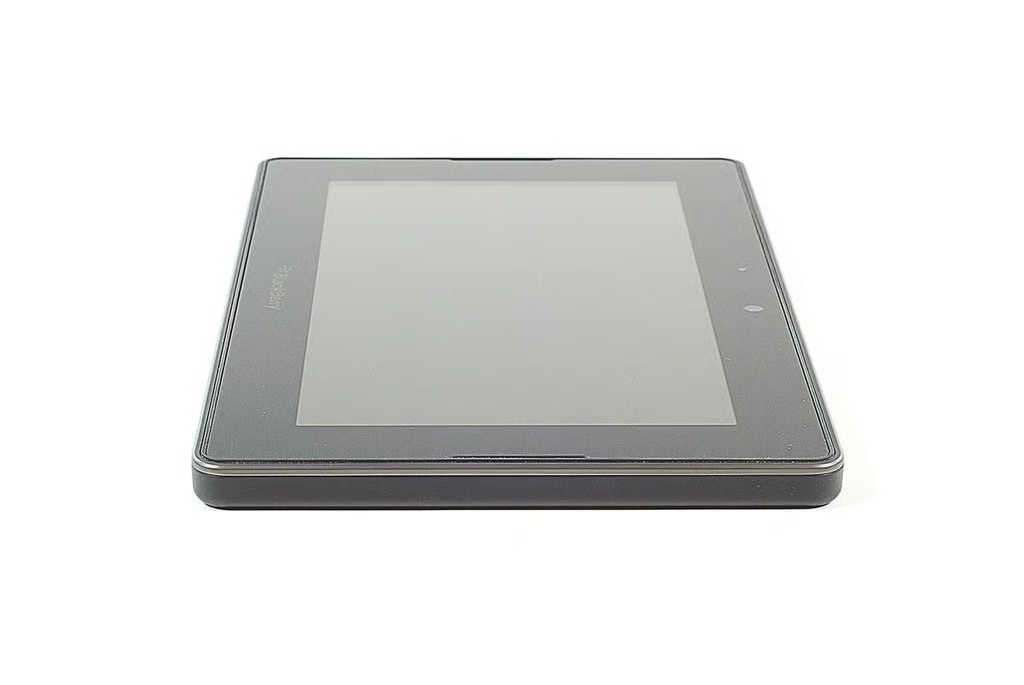
\n\tAs of this writing, the BlackBerry Playbook comes in 16GB, 32GB, and 64GB models. It retails for $499, $599, and $699 (US) respectively. RIM’s tablet runs BlackBerry Tablet OS and has a 1 GHz dual-core processor, 1GB RAM, 3MP forward-facing and 5MP rear-facing cameras (both can record 1080p HD video), and supports Wi-Fi 802.1 a/b/g/n. The PlayBook’s 7-inch LCD display has a resolution of 1024 x 600 pixels.
\n\t
\n\tPhoto by: Bill Detwiler / TechRepublic
\n\tCaption by: Bill Detwiler
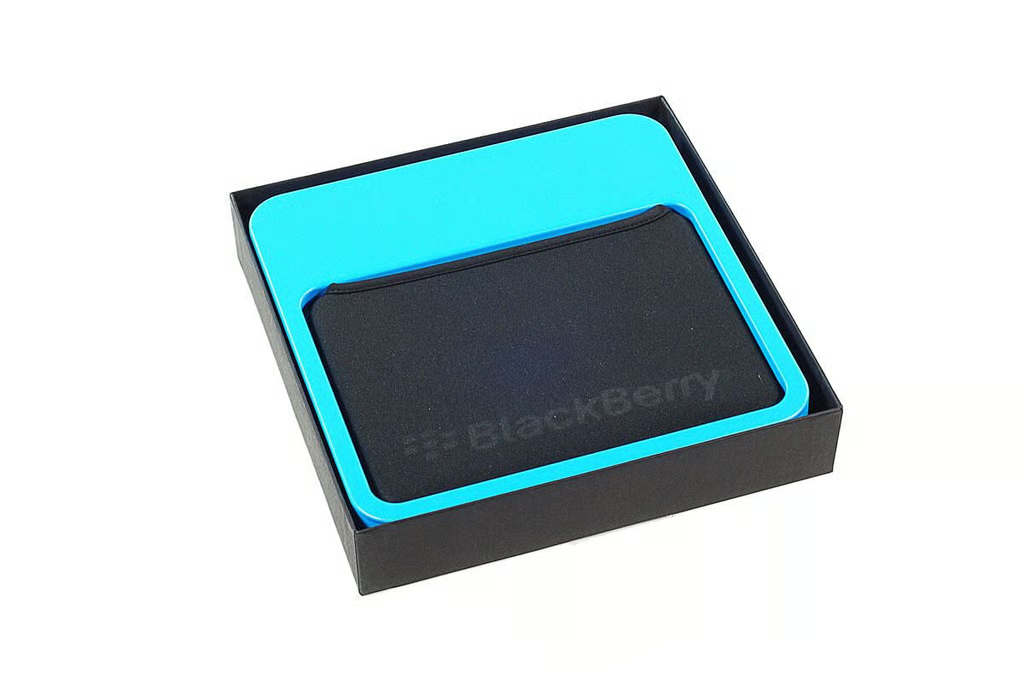
\n\tUnlike the Apple iPad 2 or the Motorola XOOM, RIM includes a neoprene sleeve with the BlackBerry PlayBook.
\n
\n\tPhoto by: Bill Detwiler / TechRepublic
\n\tCaption by: Bill Detwiler
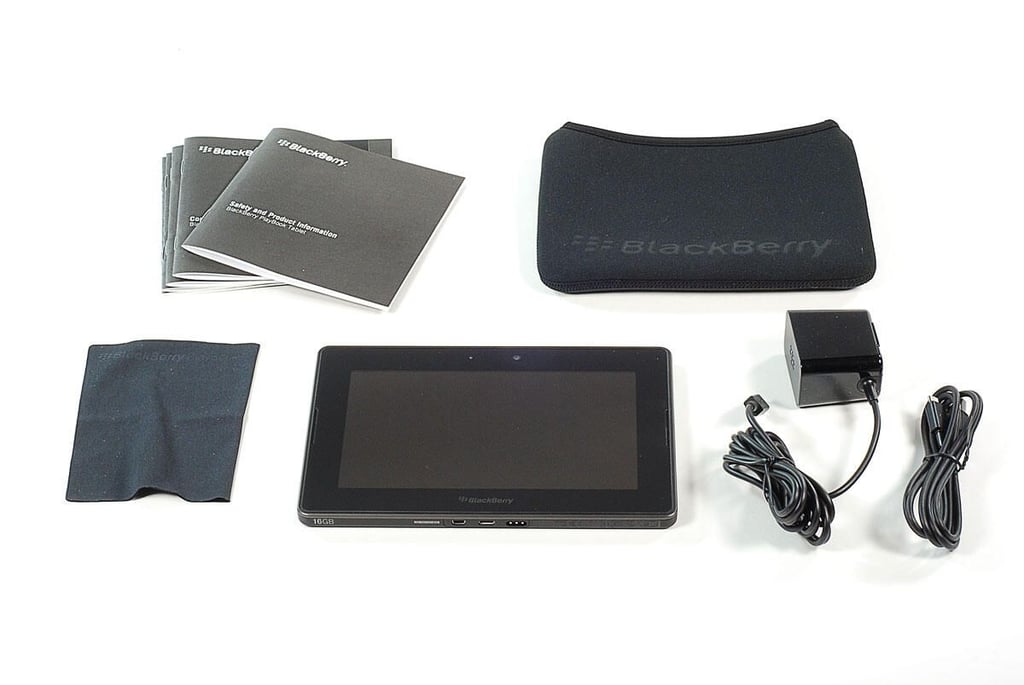
\n\tAlong with the BlackBerry PlayBook, you’ll find a neoprene sleeve, charger, data cable, screen-cleaning cloth, and product documentation.
\n
\n\tPhoto by: Bill Detwiler / TechRepublic
\n\tCaption by: Bill Detwiler
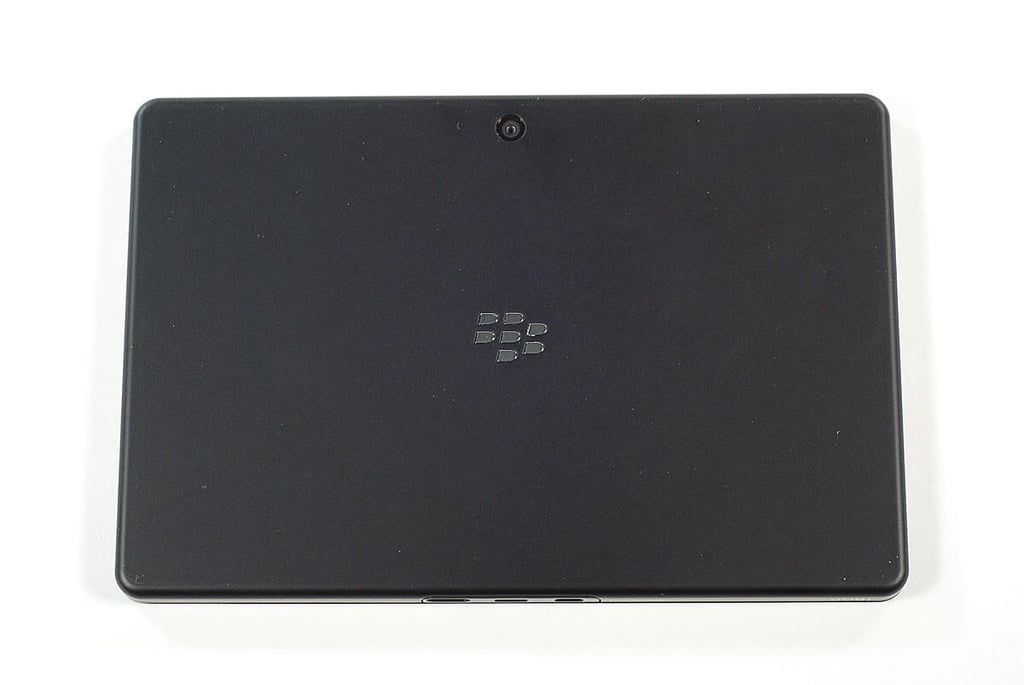
\n\tThe BlackBerry PlayBook weighs 0.9 lbs. and measures 7.6″ wide x 5.1″ tall x 0.4″ deep.
\n\t
\n\tPhoto by: Bill Detwiler / TechRepublic
\n\tCaption by: Bill Detwiler
\n\tPhoto by: Bill Detwiler / TechRepublic
\n\tCaption by: Bill Detwiler
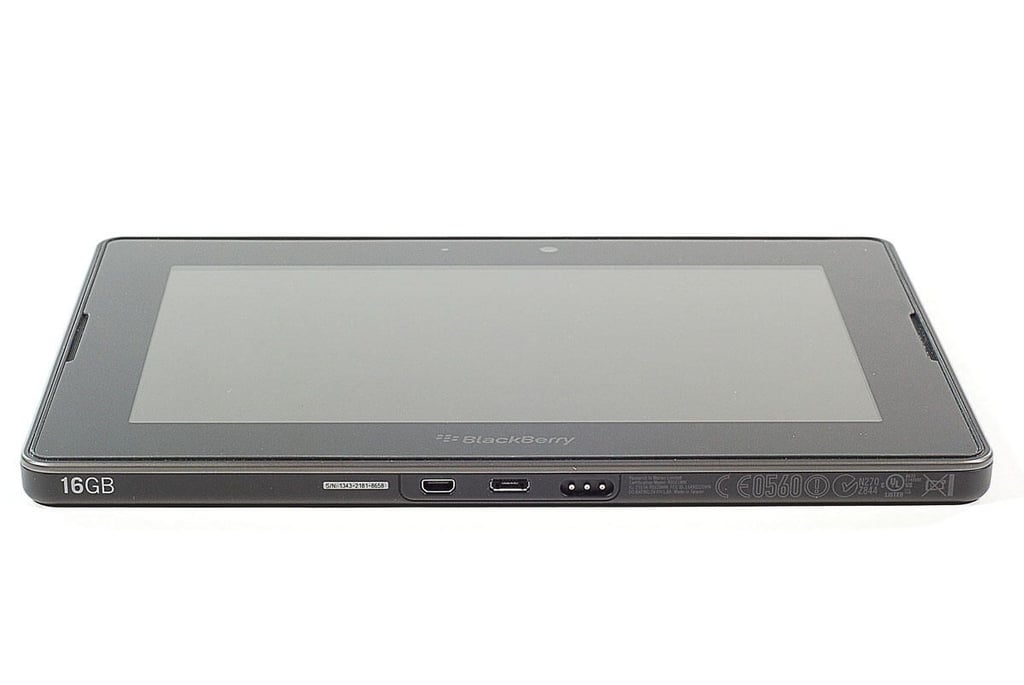
\n\tAlong the BlackBerry PlayBook’s bottom edge are the Micro HDMI port, MicroUSB port, and power connector with magnetic connection.
\n
\n\tPhoto by: Bill Detwiler / TechRepublic
\n\tCaption by: Bill Detwiler
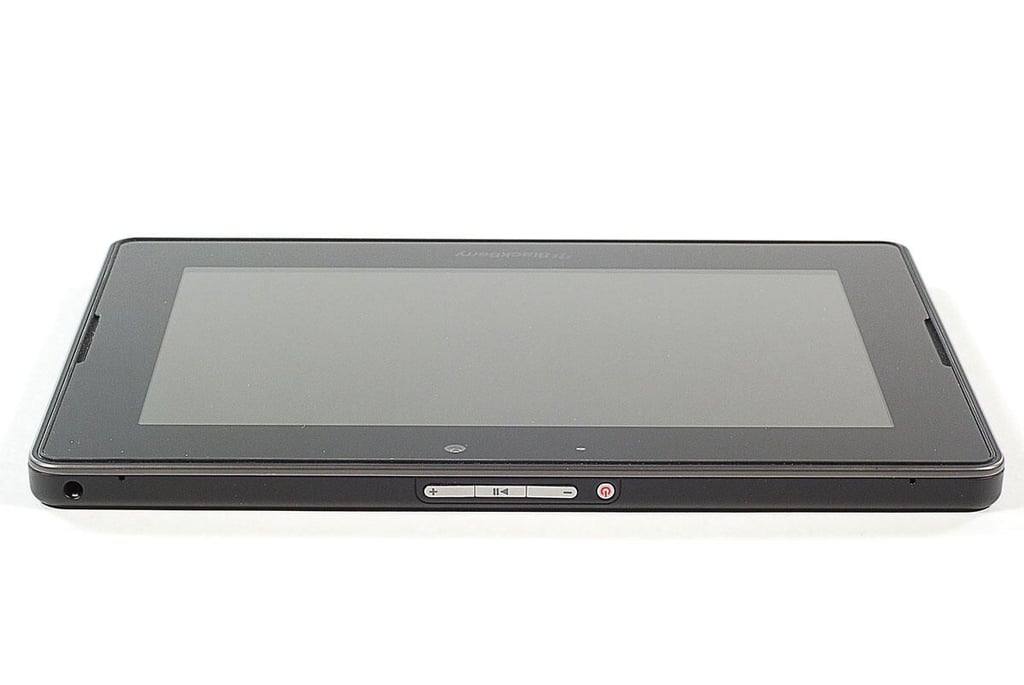
\n\tAlong the BlackBerry PlayBook’s top edge are the headphone jack, two tiny holes for the left and right microphones, the volume up and down buttons, a play/pause button, and the power button.
\n
\n\tPhoto by: Bill Detwiler / TechRepublic
\n\tCaption by: Bill Detwiler
\n\tPhoto by: Bill Detwiler / TechRepublic
\n\tCaption by: Bill Detwiler
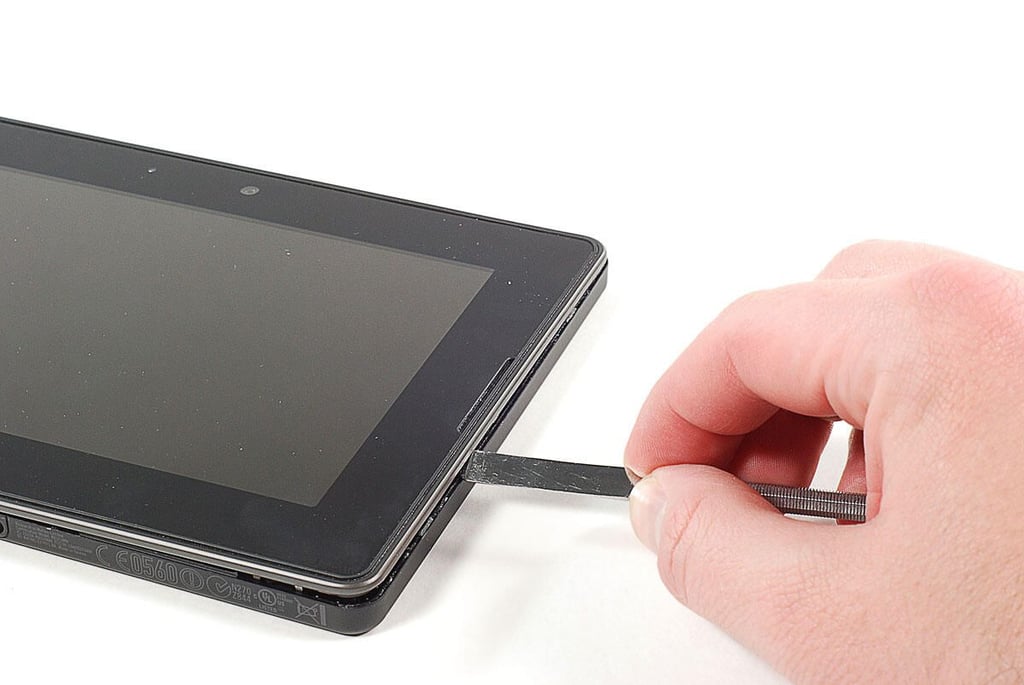
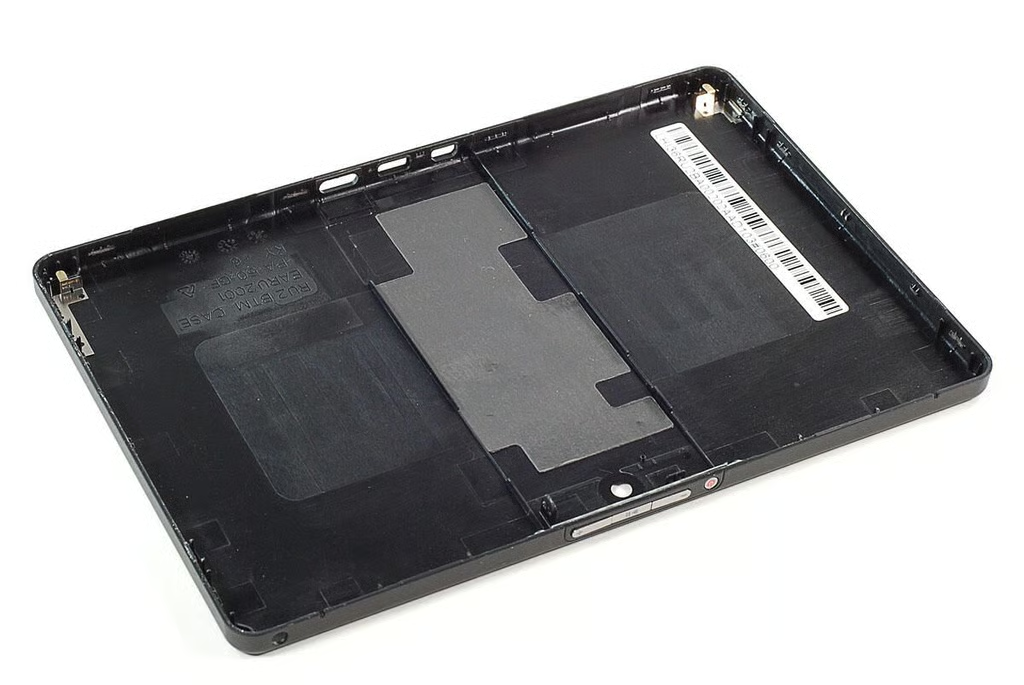
\n\tUsing a thin metal blade a plastic spudger, I was able to pry loose the BlackBerry PlayBook’s back, plastic cover.
\n
\n\tPhoto by: Bill Detwiler / TechRepublic
\n\tCaption by: Bill Detwiler
\n\tPhoto by: Bill Detwiler / TechRepublic
\n\tCaption by: Bill Detwiler
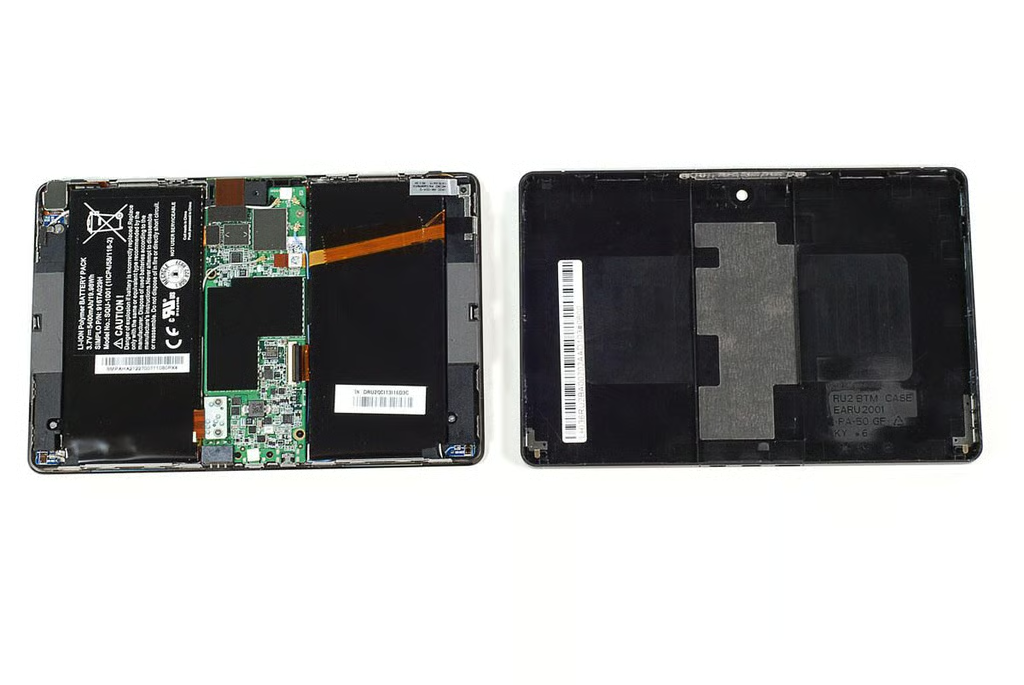
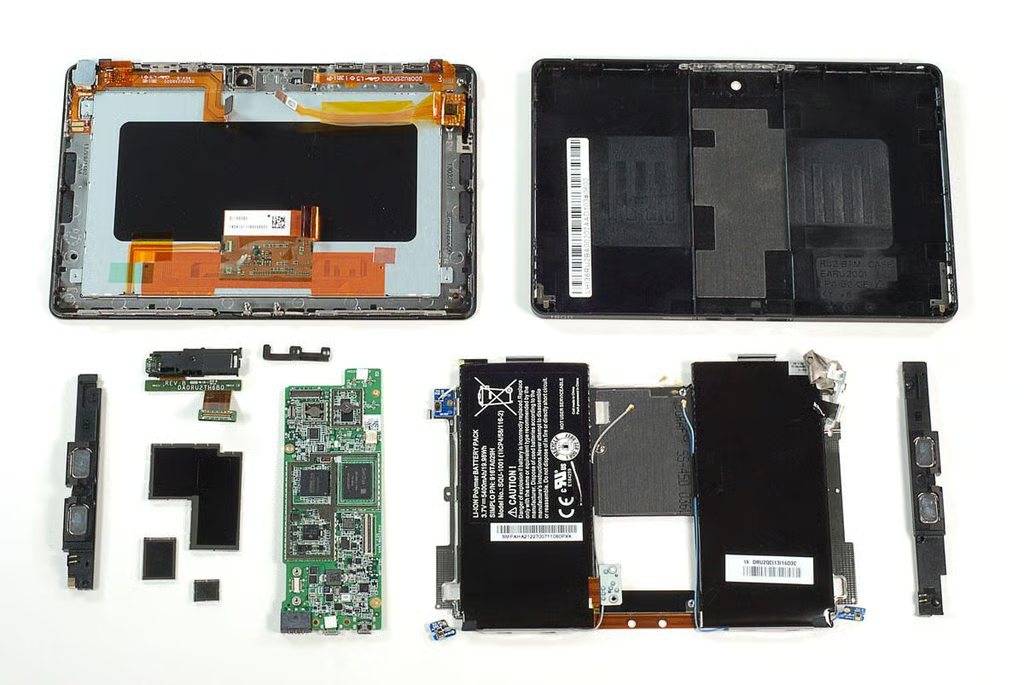
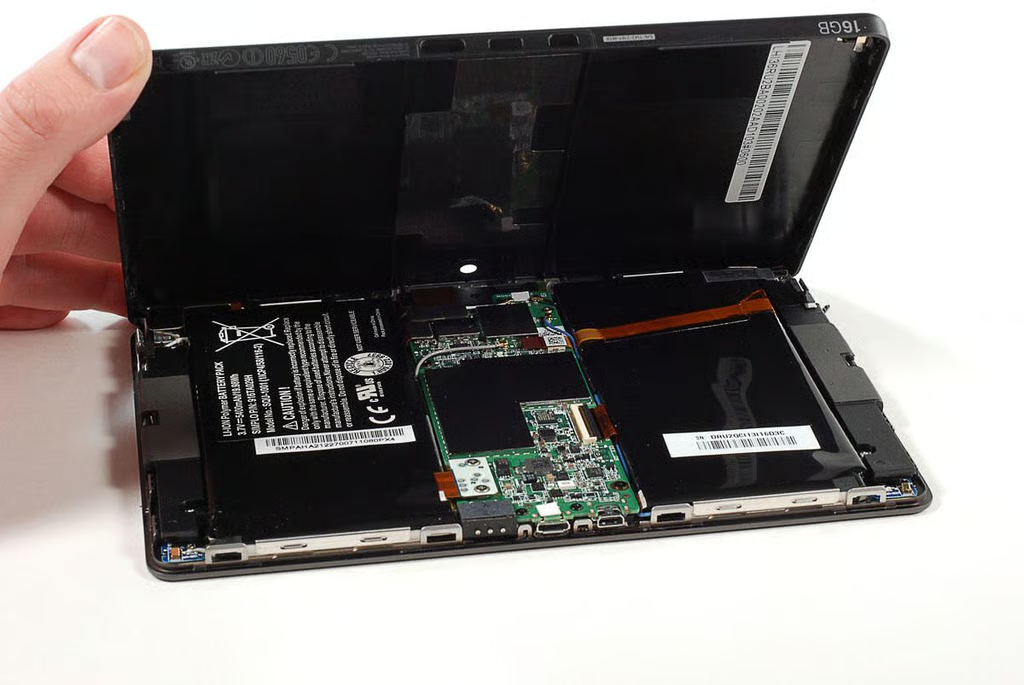
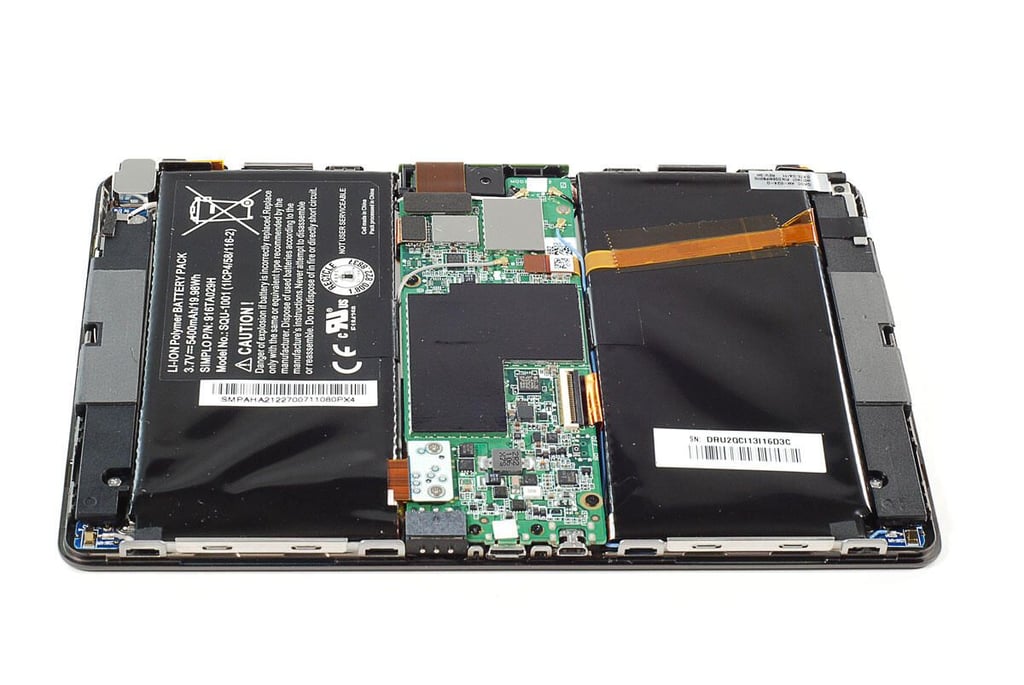
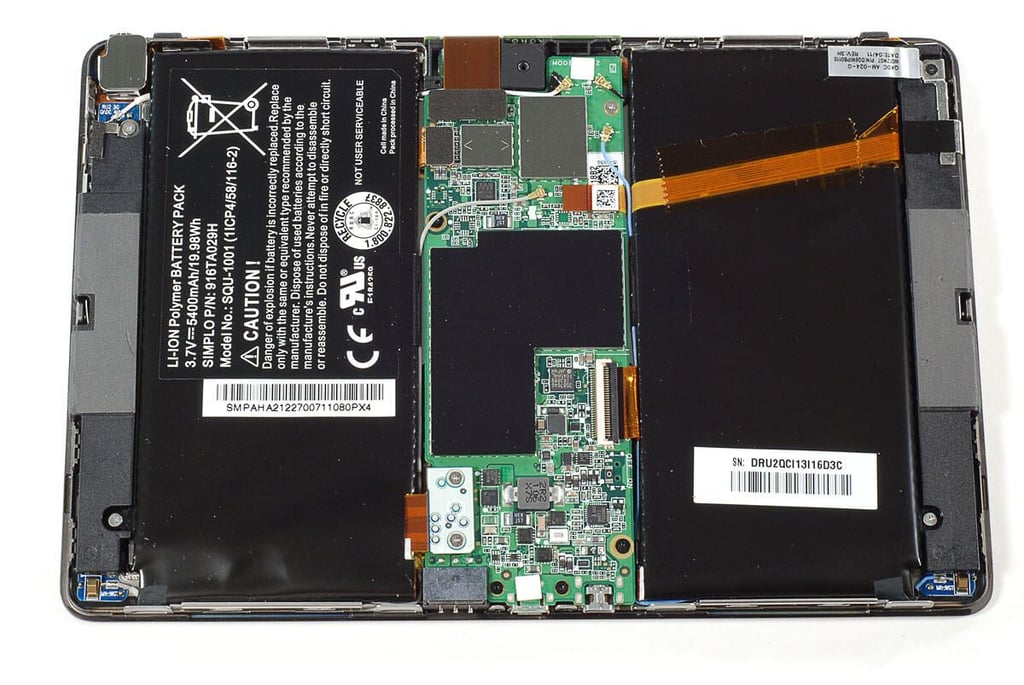
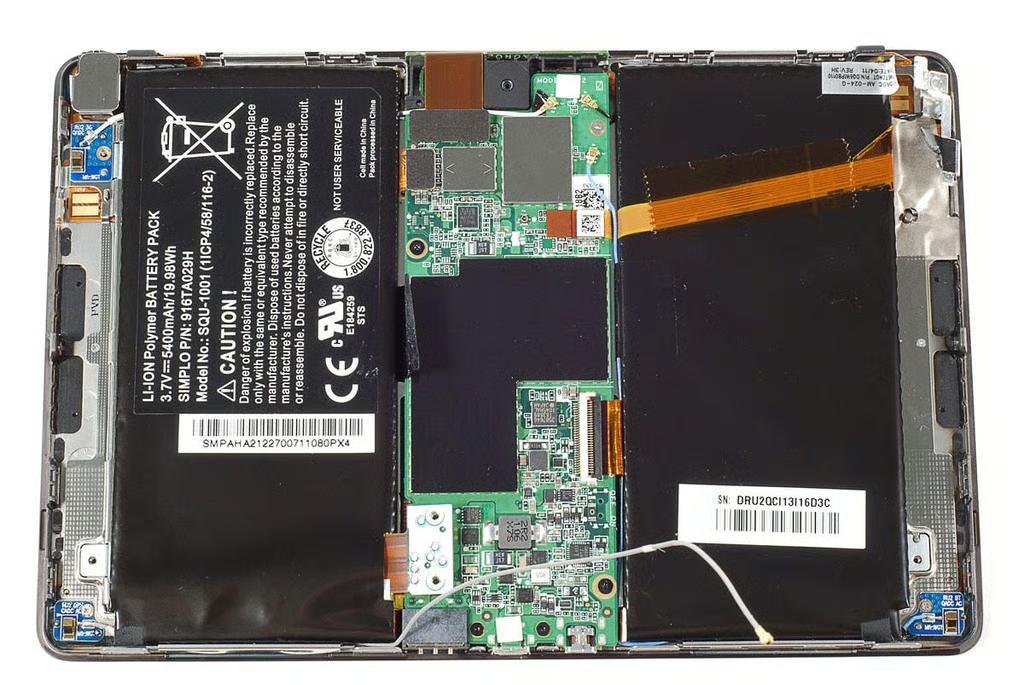
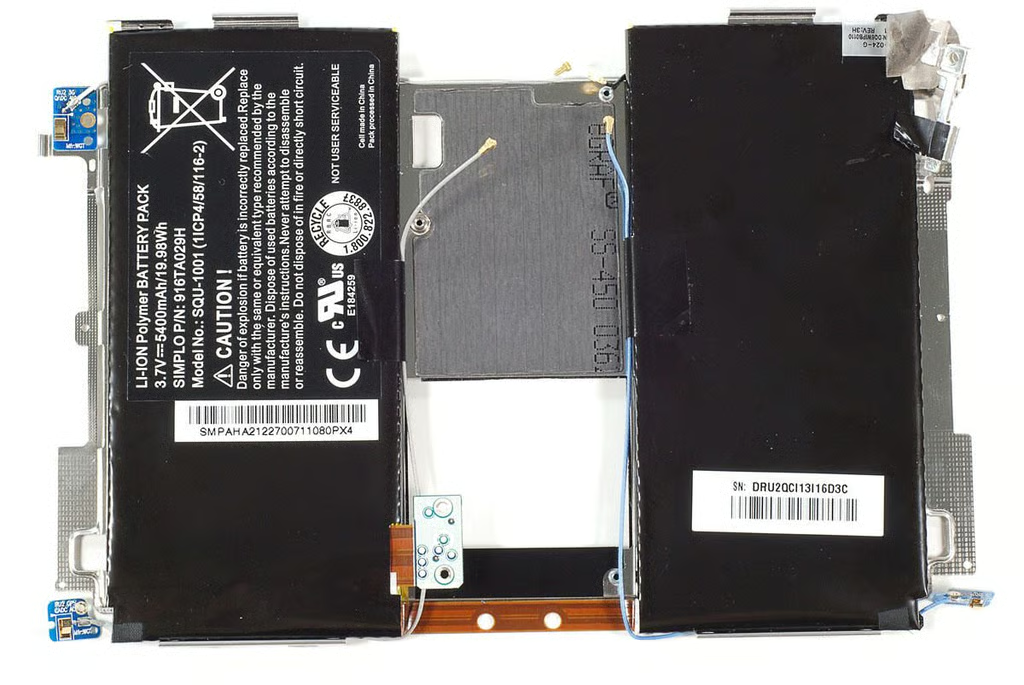
\n\tWith the back cover removed, we get our first look inside the BlackBerry PlayBook. The first thing I noticed was the split battery pack and center-mounted motherboard.
\n
\n\tPhoto by: Bill Detwiler / TechRepublic
\n\tCaption by: Bill Detwiler
\n\tPhoto by: Bill Detwiler / TechRepublic
\n\tCaption by: Bill Detwiler
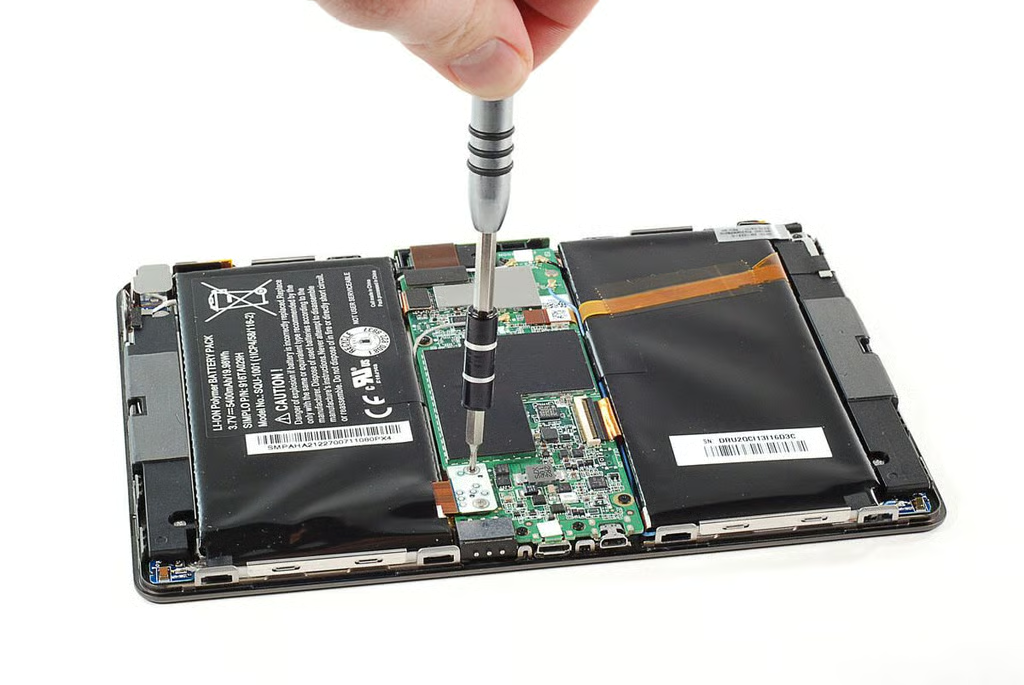
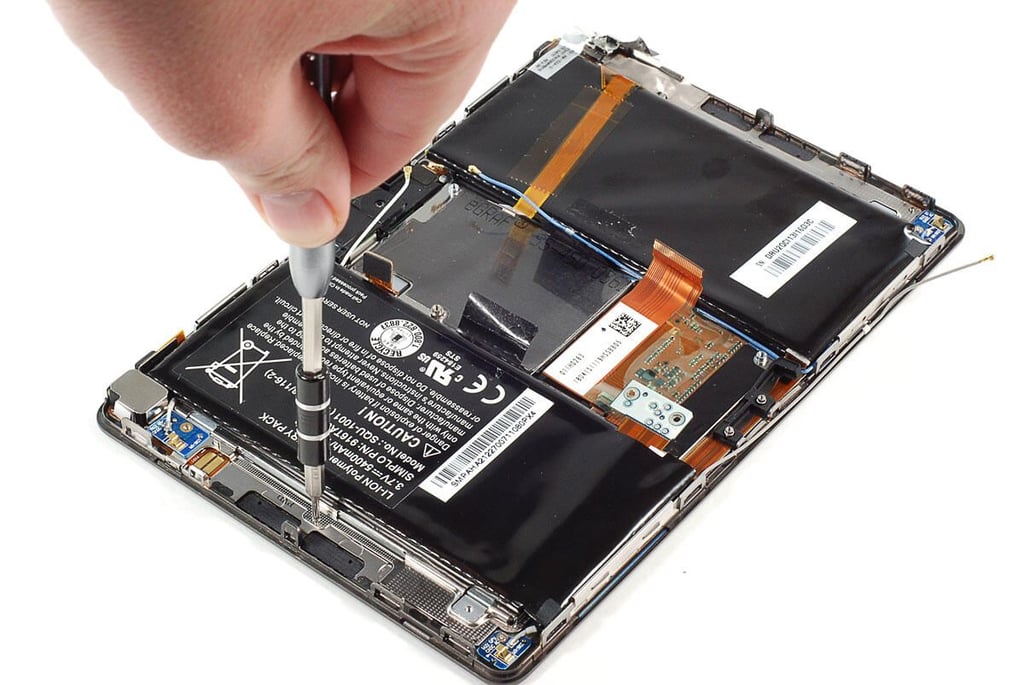
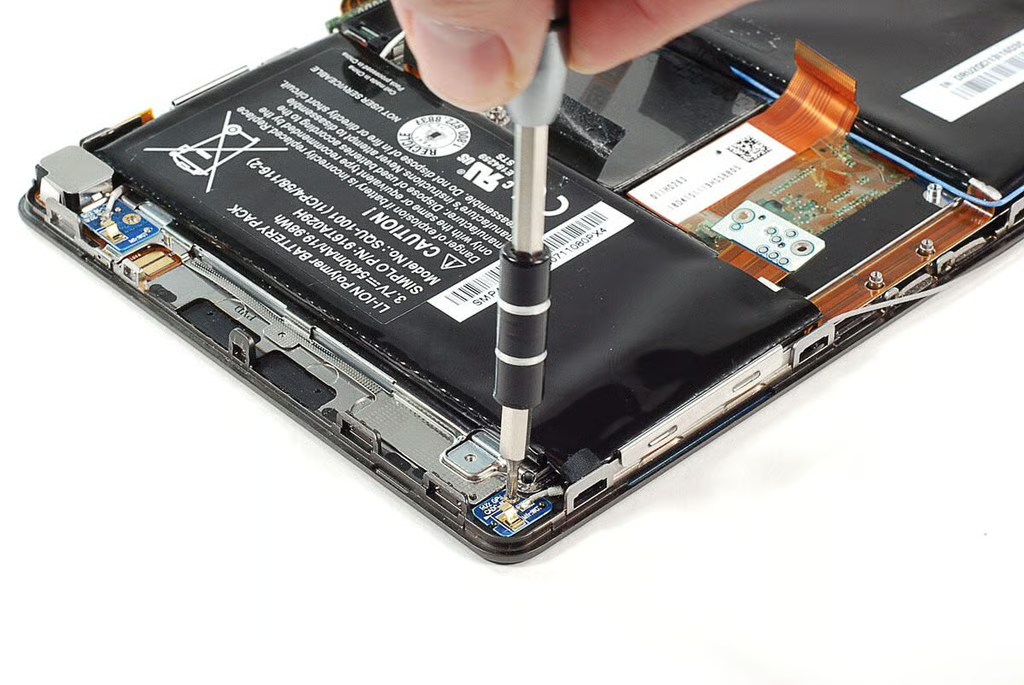
\n\tThe battery pack’s connector is secured to the BlackBerry Playbook’s motherboard with two Phillips #000 screws.
\n
\n\tPhoto by: Bill Detwiler / TechRepublic
\n\tCaption by: Bill Detwiler
\n\tWith the screws removed, I was able to pop loose the battery pack’s connector.
\n
\n\tPhoto by: Bill Detwiler / TechRepublic
\n\tCaption by: Bill Detwiler
\n\tSeveral antenna wires are attached to the battery pack with black tape. I decided to peel away enough of the tape to free the wire from the battery.
\n
\n\tI would later discover that I could have left the wires taped to the battery pack–as the battery assembly (including the wires) can be removed as a single unit.
\n
\n\tPhoto by: Bill Detwiler / TechRepublic
\n\tCaption by: Bill Detwiler

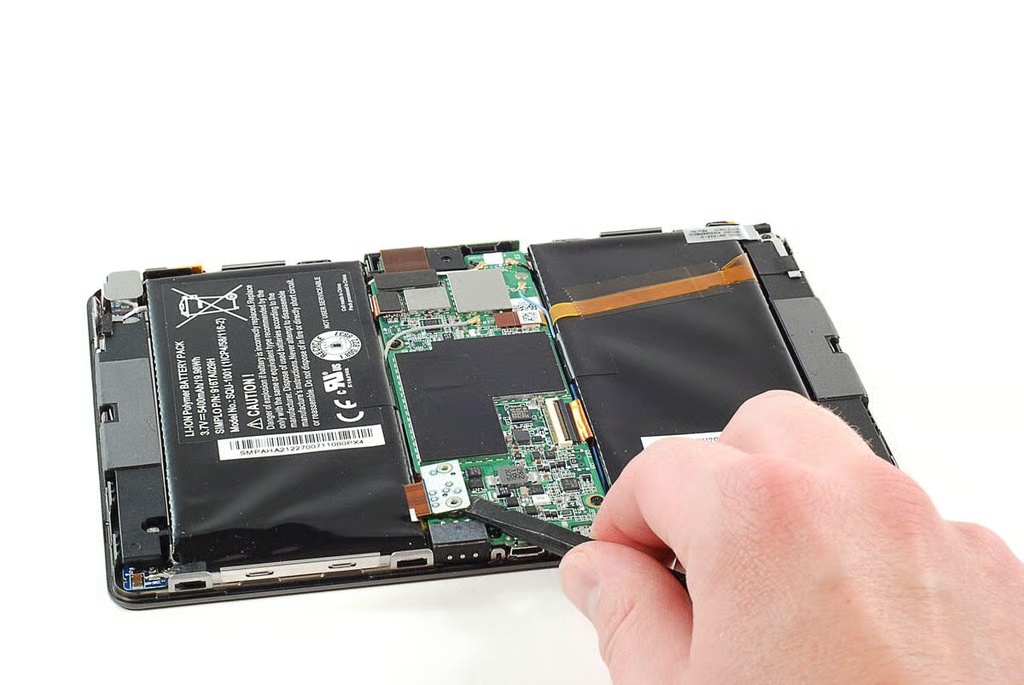
\n\tNext, I disconnected the antenna wires from the BlackBerry PlayBook’s motherboard.
\n
\n\tPhoto by: Bill Detwiler / TechRepublic
\n\tCaption by: Bill Detwiler
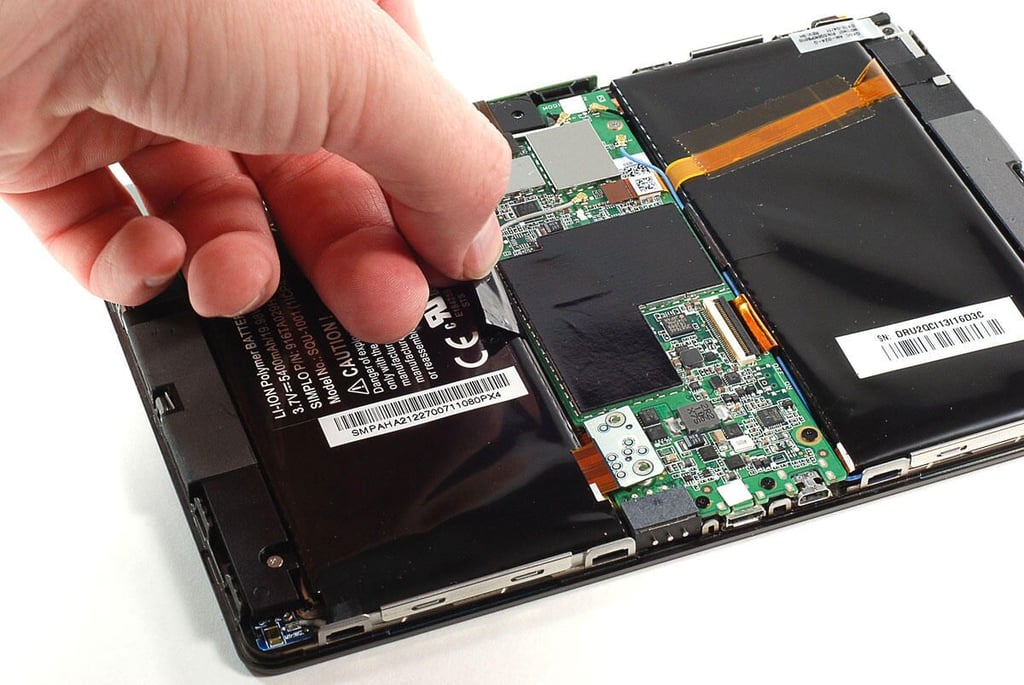
\n\tUnfortunately, the battery pack is attached to an underlying metal plate with extremely strong adhesive. I descied to avoid prying loose the battery pack, and remove the BlackBerry PlayBook’s other internal components.
\n
\n\tFirst was the right speaker, which is held in place with two Phillips screws.
\n
\n\tPhoto by: Bill Detwiler / TechRepublic
\n\tCaption by: Bill Detwiler

\n\tPhoto by: Bill Detwiler / TechRepublic
\n\tCaption by: Bill Detwiler
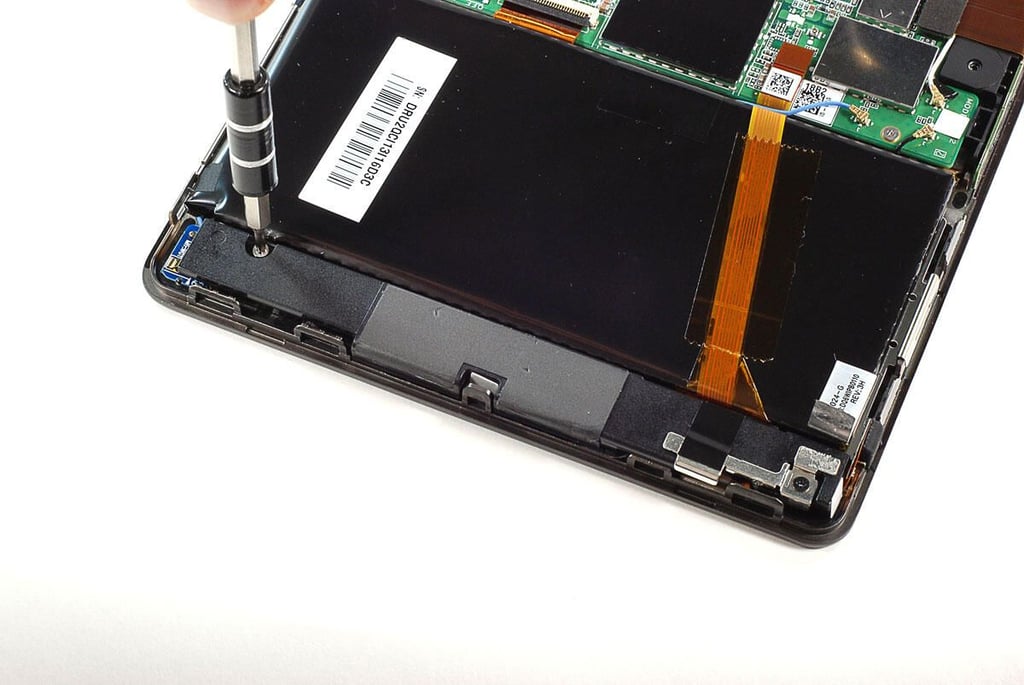
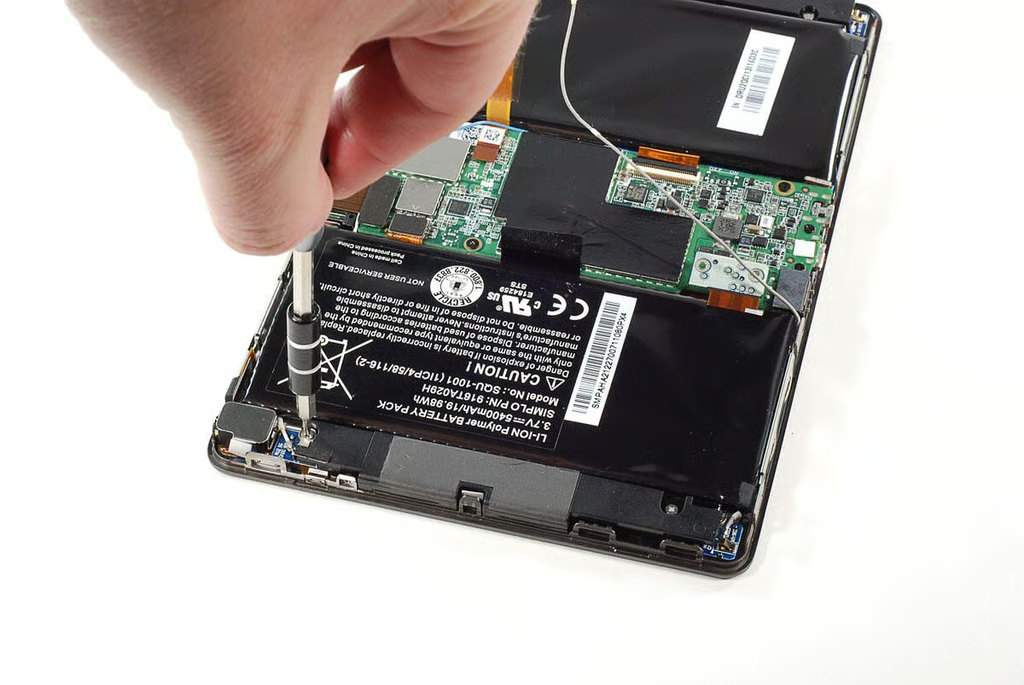
\n\tAfter removing the right speaker, I moved over to the BlackBerry PlayBook’s left speaker. It is also held in place with two Phillips #000 screws.
\n
\n\tPhoto by: Bill Detwiler / TechRepublic
\n\tCaption by: Bill Detwiler
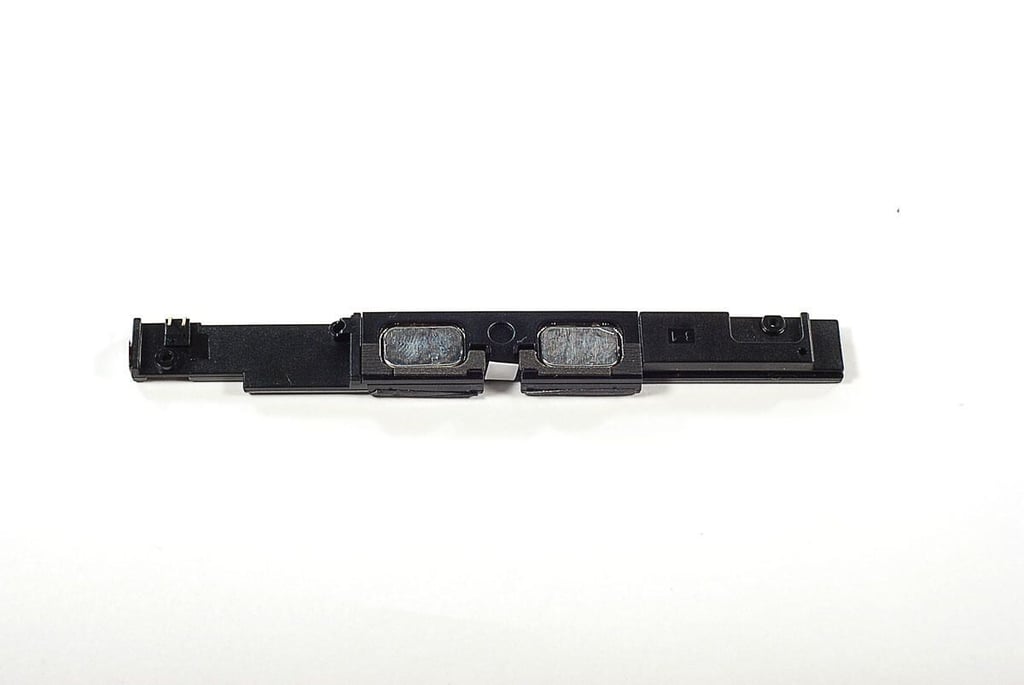
\n\tOne end of the BlackBerry Playbook’s left speaker assembly has an antenna contact attached to it with black tape. Before removing the speaker assembly, I peeled back the tape and freed the contact.
\n
\n\tPhoto by: Bill Detwiler / TechRepublic
\n\tCaption by: Bill Detwiler
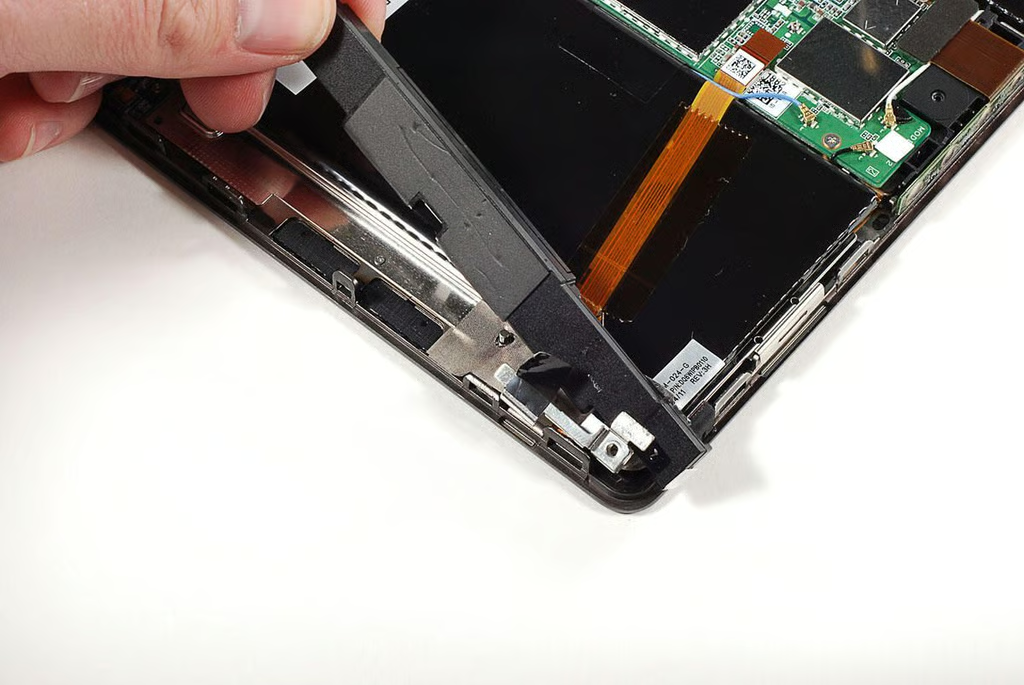
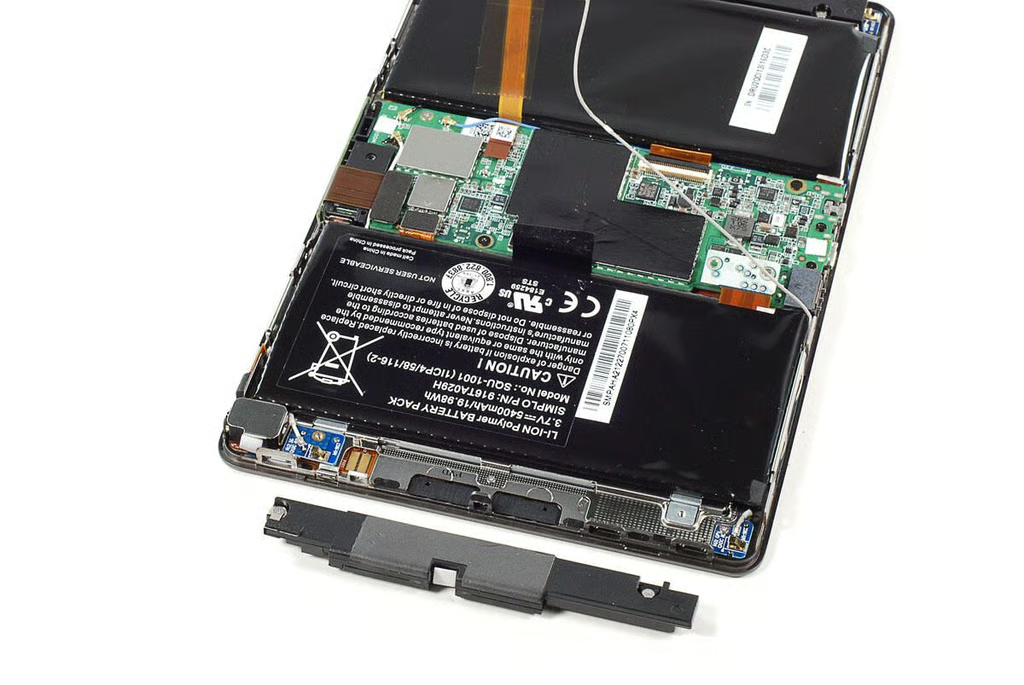
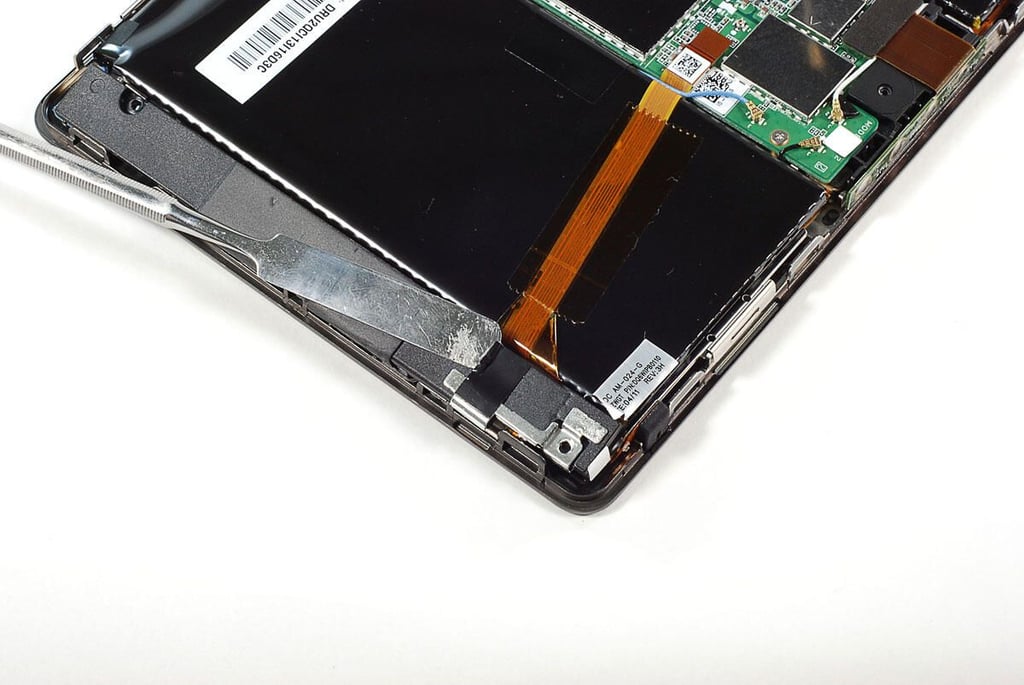
\n\tWith the two Phillips screws and the tape removed, I lifted the speaker assembly away from the BlackBerry PlayBook.
\n
\n\tPhoto by: Bill Detwiler / TechRepublic
\n\tCaption by: Bill Detwiler
\n\tPhoto by: Bill Detwiler / TechRepublic
\n\tCaption by: Bill Detwiler
\n\tPhoto by: Bill Detwiler / TechRepublic
\n\tCaption by: Bill Detwiler
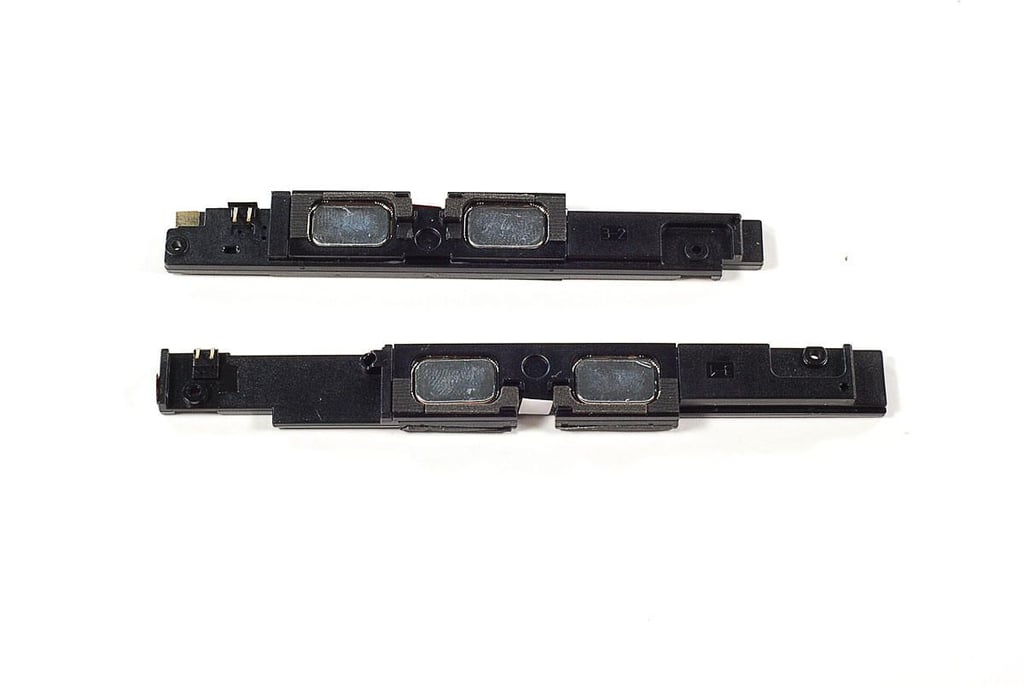
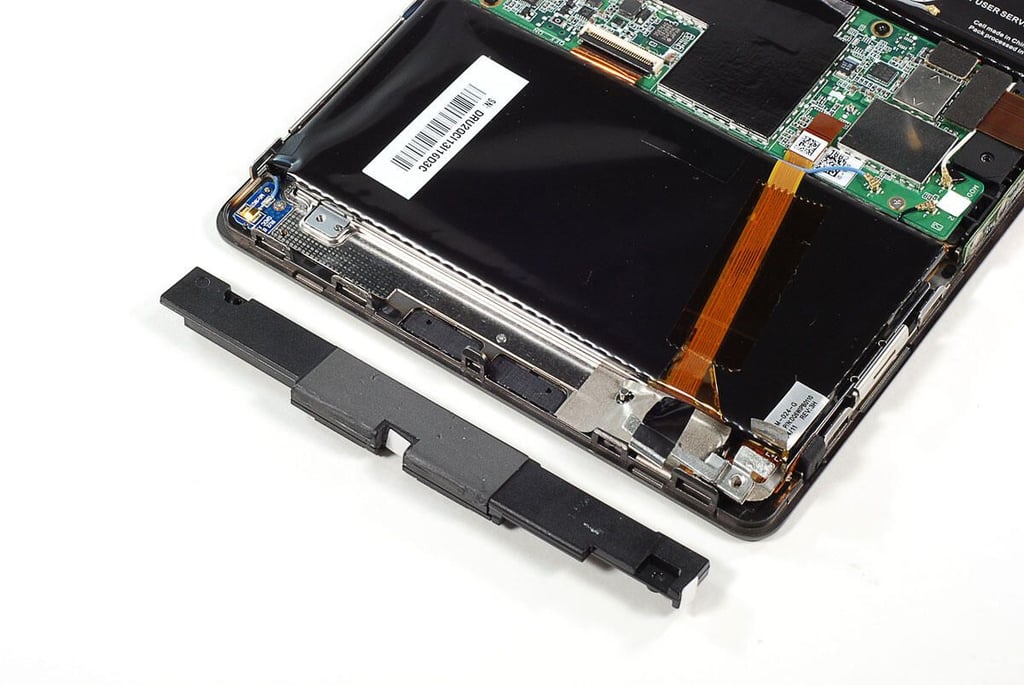
\n\tEach of the BlackBerry Playbook’s speaker assemblies contains two speakers. Give the device a total of four internal speakers. The right speaker assembly (top) is slightly shorter than the left assembly (bottom).
\n
\n\tPhoto by: Bill Detwiler / TechRepublic
\n\tCaption by: Bill Detwiler
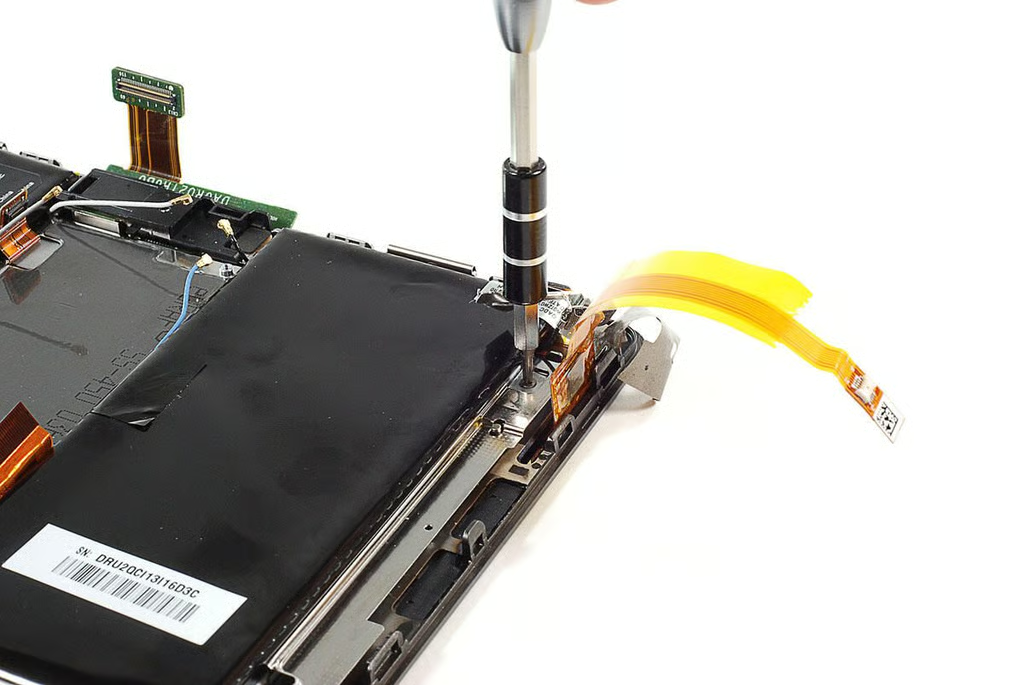
\n\tWith the speakers removed, I turned my attention to the BlackBerry PlayBook’s motherboard, which is held in place with several Phillips screws.
\n
\n\tPhoto by: Bill Detwiler / TechRepublic
\n\tCaption by: Bill Detwiler
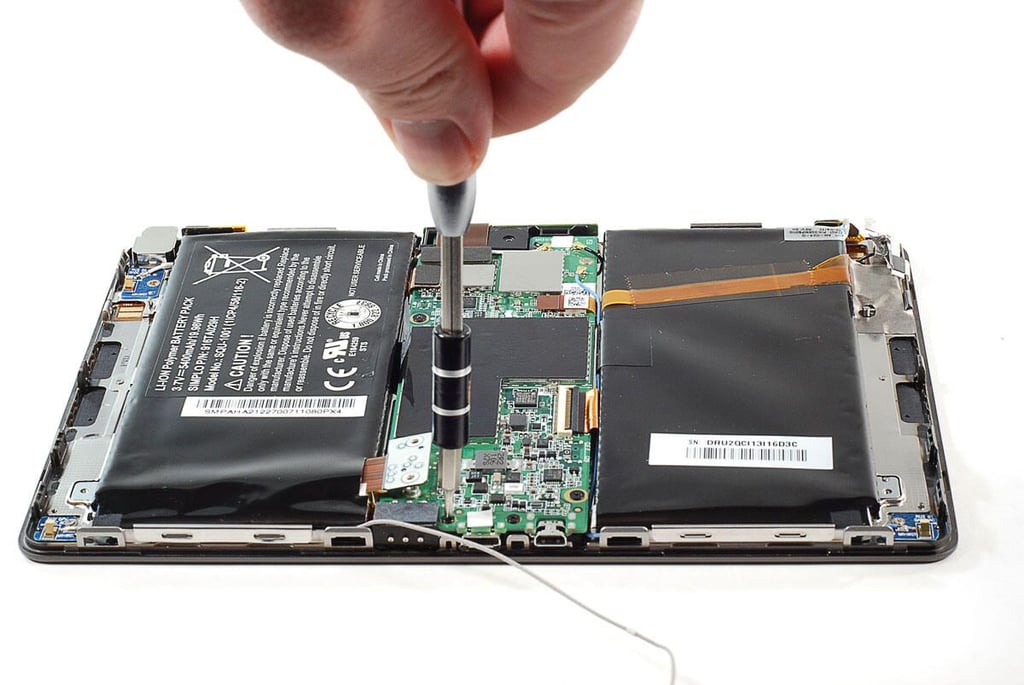
\n\tThe first step in removing the BlackBerry PlayBook’s motherbard is removing the Phillips screws that hold it in place.
\n
\n\tPhoto by: Bill Detwiler / TechRepublic
\n\tCaption by: Bill Detwiler

\n\tPhoto by: Bill Detwiler / TechRepublic
\n\tCaption by: Bill Detwiler
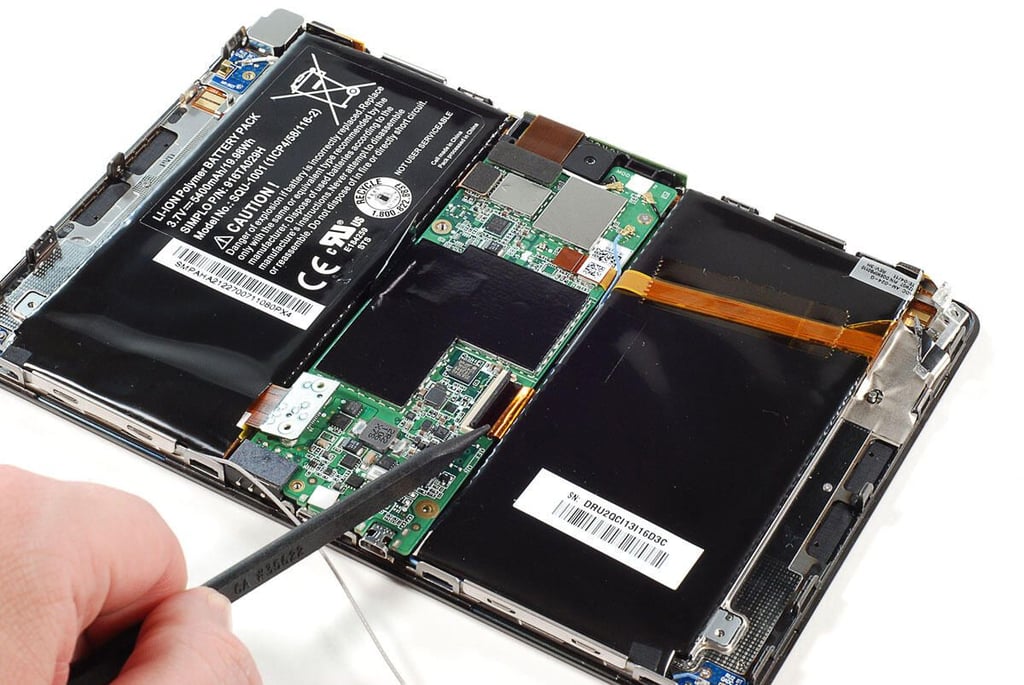
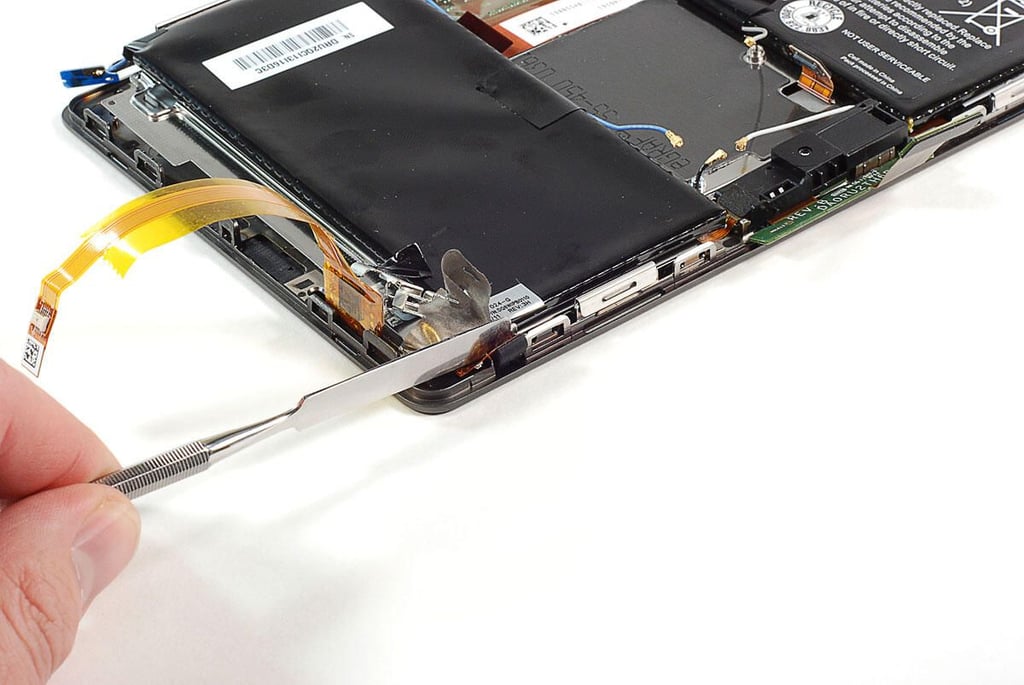
\n\tAfter removing all the screws on the BlackBerry PlayBook’s motherboard, I disconnected all the attached cables and wires.
\n
\n\tPhoto by: Bill Detwiler / TechRepublic
\n\tCaption by: Bill Detwiler
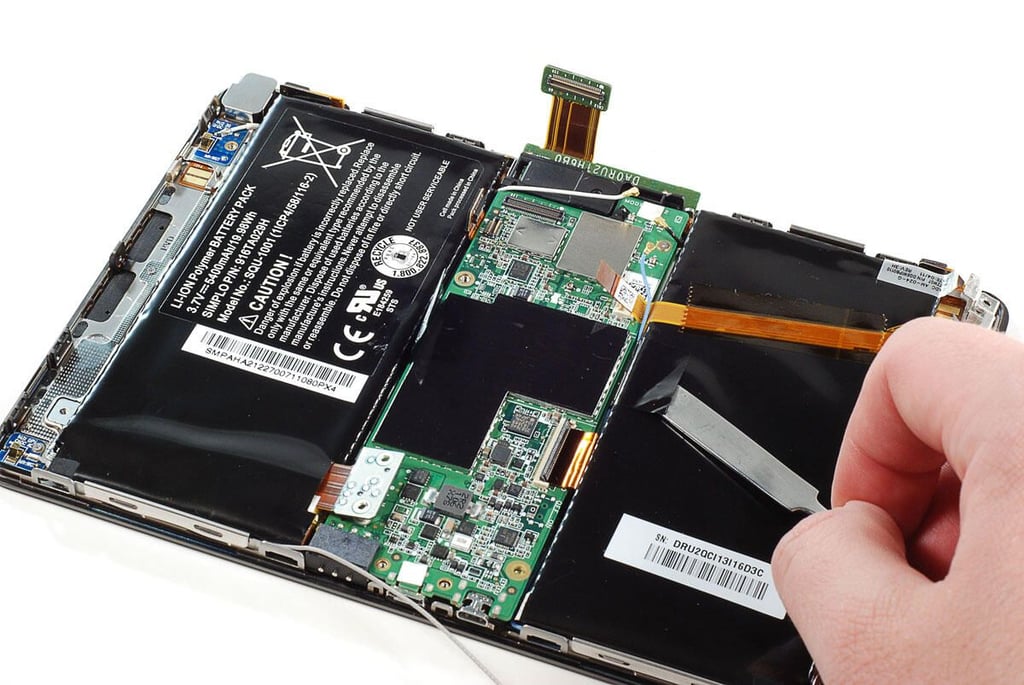
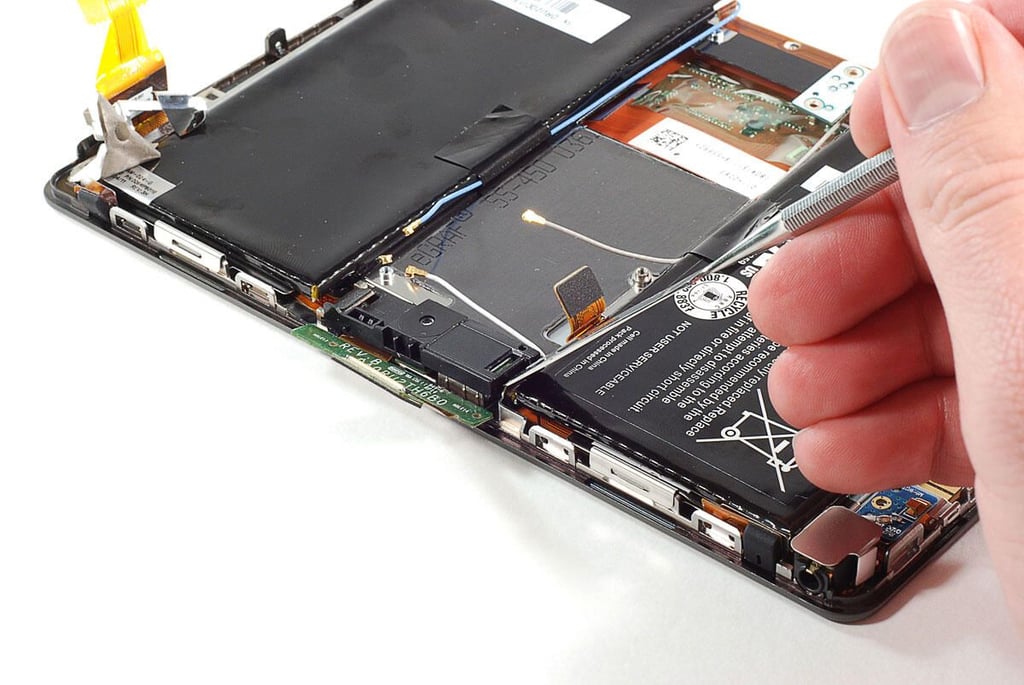
\n\tAfter removing all the motherboard’s screws and disconnecting all the wires and cables, I peeled a second piece of black tape away from the right half of the battery back. As with the piece of black tape on the left half, it held one of the BlackBerry Playbook’s four antenna wires in place.
\n
\n\tAs with the first antenna wire, I later discovered that I didn’t need to peel away this piece of tape to remove the motherboard.
\n
\n\tPhoto by: Bill Detwiler / TechRepublic
\n\tCaption by: Bill Detwiler
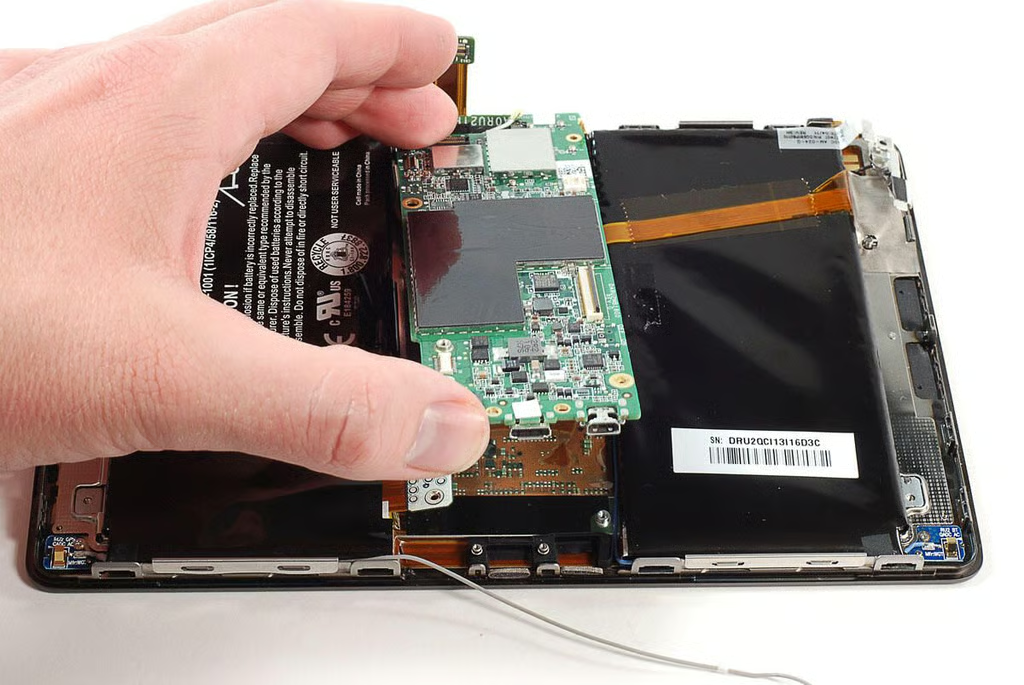
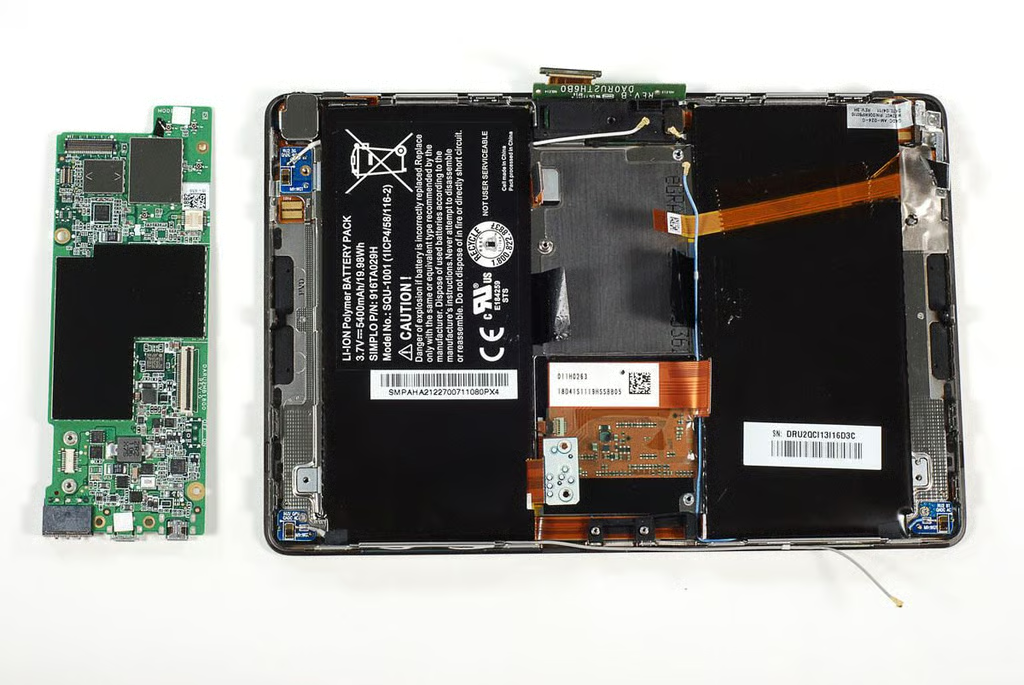
\n\tI could finally lift the BlackBerry PlayBook’s motherboard away from the display and battery assemblies.
\n
\n\tPhoto by: Bill Detwiler / TechRepublic
\n\tCaption by: Bill Detwiler
\n\tPhoto by: Bill Detwiler / TechRepublic
\n\tCaption by: Bill Detwiler
\n\tAfter removing the motherboard, I removed the several small Phillips screws that hold the battery assembly in place.
\n
\n\tPhoto by: Bill Detwiler / TechRepublic
\n\tCaption by: Bill Detwiler
\n\tThree of the BlackBerry PlayBook’s antenna wires are attached to small PCBs located at the device’s corners. As the antenna wires appeared to be attached to the battery assembly with adhesive, I decided to remove them along with the assembly. Each of the small antenna PCBs is held in place with a Phillips screw.
\n
\n\tPhoto by: Bill Detwiler / TechRepublic
\n\tCaption by: Bill Detwiler
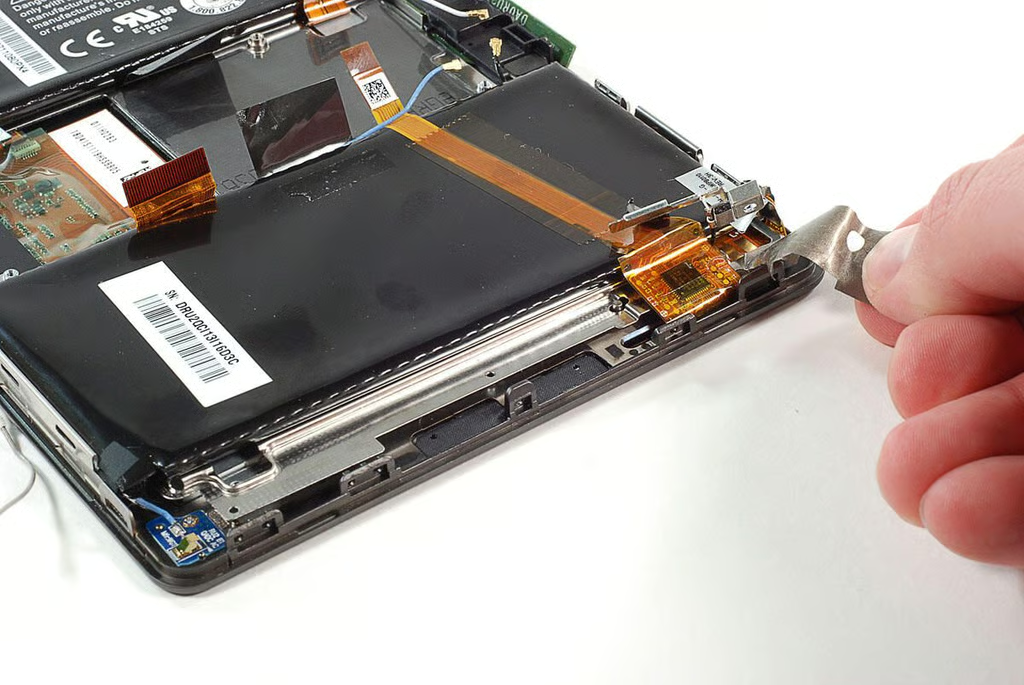
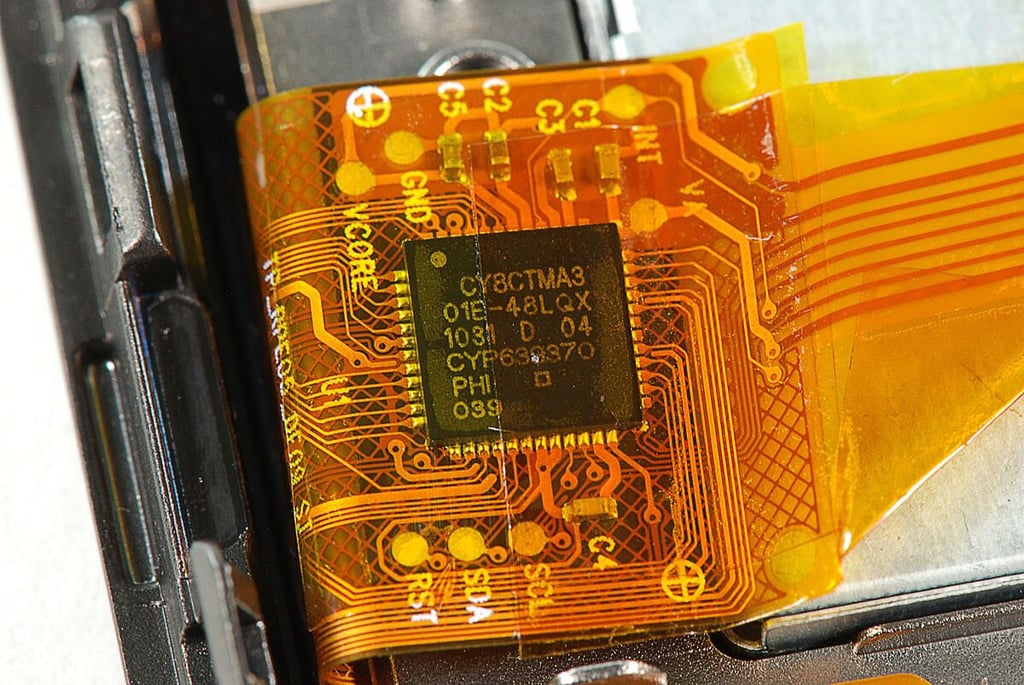
\n\tAt the top left corner of the BlackBerry PlayBook (looking at it from the front) is the touchscreen controller and cable. It is held in place with a piece of silver tape. I peeled the tape away from the ribbon cable and controller.
\n
\n\tPhoto by: Bill Detwiler / TechRepublic
\n\tCaption by: Bill Detwiler
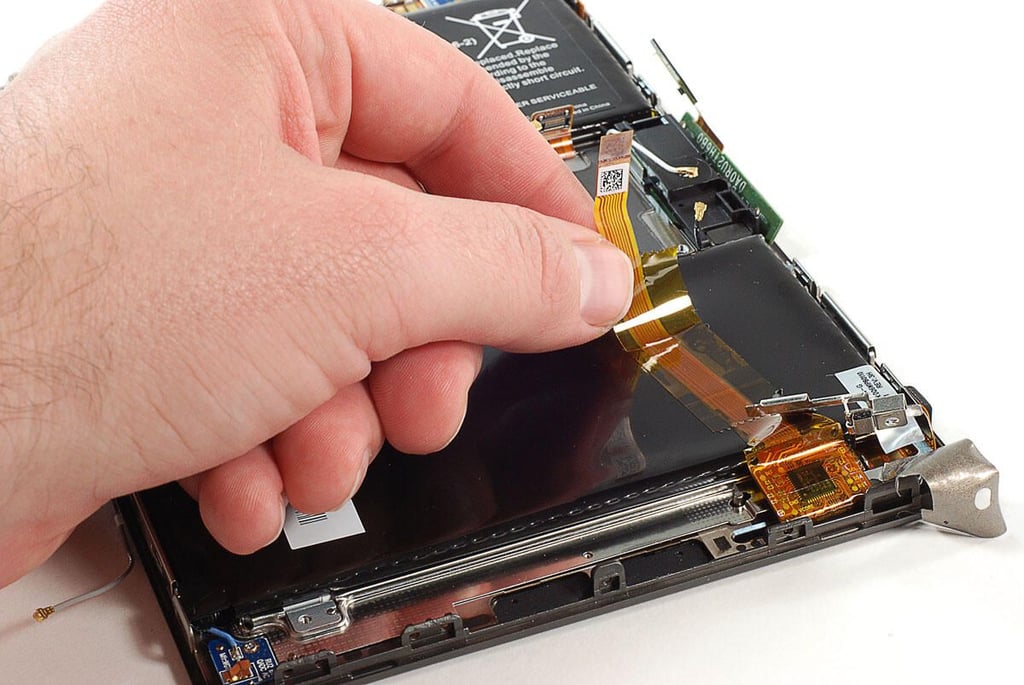
\n\tAfter peeling back the silver tape, I genetly detatched the touchscreen controller ribbon cable from the BlackBerry PlayBook’s battery pack.
\n
\n\tPhoto by: Bill Detwiler / TechRepublic
\n\tCaption by: Bill Detwiler
\n\tPhoto by: Bill Detwiler / TechRepublic
\n\tCaption by: Bill Detwiler
\n\tOne last Phillips #000 screw was hidden under the touchscreen controller.
\n
\n\tPhoto by: Bill Detwiler / TechRepublic
\n\tCaption by: Bill Detwiler
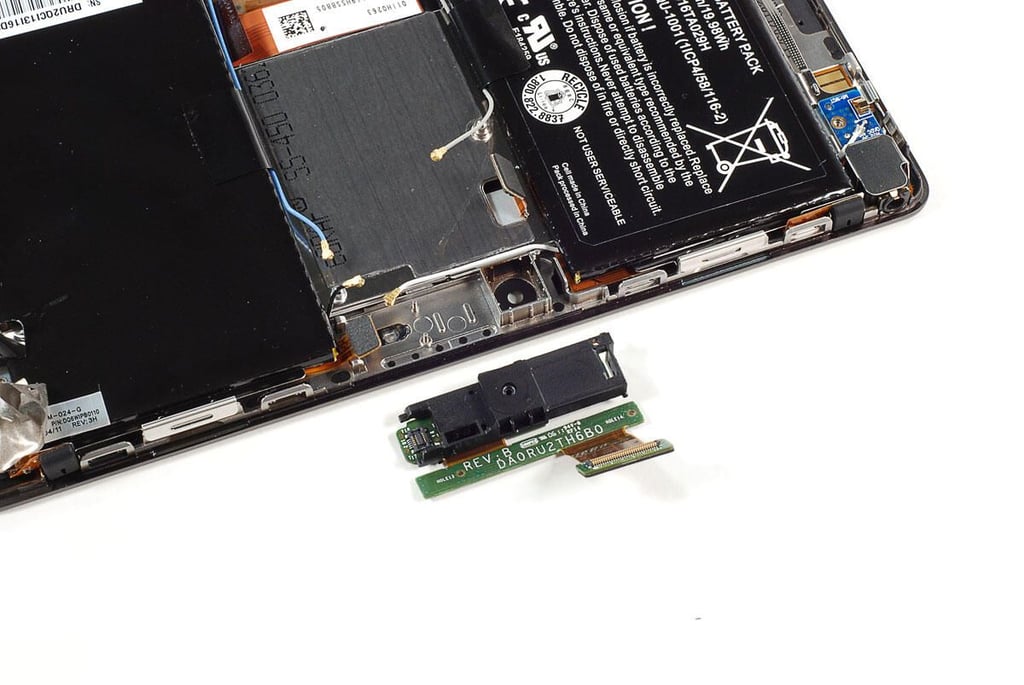
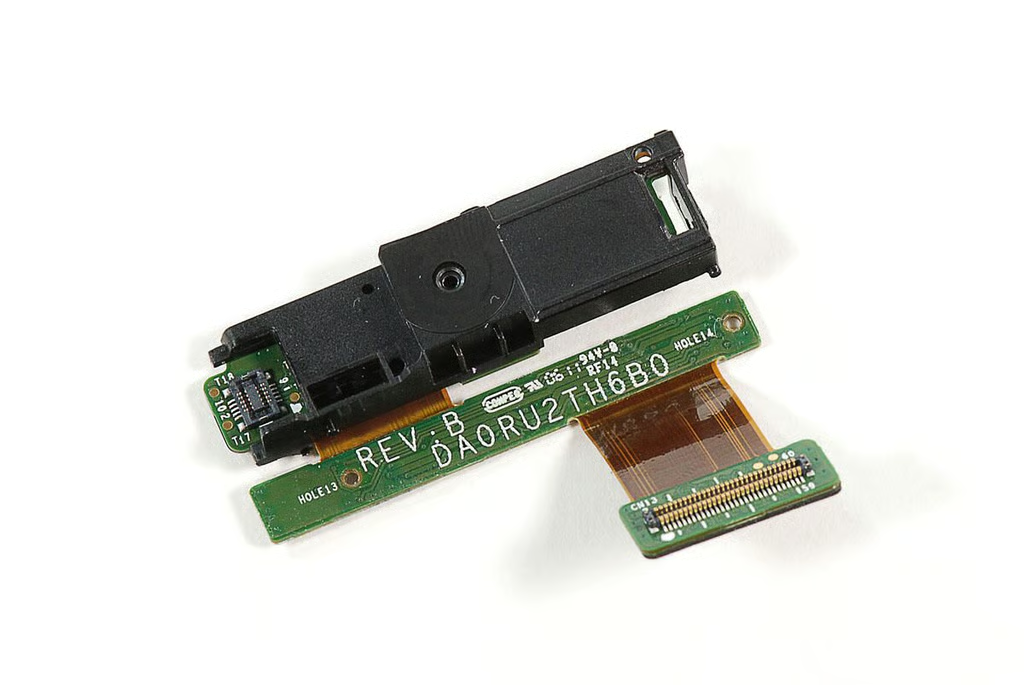
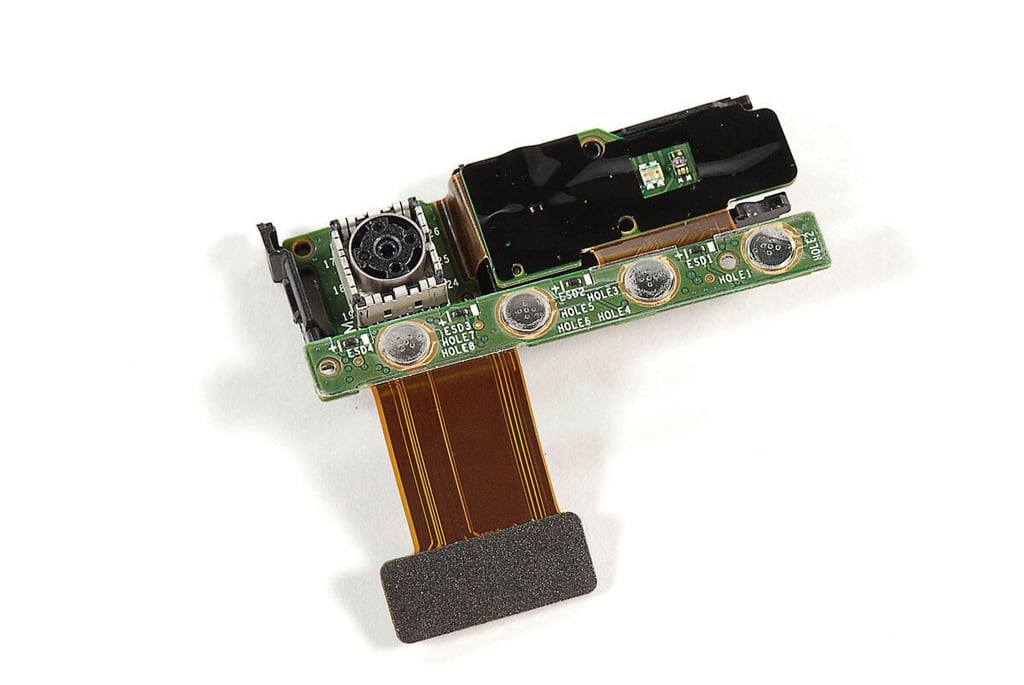
\n\tEven though all its screws were removed and cable disconnected, I needed to remove the camera and control buton assembly before I could lift the battery assembly away from the BlackBerry PlayBook.
\n
\n\tPhoto by: Bill Detwiler / TechRepublic
\n\tCaption by: Bill Detwiler
\n\tPhoto by: Bill Detwiler / TechRepublic
\n\tCaption by: Bill Detwiler
\n\tPhoto by: Bill Detwiler / TechRepublic
\n\tCaption by: Bill Detwiler
\n\tPhoto by: Bill Detwiler / TechRepublic
\n\tCaption by: Bill Detwiler
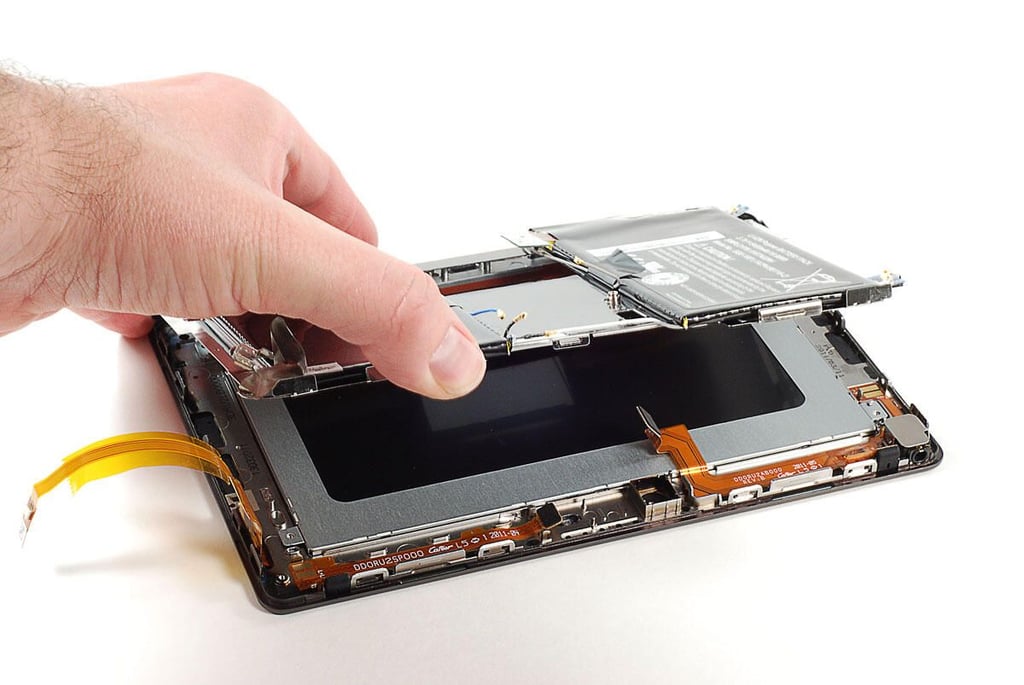
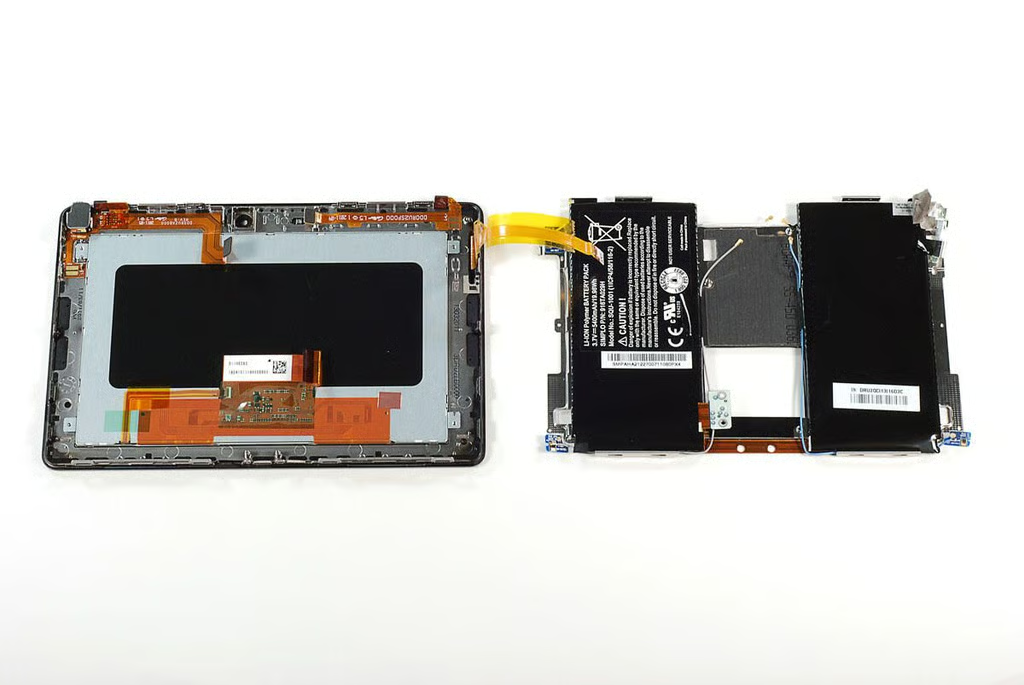
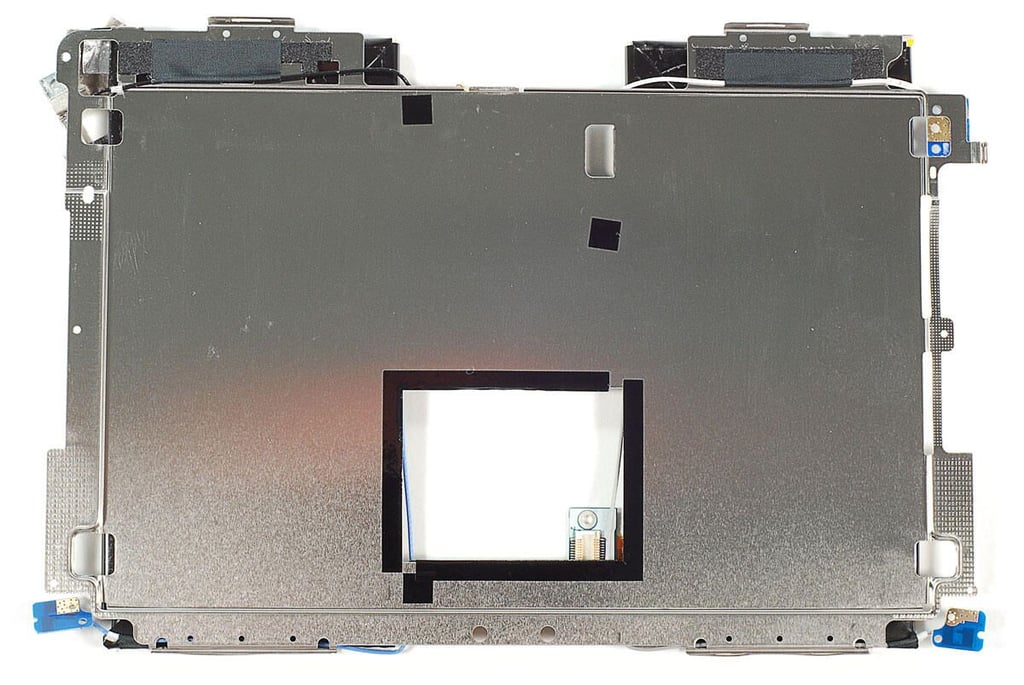
\n\tWith all the screws removed and cable detached, I lifted the BlackBerry PlayBook’s battery assembly away from the display assembly.
\n
\n\tPhoto by: Bill Detwiler / TechRepublic
\n\tCaption by: Bill Detwiler
\n\tPhoto by: Bill Detwiler / TechRepublic
\n\tCaption by: Bill Detwiler
\n\tPhoto by: Bill Detwiler / TechRepublic
\n\tCaption by: Bill Detwiler
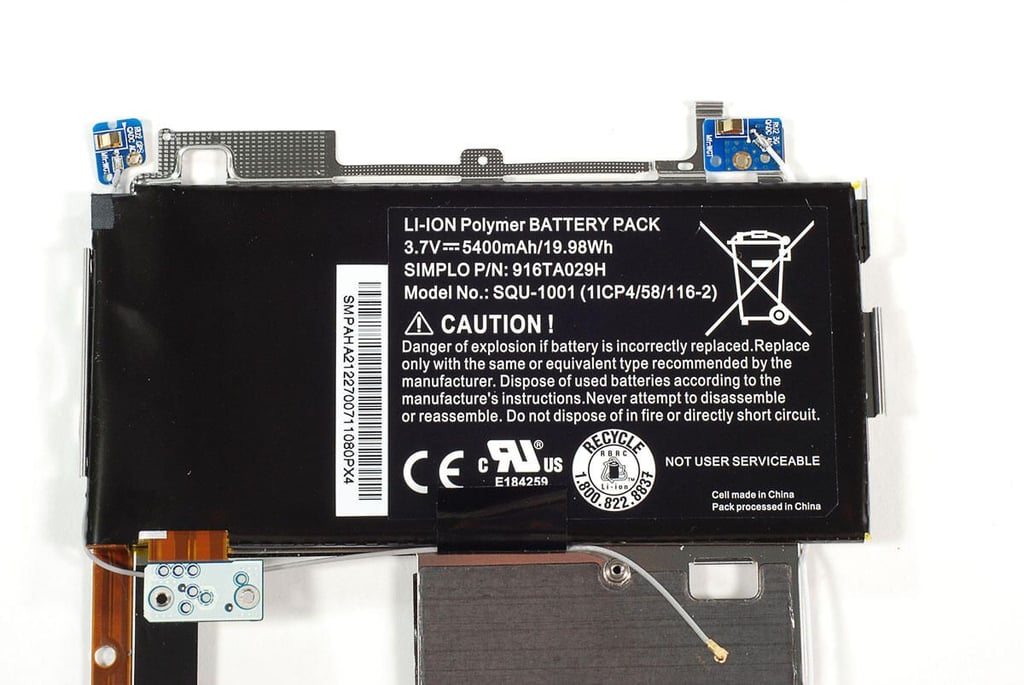
\n\tThe BlackBerry PlayBook has 3.7V 5400mAh/19.98Wh Li-ion battery pack.
\n
\n\tPhoto by: Bill Detwiler / TechRepublic
\n\tCaption by: Bill Detwiler
\n\tPhoto by: Bill Detwiler / TechRepublic
\n\tCaption by: Bill Detwiler
\n\tPhoto by: Bill Detwiler / TechRepublic
\n\tCaption by: Bill Detwiler
\n\tPhoto by: Bill Detwiler / TechRepublic
\n\tCaption by: Bill Detwiler
\n\tPhoto by: Bill Detwiler / TechRepublic
\n\tCaption by: Bill Detwiler
\n\tPhoto by: Bill Detwiler / TechRepublic
\n\tCaption by: Bill Detwiler
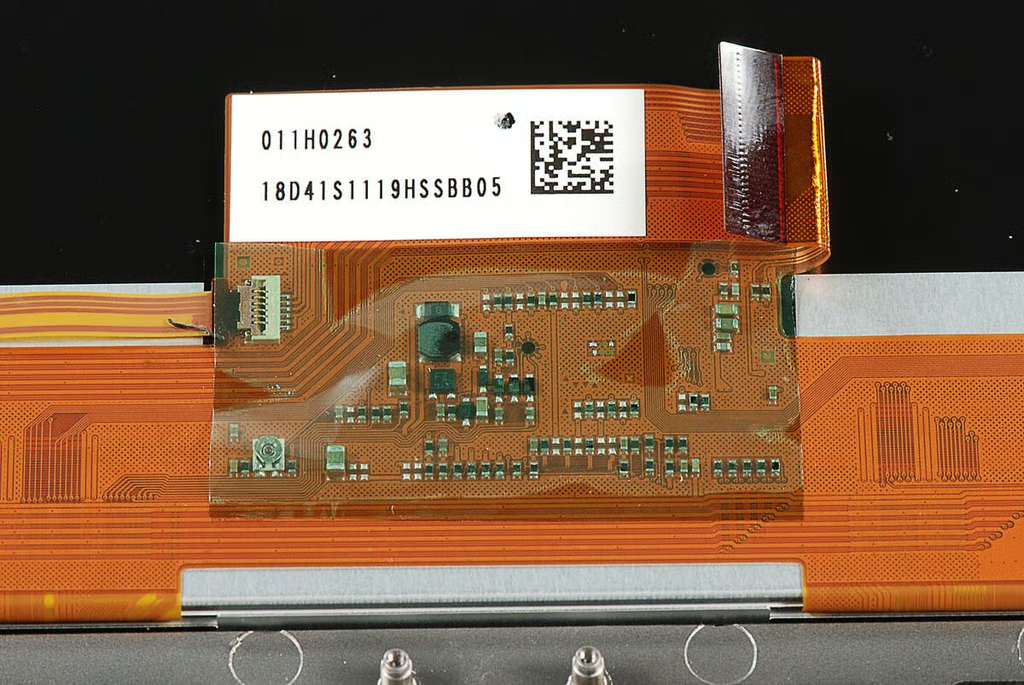
\n\tPhoto by: Bill Detwiler / TechRepublic
\n\tCaption by: Bill Detwiler
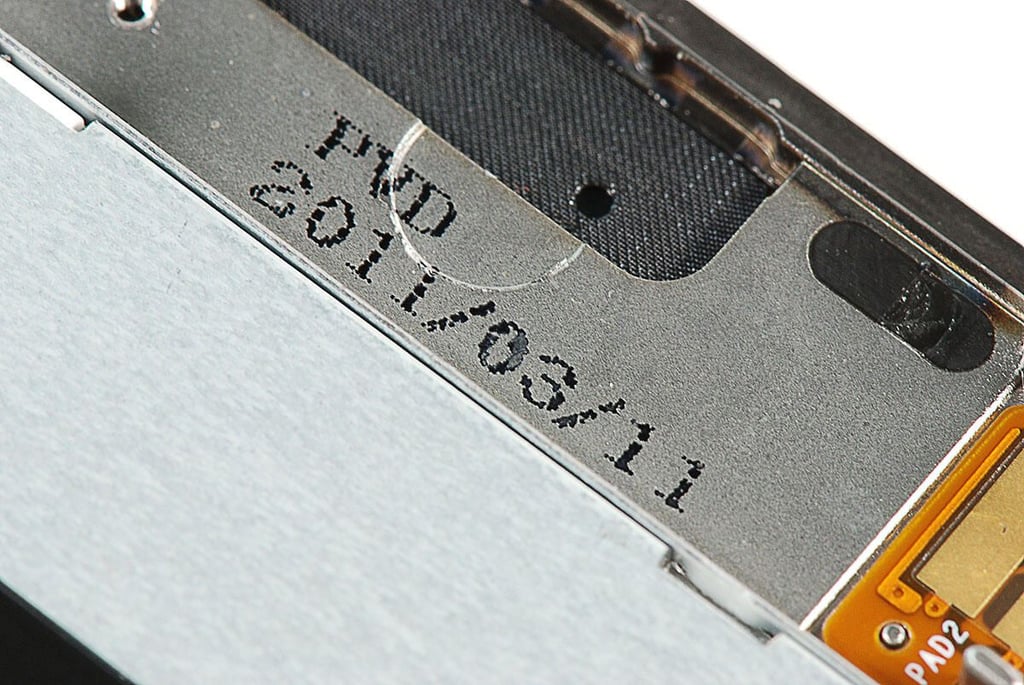
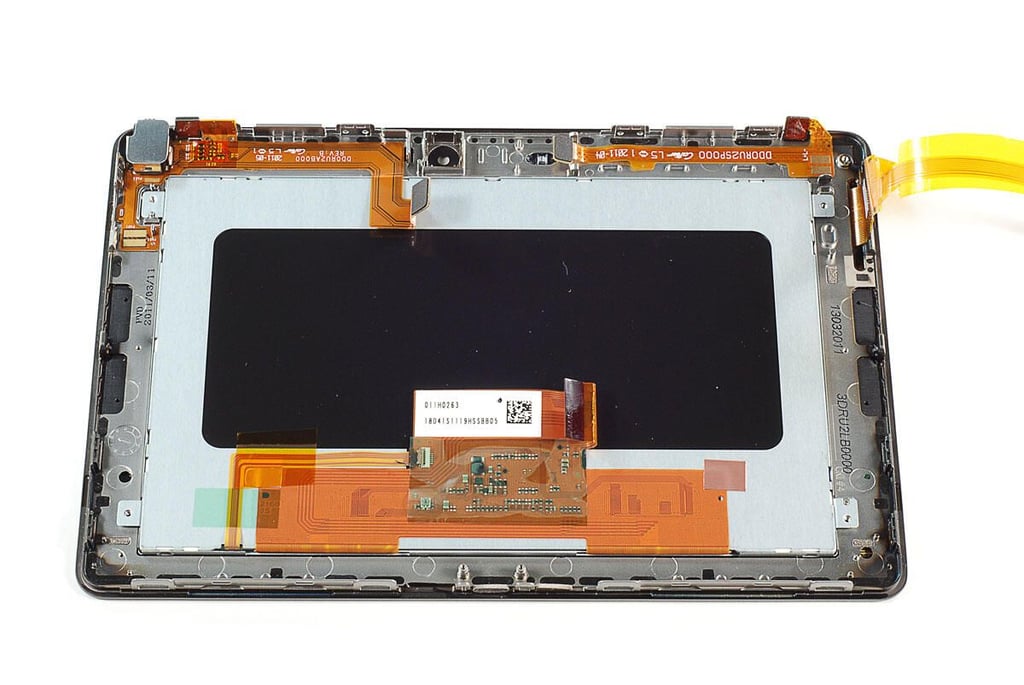
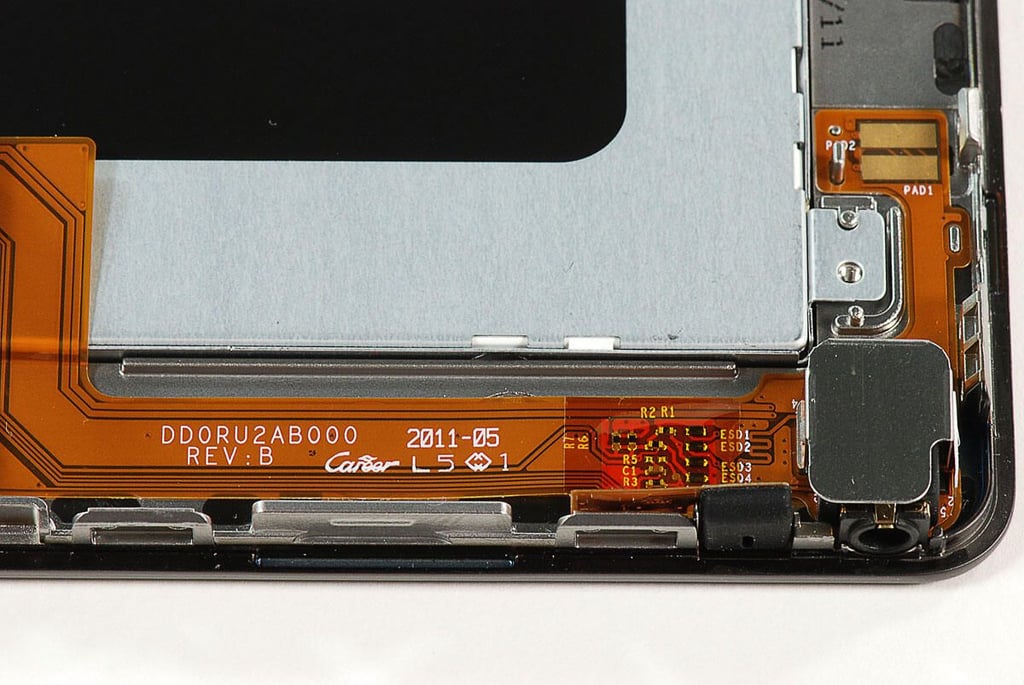
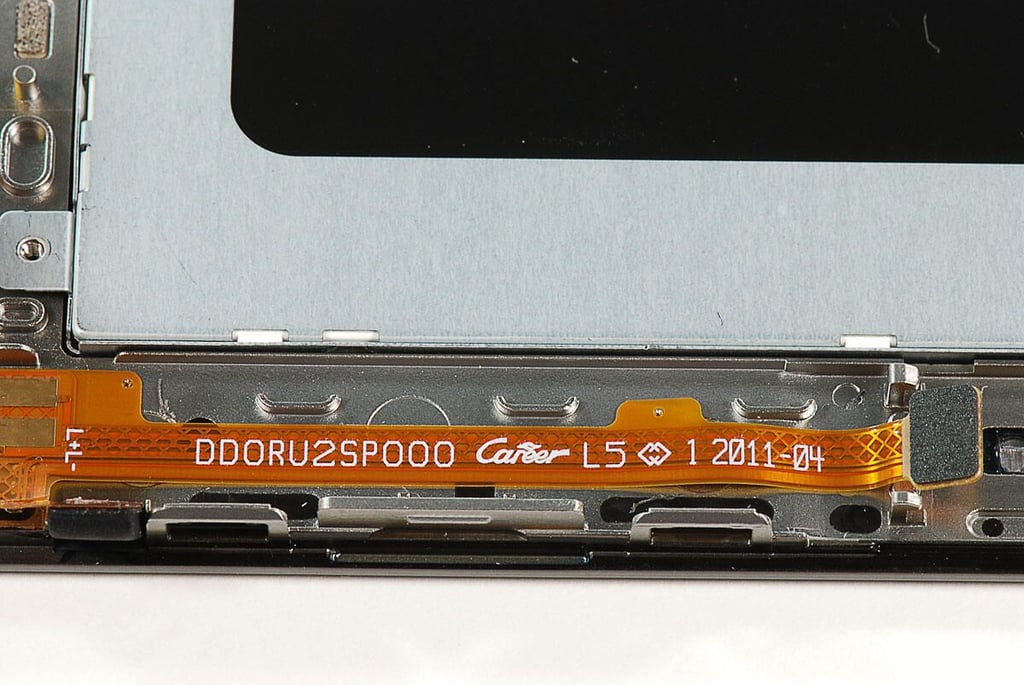
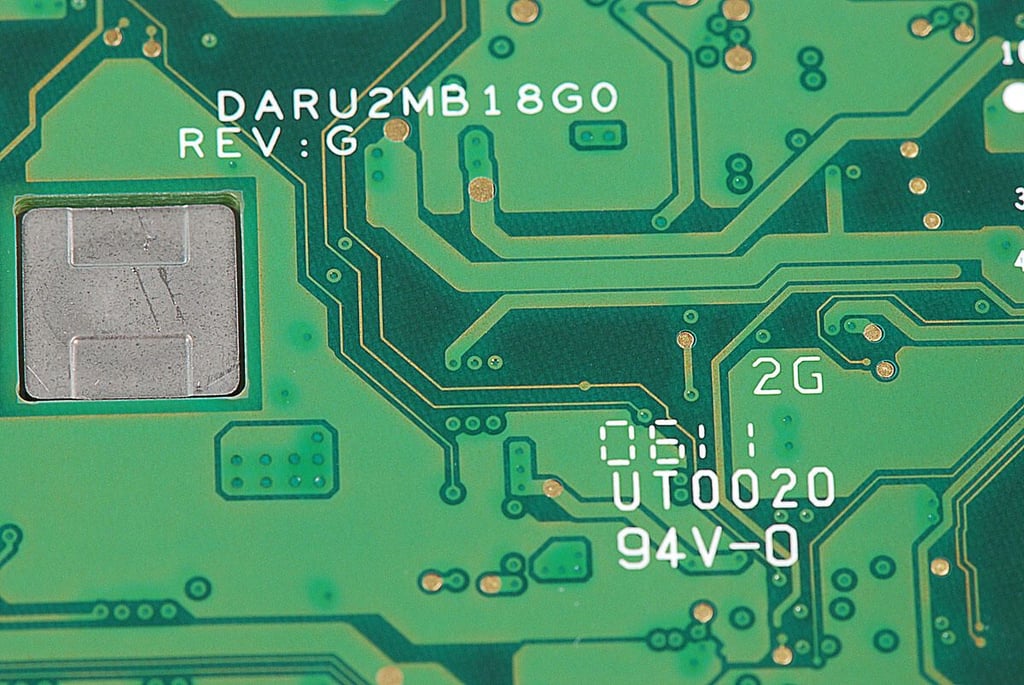
\n\tAccording to these markings on the display assembly, this component of the BlackBerry PlayBook was manufactured in March 2011.
\n
\n\tPhoto by: Bill Detwiler / TechRepublic
\n\tCaption by: Bill Detwiler
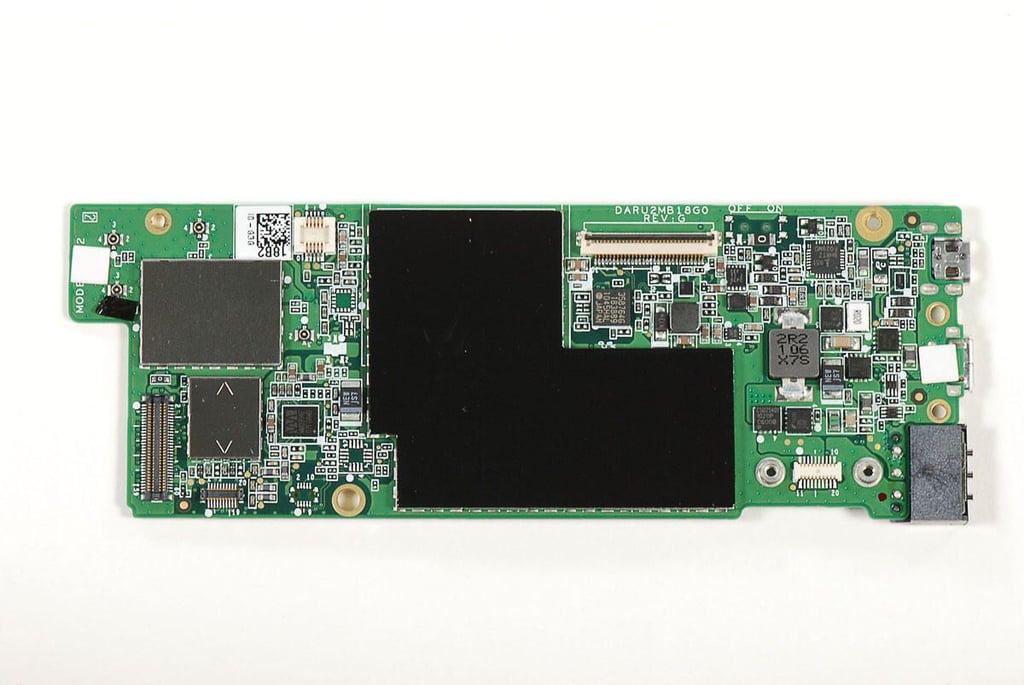
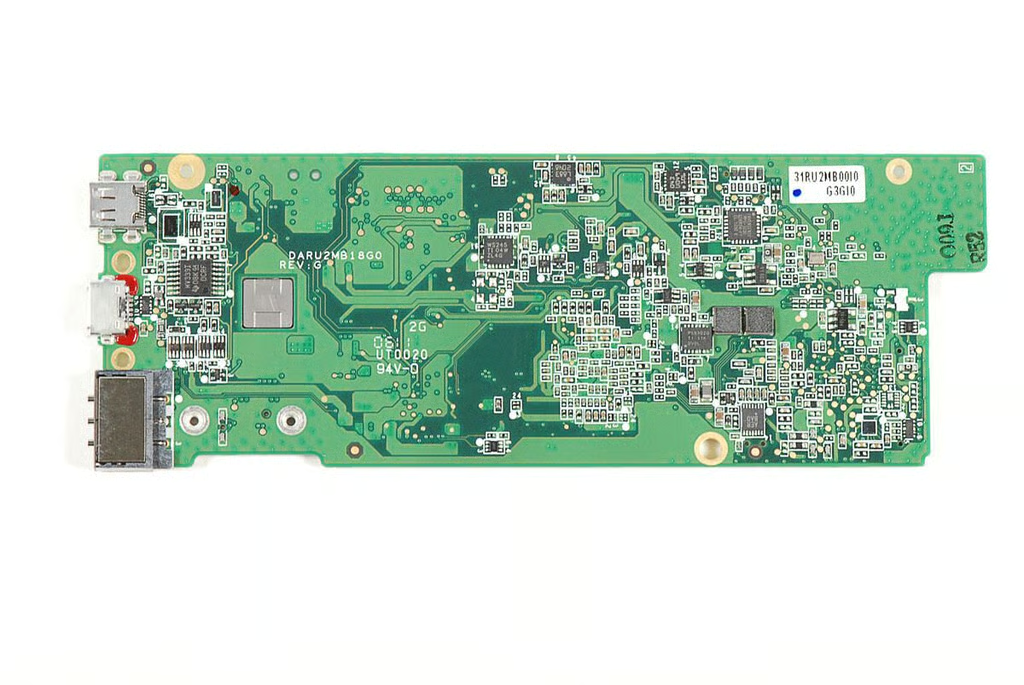
\n\tWith the EMI shields in place, we can’t see the major chips on the BlackBerry PlayBook’s motherboard.
\n
\n\tPhoto by: Bill Detwiler / TechRepublic
\n\tCaption by: Bill Detwiler
\n\tPhoto by: Bill Detwiler / TechRepublic
\n\tCaption by: Bill Detwiler
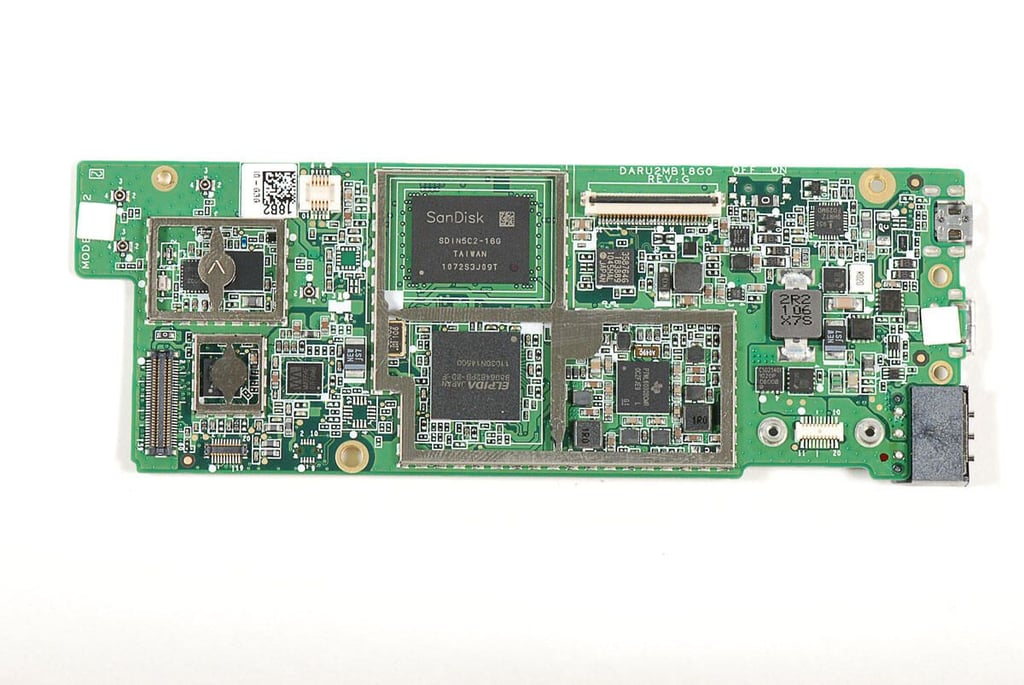
\n\tWith the EMI shields removed, we finally get a look at the chips that run the BlackBerry PlayBook.
\n
\n\tPhoto by: Bill Detwiler / TechRepublic
\n\tCaption by: Bill Detwiler
\n\tPhoto by: Bill Detwiler / TechRepublic
\n\tCaption by: Bill Detwiler
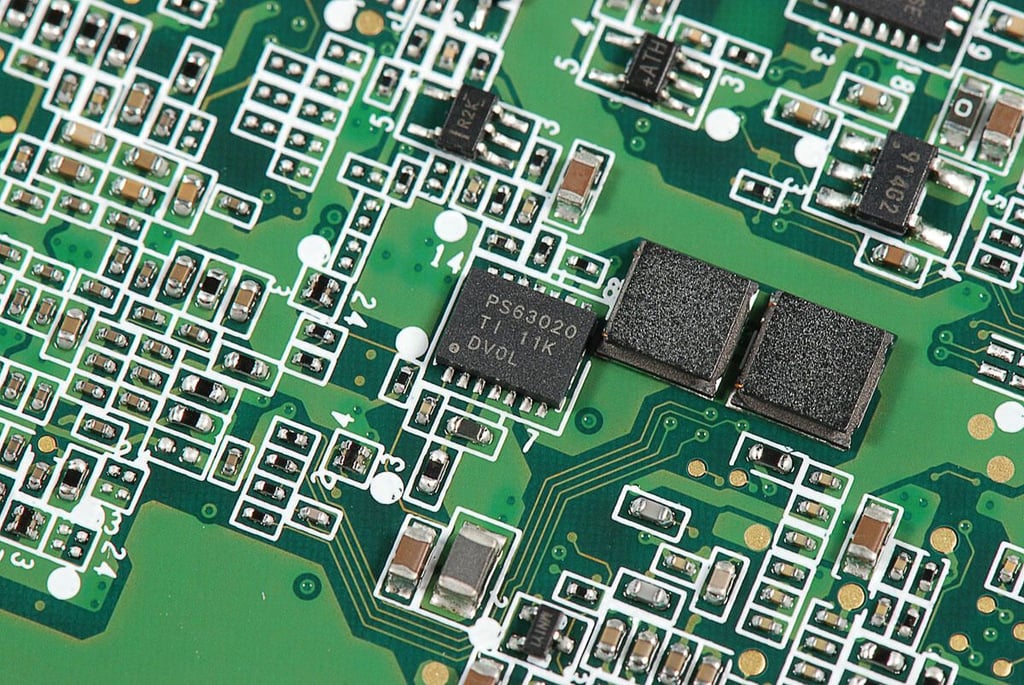
\n\tAccording to Chipworks, this chip is a “Texas Instruments PS63020 High Efficiency Single Inductor Buck-Boost Converter with 4A Switch”.
\n
\n\tPhoto by: Bill Detwiler / TechRepublic
\n\tCaption by: Bill Detwiler

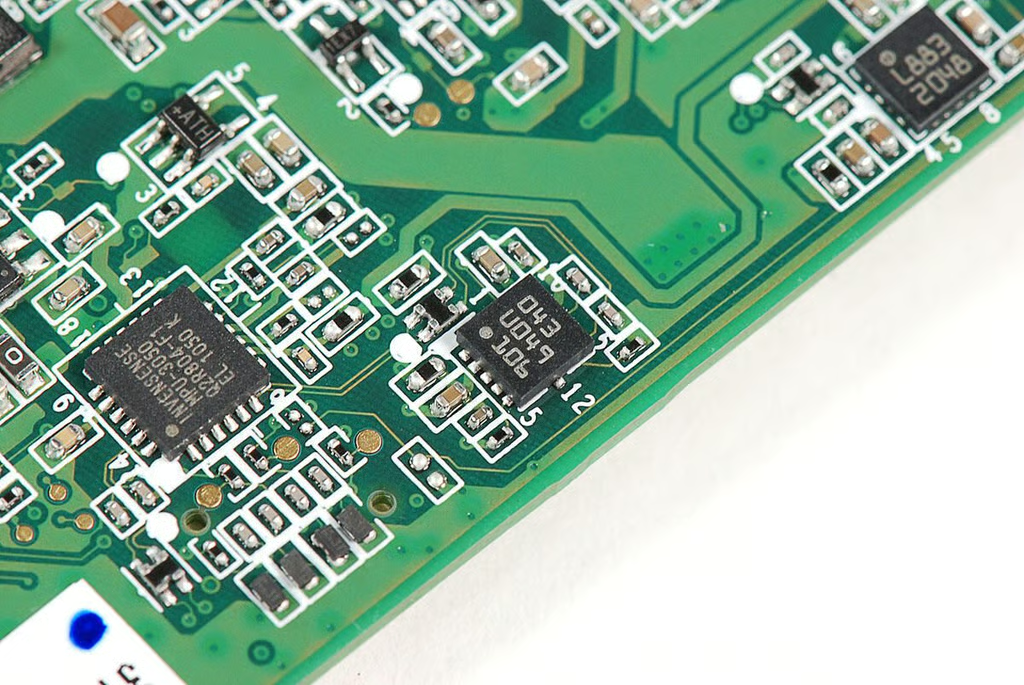
\n\tAccording to Chipworks, this chip is an Invensense MPU-3050 three-axis gyroscope.
\n
\n\tPhoto by: Bill Detwiler / TechRepublic
\n\tCaption by: Bill Detwiler
\n\tAccording to Chipworks, this chip is a “Bosch Sensortec BMA150 Digital 3-axis accelerometer”.
\n
\n\tPhoto by: Bill Detwiler / TechRepublic
\n\tCaption by: Bill Detwiler
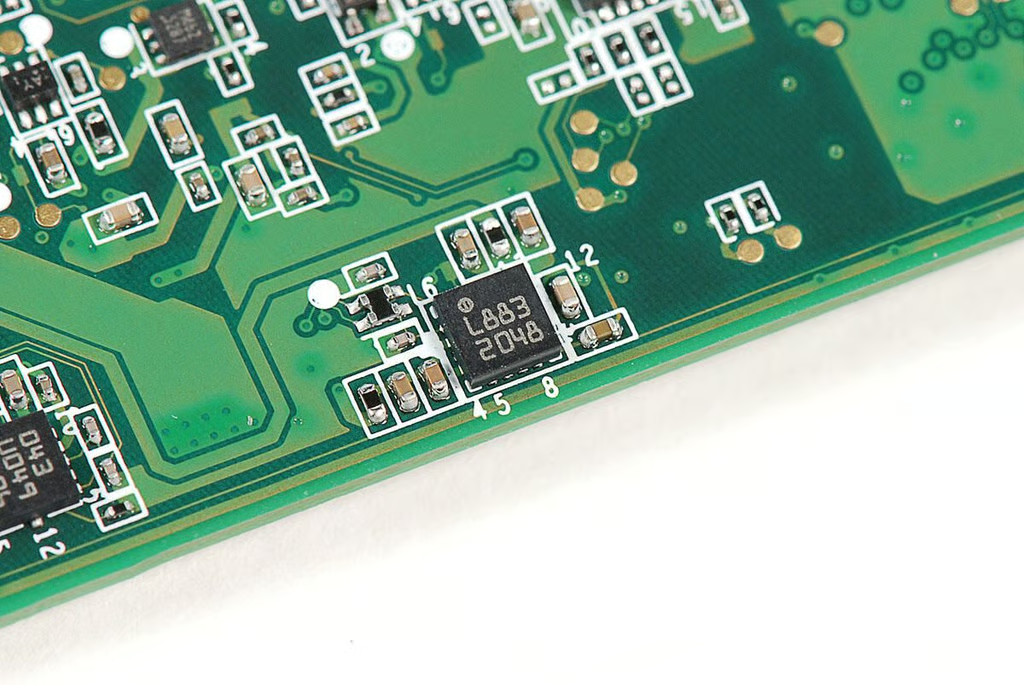
\n\tUnknown chip with markings L883 2048
\n
\n\tPhoto by: Bill Detwiler / TechRepublic
\n\tCaption by: Bill Detwiler
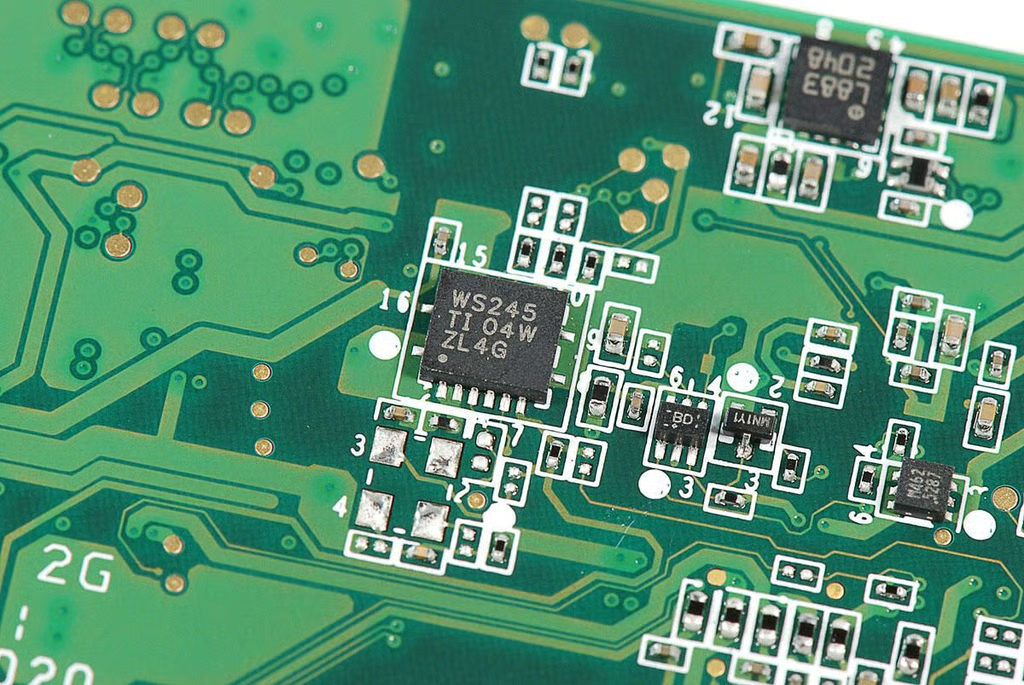
\n\tAccording to Chipworks, this chip is a “Texas Instruments SN74AVCH4T245 4-Bit Dual-Supply Bus Transceiver”.
\n
\n\tPhoto by: Bill Detwiler / TechRepublic
\n\tCaption by: Bill Detwiler
\n\tPhoto by: Bill Detwiler / TechRepublic
\n\tCaption by: Bill Detwiler
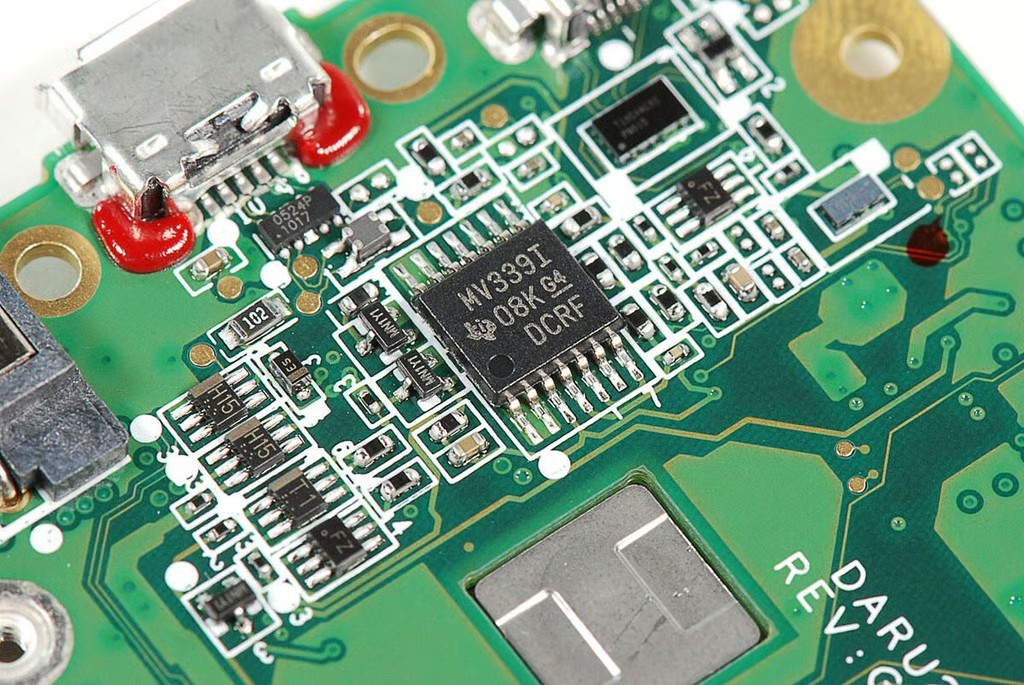
\n\tAccording to Chipworks, this chip is a “Texas Instruments LMV339 Quad General Purpose Low-Voltage Comparator”.
\n
\n\tPhoto by: Bill Detwiler / TechRepublic
\n\tCaption by: Bill Detwiler

\n\tAccording to Chipworks, this chip is an “Intersil ISL9519 Highly integrated Narrow VDC system voltage regulator and battery charger controller”.
\n
\n\tPhoto by: Bill Detwiler / TechRepublic
\n\tCaption by: Bill Detwiler
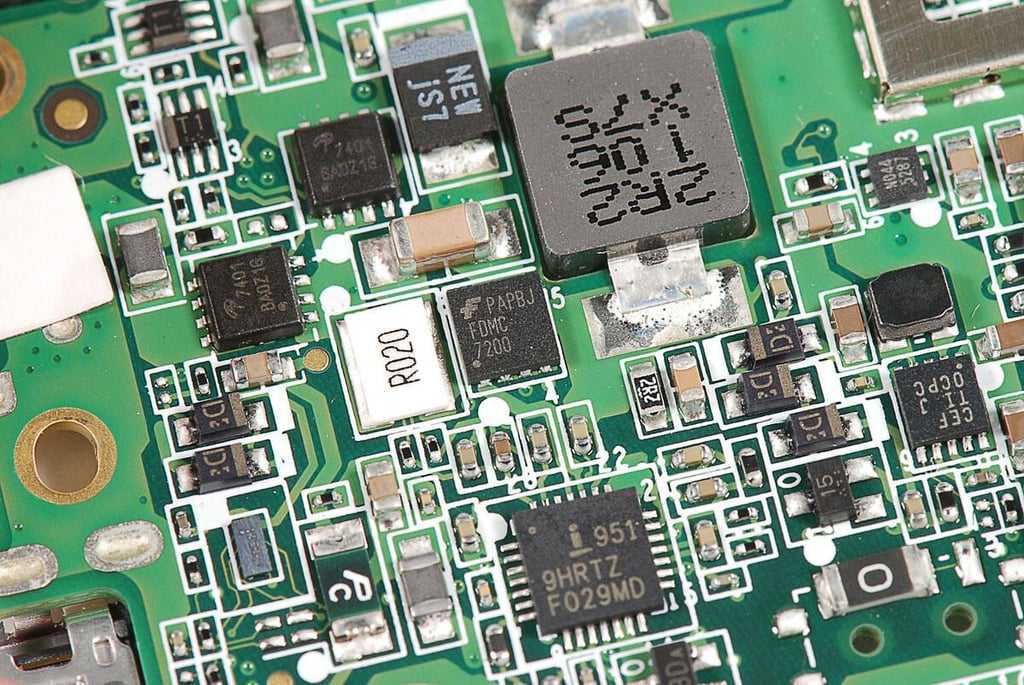
\n\t Fairchild Semiconductor FDMC 7200
\n
\n\tPhoto by: Bill Detwiler / TechRepublic
\n\tCaption by: Bill Detwiler
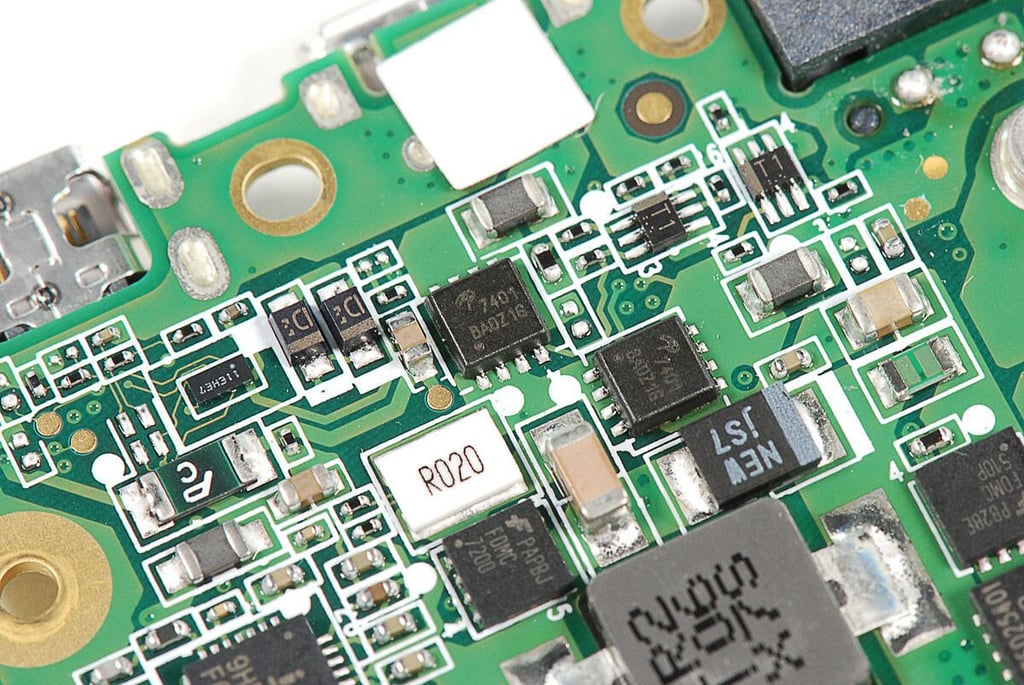
\n\tUnknown chips with markings 7401 BA0Z16
\n
\n\tPhoto by: Bill Detwiler / TechRepublic
\n\tCaption by: Bill Detwiler
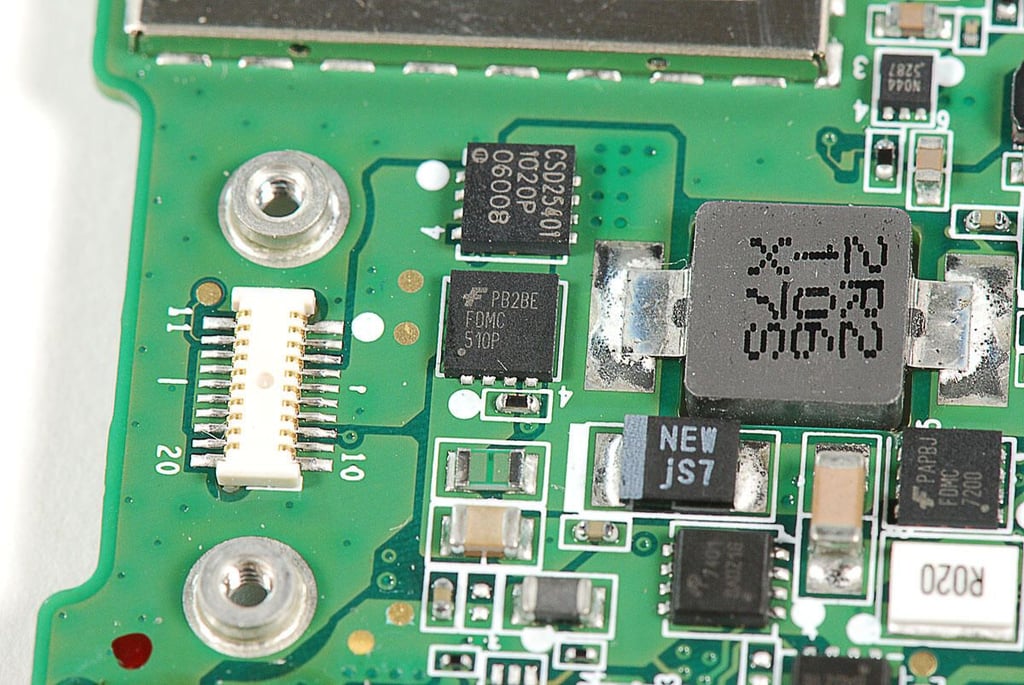
\n\tFairchild Semiconductor FDMC 510P
\n
\n\tPhoto by: Bill Detwiler / TechRepublic
\n\tCaption by: Bill Detwiler
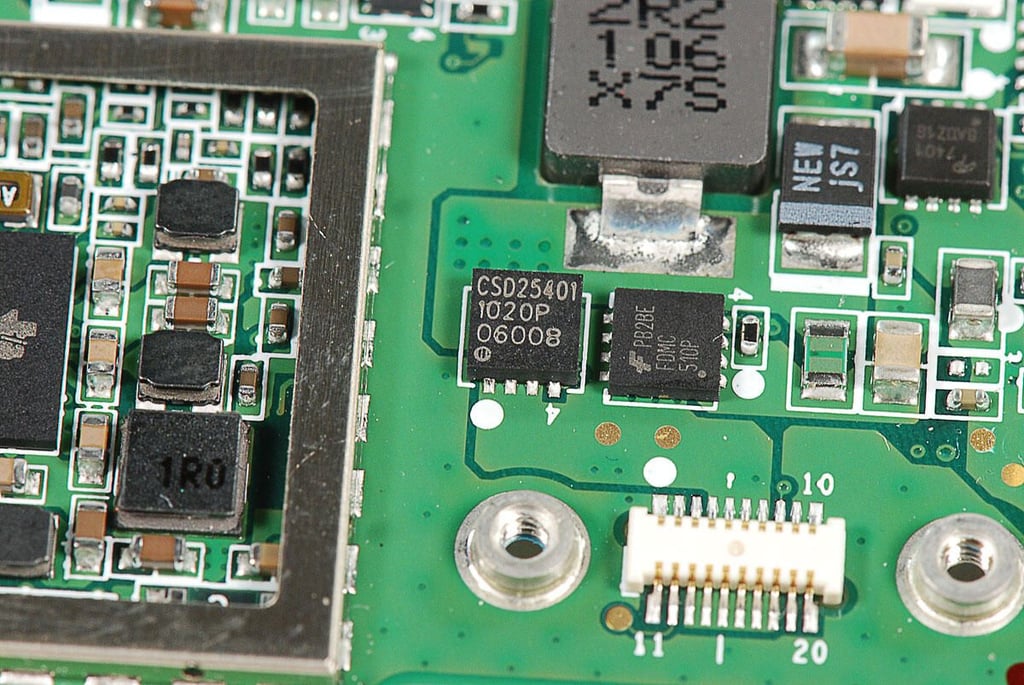
\n\tUnknown chip with markings CSD25401 1020P 06008
\n
\n\tPhoto by: Bill Detwiler / TechRepublic
\n\tCaption by: Bill Detwiler
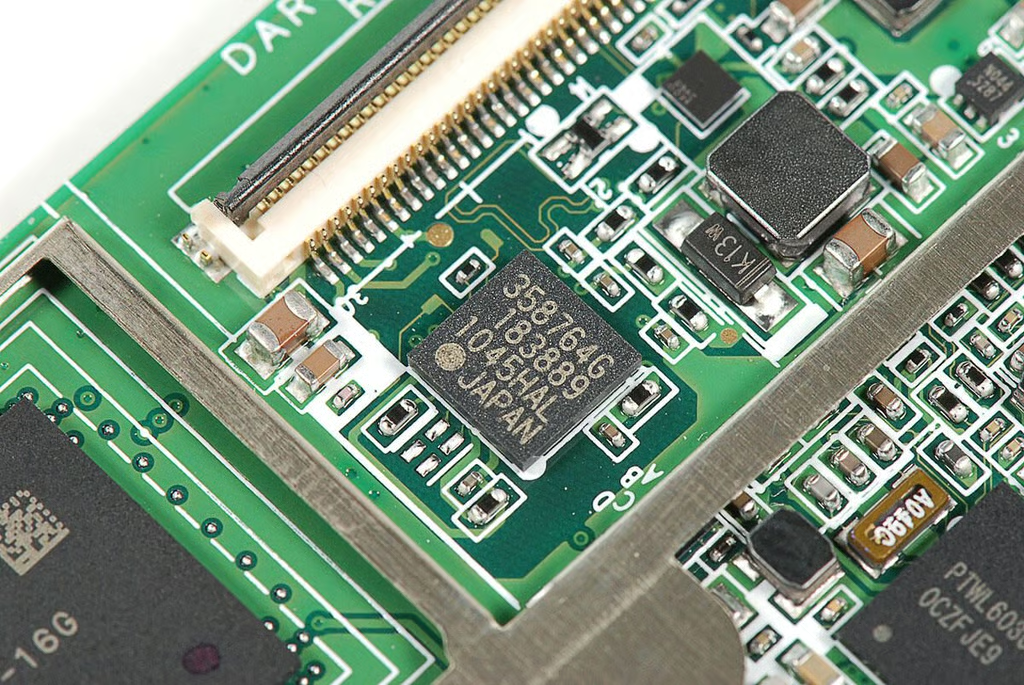
\n\tUnknown chip with markings 358764G 183889 1045HAL JAPAN
\n
\n\tPhoto by: Bill Detwiler / TechRepublic
\n\tCaption by: Bill Detwiler
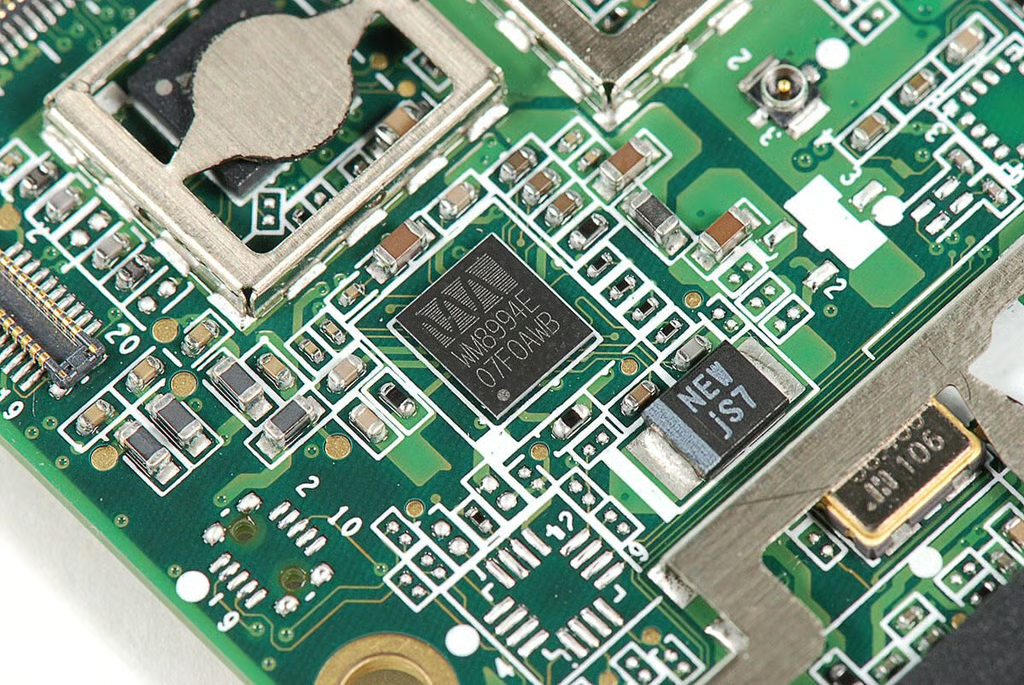
\n\tAccording to Chipworks, this chip is a Wolfson WM8994E CODEC.
\n
\n\tPhoto by: Bill Detwiler / TechRepublic
\n\tCaption by: Bill Detwiler
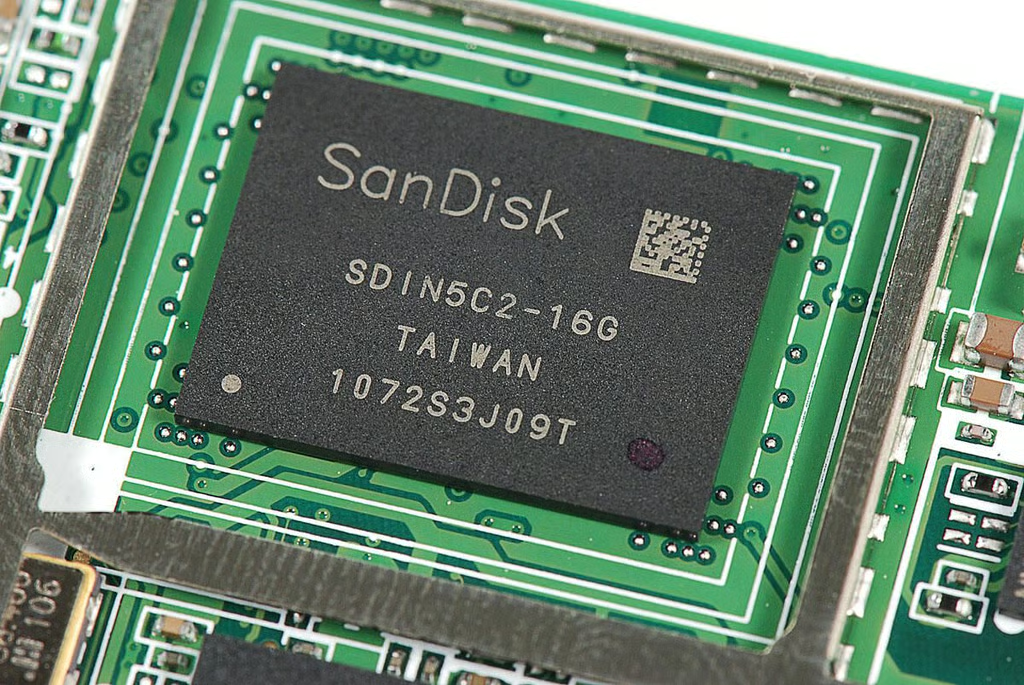
\n\tAccording to Chipworks, this is a SanDisk SDIN5C2-16G 16 Gb NAND Flash chip.
\n
\n\tPhoto by: Bill Detwiler / TechRepublic
\n\tCaption by: Bill Detwiler
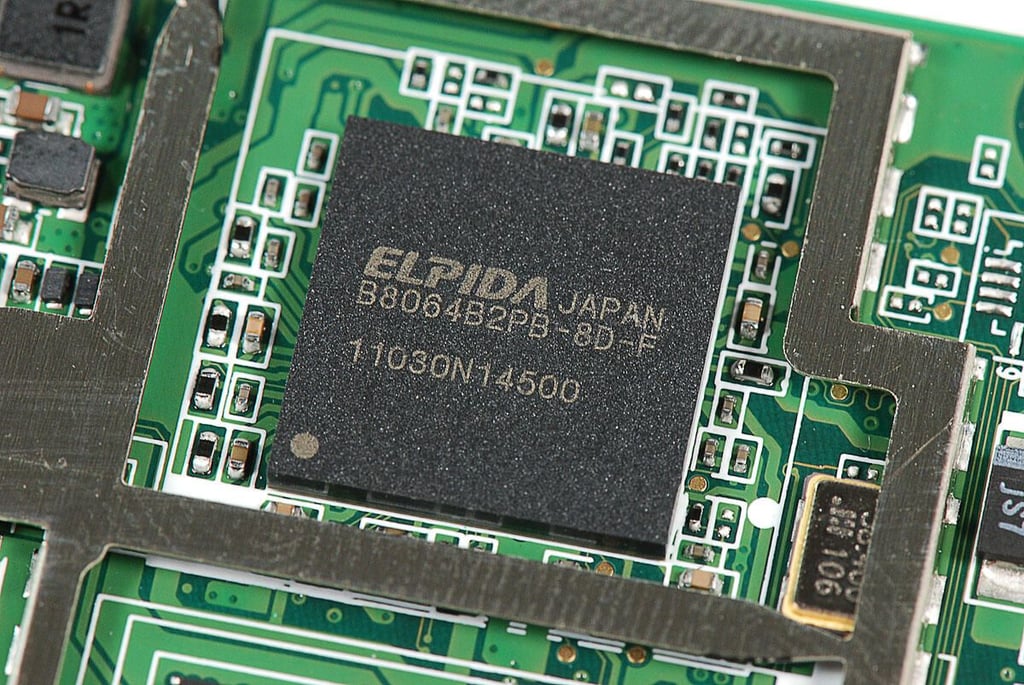
\n\tAccording to Chipworks, this chip contains both the “Elpida B8064B2PB-8D-F 8 Gb DRAM” and “Texas Instruments OMAP4430 Application Processor”.
\n
\n\tPhoto by: Bill Detwiler / TechRepublic
\n\tCaption by: Bill Detwiler
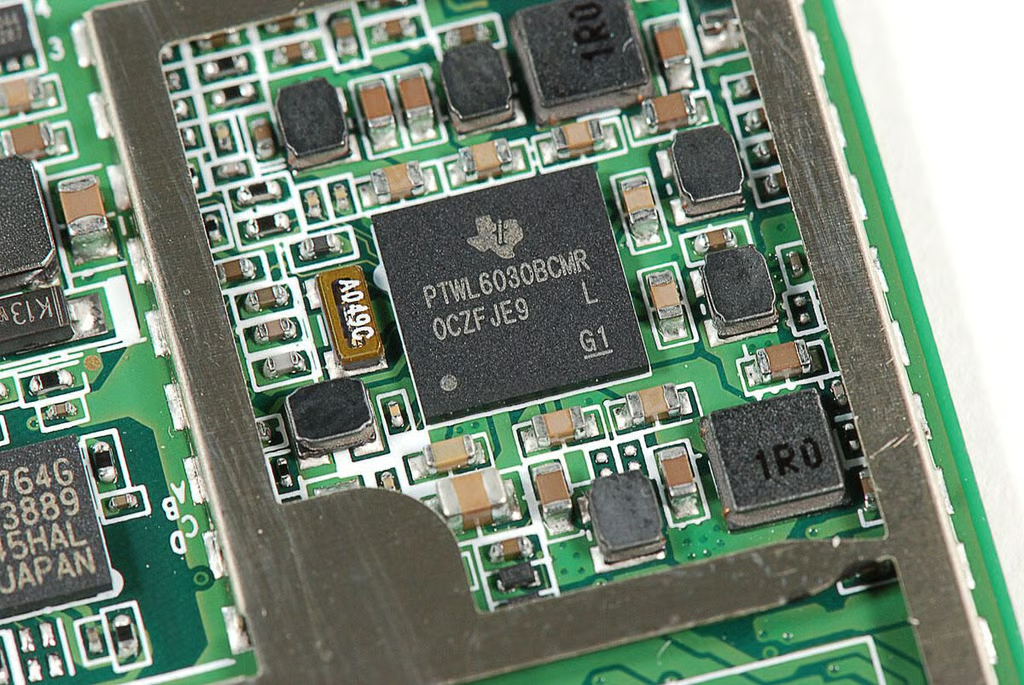
\n\tAccording to Chipworks, this is a Texas Instruments TWL6030 power management chip.
\n
\n\tPhoto by: Bill Detwiler / TechRepublic
\n\tCaption by: Bill Detwiler
\n\tAccording to Chipworks, this chip is an “STMicroelectronics STV0986 5 MP mobile imaging processor”.
\n
\n\tPhoto by: Bill Detwiler / TechRepublic
\n\tCaption by: Bill Detwiler
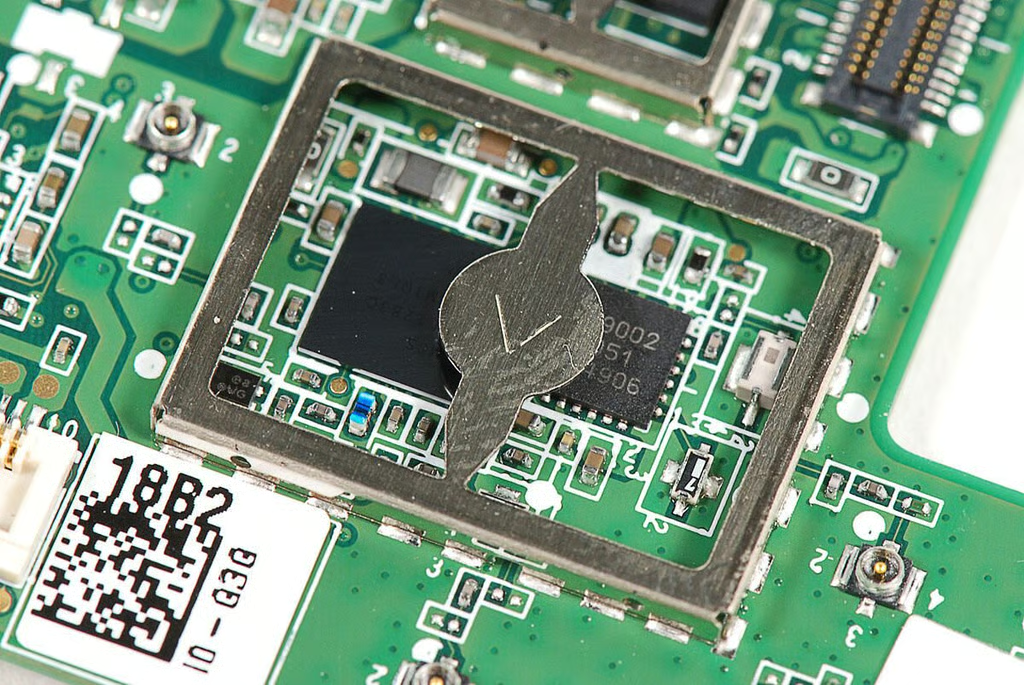
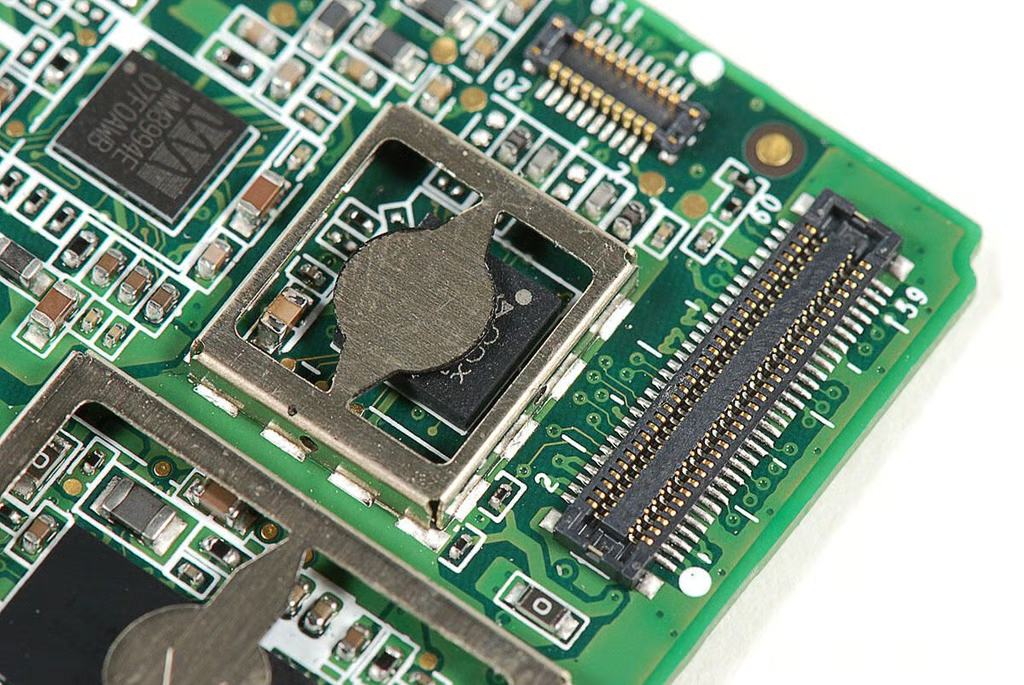
\n\tAccording to Chipworks, these two chips are the:
\n
\n\t”Texas Instruments WL1283 WLAN/Bluetooth/FM”
\n
\n\t”TriQuint Semiconductor TQP6M9002 802.11a/b/g/n + BT front-end module”
\n
\n\tPhoto by: Bill Detwiler / TechRepublic
\n\tCaption by: Bill Detwiler
\n\tOnce opened, the BlackBerry PlayBook wasn’t terribly difficult to disassemble. Unfortunately, swapping out the battery pack requires removing the motherboard and several other internal components.
\n
\n\tOverall, the PlayBook feels sturdy and appears to be well constructed. But, it wasn’t meant to be easily serviced.
\n
\n\tPhoto by: Bill Detwiler / TechRepublic
\n\tCaption by: Bill Detwiler
Bill Detwiler is the Editor for Technical Content and Ecosystem at Celonis. He is the former Editor in Chief of TechRepublic and previous host of TechRepublic's Dynamic Developer podcast and Cracking Open, CNET and TechRepublic's popular online show. Previously, Bill was an IT manager in the social research and energy industries. He has bachelor's and master's degrees from the University of Louisville, where he has also lectured on computer crime and crime prevention.


