After reading my recent blog post, Use Windows 7 Event Viewer to track down issues that cause slower boot times, a friend who just recently made the move to Microsoft Windows 7 from Windows XP asked me whether the System Configuration Utility was still a viable tool to use in Windows 7. After I assured him that it was still a useful troubleshooting tool and described the modifications in the new version, I thought that a lot of people moving from XP to Windows 7 might have the same question.
Therefore, in this edition of the Windows Desktop Report, I’ll take a closer look Windows 7’s System Configuration utility.
Launching System Configuration
Of course, just like in Windows XP, you can launch the Windows 7 System Configuration utility by pressing [Windows] +R to access the Run dialog box, typing msconfig.exe in the Open box, and then clicking OK. However, it is a bit quicker to just click the Start button, type msconfig.exe in the Start Search box, and press [Enter].
Once System Configuration launches, you’ll discover several differences when compared to the Windows XP version. To begin with, you’ll notice that the word Utility has been dropped from the name of the tool. You’ll also notice a more concise set of tabs. Let take a closer look.
(Keep in mind that the clicking the Help button will provide you with the details of each option in System Configuration.)
General
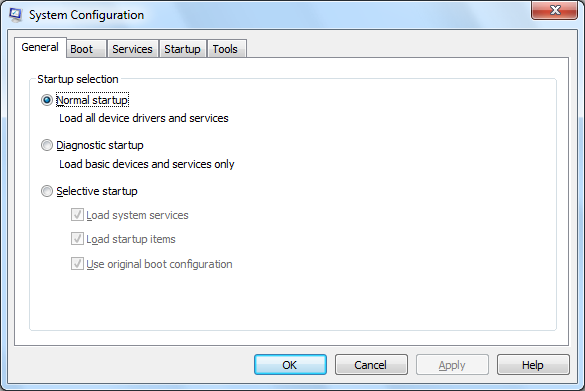
When you look at the contents of the General tab, you’ll notice that it contains the same three startup options as the Windows XP version. Of course, the default is Normal Startup, which loads all the normal device drivers and services. The Diagnostic Startup option loads only with basic services and drivers while the Selective Startup provides you with the option to selectively load system services and startup programs. (The Use Original Boot Configuration check box stays selected unless you change the default setting on the Boot tab.)
This gallery is also available as an entry in the TechRepublic Microsoft Windows Blog.
Screenshot by Greg Shultz.
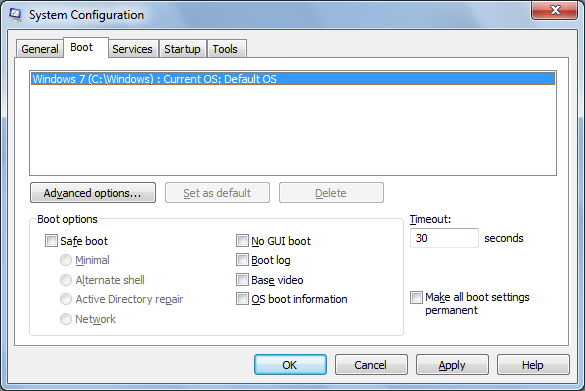
When you access the Boot tab, as shown in Figure B, you’ll find options that will allow you to easily boot into Safe Mode as well as configure other boot options that will come in handy when troubleshooting startup issues. For example, selecting the Boot Log check box will create a detailed log in the file C:\\Windows\\Ntbtlog.txt. Selecting the OS boot information check box will allow you to see all the driver names as they are being loaded during the startup process.
By selecting the Safe Boot check box, you can force the system to boot into Safe Mode and then select one of the option buttons to configure how you want Safe Mode to function. If you select the Alternate shell option, Windows 7 will boot right to a command prompt running only critical system services. Both the graphical user interface and network access will be disabled.
This gallery is also available as an entry in the TechRepublic Microsoft Windows Blog.
Screenshot by Greg Shultz.
In the lower right, you’ll find a check box titled Make All Boot Settings Permanent. Use this feature with caution!
When you select the Make All Boot Settings Permanent check box, System Configuration will not keep track of any changes that you make. In other words, you will not be able to undo any changes simply by selecting Normal Startup on the General tab. With this setting enabled, you must manually revert any, and all, changes that you’ve made.
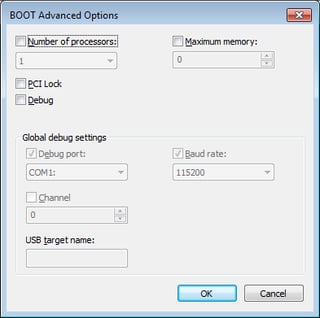
Clicking the Advanced Options button brings up the Boot Advanced Options dialog box. In most cases you probably won’t need to use these options, but they can come in handy. For example, if you suspect that a boot issue is being caused by having multiple processors, you and limit the number of processors used to boot the system by selecting the Number of Processors check box and specifying a number.
This gallery is also available as an entry in the TechRepublic Microsoft Windows Blog.
Screenshot by Greg Shultz.
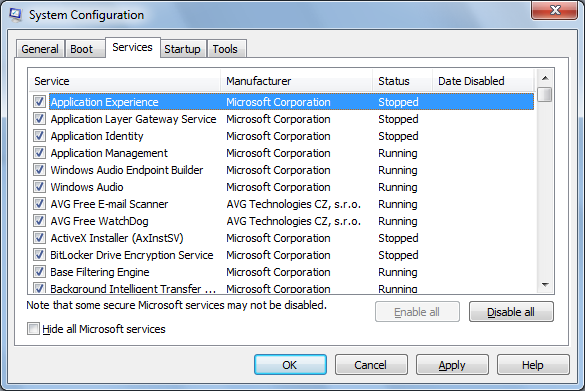
On the Services tab, you’ll find a list of all the services that start when the computer boots, along with their current status – either Running or Stopped. Just like in Windows XP, you can enable or disable individual services at boot time to troubleshoot services that might be contributing to startup problems. A new and very valuable feature on the Services tab is that System Configuration will now keep track of the date on which you disabled a particular service.
This gallery is also available as an entry in the TechRepublic Microsoft Windows Blog.
Screenshot by Greg Shultz.
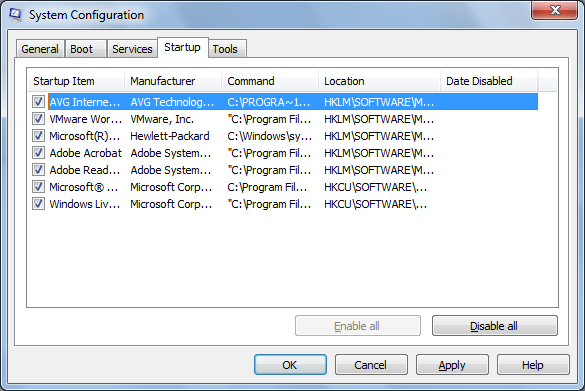
Selecting the Startup tab will show you a list of all the applications that run when the Windows 7 starts. Two new features on the Startup tab include the Manufacturer heading, which can be a big help in identifying an application and Date Disabled heading, which will help you keep track of the date on which you disabled a startup application.
This gallery is also available as an entry in the TechRepublic Microsoft Windows Blog.
Screenshot by Greg Shultz.
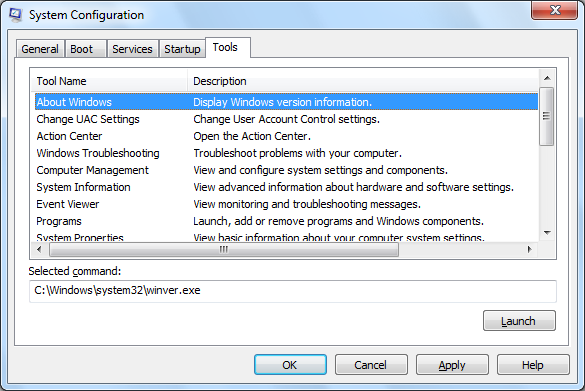
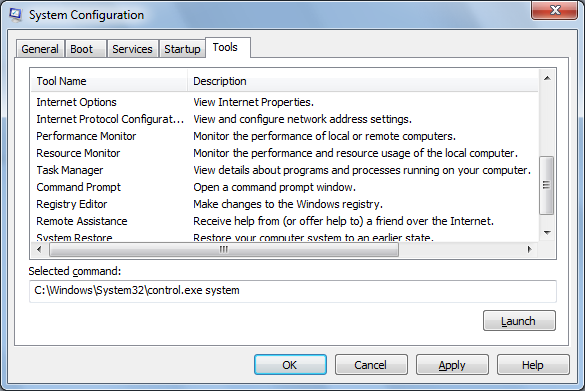
The Tools tab is a really useful resource to have at your fingertips when troubleshooting configuration errors. As you can see, the list of tools is comprehensive and includes detailed descriptions. And it’s easy to use: just select the tool you want and click the Launch button.
This gallery is also available as an entry in the TechRepublic Microsoft Windows Blog.
Screenshot by Greg Shultz.
Have you used the Windows 7 System Configuration utility for troubleshooting configuration errors? If so, what’s been your experience?
This gallery is also available as an entry in the TechRepublic Microsoft Windows Blog.
Screenshot by Greg Shultz.

My first computer was a Kaypro 16 \"luggable\" running MS-DOS 2.11 which I obtained while studying computer science in 1986. After two years, I discovered that I had a knack for writing documentation and shifted my focus over to technical writing.


