\n\tThis gallery is also available as a post in the Windows and Office Blog.
\n
\n\tIn last week’s post, Create a Recovery Drive in Windows 8, I showed you how to create a Recovery drive using both a USB flash drive and an optical disc. While knowing that you have a Recovery Drive provides you with a certain level of comfort, using it is another story. The only time you’ll ever get to see what the Recovery Drive looks like or see how it works, is when you need to use after a disaster has occurred. And, chances are that you’ll be pretty stressed at that point and won’t really want any more uncertainty in your life.
\n
\n\tWith that in mind, in this edition of the Windows Desktop Report, I’ll show you how to use the Windows 8 Recovery Drive. That way, if the time comes when you need to use it, you’ll know exactly what to expect.
\n
\n\tThis blog post is also available as a TechRepublic Photo Gallery.
\n
\n\tNote: In a series of follow-up articles, I’ll be showing you in detail how each one of the recovery tools on the Windows 8 Recovery Drive works.
\n
\n
\n
\n\tRegardless of whether you are using a Recovery Drive from a USB flash drive or from an optical disc, it is important to remember that a Recovery Drive is bit specific. In other words, if you create a Recovery Drive in a 64-bit version of Windows 8, you can’t use that drive to boot up and repair a 32-bit version of Windows 8. Likewise, you can’t use a 32-bit Recovery Drive to boot up and repair a 64-bit system.
\n
\n
\n\tWhen you boot from the Windows 8 Recovery Drive (USB flash drive or an optical disc), you’ll see the Windows logo displayed on a black screen for few moments. In the background, your PC is actually booting in the Windows Recovery Environment or more simply Windows RE. As you can imagine, Windows RE is based on Windows PE (Windows Preinstallation Environment).
\n
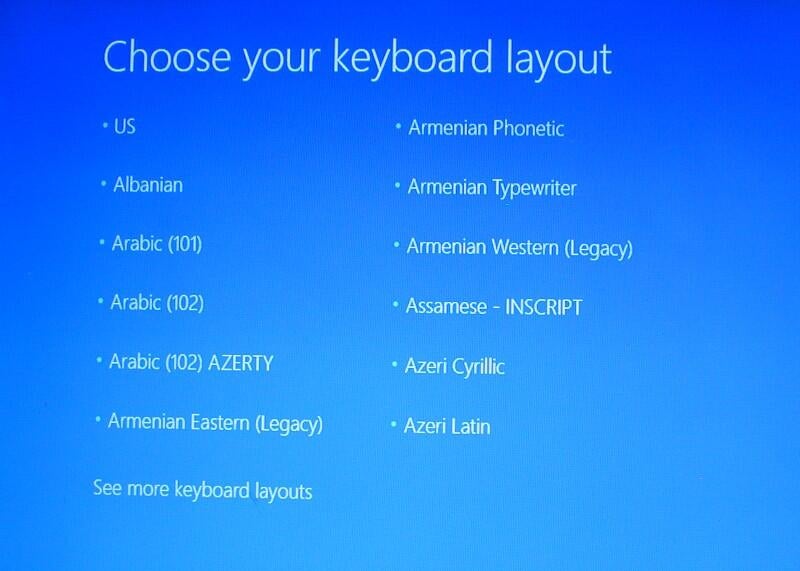
\n\tYou’ll then see the screen shown in Figure A, where you are prompted to choose a keyboard layout. For example, you might click US. If you do not see your keyboard layout on this first screen, click the See more keyboard layouts link until you find one that fits. There are 15 additional pages of keyboard layouts arranged in alphabetical order.
\n
\n\tCredit: Images by Greg Shultz for TechRepublic
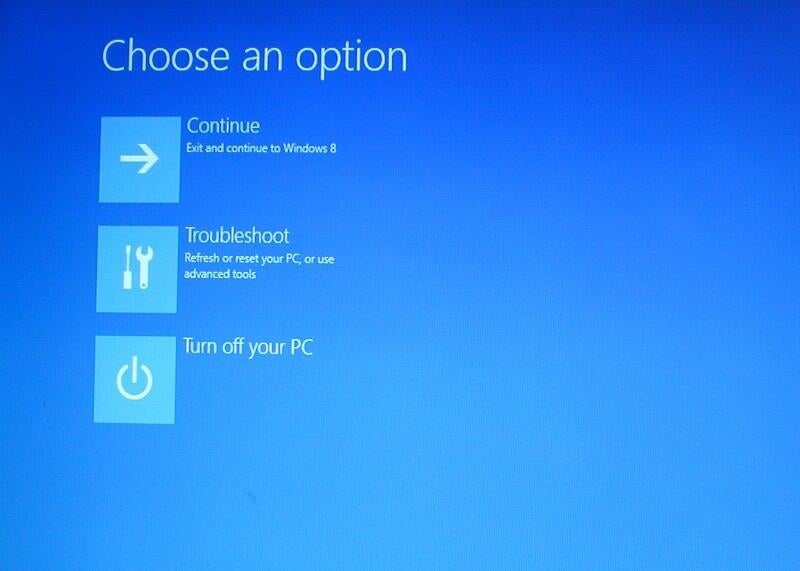
\n\tOn the main screen, shown in Figure B, you’ll see three tiles. If you inadvertently boot off your Recovery Drive, you can select the Continue tile to exit the Recovery Drive and boot up Windows 8 as you normally would. If you are done working with the Recovery drive for the time being, you can select the Turn off your PC tile. To access the tools on the Recovery Drive, you will select the Troubleshoot tile.
\n
\n\tCredit: Images by Greg Shultz for TechRepublic
\n
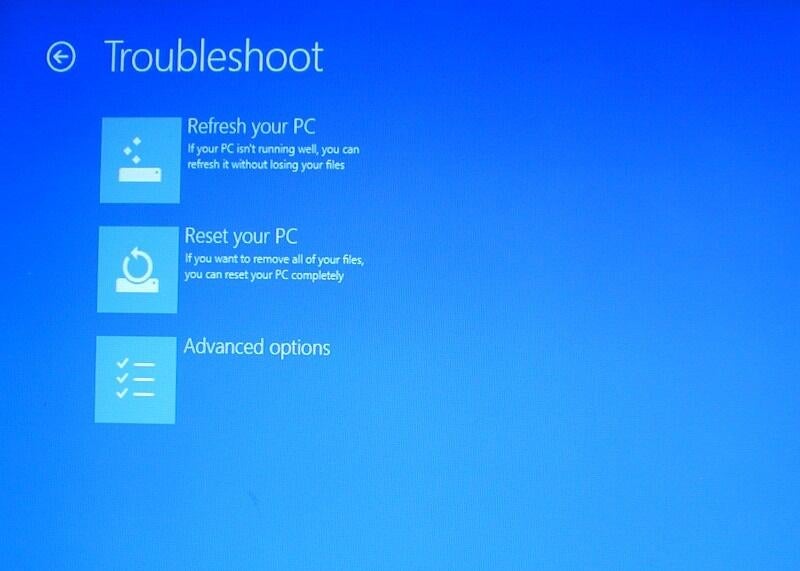
\n\tWhen you see the Troubleshoot screen, as shown in Figure C, you’ll see it has three tiles. The first two, Refresh your PC and Reset your PC, present two new Windows 8 options while the Advanced options tile will open a page of more familiar recovery tools, as well as one refurbished tool.
\n
\n\tCredit: Images by Greg Shultz for TechRepublic
\n
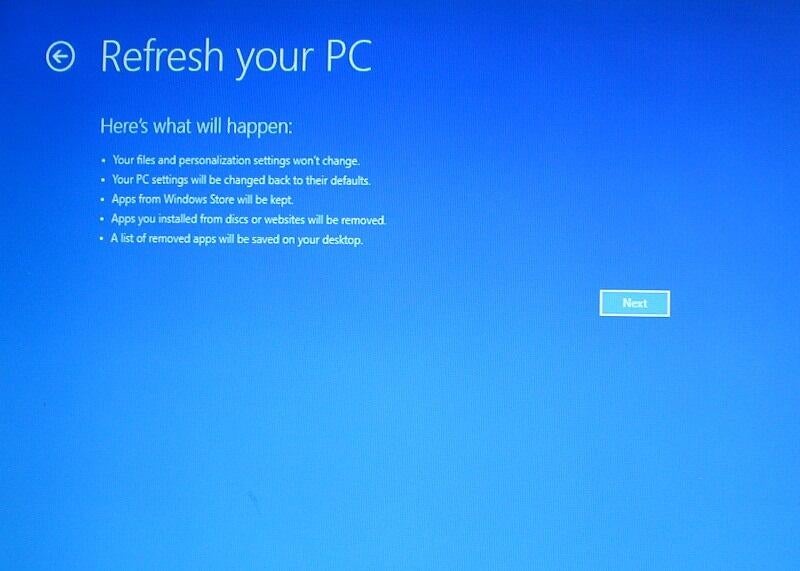
\n\tIf you are having minor, but annoying problems with your current Windows 8 installation and it feels a bit unstable, you can use the new Refresh your PC option to essentially perform with a fresh install of Windows 8. Selecting the Refresh your PC option, you’ll see the screen shown in Figure D.
\n
\n\tCredit: Images by Greg Shultz for TechRepublic
\n\tWhen you choose this option, Windows RE will find and backup all your data, settings, and apps. It will then install a fresh copy of Windows and restore all of your data, settings, and apps. When your PC restarts, you can login with your exact same username and password and find all of your data. However, as noted on the above screen, any desktop applications that you have installed will not be saved or restored. The reasoning is that it is possible that a recently installed desktop application could be the cause of the instability. For your convenience, Windows RE will create a list of those applications that were not saved or restored, so that you can decide whether you want to reinstall them.
\n
\n
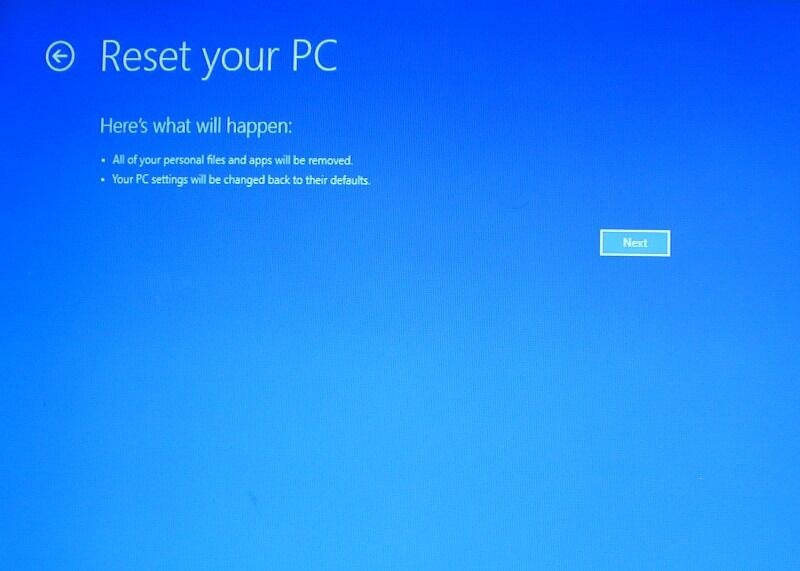
\n\tIf you have backed up all of your data and want to either start from scratch or are getting ready to decommission your PC, you can use the new Reset your PC option. When you select it, you’ll see the screen shown in Figure E. If you click Next, Windows RE will erase and reformat the hard drive and then reinstall a fresh copy of Windows 8. In this case, your system will return to the same condition it was in when you started Windows 8 for the first time.
\n
\n\t
\n
\n\tNote:In a series of future articles, I’ll show you in detail how the Refresh and Reset options work.
\n
\n\tCredit: Images by Greg Shultz for TechRepublic
\n
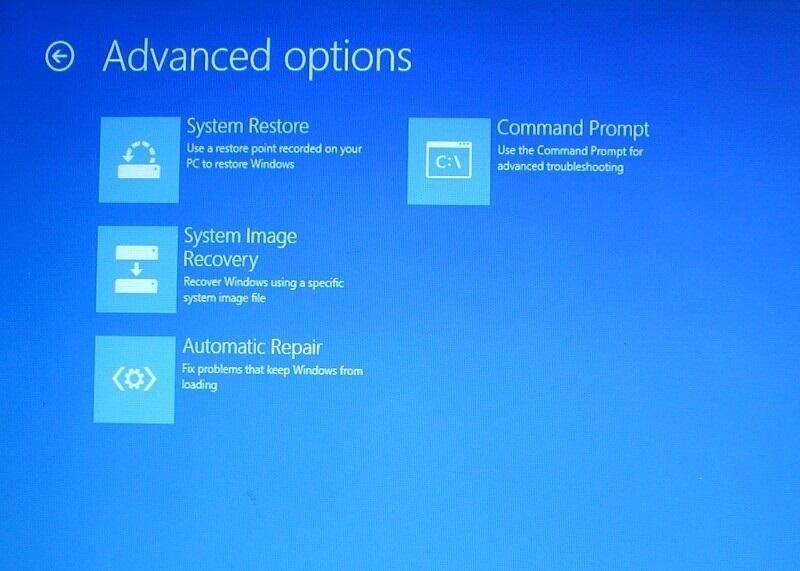
\n\tWhen you select Advanced options, you’ll see the screen shown in Figure F, which provides you with four other tools that you can use to recover your damaged Windows system.
\n
\n\tCredit: Images by Greg Shultz for TechRepublic
\n
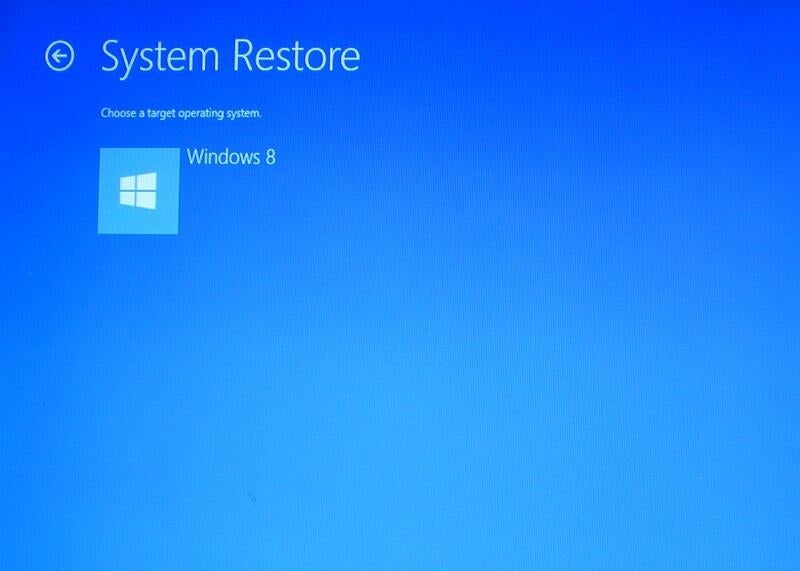
\n\tIf you are encountering weird problems with your Windows 8 system, you can use System Restore to restore your system to the state that it was in at an earlier point in time. When you select System Restore and you’ll see the screen shown in Figure G. As you can imagine, this option essentially works just like the System Restore tool in previous versions of Windows – it restores all system files and settings to the state they were in when the last restore point was created. And, all your data will remain intact.
\n
\n\tCredit: Images by Greg Shultz for TechRepublic
\n
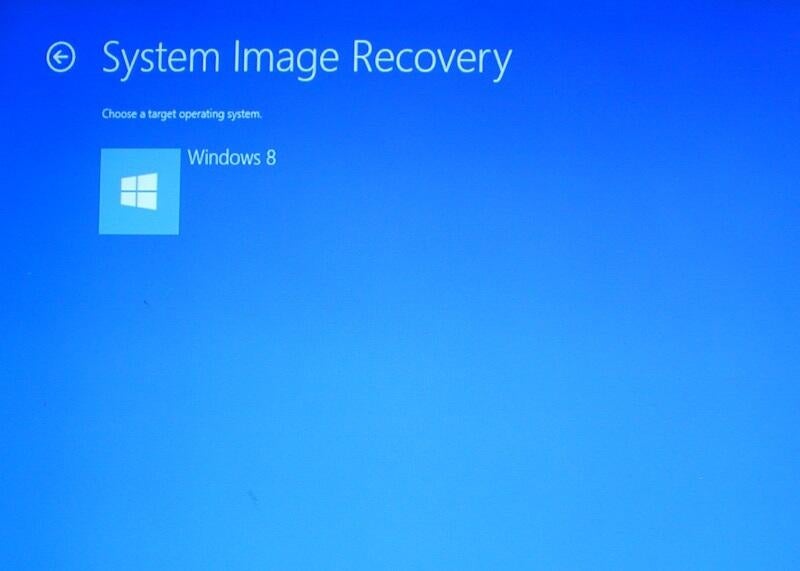
\n\tIf your Windows 8 installation is totally corrupt and unbootable and you have a created a system image on a set of optical discs or on an external drive, you can use the System Image Recovery option to recover your system. When you select the System Image Recovery option, you’ll see the screen shown in Figure H.
\n
\n\tAs you know, a system image includes the operating system and all your system settings, your programs, and all your files. However, keep in mind that when you restore your computer from a system image, it will actually perform a complete restoration of your entire system, which means that all your current programs, system settings, and files will be replaced with the versions that were current when you made the system image.
\n
\n\tCredit: Images by Greg Shultz for TechRepublic
\n
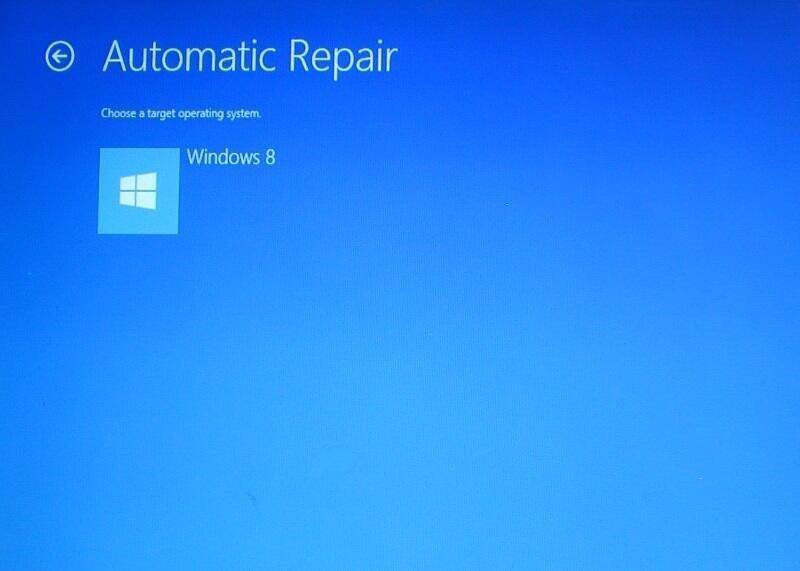
\n\tYour first line of defense when it comes to recovering a Windows 8 system that will not start is the Automatic Repair option, which is a refurbished version of Windows 7’s Startup Repair Tool. When you select the Automatic Repair option, you’ll see the screen shown in Figure I.
\n
\n\t
\n
\n\tUnder most startup failure circumstances, Automatic Repair will start automatically and go right to work; however, it can be run from the Recovery Drive. When you launch it, Automatic Repair will begin scanning your system and analyze the various settings, configuration options, and system files looking for corrupt files or botched configuration settings. If it detects anything of that nature, it will automatically attempt to fix them so that your system can boot normally.
\n
\n\tNote: In a future article, I’ll show you in detail how the Automatic Repair option works.
\n
\n\tCredit: Images by Greg Shultz for TechRepublic
\n
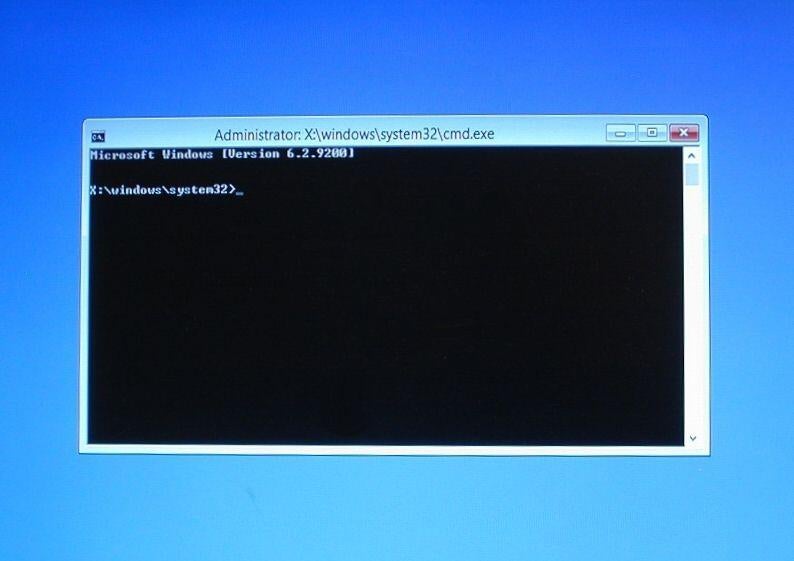
\n\tIf Automatic Repair is unable to fix your system and you are not ready to concede to a System Restore, System Image Recovery, or a Refresh, you can delve into the bowels of the operating system, by choosing the Command Prompt option. When you select this option, you’ll see a Command Prompt window like the one shown in Figure J.
\n
\n\tFrom the good old Command Prompt, a host of command line tools are at your disposal, as long as you know how to use them correctly and aren’t afraid to get your hands dirty. For example, you can use the Reg command to work with the Registry, Bcdboot to repair a boot environment, or Manage-bde to investigate Bitlocker. You can even launch Some Windows programs such as Notepad or the Registry Editor.
\n
\n\tTo see a list of the programs available from the Command Prompt, type the command
\n
\n\tDir *.exe /b
\n
\n\tIf you want to find out more about a particular command, use the help parameter /?. For example,
\n
\n\tBcdboot /?
\n
\n
\n\tNow that you know what the Recovery Drive contains, you will be prepared if the time comes when you are forced to use it to recover your computer. If you have used the Recovery Drive already, what was your experience? As always, if you have comments or information to share about this topic, please take a moment to drop by the TechRepublic Community Forums and let us hear from you.
\n
\n
\n\t
\n\t
\n
\n
\n\t
\n
\n\tCredit: Images by Greg Shultz for TechRepublic

My first computer was a Kaypro 16 \"luggable\" running MS-DOS 2.11 which I obtained while studying computer science in 1986. After two years, I discovered that I had a knack for writing documentation and shifted my focus over to technical writing.

