\n\tThis gallery is also available as a post in the Windows and Office Blog.
\n
\n\tEditor’s note:Greg covered this topic while Windows 8 was in beta. There have been some feature changes implemented for the current retail version.
\n
\n\t
\n
\n\tDo you have an external hard disk connected to your Windows 8 computer? If you do, you’ll want to enable Windows 8’s File History tool to protect your data. File History is essentially an update to the Previous Versions feature that was included in Windows 7, which was based on a Windows Server 2003 feature called Volume Shadow Copy. Like Previous Versions, File History continuously monitors files stored in Libraries, Desktop, Contacts, and Favorites folders and when it detects changes in any file, it then makes a backup of that file. Unlike, Previous Versions, File History isn’t enabled by default. Fortunately, doing so is a pretty straightforward operation and once enabled, File History’s improved user interface makes it much easier to configure and use than its predecessor.
\n
\n\tIn this edition of the Windows Desktop Report, I’ll show you how enable File History and then show you how it works.
\n
\n\tEditor’s note: Greg covered this topic while Windows 8 was in beta. There have been some feature changes implemented for the current retail version.
\n
\n
\n
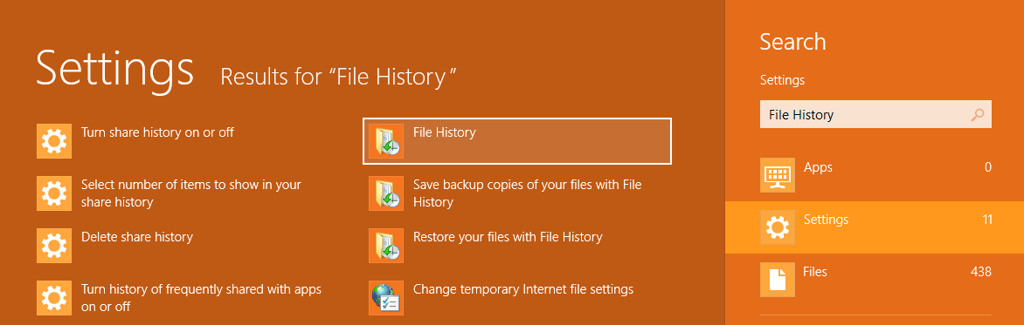
\n\tLaunching File History in Windows 8 is easy. Just press the [Windows] + W to access the Search Settings page, type File History in the text box, and click File History, as illustrated in Figure A.
\n
\n\tCredit: Images by Greg Shultz for TechRepublic
\n\t
\n
\n
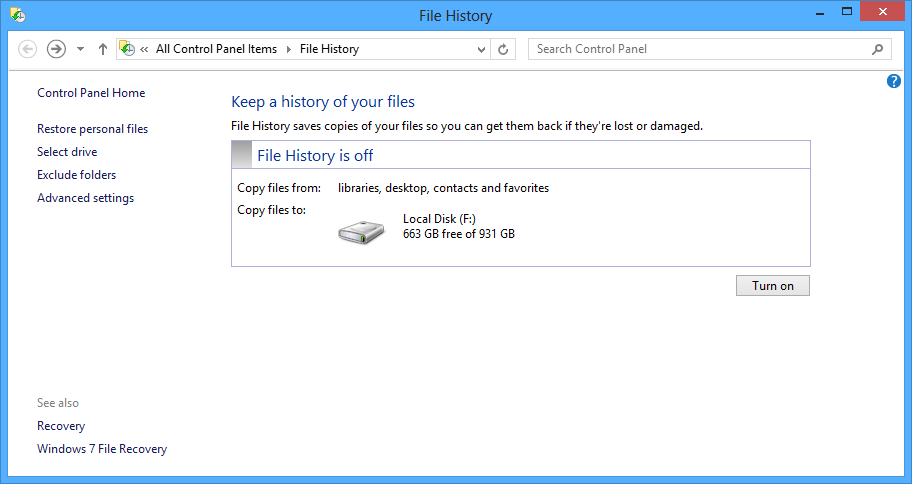
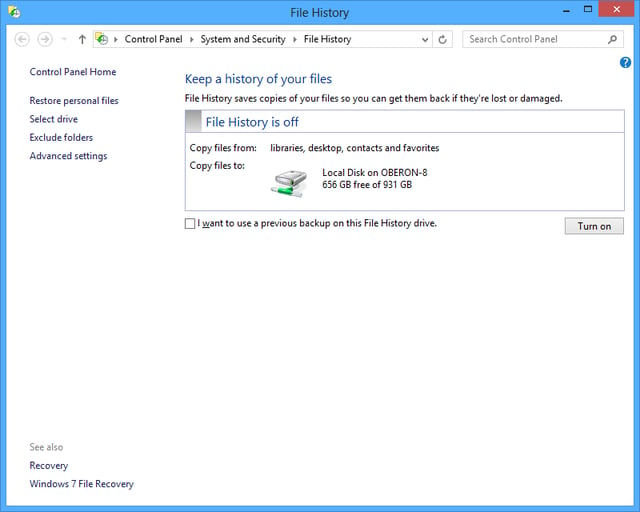
\n\tOnce the screen appears, as shown in Figure B, you’ll see that by default File History is turned off, but that the external hard disk is recognized as the storage location. (If your external hard disk doesn’t show up, you’ll need to make sure that it is connected.)
\n
\n\tCredit: Images by Greg Shultz for TechRepublic
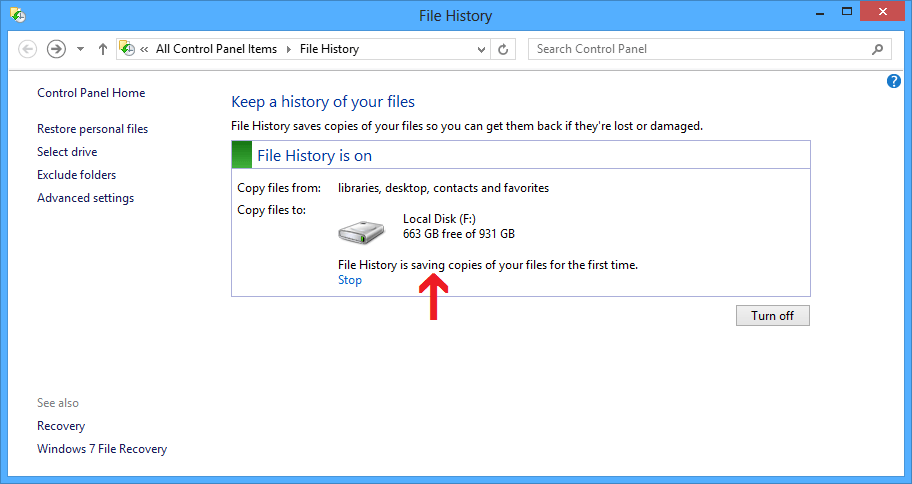
\n\tTo begin using File History, click the Turn on button. As soon as you do, File History begins making copies of all the files in your Libraries (Documents, Music, Pictures, and Videos), as well as files in Contacts, Favorites, and on your Desktop, as shown in Figure C. It will not allow you to select folders in other locations – if you have other files that you want File History to keep track of, you can add them to one of your existing libraries or you can create a new library.
\n
\n\tCredit: Images by Greg Shultz for TechRepublic
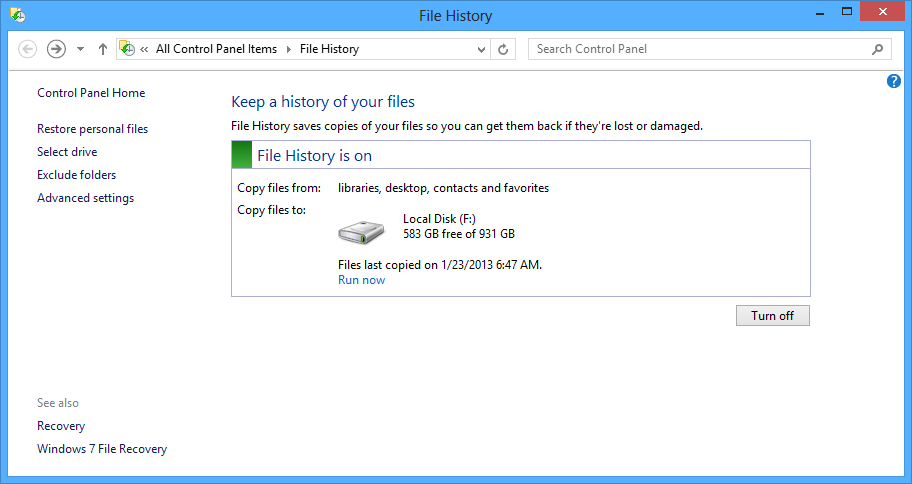
\n\tAs soon as File History is done backing up your files, it displays a date and time stamp, as shown in Figure D, so you’ll know how current the backup is. You’ll also see how much disk space is still available. If at any time you want to manually create a backup, you can click the Run now link.
\n
\n\tCredit: Images by Greg Shultz for TechRepublic
\n\t
\n
\n
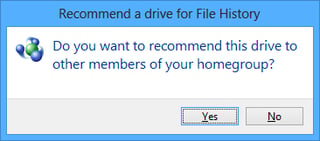
\n\tNow, if your Windows 8 system is connected to a Homegroup, you’ll be prompted to recommend this backup drive to members of the Homegroup, as shown in Figure E, so they too can use it to run File History.
\n
\n\tCredit: Images by Greg Shultz for TechRepublic
\n\tOnce you recommend the backup drive to members of the Homegroup, the drive will automatically appear as the storage location when File History is run on a member system, as shown in Figure F. As you can see in this example, when I ran File History on JOVIAN-8, the backup location is automatically listed as a Local drive on OBERON-8.
\n
\n\tCredit: Images by Greg Shultz for TechRepublic
\n\t
\n
\n\tKeep in mind that when you recommend this drive to members of the Homegroup, it is specifically made available via File History. In other words, you will not see the drive as a shared device in the Homegroup or in Network. While you won’t see the drive in Network, you will find a new share called FileHistory#. Even though you can see and access the share, you shouldn’t try to use it as a traditional share i.e. you should not copy, move, or delete files. If you do, chances are good that you will corrupt the File History management system.
\n
\n
\n\tOnce you have File History up and running it is ready to begin protecting your data. By default, every hour File History will go to work and create backup copies of any file that has changed since the last backup. To do so, File History takes advantage of a feature of the NTFS file system, called the Change Journal.
\n
\n\tEssentially, when any change is made to a file or folder on your hard disk, the change journal is updated with a description of the change and the name of the file or folder. So, in order to determine which files need to be backed up, File History simply consults the NTFS change journal, discovers which files or folders have changed, and backs them up. Using the change journal is fast and efficient and won’t suck up tons of system resources like running a conventional backup routine does.
\n
\n\tFile History has some other cool features up its sleeve as well. If the device configured as the backup location becomes unavailable, such as when a USB cable is disconnected or network goes down for maintenance, File History will continue to do its job by saving the copies to a cache on the local drive. Once the backup location becomes available again, the cached contents are transferred to the backup location and removed from the local drive.
\n
\n\tIn addition, File History is sensitive to resource utilization. In other words, if File History is running and some other task needs the same system resources, File History will automatically back off and go into an idle state as it waits for the other task to finish before it resumes.
\n
\n\tFile History is also aware of activity related to mobile computing such as running on AC or battery power or when the system goes into Sleep mode and will adjust accordingly so as not to interfere with power saving features.
\n
\n
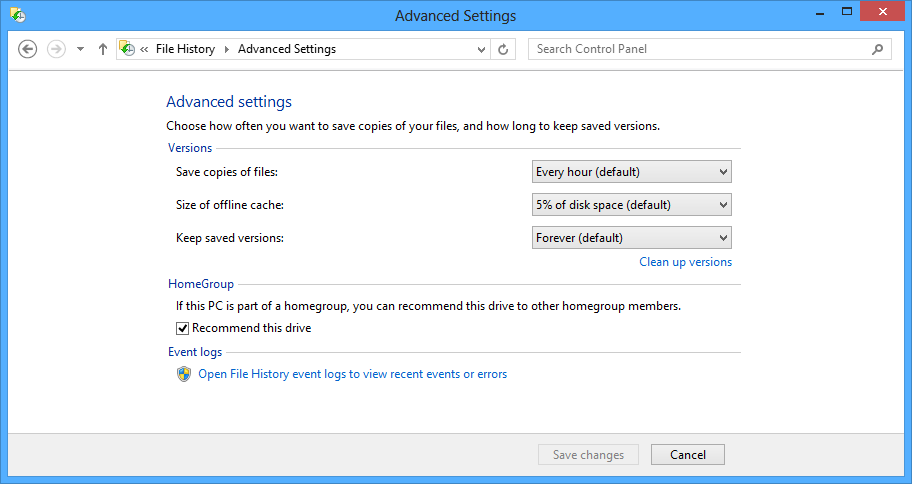
\n\tAs I mentioned, File History will scan through the change journal every hour and back up changed files. However, you can change that frequency as well as adjust other settings. To do so, select the Advanced setting in the Task pane on the left side of the main window. You’ll then see the Advanced Settings window, shown in Figure G, and can change the various settings.
\n
\n\tIn the Versions section, you’ll see the default settings but can change them to any of the available selections. For instance, you can set the Save copies of files setting, which is the frequency that File History will check for changes and make backups from 10 minutes to 24 hours. You can change the size of the offline cache from 5% to 20% of disk space, and you can change the length of time that File History will keep saved versions of changed files from one month to forever or until space is needed.
\n
\n\tCredit: Images by Greg Shultz for TechRepublic
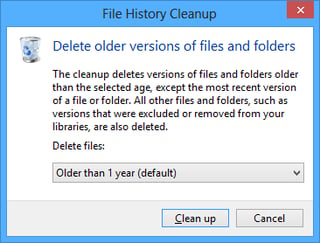
\n\tAfter you have been using File History for an extended period of time, you may want to manually clean up File History’s store. Select Clean up versions and use the File History Cleanup tool, shown in Figure H. Using the Delete files drop down allows you to select anywhere from older than one month to older than two years. Files and folders older than the selected age will be removed from the store leaving just the most recent versions.
\n
\n\tCredit: Images by Greg Shultz for TechRepublic
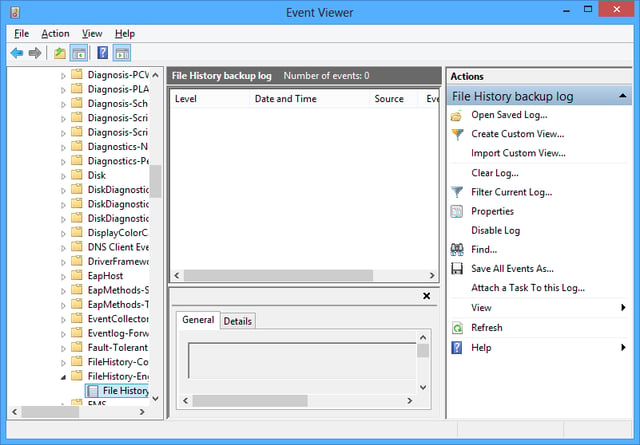
\n\tIn the Homegroup section, you can enable or disable the sharing of the external drive for File History. If File History encounters any problems, it will create records in the File History event logs, which as you can see are easily accessible from the Advanced Settings window. Just click the link in the Event logs section and you will see Event Viewer, as shown in Figure I.
\n
\n\tCredit: Images by Greg Shultz for TechRepublic
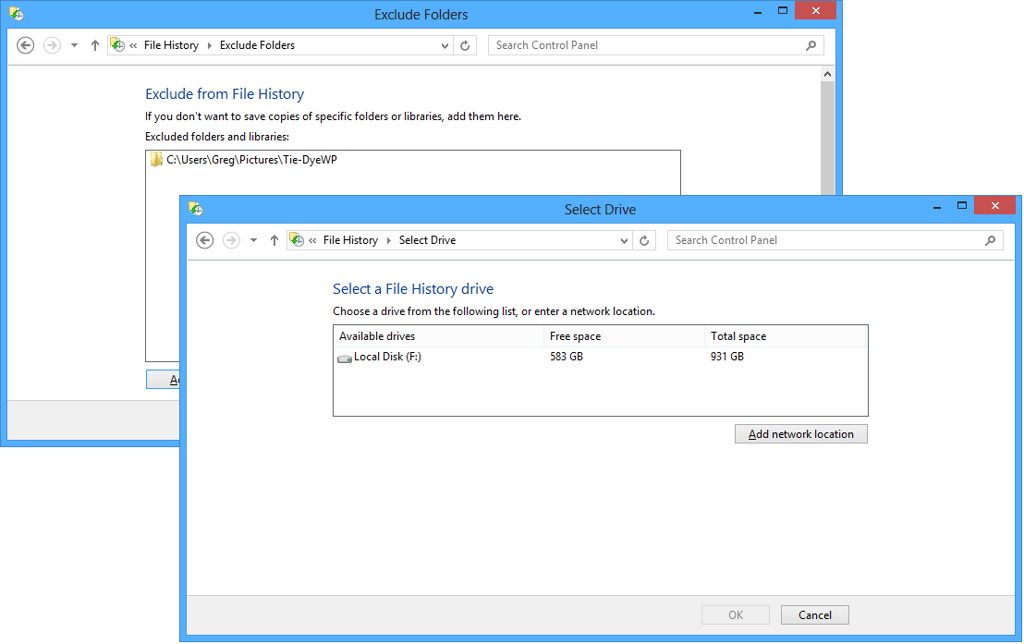
\n\tIf you return to the main window and select Exclude folders, you can choose certain folders that you don’t want File History to monitor. If you want to select a different backup device, you can choose Select drive and choose another external drive or a network location. Both these options are shown in Figure J.
\n
\n\tCredit: Images by Greg Shultz for TechRepublic
\n\t
\n
\n
\n\tOf course the ultimate goal of File History is to be able to restore files that have been corrupted or inadvertently deleted. There are two ways that you can go about restoring files and you can either perform a full restore or simply restore individual files. The first way to initiate a restore operation is from the main File History window by selecting Restore personal files setting in the Task pane on the left. The other way is from Windows Explorer. Restoring from the main File History window will make a full restore easy while restoring from Windows Explorer will make restoring individual files easy.
\n
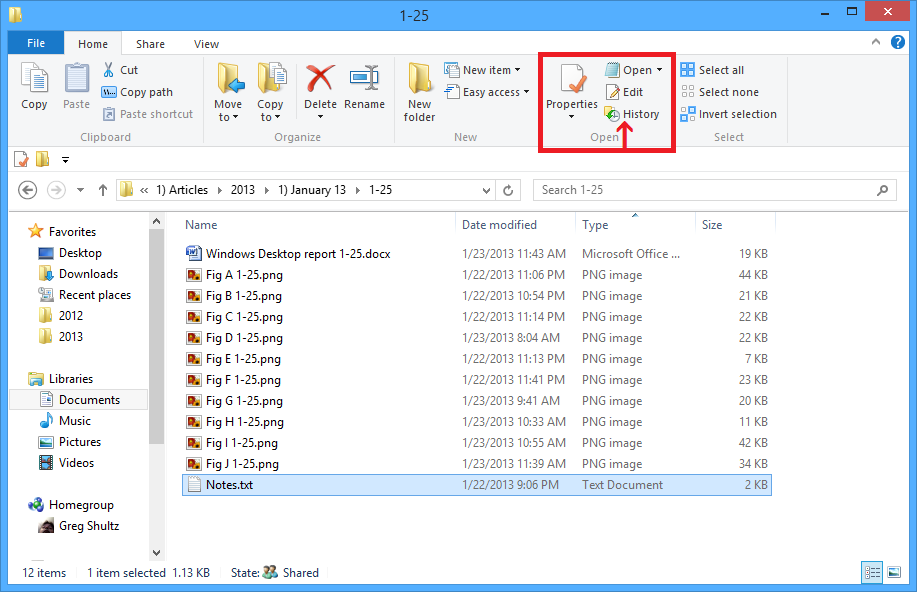
\n\tFrom Windows Explorer, you will go to the Home tab in the Open section and you’ll see a History button, as shown in Figure K.
\n
\n\tCredit: Images by Greg Shultz for TechRepublic
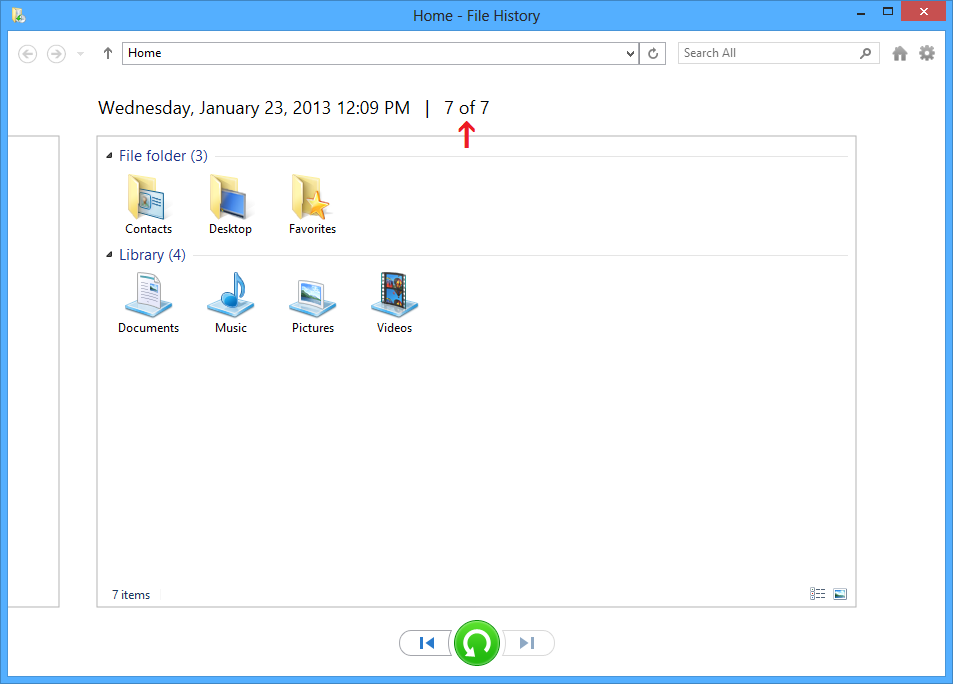
\n\tFor the sake of showing a detailed example, let’s suppose that you launch the restore operation from the File History window with the goal of restoring a single file. When you do, you’ll see a window like the one shown in Figure L. Here you’ll see all of the folders in the backup and can drill down to any folder containing the file or files that you want to restore.
\n
\n\tCredit: Images by Greg Shultz for TechRepublic
\n\t
\n
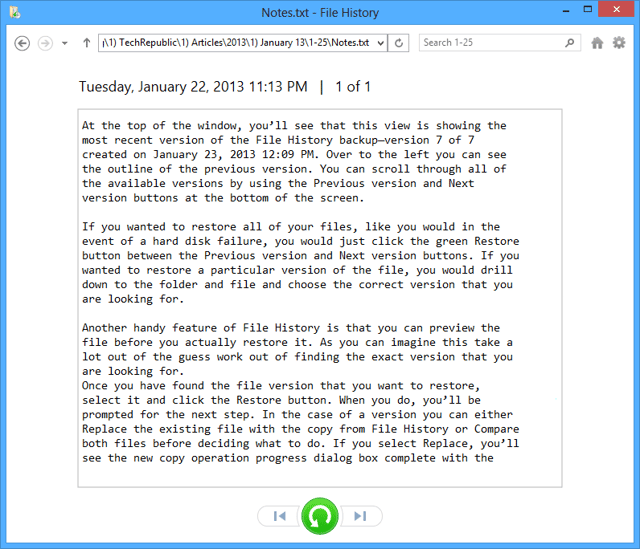
\n\tAt the top of the window, you’ll see that this view is showing the most recent version of the File History backup – version 7 of 7 created on January 23, 2013 12:09 PM. Over to the left you can see the outline of the previous version. You can scroll through all of the available versions by using the Previous version and Next version buttons at the bottom of the screen.
\n
\n\tIf you wanted to restore all of your files, like you would in the event of a hard disk failure, you would just click the green Restore button between the Previous version and Next version buttons. If you wanted to restore a particular version of the file, you would drill down to the folder and file and choose the correct version that you are looking for.
\n
\n\tAnother handy feature of File History is that you can preview the file before you actually restore it. As you can imagine this take a lot out of the guess work out of finding the exact version that you are looking for.
\n
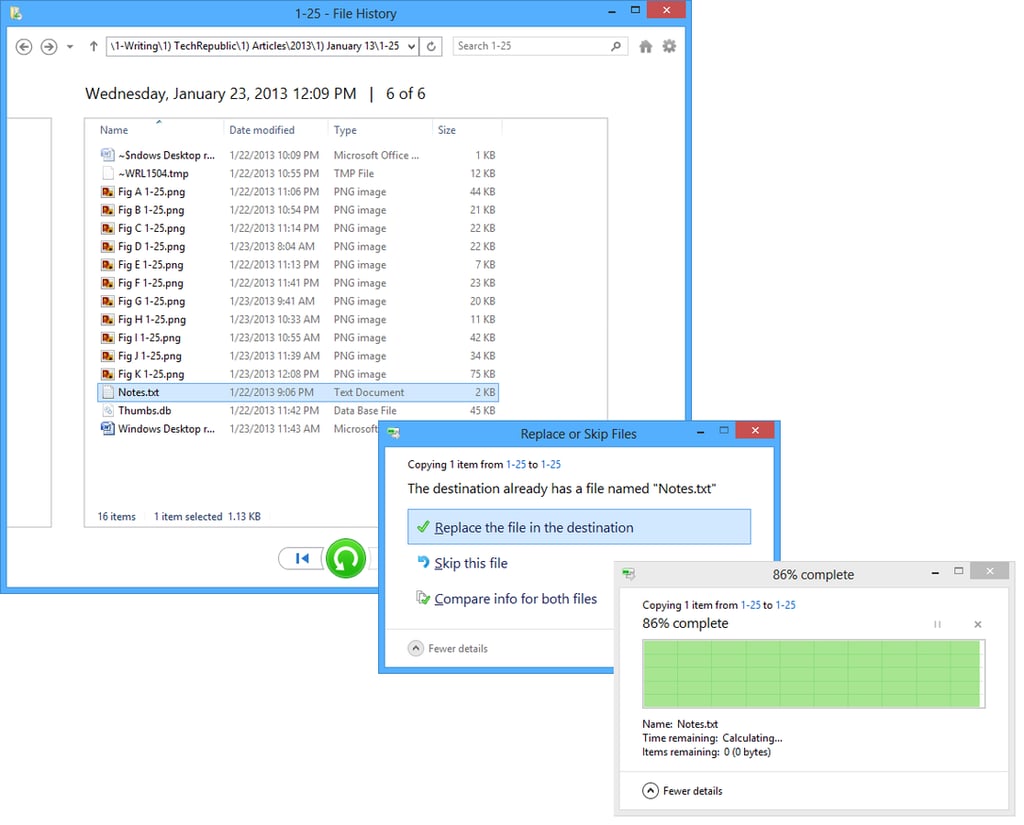
\n\tOnce you have found the file version that you want to restore, select it and click the Restore button. When you do, you’ll be prompted for the next step. In the case of a version you can either Replace the existing file with the copy from File History or Compare both files before deciding what to do. If you select Replace, you’ll see the new copy operation progress dialog box complete with the graph. This process is illustrated in Figure M. When the operation is complete, the folder containing the new file will open.
\n
\n\tCredit: Images by Greg Shultz for TechRepublic
\n\t
\n
\n\tIf the file that you want to restore has been inadvertently deleted from your hard disk, the restore will happen immediately since the destination no longer contains a duplicate file name.
\n
\n\tNow, if you wanted to preview a file before deciding if it is the one that you want to restore, just double click the file. If File History can provide a preview, it will be displayed right in the window, as shown in Figure N. If File History is unable to provide the preview, if will prompt you to launch the application associated with the file.
\n
\n\tCredit: Images by Greg Shultz for TechRepublic
\n\t
\n
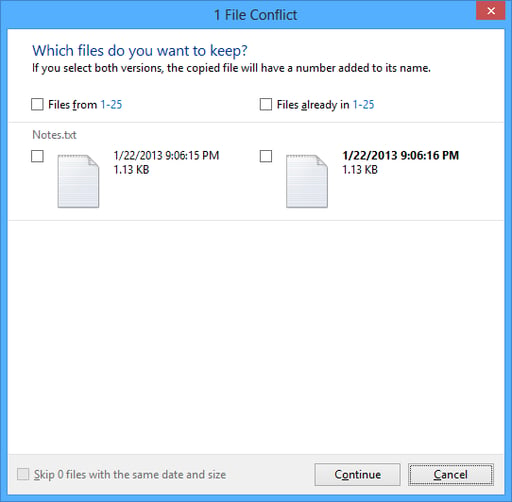
\n\tIf from the Replace or Skip Files dialog box you selected Compare, you would see a window like the one shown in Figure O, which is titled File Conflict, and shows you the file’s date and time stamp as well as the file’s size. You would select the check box adjacent to the one that you want to keep and click Continue.
\n
\n
\n\tFile History’s user interface makes it easy to take advantage of this data protection tool. Will you use File History? Are you using File History? If so, what has been your experience? As always, if you have comments or information to share about this topic, please take a moment to drop by the TechRepublic Community Forums and let us hear from you.
\n
\n
\n\t
\n\t
\n
\n
\n\t
\n
\n\tCredit: Images by Greg Shultz for TechRepublic

My first computer was a Kaypro 16 \"luggable\" running MS-DOS 2.11 which I obtained while studying computer science in 1986. After two years, I discovered that I had a knack for writing documentation and shifted my focus over to technical writing.


