\n\tIn this edition of the Windows Desktop Report, I’ll use my new system to show you how to prepare and configure your Windows 7 system to dual-boot Windows 8. While I’ll be using the Windows 8 Release Preview for this article, I’ve heard that the procedure should be very similar with the actual release version. Even so, I’ll revisit this topic in the near future once Windows 8 is available to the general public.
\n
\n
\n\tThis slideshow is also available in the blog format in the Windows and Office Blog.
\n
\n
\n\tFor this article, I’m going to assume that you have already visited the Windows 8 Release Preview site and followed Microsoft’s instructions for downloading and converting the ISO file to a DVD in Windows 7. If you haven’t, you should do so before you get started with this article. The process is pretty straightforward and Microsoft has documented the steps you need to follow.
\n
\n
\n\tThe first thing that you’ll want to do is create a System Image from within Windows 7’s Backup and Restore. When you do, you’ll end up with a complete image of your hard disk. That way, if anything out of the ordinary were to occur as you follow the steps for creating a dual-boot system, you will be able to return to your current configuration. Furthermore, I recommend that you also create a separate backup of your data. Maybe just make copies of all your data files on CD/DVD or on an external hard disk. While it may sound like overkill, having an extra backup will give you peace of mind.
\n
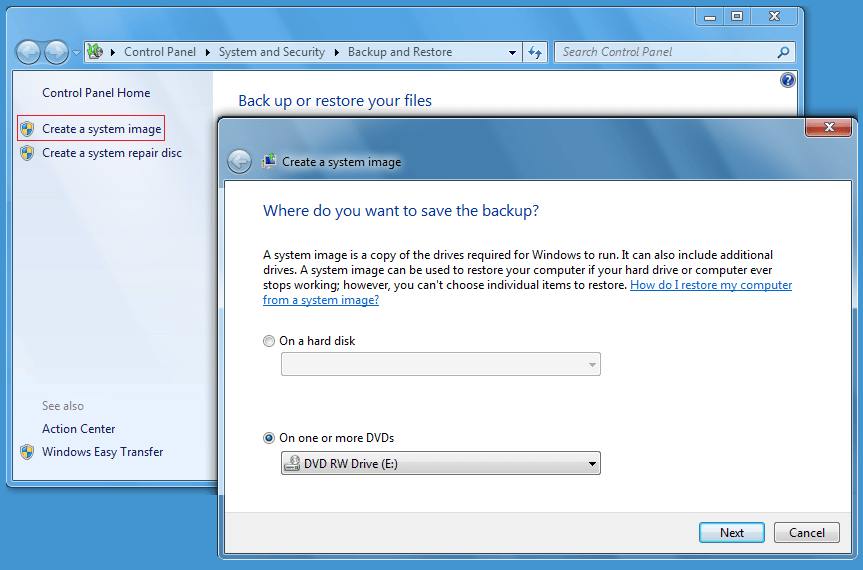
\n\tTo create a system image, you’ll need to have a CD-RW/DVD-RW drive, an external hard disk, or access to a network drive. To access Backup and Restore, click the Start button, type Backup in the Search box, and press [Enter] when Backup and Restore appears in the result pane.
\n
\n\tOnce you have Backup and Restore up, select the Create a System Image option and choose your backup location. As you can see, I used a DVD-RW drive on my system.
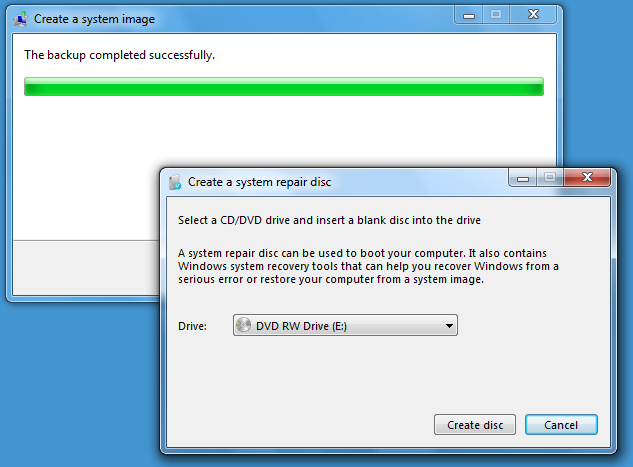
\n\tWhen the System Image is complete, you’ll be prompted to create a System Repair disc. This is the disc that you will use to boot your system and restore your system image in the event that you need it.
\n
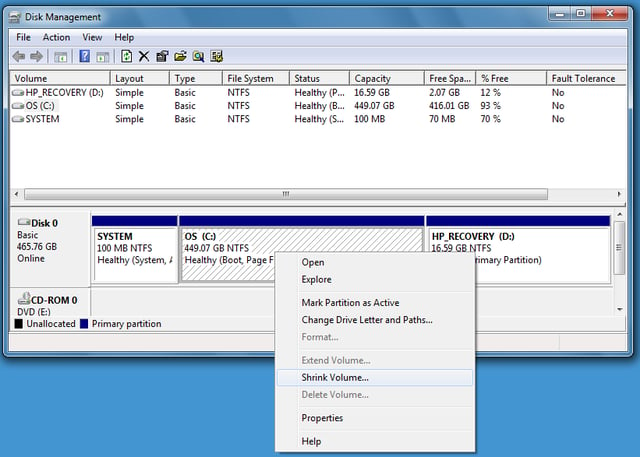
\n\tWith your System Image discs safely tucked away, you’ll use the Disk Management tool to make room on your hard disk for Windows 8. To launch Disk Management, click the Start button, type Disk Management in the Search box, and press [Enter] when Create and format hard disk partitions appears in the result pane. When Disk Management launches, locate the operating system partition of the drive, right click, and select the Shrink Volume command. As you can see, on my example system, there is a 100MB system partition and a 17GB HP Recovery partition in addition to the 450GB OS, or operating system, partition.
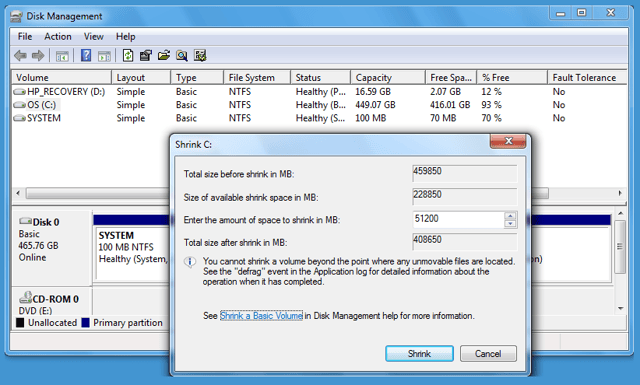
\n\tFor my Windows 8 partition, I set aside 50GB by entering 51200 as the amount of space to shrink the existing volume. Once you’ve specified the size, click the Shrink button. It will take a several minutes to shrink the partition. When the operation is complete, you’ll see the new space at the end of the partition and notice that it is marked as Unallocated. In order to install Windows 8 without any problems, you should covert this unallocated space into a volume with a drive letter. To do so you’ll launch the New Simple Volume Wizard.

\n\tTo continue, right click the new partition and select the New Simple Volume command. When you do, the New Simple Volume Wizard will launch.
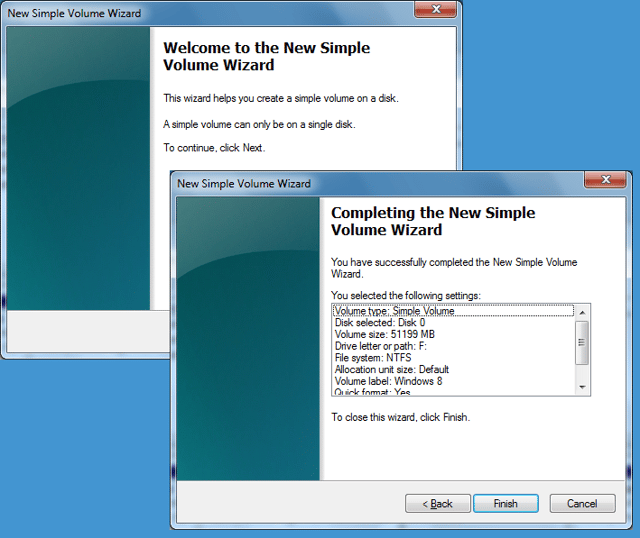
\n\tThe New Simple Volume Wizard consists of five screens – the first and the fifth are shown. As you progress through the wizard, you’ll be prompted to specify the size, assign a drive letter, choose a file system, enter a name for the volume, and choose how to format the drive. For everything but the volume name, you should just go with the defaults. As you can see, I specifically named the volume Windows 8 to prevent any ambiguity in later steps. Since the partition was created from your existing partition, you can just go with the Quick format option.
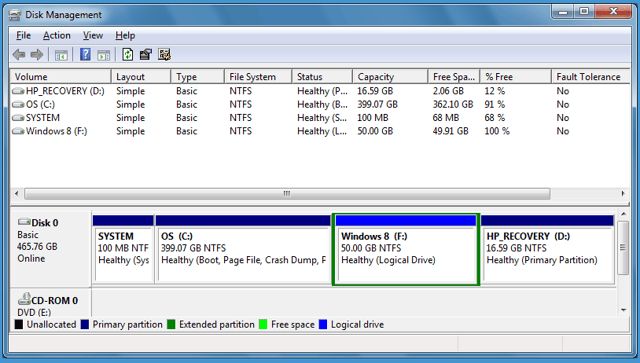
\n\tWhen you’re finished, you’ll see the new partition in Disk Manager. The screenshot shows the new 50GB partition with the volume name, assigned to drive F, and marked as a Logical Drive.
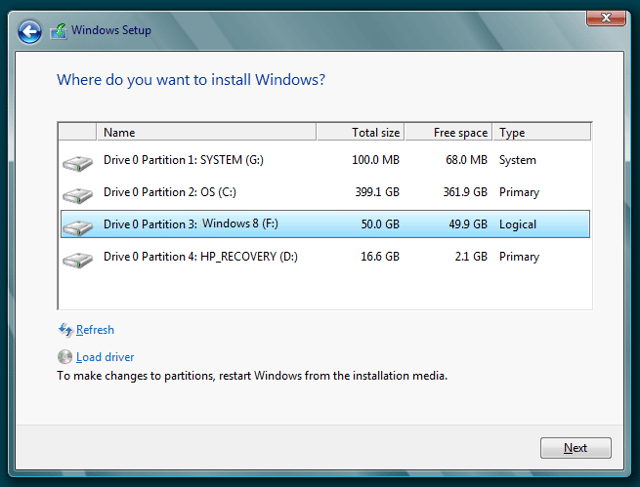
\n\tAt this point, Windows Setup will prompt you to choose the location to which you want to install Windows 8. As you can see, on my test system it is showing all available partitions and I have selected the new volume labeled Windows 8 and assigned drive letter F.

My first computer was a Kaypro 16 \"luggable\" running MS-DOS 2.11 which I obtained while studying computer science in 1986. After two years, I discovered that I had a knack for writing documentation and shifted my focus over to technical writing.


