This\r\ngallery is also available as a TechRepublic article.
If you are currently running Windows XP and are planning to\r\nget a new Windows 8 computer before Microsoft ends\r\nsupport for Windows XP, then you may be wondering how you will go about\r\nmigrating your data and settings from Windows XP to Windows 8. Fortunately,\r\nWindows 8 comes with a little used migration tool called Windows Easy Transfer,\r\nwhich first appeared in Windows Vista and was improved for Windows 7. Windows\r\nEasy Transfer has been updated for Windows 8 and provides features for\r\nmigrating from Windows XP.
\r\n\r\n
In this article, I’ll walk you through the entire process of\r\nmigrating files and settings from a Windows XP computer to a new Windows 8\r\ncomputer using a network connection. You’ll then have a very good idea of what\r\nto expect when you run Windows\r\nEasy Transfer on your Windows XP system.
\r\n\r\n
\r\n\r\n
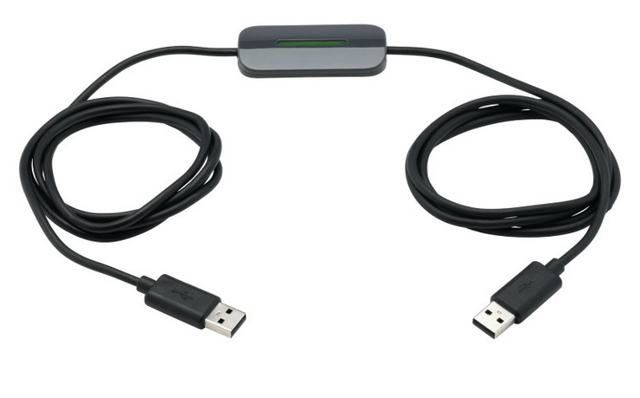
There are actually three ways that you can use Windows Easy\r\nTransfer to migrate from Windows XP to Windows 8 depending on how you are\r\nmigrating. If you are migrating from one operating system to another on the\r\nsame computer, you would use an external hard disk or a USB flash drive as an\r\nintermediary device. However, in the case of moving from Windows XP to Windows\r\n8.x, chances are you will be migrating from an old computer to a new computer. As\r\nsuch, you’ll want to connect the two computers together using either an Easy\r\nTransfer Cable or your network.
\r\n\r\n
Since just about everyone’s computer is connected a network,\r\nI’ve decided to cover the network method in this article. In addition to\r\nrunning across a cabled network, Windows Easy transfer will run just fine\r\nacross a wireless connection.
\r\n\r\n
Keep in mind that Windows Easy Transfer is only designed to\r\nmigrate your data files and your settings. It does not migrate your applications.\r\nAs such, you will have to manually reinstall those applications that are\r\nWindows 8 compatible.
\r\n\r\n
More specifically Windows Easy Transfer will allow you to\r\nmigrate the following:
\r\n\r\n
\r\n
\r\n
\r\n
\r\n
\r\n
\r\n
\r\n
\r\n
\r\n\r\nCredit: Images by Greg Shultz for TechRepublic
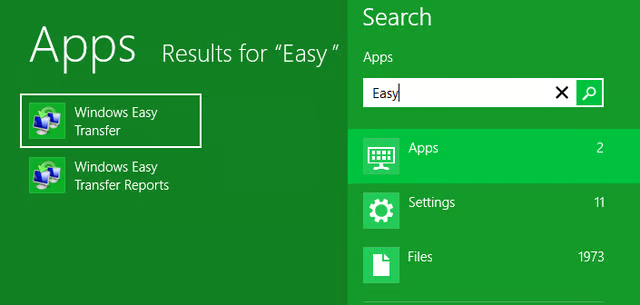
\r\n\r\nOnce you have your Windows\r\nXP and Windows 8 systems on the network, you’re ready to get started. You’ll\r\nbegin by launching Windows Easy Transfer on your Windows 8 system. While there\r\nare several ways that you can launch Windows Easy Transfer, the quickest way is\r\nto use the [Windows] + Q keystroke to access the Apps Search page and then type\r\nEasy in the text box. When Windows\r\nEasy Transfer appears in the search results, as shown in Figure A, just click the icon.
\r\n\r\nCredit: Images by Greg Shultz for TechRepublic
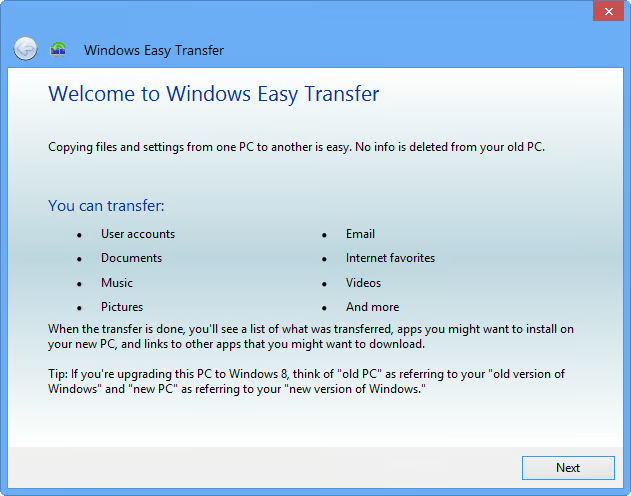
In\r\na moment, you’ll see the introductory screen on the Windows Easy Transfer\r\nwizard, as shown in Figure B. As you\r\ncan see from the list shown on this screen, Windows Easy Transfer will allow\r\nyou to copy everything that you will need on your new computer.
\r\n\r\nCredit: Images by Greg Shultz for TechRepublic
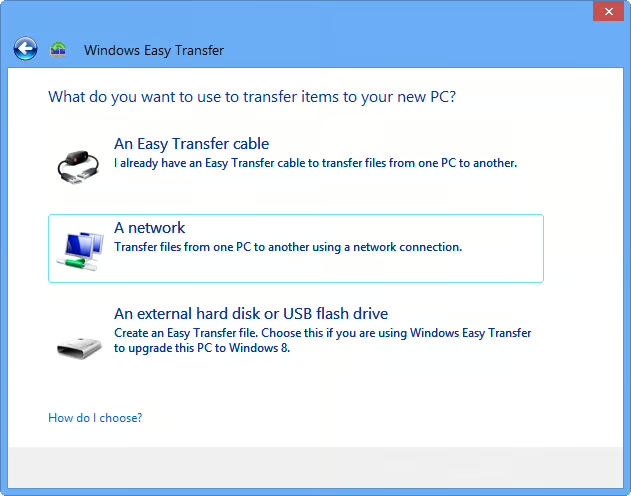
When\r\nyou click Next, you’ll see the screen that prompts you to choose how you want\r\nto transfer items to your new computer. You’ll select the network option, as\r\nshown in Figure C.
\r\n\r\nCredit: Images by Greg Shultz for TechRepublic
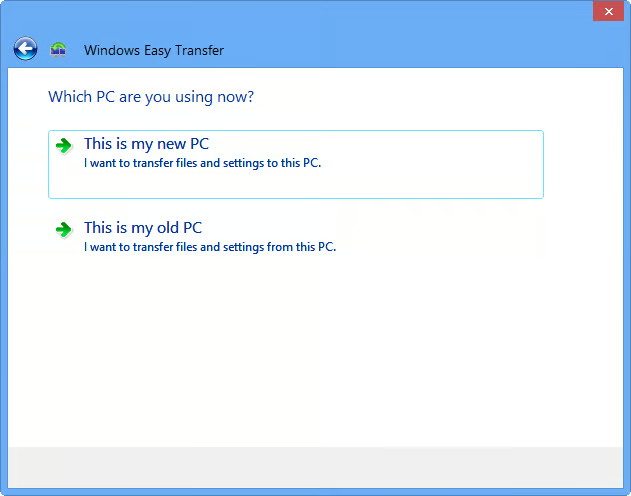
\r\n\r\nOnce you select the network\r\nas your transfer method, you’re ready to begin the preparation phase, in which\r\nyou will choose how and where to copy the Windows Easy Transfer executable\r\nfiles for your Windows XP system. The first screen in this phase of the\r\noperation prompts you to identify the PC on which you are working. In this\r\ncase, you’ll select the This is my new PC\r\noption, as shown in Figure D.
\r\n\r\nCredit: Images by Greg Shultz for TechRepublic
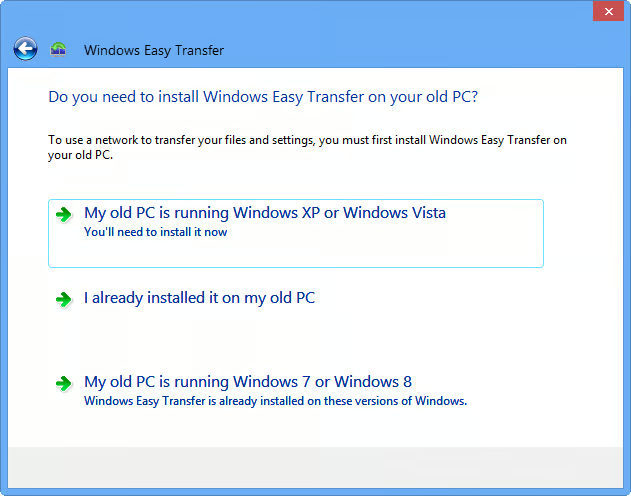
Now\r\nthat you’ve identified your Windows 8 system as the new PC, the wizard will\r\nprompt you to begin preparations to make the Windows Easy Transfer software available\r\nfor your Windows XP system. As you can see in Figure E, you’ll now select the My old PC is running Windows XP\r\noption.
\r\n\r\nCredit: Images by Greg Shultz for TechRepublic
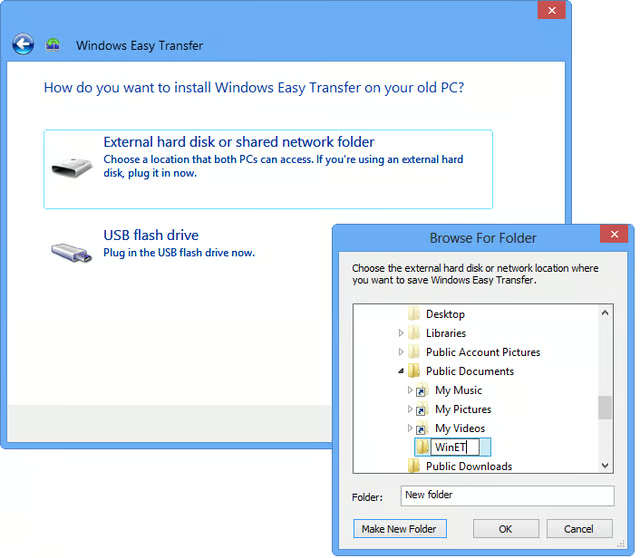
You’ll\r\nnext be prompted to choose where you want to copy the Windows Easy Transfer executable\r\nfiles. As you can see in Figure F,\r\nyou’ll select the shared network folder option and will then see a browse\r\ndialog box. In my example, I chose to create a new folder called WinET in my\r\nWindows 8 system’s Public\\Public Documents folder. When both Windows XP and\r\nWindows 8 are on the same network, the Public folder system makes it extremely\r\neasy to share files on the network.
\r\n\r\nCredit: Images by Greg Shultz for TechRepublic
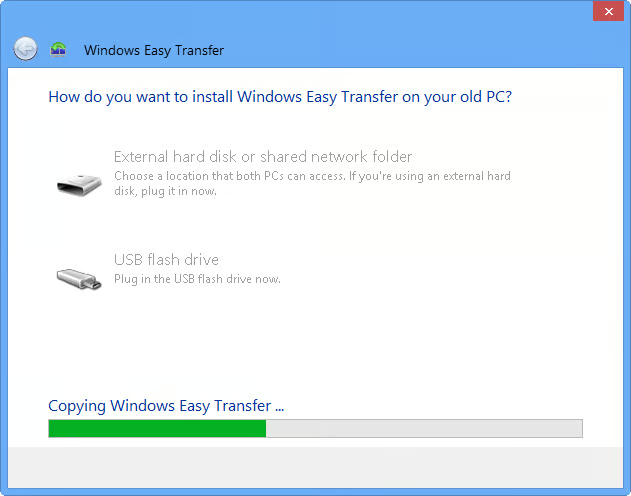
Once\r\nyou specify the location, the Windows Easy Transfer executable files will be\r\ncopied to that folder, as shown in Figure\r\nG.
\r\n\r\nCredit: Images by Greg Shultz for TechRepublic
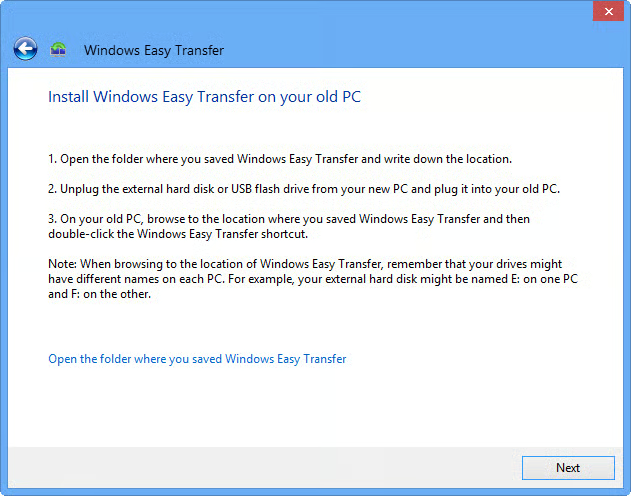
After\r\nthe files are copied, you’ll see the screen shown in Figure H, which prompts you run Windows Easy Transfer on your Windows\r\nXP system. At this point, just leave this screen as it is and physically move\r\nto your Windows XP system.
\r\n\r\nCredit: Images by Greg Shultz for TechRepublic
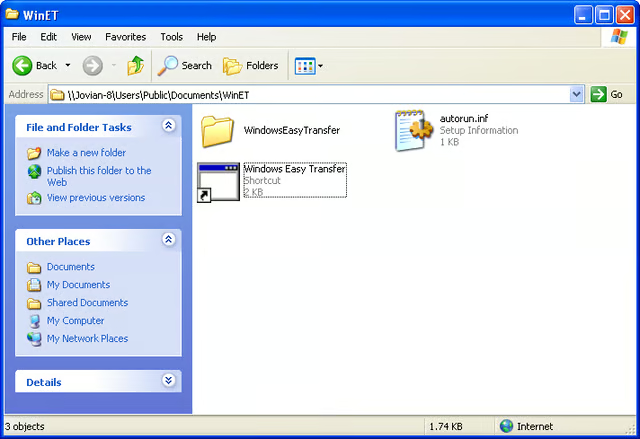
\r\n\r\nWhen you are on your\r\nWindows XP system, launch My Network Places and navigate to the folder in which\r\nyou copied the Windows Easy Transfer files. When you open that folder, you’ll\r\nfind a shortcut titled Windows Easy Transfer that you will use to launch the\r\nprocess, as shown in Figure I.
\r\n\r\nCredit: Images by Greg Shultz for TechRepublic
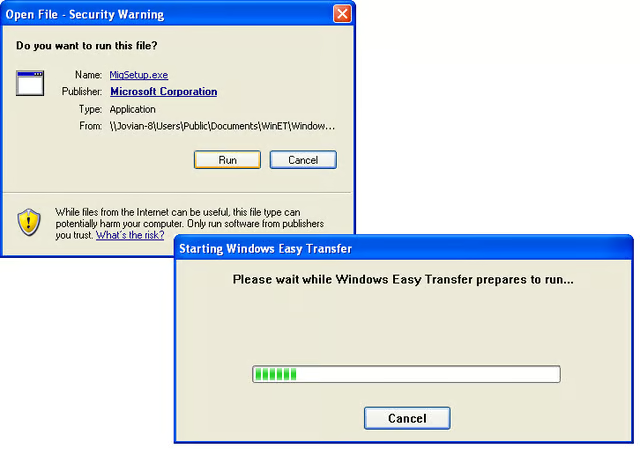
As\r\nsoon as you launch the shortcut, you’ll be prompted to confirm the run operation.\r\nWhen you do, Windows Easy Transfer will run as a stand-alone application -\r\ntechnically it isn’t installed in Windows XP. These steps are illustrated in Figure J.
\r\n\r\nCredit: Images by Greg Shultz for TechRepublic
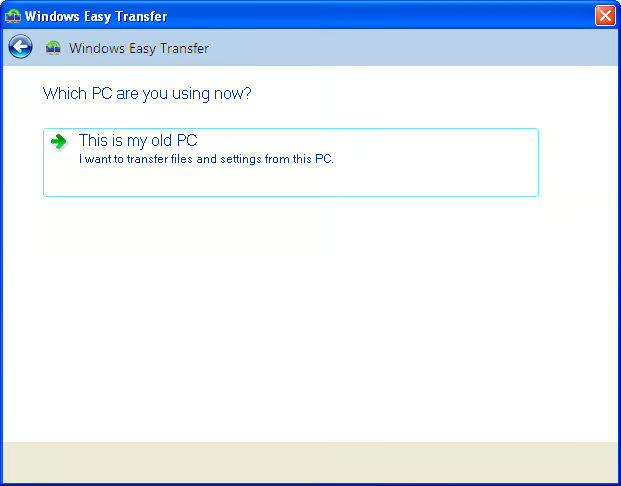
When\r\nWindows Easy Transfer launches, you see the introductory screen and then be\r\nprompted to choose the transfer type. These screens will be identical to the\r\nones shown above in Figures B and C. You’ll then be prompted to identify the PC\r\non which you are working. In this case, there is only one option; This is my old PC, as shown in Figure K.
\r\n\r\nCredit: Images by Greg Shultz for TechRepublic
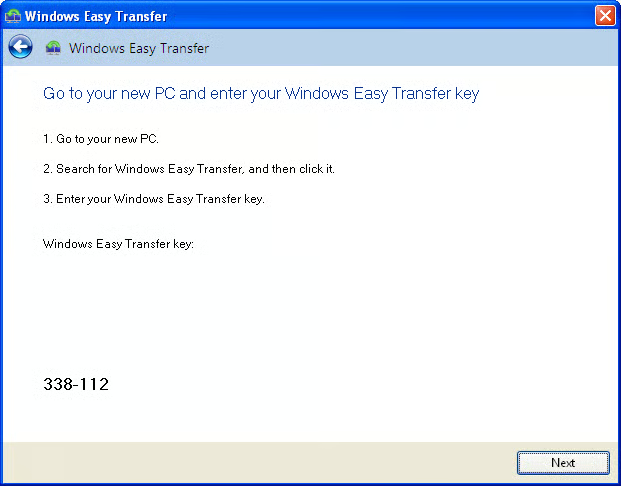
You’ll\r\nthen see a screen that shows you the Windows Easy Transfer key, as shown in Figure L. This randomly generated number\r\nsequence consists of six digits separated by a dash. At this point, your\r\nWindows XP system goes into a wait state where it will essentially listen on\r\nthe network for a broadcast containing that key sequence. When it picks up a\r\nbroadcast containing that key, it will respond and a connection will initiated.\r\nTo continue, take note to the Windows Easy Transfer key number sequence, leave\r\nthis screen as it is, and physically move back to your Windows 8 system.
\r\n\r\nCredit: Images by Greg Shultz for TechRepublic
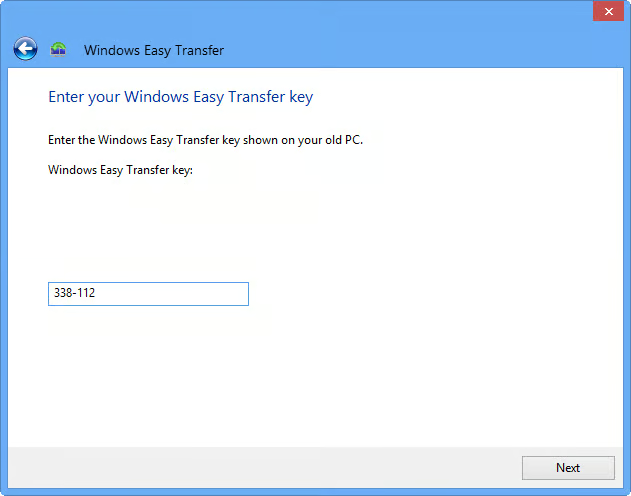
\r\n\r\nWhen you return to your\r\nWindows 8 system, click Next and you’ll be prompted to enter in the Windows\r\nEasy Transfer key, as shown in Figure M.\r\nOnce you enter the key and click Next, Windows Easy Transfer will broadcast the\r\nkey and wait for a response. When a response is received from your Windows XP\r\nsystem, Windows Easy Transfer will establish a connection, check for updates,\r\ncheck compatibility, and then check what can be transferred.
\r\n\r\nCredit: Images by Greg Shultz for TechRepublic
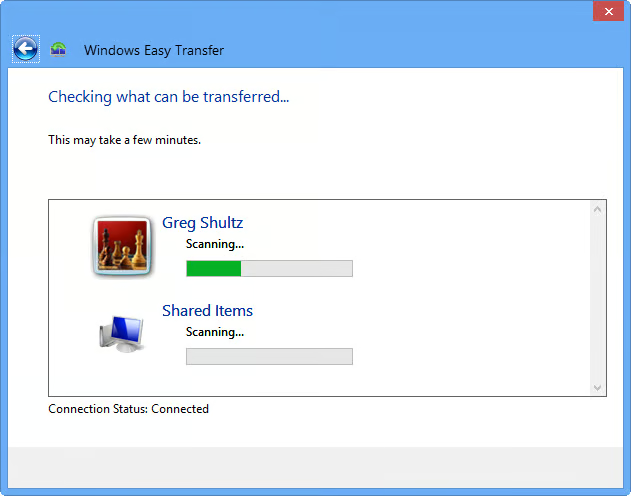
In\r\na moment, Windows Easy Transfer will begin scanning the user account on your\r\nWindows XP system and will display a progress bar, as shown in Figure N. As you can see, in addition\r\nto scanning your user account, Windows XP’s Shared Documents folder will also\r\nbe scanned. If there are multiple user accounts on your Windows XP system, they\r\ntoo will be scanned and you will be given the opportunity to transfer those\r\nuser accounts and files over to your Windows 8 system.
\r\n\r\nCredit: Images by Greg Shultz for TechRepublic
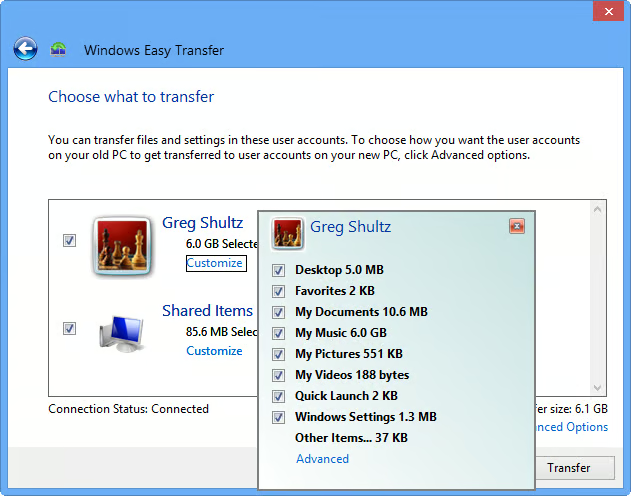
When\r\nWindows Easy Transfer is finished scanning your Windows XP system, you’ll see\r\nthe total amount of space required for all the items that were found and\r\nselected. If you don’t want to copy everything, you can click the Customize\r\nbutton and you’ll see a breakdown of where all the files came from, as shown in\r\nFigure O. You can then remove items\r\nfrom the transfer operation by clearing check boxes.
\r\n\r\nCredit: Images by Greg Shultz for TechRepublic
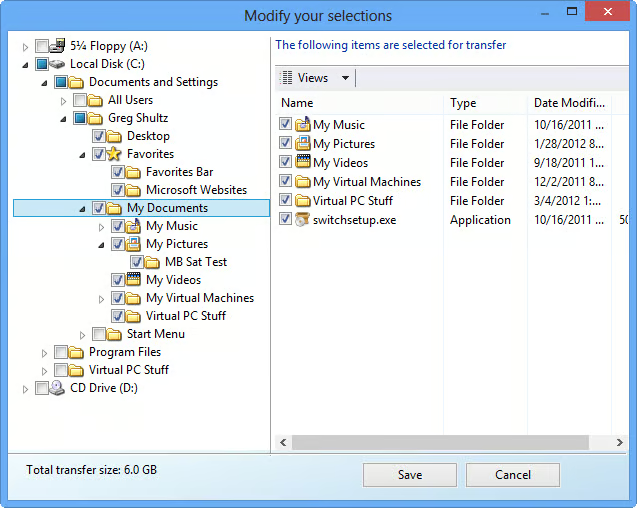
As\r\nyou can see, this list just names the folders containing the files that will be\r\ntransferred. If you would like to be more specific, click Advanced and you’ll\r\nsee an Explorer-like window, as shown in Figure\r\nP. Here, you can pick and choose individual files.
\r\n\r\nCredit: Images by Greg Shultz for TechRepublic

If you want to exercise even more control over the transfer\r\nprocess, clicking Advanced Options will reveal a two tabbed dialog box that\r\nwill allow you to map user accounts and drives, as shown in Figure Q. Mapping user accounts, will\r\ncome in handy if you are migrating multiple accounts from Windows XP system and\r\nyou want to keep them separate on your Windows 8 system.
\r\n\r\nAs you can see, if the\r\naccounts don’t yet exist on your Windows 8 system, you can use the Create User\r\nfrom the drop down list. Mapping drives might come in handy if you have more\r\nthan one drive in your Windows 8 system, for example an SSD for operating\r\nsystem files and an SATA drive for your data files.
\r\n\r\nCredit: Images by Greg Shultz for TechRepublic
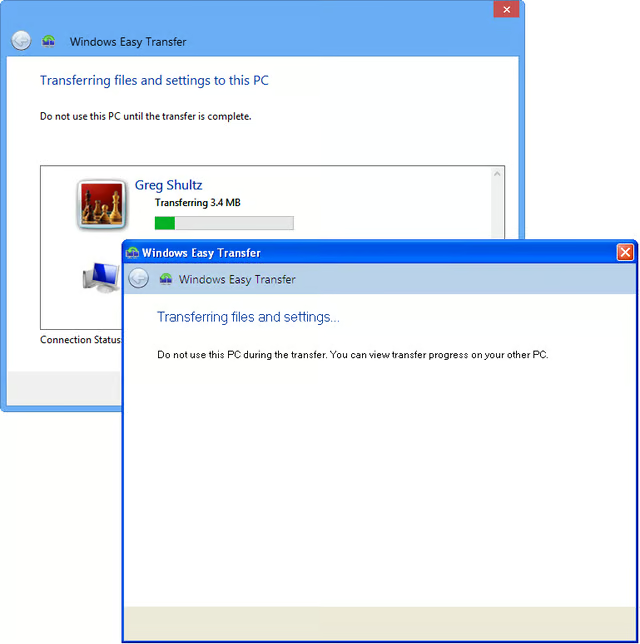
When\r\nyou are satisfied with your transfer configuration settings, just click the\r\nTransfer button and the transfer process will begin. On your Windows 8 system,\r\nyou will see a progress bar that will keep you apprised of the operation while\r\non your Windows XP system, you’ll see screen that lets you know that the\r\ntransfer operation is occurring and reminds you not to use Windows XP during\r\nthe transfer. These two screens are shown in Figure R.
\r\n\r\nCredit: Images by Greg Shultz for TechRepublic

\r\n\r\nWhen the transfer procedure\r\nis complete, you’ll see a message to that effect on your Windows XP system. On\r\nyour Windows 8 system you’ll see a similar message as well as a prompt to view\r\nthe Windows Easy Transfer Reports. These two screens are shown in Figure S.
\r\n\r\nCredit: Images by Greg Shultz for TechRepublic
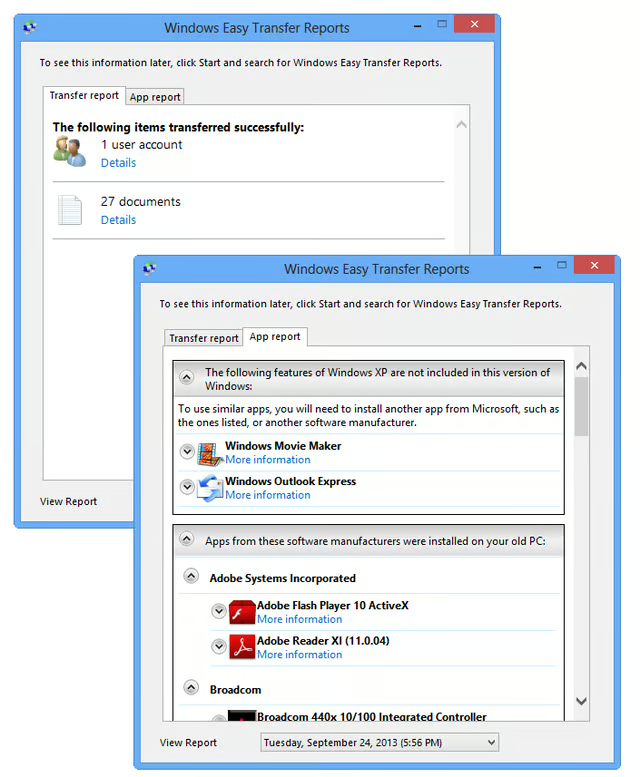
As you can see, there are two types of Windows easy Transfer\r\nReports – one that shows you what was transferred and one that shows you a list\r\nof application that were found on you old system along with links that provide\r\nyou with details and possible replacements. Figure T shows the Windows Easy Transfer Reports which can be\r\naccessed from the tabs on the dialog box.
\r\n\r\n
\r\n\r\n
Will you be getting a new Windows 8 computer to replace your\r\nold Windows XP computer? If so, do you think that you will use Windows Easy\r\nTransfer to migrate your files and settings? As always, if you have comments or\r\ninformation to share about this topic, please take a moment to drop by the\r\nTechRepublic Community Forums and let us hear from you.
\r\n\r\nCredit: Images by Greg Shultz for TechRepublic

My first computer was a Kaypro 16 \"luggable\" running MS-DOS 2.11 which I obtained while studying computer science in 1986. After two years, I discovered that I had a knack for writing documentation and shifted my focus over to technical writing.


