Over the past several weeks I have written a series of\r\narticles on working with Windows 8’s Client Hyper-V with the aim of\r\nestablishing a working Windows XP environment that will allow migrating users\r\nto have something to fall back on as they get used to Windows 8. For your\r\nconvenience, those articles are listed here:
\r\n\r\n
\r\n
\r\n
\r\n
\r\n\r\n
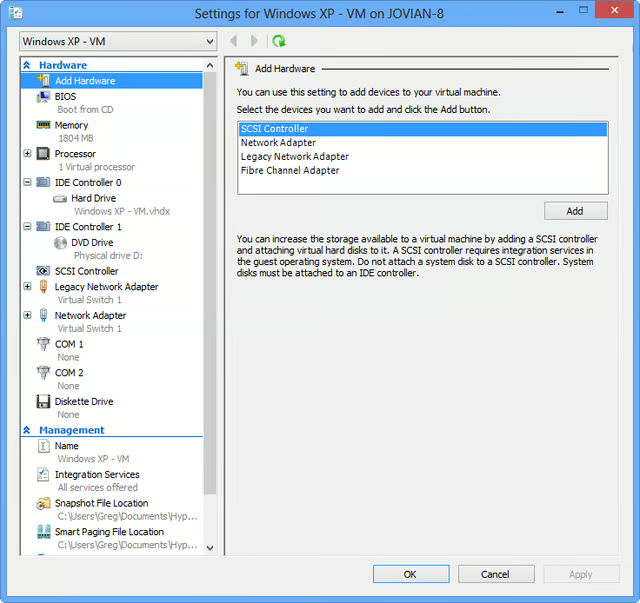
In the most recent article, I walked you through the steps\r\nof creating a virtual machine onto which you would install Windows XP. As you\r\nmay have noticed while working through the New Virtual Machine Wizard and\r\nexamining the virtual machine Settings window, shown in Figure A, there was no mention of USB connections. Well, that’s\r\nbecause, unfortunately, Client Hyper-V doesn’t provide native support for USB\r\nconnections.
\r\n\r\n
While the lack of USB support in Hyper-V is definitely a\r\nhuge shortcoming, it’s actually by design. That may come as a shock, but the\r\nfact is that USB support is not available in Hyper-V Server, because it is\r\nincompatible with certain key features, such as Live Migration.\r\nUnfortunately, the lack of USB support was passed down to Windows 8’s Client\r\nHyper-V.
\r\n\r\n
As you can imagine, a number of third-party solutions have\r\nsprung up to fill the gap. For example, there are software products, such as USB Redirector, and\r\nhardware products like the\r\nNetwork-attached USB hubs. However, when it comes to using Windows 8’s Client\r\nHyper-V and a Windows XP virtual machine, you don’t have to resort to such\r\nelaborate or expensive methods of making USB devices accessible to a virtual\r\nmachine.
\r\n\r\n
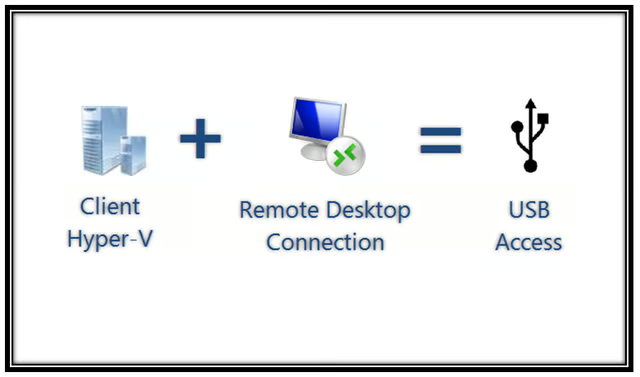
Instead, you can employ a little trick that uses the Remote\r\nDesktop Connection tool to connect to a networked virtual machine running in\r\nClient Hyper-V. You can then use the features on the Local Resources tab of a\r\nRemote Desktop Connection to redirect USB devices connected to the host machine,\r\nsuch as USB drives and USB printers, to the virtual machine. While on the\r\nsurface this may sound like a quirky workaround, in actuality it brings with it\r\nhost of benefits besides the access to USB. For example, you get a full screen\r\ndisplay, slightly better performance, and you can use the clipboard to copy and\r\npaste data between the host and virtual machines.
\r\n\r\n
In this article, I’ll walk you through the steps you need to\r\nperform in order to make your Windows XP virtual machine accessible through\r\nRemote Desktop Connection. I’ll then show you how to configure and access USB\r\ndevices connected to the Windows 8 host machine from within your Windows XP\r\nvirtual machine.
\r\n\r\n
\r\n\r\n
The first thing that you need to do in order to be able to\r\nuse Remote Desktop Connection to access a virtual machine, is make sure that\r\nboth the host machine and the virtual machine are configured to use the exact\r\nsame workgroup. Let’s take a closer look.
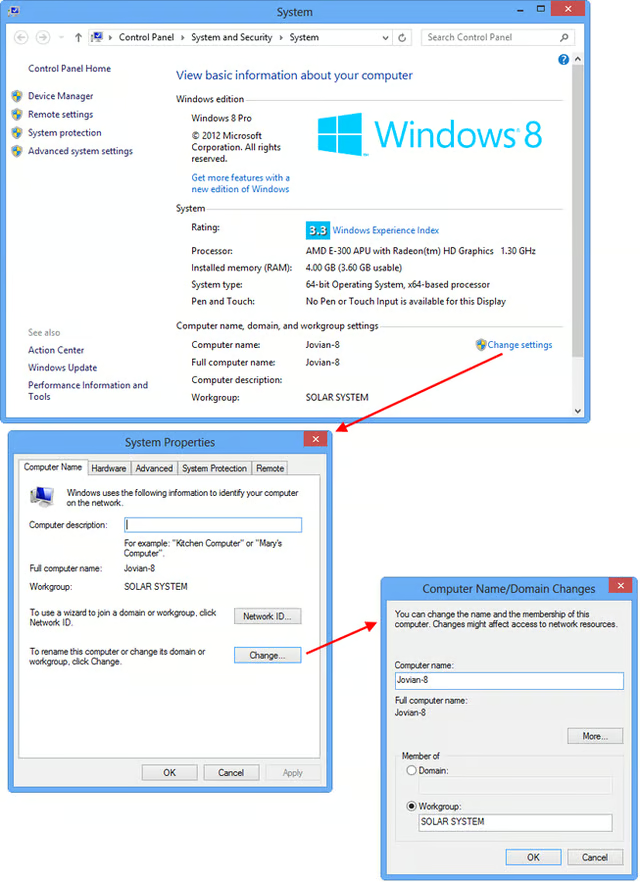
\r\n\r\nOn the Windows 8 host\r\nmachine, press [Windows]+[Break] to bring up the System window shown in Figure B. If you haven’t specified a\r\nworkgroup name or wish to change your computer name, you can click Change\r\nsettings and use the Change button on the System Properties Computer Name tab.\r\nKeep in mind that you will be prompted to Restart the system if you change the\r\ncomputer name or the workgroup name. As you can see, on my example system, the\r\ncomputer name is Jovian-8 and the workgroup is SOLAR SYSTEM.
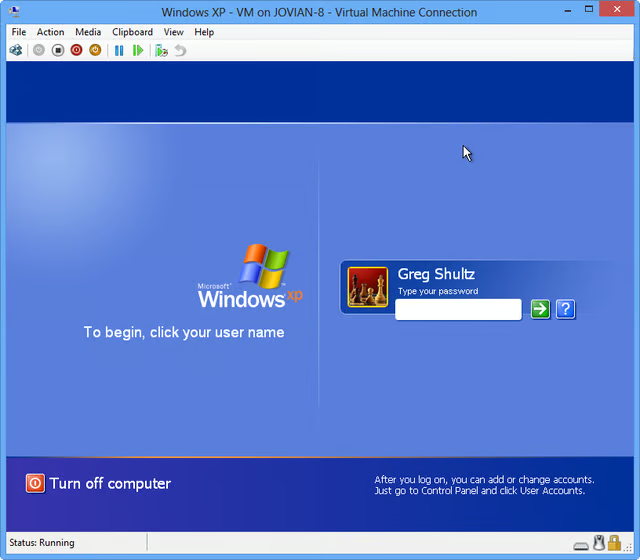
Next,\r\nlaunch Hyper-V Manager and access your virtual machine. Choose your virtual\r\nmachine and select Connect from the Action menu. When your Windows XP Virtual\r\nMachine Connection window appears, click the Green Start button. When you see\r\nthe Windows XP Login screen, select your user name and enter your password, as\r\nshown in Figure C. Make a mental\r\nnote of this user name and password, as you will need them later.
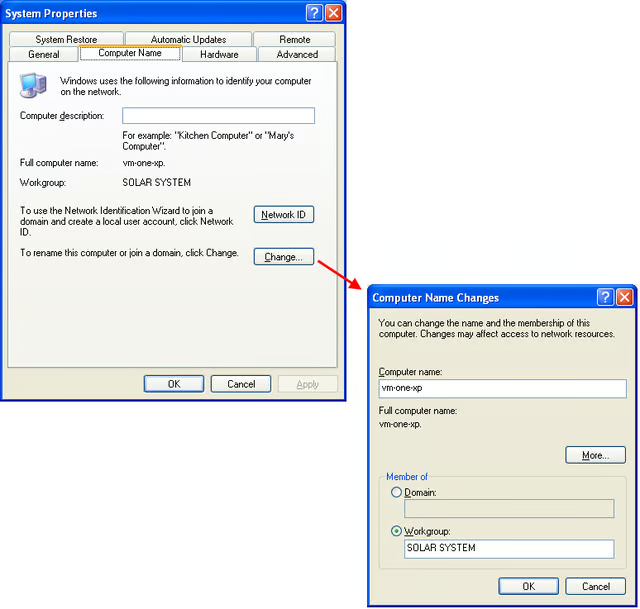
When\r\nWindows XP starts up, press [Windows]+[Break] to bring up the System Properties\r\ndialog box and then select the Computer Name tab. Then click the Change button\r\nand make sure that your Windows XP virtual machine has a unique computer name\r\nand is using the same workgroup name as your Windows 8 host machine. As you can\r\nsee in Figure D, on my example system\r\nthe computer name is vm-one-xp and the workgroup is SOLAR SYSTEM. Keep in mind\r\nthat you will be prompted to Restart the system if you change the computer name\r\nor the workgroup name.
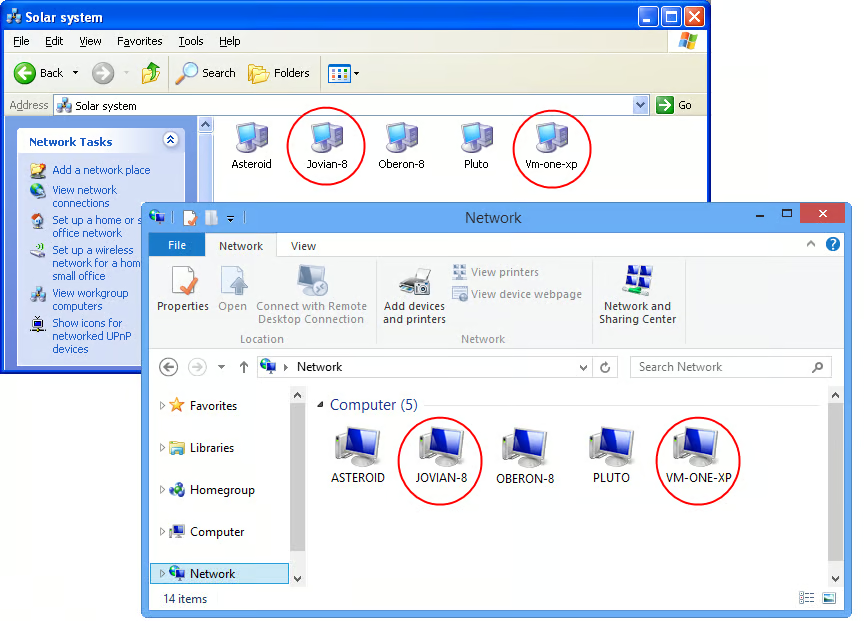
Once\r\nyou are done with your network configuration, make sure that from each\r\nmachine’s Network list you can see both the host machine and the host machine. As\r\nyou can see in Figure E, both\r\nJovian-8 and Vm-one-xp are visible from Windows XP’s Network Neighborhood and\r\nboth are visible from Windows 8’s Network view in File Explorer.
\r\n\r\n
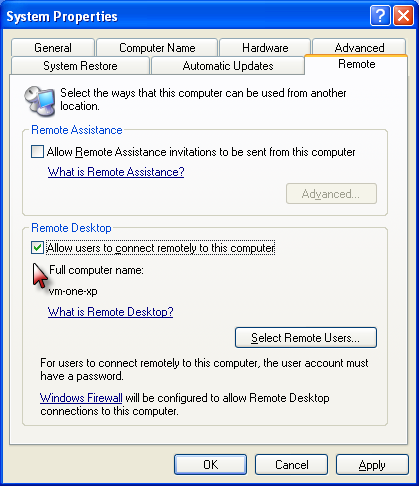
One more thing that you have to do on your Windows XP\r\nvirtual machine is enable the remote connection. To do so, press\r\n[Windows]+[Break] to bring up the System Properties dialog box and then select\r\nthe Remote tab. Then, select the Allow users to connect remotely to this\r\ncomputer check box in the Remote Desktop panel, as shown in Figure F.
\r\n\r\nAt this point, you can\r\nclick OK and then restart the Windows XP virtual machine. When your Windows XP\r\nvirtual machine restarts, it will be available on the network, but you won’t\r\nneed to log in again right now. In fact, you can minimize your Windows XP\r\nVirtual Machine Connection window and close the Hyper-V Manager window.

\r\n\r\n
Now that you Windows XP virtual machine’s network and remote\r\nsettings are correctly configured, you’re ready to configure your Windows 8\r\nRemote Desktop Connection. To do begin, use the [Windows] + Q keystroke to access\r\nthe Search Apps page. Then, type Remote in the text box and click the Remote\r\nDesktop Connection icon when it appears in the Results.
\r\n\r\nWhen you see the Remote\r\nDesktop Connection window, click the Show Options button at the bottom of the\r\nscreen to reveal the entire window with all the tabs. Then, type the name that\r\nyou assigned to your Windows XP system and your Windows XP User name in the\r\nappropriate text boxes. Then, click the Save As button and assign your connection\r\na name. This process is illustrated in Figure\r\nG.
Normally, I would select the Allow me to save my credentials\r\ncheck box, to automate the login procedure, but for some reason, I have not\r\nbeen able to get that feature to work when connecting to a Windows XP virtual\r\nmachine via Remote Desktop Connection – it just locks up the connection\r\nprocedure. So make sure that you leave the check box blank.
\r\n\r\n
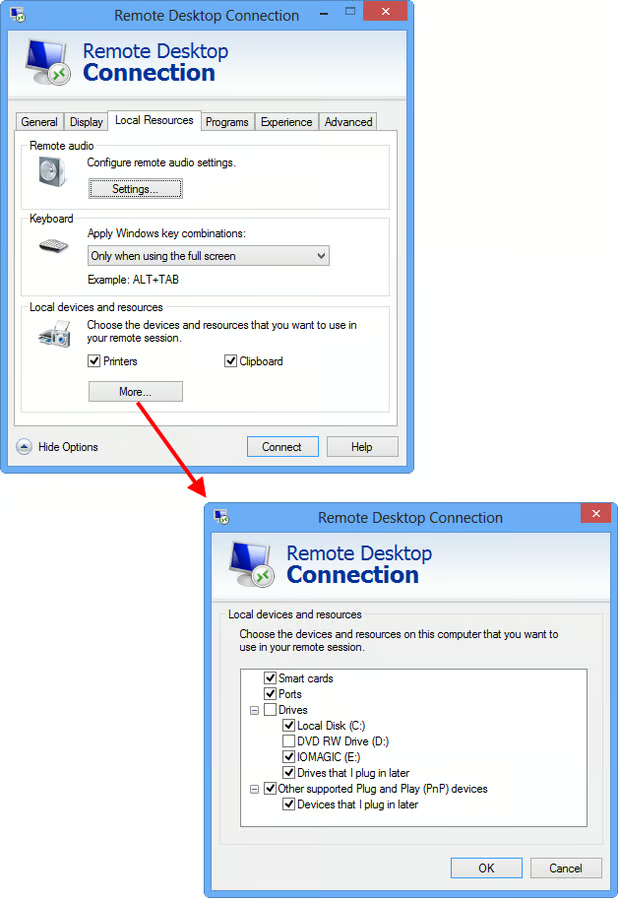
To continue, click the Local Resources tab. Here is where\r\nyou can pick and choose what resources connected to the host machine, such as USB\r\ndrives and USB printers, which you want to redirect to the virtual machine.
\r\n\r\nIn the Local devices and\r\nresources section, both the Printers and Clipboard check boxes should already\r\nbe selected. You can then click the More button. When you do, you’ll see a\r\nwindow that shows a list of other types of local devices that can be redirected\r\nto the virtual machine. These steps are illustrated in Figure H.
Having the Printers check box selected means that the Canon\r\niP3500 USB printer connected to my Windows 8 system will now be available to\r\nthe Windows XP virtual machine. (It will need some further configuration as\r\nI’ll show you in a minute.)
\r\n\r\n
As you can see, I’ve selected just about every available\r\ncheck box in the second Local devices and resources window. The only thing I\r\ndidn’t select is the DVD drive because it’s already connected to the virtual\r\nmachine. However, I selected Local Disk (C:), which means that I will have\r\naccess to the hard disk on the host machine from within the virtual machine. I\r\nalso selected IOMAGIC (E:) which is a USB drive connected to the USB port on\r\nthe host machine. I then selected the Drives that I plug in later check box, so\r\nthat any time I connect a USB flash drive to the host machine, it will be\r\naccessible in the virtual machine.
\r\n\r\n
To continue, click OK to close the second Local devices and\r\nresources window. Then, return to the General tab and click the Save button.\r\nYou can leave all the other default settings in Remote Desktop Connection as\r\nthey are.
\r\n\r\n
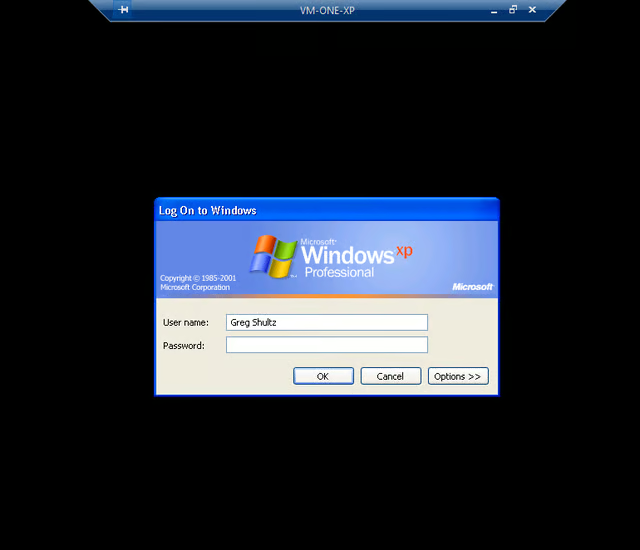
\r\n\r\nWith all the necessary\r\nsettings in place, you can launch Remote Desktop Connection by clicking the\r\nConnect button. When you do, you’ll see the login screen, shown in Figure I, and will notice another\r\nadvantage of using Remote Desktop Connection – you automatically get a full\r\nscreen display of your virtual machine. After you enter your password and click\r\nOK, you’ll be connected via Remote Desktop Connection to your Windows XP\r\nvirtual machine in Hyper-V.
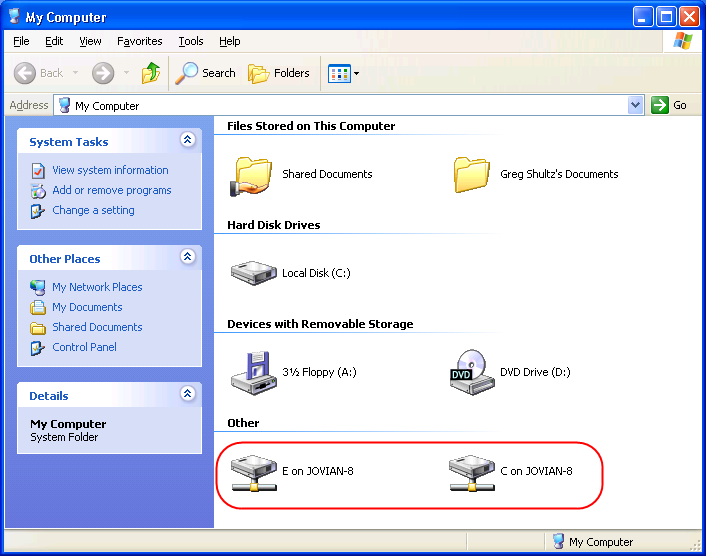
Once your Windows XP virtual machine is up and running, go\r\nahead and open up My Computer. When you do, you’ll find that there are\r\nconnections in the Other section to the hard disk and any other USB disks have\r\non you Windows 8 host machine, as shown in Figure\r\nJ. Now, you can easily access files and folders on your host machine from\r\nwithin your virtual machine.
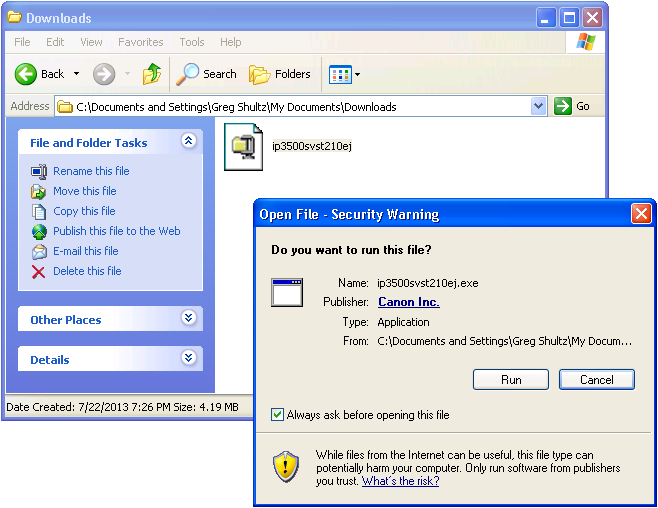
\r\n\r\nWhile the disk drives are\r\nautomatically redirected from your host machine to your virtual machine, your\r\nUSB printer will require some additional configuration before it is fully\r\naccessible in your virtual machine. The first thing that you must do is install\r\nthe driver on your Windows XP virtual machine. You can do so, from the CD that\r\ncame with your printer or you can download the driver from the Web. In the case\r\nof my Canon iP3500 USB printer, I downloaded the Windows XP driver installation\r\npackage from the Canon web site, and then ran it, as shown in Figure K.
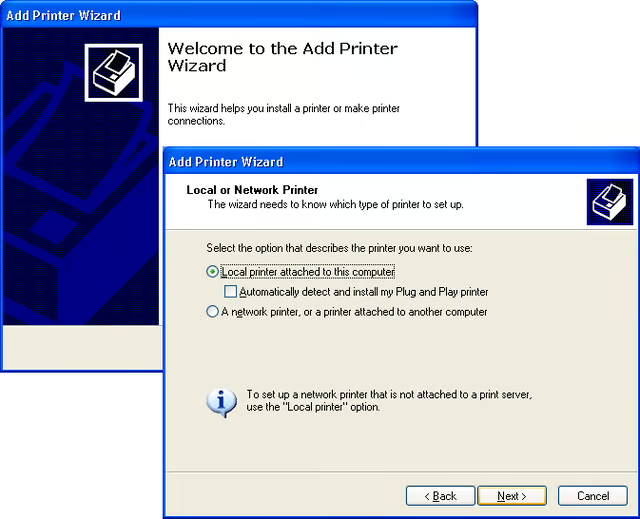
With\r\nthe driver installed, you can now add the printer. Go to the Control Panel and\r\nlaunch the Add Printer Wizard. On the second screen, select the Local printer\r\nattached to this computer option, but then clear the Automatically detect and\r\ninstall my Plug and Play printer check box, as shown in Figure L. To continue click Next.
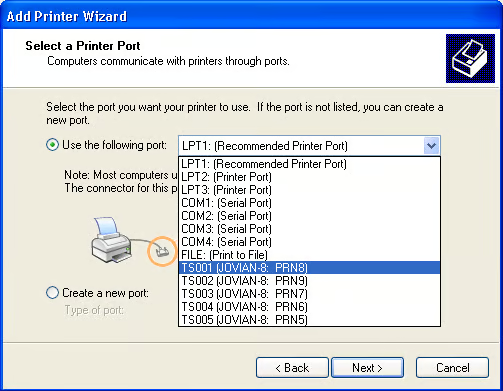
When\r\nyou get to the Select a Printer Port screen, select the Use the following port\r\noption and then click the drop down arrow. When you do, you should find a group\r\nof Terminal Server ports identified with the codes TS00# {Host machine name} PRN#. These are the ports that are\r\nredirected from the host machine to the virtual machine via Remote Desktop\r\nConnection. You should select the TS001 port, as shown in Figure M. Then click Next.
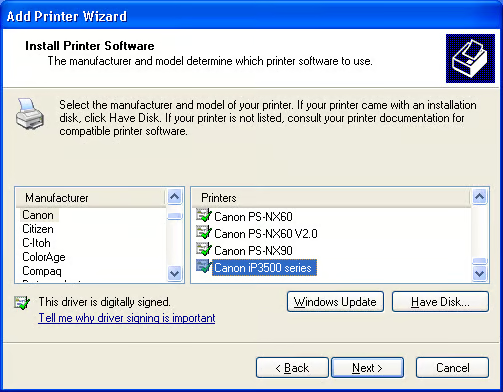
You\r\nwill now see the Install Printer Software screen, from the Manufacturer list\r\nselect your printer brand name. Then in the Printers list, scroll all the way\r\nto the bottom and you should find the printer driver that you installed earlier.\r\nAs you can see in Figure N, I selected\r\nCanon and then found the Canon iP3500 printer driver that I downloaded and\r\ninstalled.
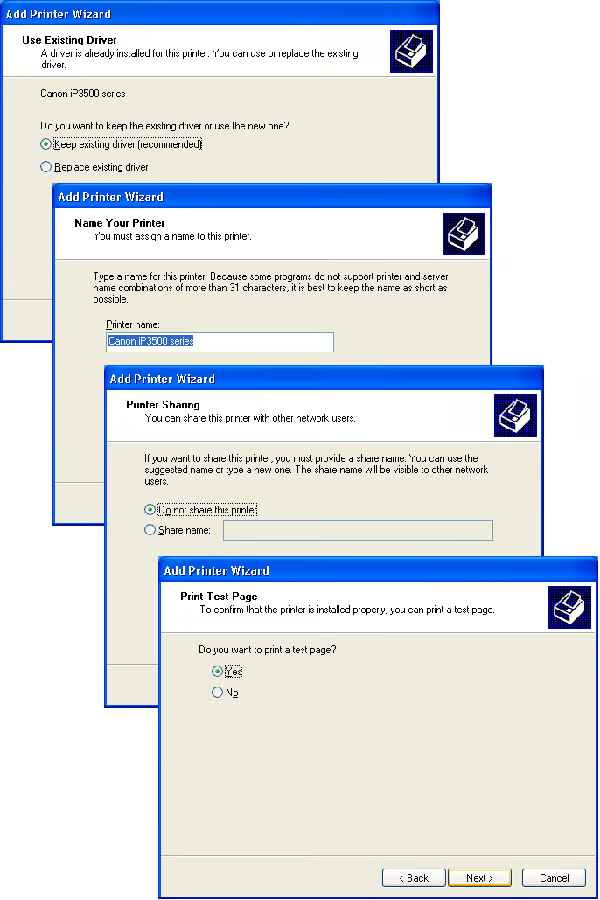
As\r\nyou work your way through the rest of the Add Printer Wizard, as shown in Figure O, be sure that you select the\r\nKeep existing driver option and then print a test page to ensure that your\r\nprinter is working correctly.
\r\n\r\n
Now that you know how to make USB devices accessible to a\r\nWindows XP virtual machine via Remote Desktop Connection, there are a couple of\r\nthings that you need to keep in mind. First, you will always have to launch\r\nyour Windows XP virtual machine from the Hyper-V Manager and the Virtual\r\nMachine Connection. And you also need to let it run for a few minutes before\r\nyou attempt to connect to it from Remote Desktop Connection. When you are\r\nfinished using your Windows XP virtual machine for the time being, you will\r\nhave to Log off from the virtual machine, which will close the Remote Desktop\r\nConnection. Then you will have to return to the Virtual Machine Connection\r\nwindow and then use the Turn off computer on the Windows XP screen
\r\n\r\n
Second, I’ve found that Terminal Server ports can be a bit\r\nquirky at times. If you discover that the printer is no longer printing, access\r\nthe Printer Properties page, select the Ports tab, and choose a different TS00#\r\nport.
\r\n\r\n
\r\n\r\n
Were you planning on setting up a Windows XP virtual machine\r\nin Windows 8’s Client Hyper-V? Were you vexed by the lack of native USB support\r\nin Hyper-V? Now that you know about the Remote Desktop Connection trick, will\r\nyou move forward with this solution? As always, if you have comments or\r\ninformation to share about this topic, please take a moment to drop by the TechRepublic Community\r\nForums and let us hear from you.

My first computer was a Kaypro 16 \"luggable\" running MS-DOS 2.11 which I obtained while studying computer science in 1986. After two years, I discovered that I had a knack for writing documentation and shifted my focus over to technical writing.


