


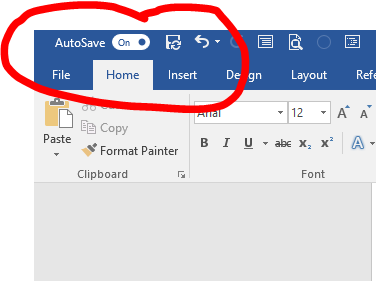
Subscribers to Microsoft Office 365 may have noticed a new button on their documents since August 2017 or so. In the upper left-hand corner there is now an AutoSave slide button. If it is grayed out, it is because your document does not reside on OneDrive or a SharePoint server. Move and store your document on OneDrive and the AutoSave button will become active automatically.
More about Software
- Software Installation Policy
- Five Methods to Insert a Checkmark Into Microsoft Office Products
- How to Hide and Handle Zero Values in an Excel Chart
- How to Use Section Breaks to Control Formatting in Word
In general, automatically saving everything you do in a document as you do it is a fantastic idea–your work will never be lost to a power outage or some other catastrophic occurrence. But automatically saving a document, particularly with a new timestamp, is not always what users want. Sometimes users want the older version of a document to remain intact while they use it as basis for a new file.
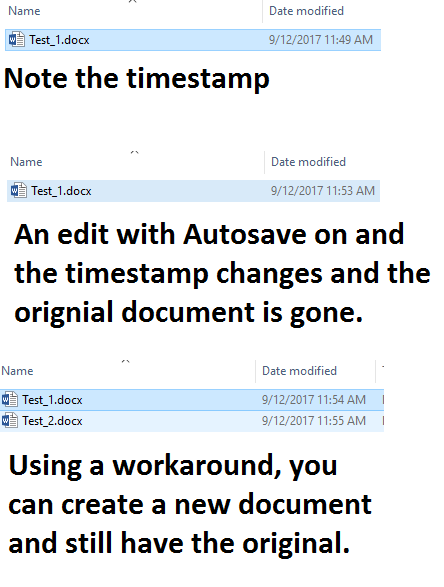
Unfortunately, and frankly inexplicably, Microsoft decided to make the AutoSave feature not only automatic, but also permanently on. There is no option to turn it off–if you open a document residing on OneDrive and make any change to it at all, the old version of the document is gone and you are left with the current version, complete with a new timestamp (Figure A).
Figure A
This how-to article will explain several ways to avoid this eventuality, but none of them is as elegant as an option that would allow users to just turn AutoSave off. Are you listening Microsoft?
SEE: 20 pro tips to make Windows 10 work the way you want (TechRepublic PDF)
Method 1: Don’t use OneDrive
The simplest and probably most dissatisfying way to avoid AutoSave is to avoid saving documents on OneDrive or a SharePoint server at all. If you store your documents on your PC or on a network drive, the AutoSave feature is disabled.
Of course, avoiding OneDrive means you also forfeit the benefits of using cloud services, like being able to access documents from remote locations or taking advantage of team collaboration capabilities. If those benefits are not important for your particular document, your problem is solved with this method.
Method 2: Copy to PC, then save to OneDrive with a new name
A little more convoluted method you can use to maintain a previously created document is to copy the old document to your PC or other non-OneDrive storage system, modify it to create a new document and then save it to OneDrive under a new name. This method allows you to have both the old document, with its original timestamp, and the new document available in the cloud.
SEE: Sage 50c review: Sage 50 Accounts meets Office 365 (Tech Pro Research)
Method 3: Save a copy
This is the not the most obvious method, but it does solve the problem. First, open the document you want to work with, and assuming you want to maintain the original document intact, immediately navigate to the File menu and click Save A Copy. Remember you must do this before you make any changes. Figure B shows what that looks like in Word.
Figure B

When you save a copy, be sure to give the document a new name. The original document will stay intact and you can then work on the new document from OneDrive and take full advantage of the AutoSave feature.
Method 4: Turn AutoSave off each time you open the document
This is the most logical and elegant method, but it also requires the most discipline. As soon as you open a document, click the AutoSave slider button to turn the feature off (Figure C). You must do this before you make any edits or changes to a document.
Figure C
The problem with this method is that you still must remember to manually perform Save A Copy on the document the first time you save it. Just clicking the Save button in the Ribbon will replace the original document. This method has the most potential to cause frustration and anxiety.
SEE: Microsoft Office Certification Training Bundle (TechRepublic Academy)
Access in the cloud
Remember, saving a document in the cloud means other members of your enterprise with the right credentials can open the older documents and, if they make any changes, a new timestamp will be established and your system will go haywire.
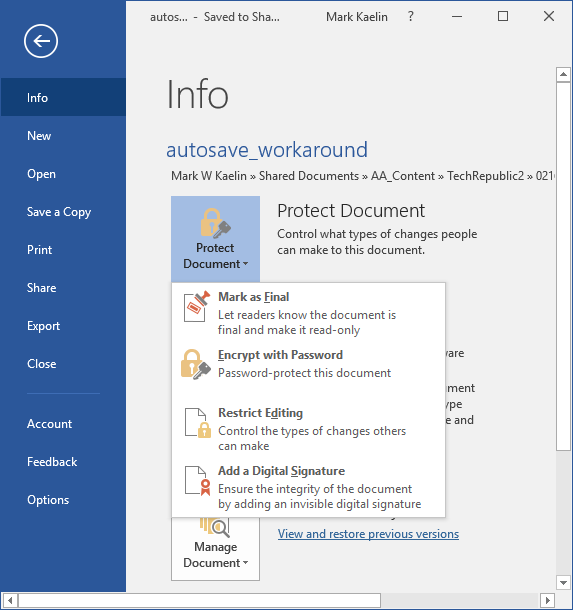
No matter what method you use, if you are concerned that other members of your team or enterprise may edit the wrong document, protect it with a password or make it read only during the save process. Just navigate to the File menu and click the appropriate button (Figure D).
Figure D
When AutoSave causes problems
In many organizations and departments, it is important to maintain a paper trail of properly timestamped documents and worksheets. For example, if you are responsible for creating a weekly Excel report, you might use last week’s report as a starting point for the current week, but that doesn’t mean you want to replace the original. The new AutoSave feature in Microsoft Office 365 puts a kink in this system.
The methods outlined in this article can help alleviate the problem, but they are just workarounds to the real problem. Microsoft should add an option to turn off AutoSave for specific documents. Users should always be able to control features–that should be an unbreakable rule for all productivity software.
Also read…
- Microsoft adds intelligent cloud collaboration features to Office 365 (TechRepublic)
- Microsoft Office 365 is suffering from the dreaded feature creep (TechRepublic)
- Microsoft broadens Office 365 through the Windows Store test program (ZDNet)
- Office 365 is clever–and sometimes just a little bit too clever (ZDNet)
Your thoughts
Do you like the new AutoSave feature? Do you want the option to turn it off when necessary? Share your thoughts and opinions with your peers at TechRepublic in the discussion thread below.