
List controls display multiple values for users to select. By restricting input to a specific list, you eliminate typos, invalid data, and sometimes improve performance. Some lists allow users to enter new values, while others are static. For example, a list of two-letter abbreviations for states is static — you know all the values up front, and those values might never change. Instead of forcing users to enter these values themselves, you should store these values in a table of its own called a lookup table. Then populate a list control with that list so users can select a value from this list. In this article, I’ll show you how to populate a list control instantly by setting properties at the field (table) level to create a lookup field. A wizard sets a few field-level properties, and any form you base on that table will automatically populate a list control for you.
This article assumes that you know how to create tables, queries, and forms, and that you have a reasonable understanding of normalization and relationships. You don’t need the latter to complete this article, but it will help you understand the process. Instructions are for the .accdb format, but you should have no problem following along if you’re using the .mdb format. For your convenience, you can download the example .accdb or .mdb file.
Some background
The link between a main table and a lookup table is a valid relationship; the main table shares a field with the lookup table. But instead of displaying the primary key value, which is meaningless to the user, a lookup field displays meaningful (descriptive) text values from a lookup table. For instance, the user might see a list of companies in an order form. The user doesn’t know that ACME, Inc. is CompanyID 12. The user chooses ACME, Inc, but the table stores the numeric value 12. A lookup field displays one value while displaying another.
This field property is inherited by controls, and that’s why this feature is such a boon to ordinary users. By applying lookup properties at the field level, you can add list controls to forms without any further work on your part.
This feature’s power generates controversy among database developers — many don’t like them. The main thing to remember is this: a lookup field displays one value and stores another. When creating a query, expression, filter, or any other object that refers to a lookup field, you must remember to reference the stored value and not what the user sees. The choice to implement lookup fields will trickle down to all of its dependent objects, so forgetting the setup isn’t an option.
If there’s any chance that your organization will upsize the Access database later, don’t use lookup fields. In addition, a secured database shouldn’t use lookup fields. These two objections are valid but won’t impact most users who lack professional IT support. I mention them to be thorough.
Here’s my advice:
- If lookup fields save you time, use them
- If creating list controls stretches your skill set, use lookup fields
- If you don’t have the basic skill, and your company has the budget for it, hire a professional database developer
- Document your decision, and remember that lookup fields can impede other operations
1. The tables
Figure A shows the three tables in the example database.
Figure A
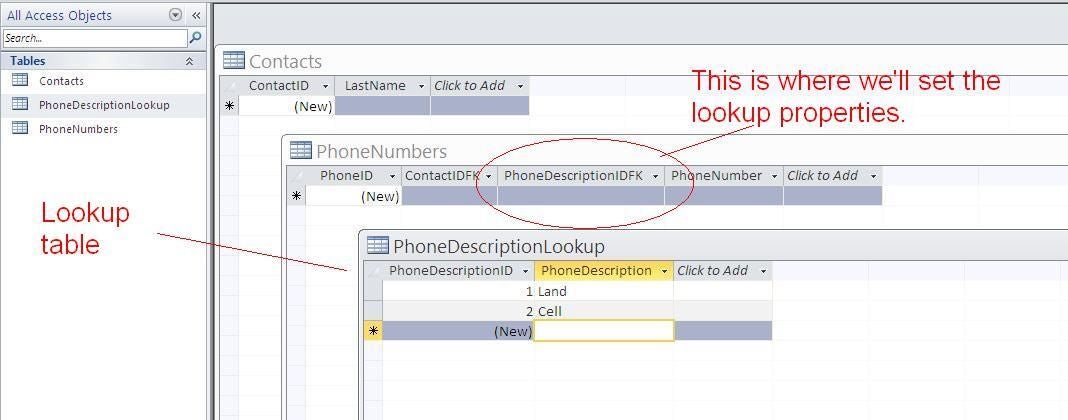
Populate a list control with values in PhoneDescriptionLookup.
Refer to Table A to create these tables, or download the example file. There’s a one-to-many relationship between the Contacts and PhoneNumbers tables based on ContactID and ContactIDFK.
Table A
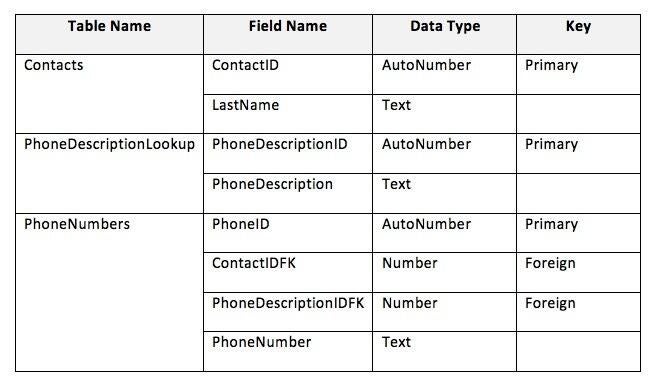
Here’s a reference for creating these tables, or download the example file.
Each contact can have more than one phone number, but each number will belong to only one contact. A phone number could belong to many contacts, but for the sake of simplicity, we’re sticking with a one-to-many relationship. Each number is a land line or a cell phone. Notice in Figure A that PhoneDescriptionLookup contains the lookup values Land and Cell.
2. The relationships
A permanent relationship between a main table and a lookup table isn’t necessary. We will, however, create a permanent relationship between the PhoneNumbers and Contacts table, so that we can use a wizard to generate the data entry form. You’ll find the Relationships window on the Database Tools tab in the Relationships group. Add PhoneNumbers and Contacts and drag ContactID to ContactIDFK. In the resulting Edit Relationship dialog shown in Figure B, click Create. Close the window and save the relationship.
Figure B
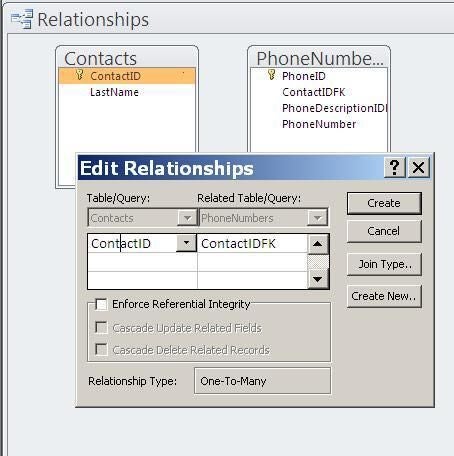
Create a one-to-many relationship.
3. The query
The data entry form we’ll create in step 4 is based on the query shown in Figure C. Use your preferred method to add all of the fields from both PhoneNumbers and Contacts to the grid. Name the query ContactsPhoneNumbersQuery.
Figure C
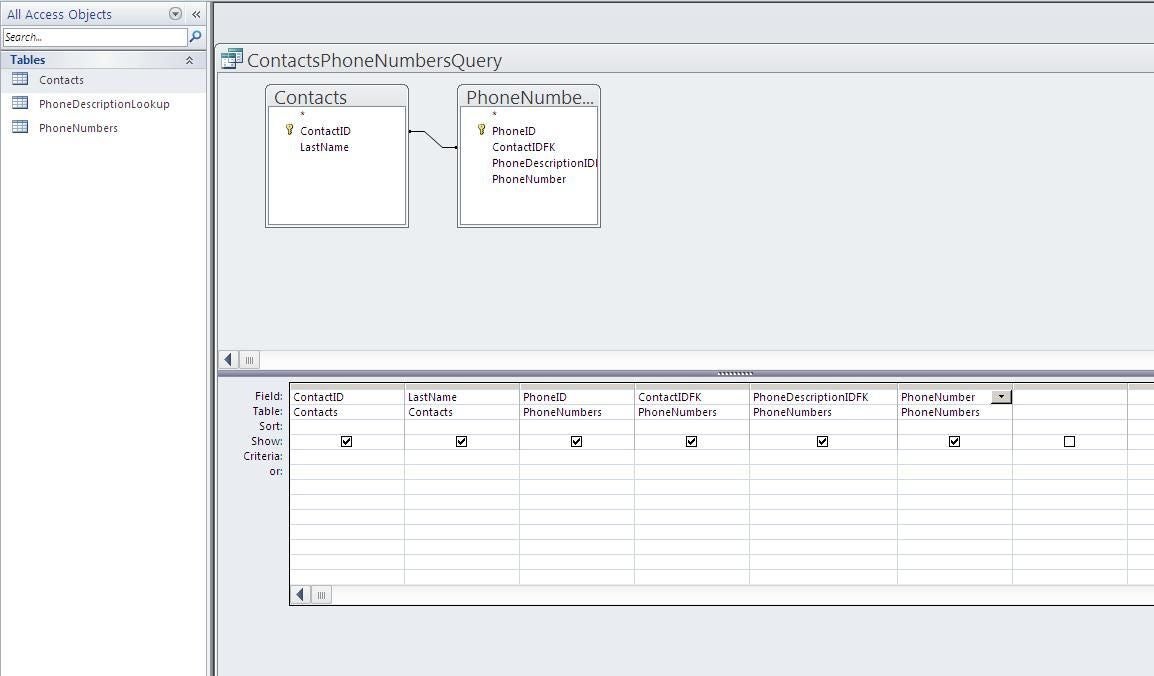
We’ll base a data entry form on this query.
4. The form
Use the Form Wizard to base the data entry form shown in Figure D on ContactsPhoneNumbersQuery. Add all fields to the form, and choose subforms rather than linked forms. Name the form Enter Phone Numbers. You might need to resize the subform.
Figure D
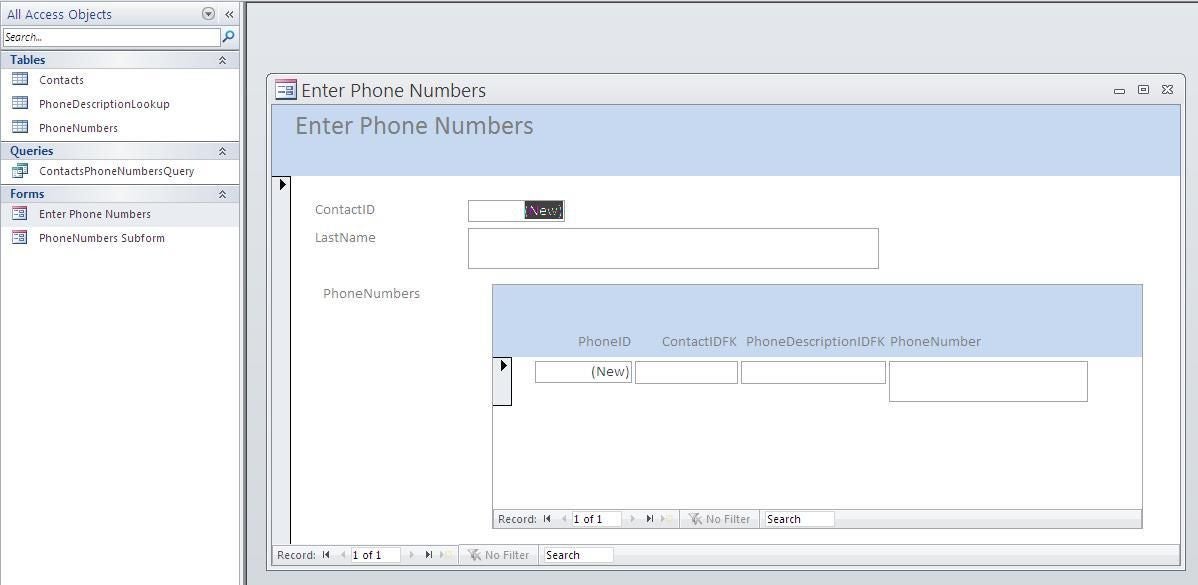
This form lets you enter phone numbers for contacts.
5. The form, as is
The form lets you enter contacts and their phone numbers. Enter Smith in the LastName text box, and Access will generate a primary key (AutoNumber) value. Tab to the subform, and Access will update the PhoneID and ContactIDFK fields.
Next, tab to the PhoneDescriptionIDFK control as if you were going to enter a phone number for Smith. As is, you must know the foreign key values to enter. Right now, that’s easy, because you have only 2: land and cell. Even if you’re the only user for this database, I don’t recommend this route. You open yourself to typos and invalid data. It’s best to control or otherwise validate all input values, as much as possible. You can do so by creating a list control manually, or you can use a lookup field to generate the control for you.
6. The lookup field
To create a list control that displays descriptive phone text and stores its corresponding numeric value automatically, use a lookup field. In this case, that means using PhoneDescriptionIDFK to display the text values in PhoneDescription, while storing the numeric values in PhoneDescriptionID (see Figure A). To do so, open the PhoneNumbers table in Design View and select the PhoneDescriptionIDFK field row, and continue as follows:
- From the Data Type drop-down, choose Lookup Wizard (Figure E).
Figure E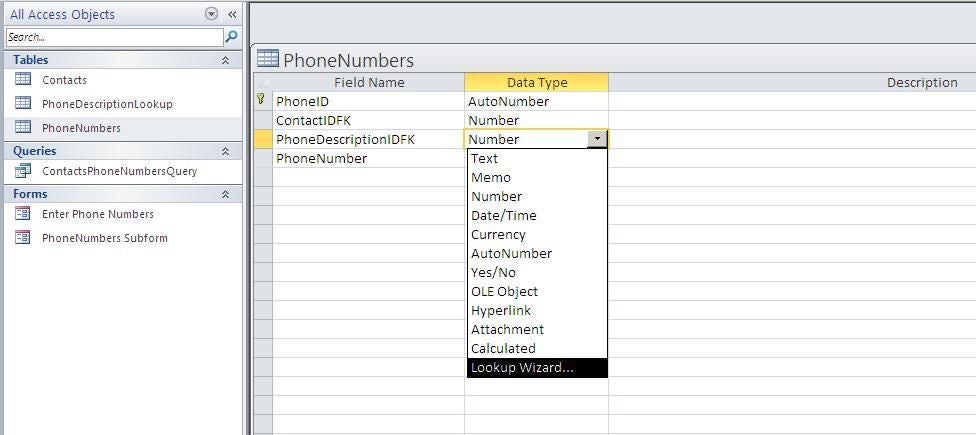
- Your values already exist in a table, so retain the default option and click Next. As a general rule, I recommend that you never type the values; always refer to existing values in a table whenever possible.
- Your values are in PhoneDescriptionLookup, so choose that table and click Next.
- Add both fields to the Selected Fields control (Figure F), and click Next.
Figure F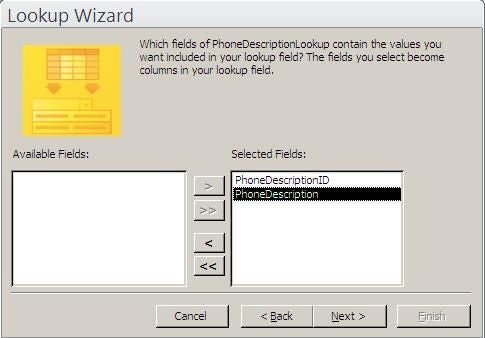
- Sort by PhoneDescription, and click Next twice.
- Click Finish, and then save the table when prompted.
Click the Lookup tab in the bottom pane to see the lookup properties you just set. The SQL statement
SELECT [PhoneDescriptionLookup].[PhoneDescriptionID], [PhoneDescriptionLookup].[PhoneDescription] FROM PhoneDescriptionLookup ORDER BY [PhoneDescription];
will populate any dependent list controls. The Column Widths property, 0″;1″, will hide the primary key values. All users will see is the text values in PhoneDescription.
7. The new form
The Enter Phone Numbers form already exists, so it can’t inherit the lookup field. You could change the control in the existing form, but doing so negates the lookup field’s true benefit — that list controls build themselves! (You’ll want to plan your lookup fields before creating forms.)
Repeat step 4 to generate a new form, and name it anything you like. As you can see in Figure G, the new subform displays the descriptive text values from PhoneDescription instead of the primary key values in PhoneDescriptionID, and you didn’t have to do a thing to populate the control.
Figure G
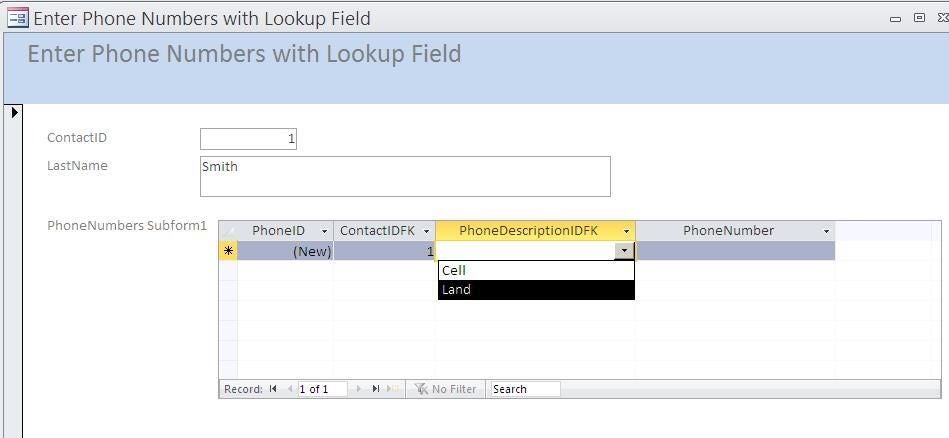
The list control inherits the field’s lookup properties.
8. Modify lookup values
Lookup values are usually stable, but occasionally, you must modify the list. To do so, open the lookup table and make the change. All of your dependent queries and controls will update accordingly — without any extra work on your part. We can illustrate this behavior by opening PhoneDescriptionLookup and adding a new record (Fax), as shown in Figure H. Save and close the table.
Figure H
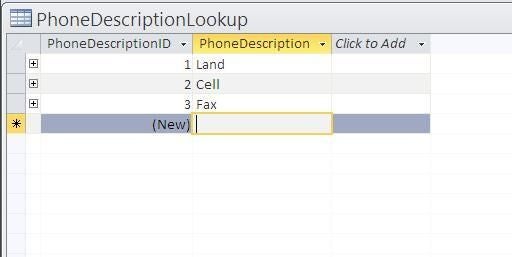
Add a new value to the lookup table.
9. Use updated list
Open the second form that you created and click the PhoneDescriptionIDFK’s drop-down list to see the updated list shown in Figure I.
Figure I
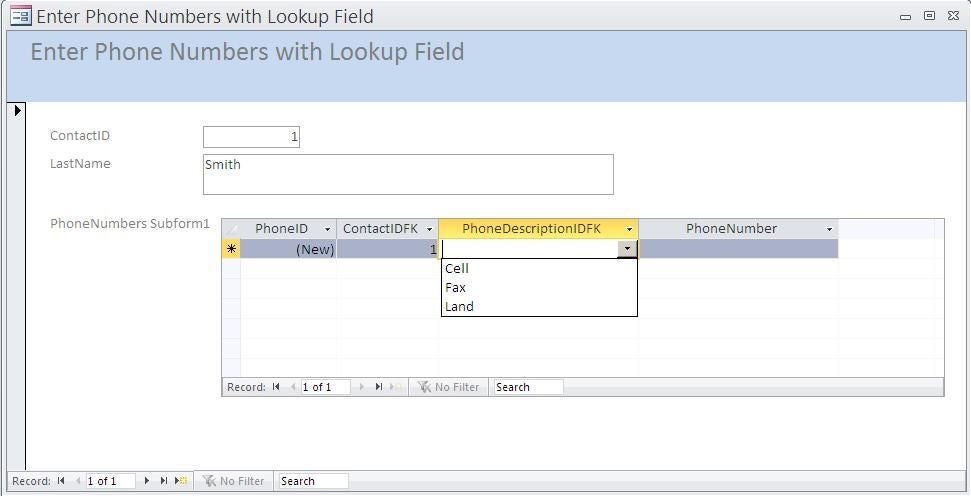
The combo box updates automatically.
10. Consequences
I mentioned that lookup fields can impede other operations, and in step 6, I recommended that you avoid implicit lists (step 2 when running the Lookup Wizard) and use a lookup table instead. With values in a lookup table, subsequent queries and reports are much easier to define. Figure J shows a simple report that groups phone numbers by their types: land, cell, and fax. With the help of a report wizard, generating this report took only a few minutes.
Figure J
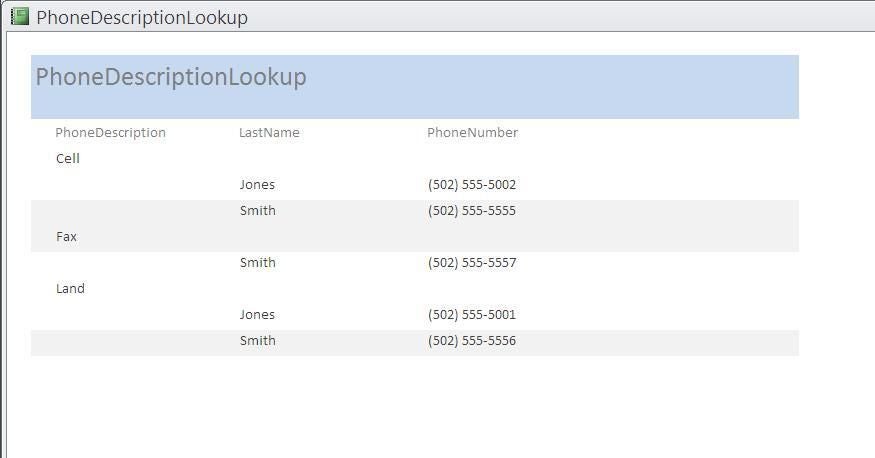
This report groups phone records by type (the lookup values).
Warning!
When populating a list control manually, you set the control’s Row Source property to retrieve values from an underlying table. The Lookup Wizard simply does this for you at the field (table) level. Despite the dire warnings of professional developers, this feature is useful as long as you adhere to #10. I’m not recommending that professional developers use lookup fields for distributed databases. I’m suggesting that users should avail themselves of a useful feature, and I know that not everyone agrees with this position.
Send me your question about Office
I answer readers’ questions when I can, but there’s no guarantee. When contacting me, be as specific as possible. For example, “Please troubleshoot my workbook and fix what’s wrong” probably won’t get a response, but “Can you tell me why this formula isn’t returning the expected results?” might. Please mention the app and version that you’re using. I’m not reimbursed by TechRepublic for my time or expertise, nor do I ask for a fee from readers. You can contact me at susansalesharkins@gmail.com.

