Word fields are placeholders that store and display data. They perform simple tasks, such as returning the current date or current page number, but they’re much more than that. You can use them to ask questions, make decisions based on specific conditions, and perform calculations. In this article, I’ll show you the basics you need to know to start utilizing this powerful and flexible feature in your Word documents.
1: Interface insertion
Using Word’s interface to insert fields is great while you’re learning or if you don’t remember all of a field’s options. You can access fields as follows:
- Position the cursor where you want to insert the field.
- Click the Insert tab. In Word 2003, choose Field from the Insert menu and skip to step # 5.
- Click the Quick Parts drop-down in the Text group.
- Choose Field, as shown in Figure A.
- Narrow your search by choosing an item from the Categories drop-down. Doing so will update the available fields in the Field Names list below.
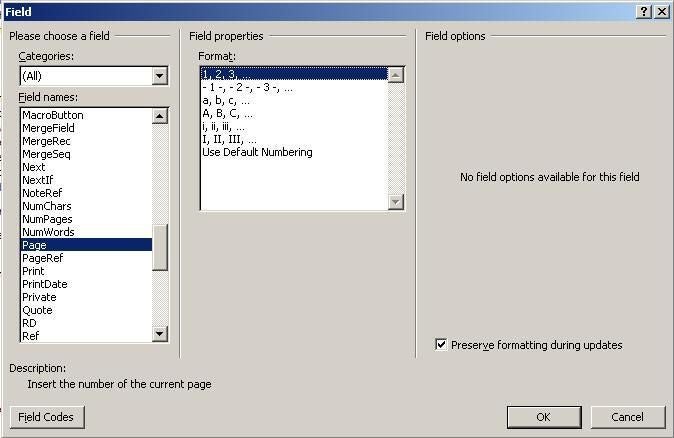
- Select a field to update the available field properties. Figure B shows the different options available for the Page field.
- Click the Field Codes button to see more advanced properties, such as switches (which I’ll explain later).
- Click OK when you’re ready to insert the field.
Figure A

Fields are part of Word’s Quick Parts feature.
Figure B

Choose a field to update the available options.
For a complete list of fields, read Field codes in Word.
2: Manual insertion
You can bypass the interface and enter fields manually. Doing so takes a bit of practice, so don’t be discouraged if you find this process a bit awkward at first:
- Position the cursor where you want to insert the field.
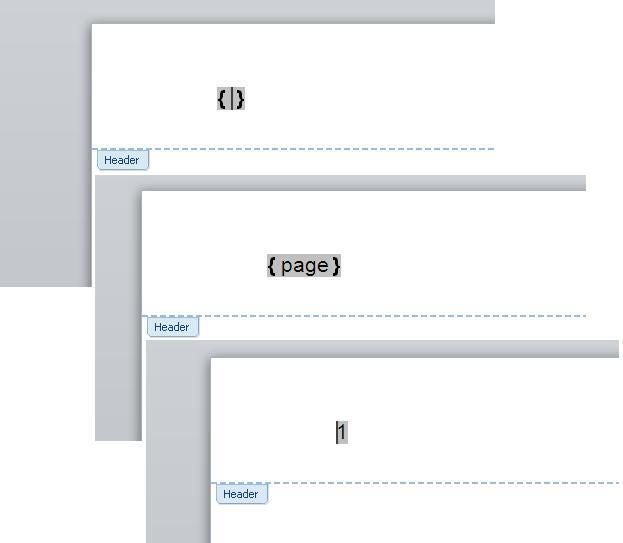
- Press Ctrl + F9 to display an empty set of field braces, as shown in Figure C.
- Type the field code within the braces.
- With the cursor still inside the field, press F9 to calculate the field.
Figure C

Ctrl + F9 inserts field braces.
You can also enter the field code (the text) first, select it, and press Ctrl + F9 to enclose the text in field braces. Then, update by pressing F9. Note: Don’t try to enter a field by typing brace characters from the keyboard; it won’t work.
3: Toggling
When entering a field manually, you press F9 to generate and display its results. To toggle between the field code and its resulting value, select the entire field and press Shift + F9. To toggle all the fields in your document, press Alt + F9. So if you open a document and see field codes instead of results, simply press Alt + F9 to toggle them all.
You’ll use this toggling feature when you’re inserting complex fields, and it’s great for debugging. You can also print the fields for documentation purposes.
4: Editing
Edit a field by right-clicking it and choosing Edit Field to open the Field dialog box you learned about in #1. Or toggle the field as you learned in #3 and you can edit the fields directly.
Right-clicking a field also offers two other options: Update Field and Toggle Field Codes, which are self-explanatory.
5: Calculating
Pressing Alt + F9 toggles between fields and their results, and it doesn’t matter where the cursor is. But when you update an individual field (by pressing F9), the cursor must be inside the field you’re updating. If a field doesn’t update as you expect, make sure the cursor is inside the field and try again. If you can’t find the field, toggle the display (#3).
6: Expressions
Field expressions combine fields and other values to return unique results. You can use the interface or enter them manually. Let’s enter a field expression that displays the filename for the current document, but only on the last page:
- Position the cursor in the document where you want to display the filename –most likely you’ll use the header or footer.
- Press Ctrl + F9 to insert the first set of field braces.
- Inside the braces, type if and press Ctrl + F9 to insert a second set of field braces.
- Inside the second set of braces, type page and press the right arrow key twice.
- With the cursor between the two closing braces, type the = sign.
- Press Ctrl + F9 to enter a third set of braces.
- Inside the third set of braces type numpages and press the right arrow key twice.
- With the cursor between the two closing braces, press Ctrl + F9 to enter a fourth set of field braces.
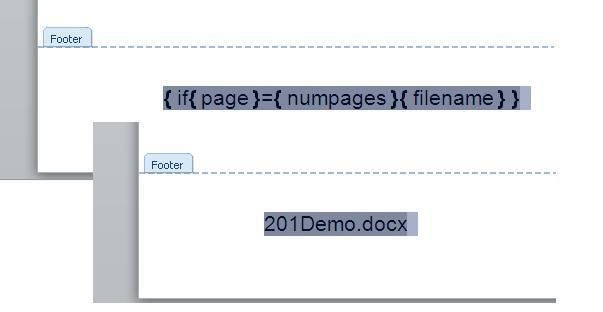
- Inside the fourth set of braces type filename. Figure D shows the resulting expression.
- Select the entire expression and press F9.
- Press Alt + F9 to display the expression’s results.
Figure D

The {IF} field can make decisions.
It seems daunting at first, but you’ll quickly get the hang of it!
7: Adding switches
Many fields have optional switches that offer more control or information. For instance, the {FILENAME} field offers one switch, \p, which returns the file’s entire path. Some fields have multiple switches. Switches are available in the Field dialog box. Just click Field Codes and then Options. If you know the switch, you can enter it via the keyboard. To learn more about using field switches, see 10 Power Tricks for Using Word Fields.
8: Converting to text
Usually, you’ll leave fields as is so they can update as conditions change. But sometimes, you might want to convert the field to its resulting (static) text. To do so, select the entire field or expression and press Ctrl + Shift + F9. Word will remove the field code, leaving only the text. If you want to retain the field code, but prevent automatic updates, lock the field by selecting it and pressing Ctrl + F11.
9: Formatting
Apply formats as you would to any other text, via the Paragraph and Font groups on the Home tab. When you need more control, add formatting switches. For instance, the \*Caps switch in the following field displays the filename using title case, regardless of the case originally applied:
{ FILENAME } \*Caps
You’ll find a list of format switches and examples at Insert and format field codes in Word 2010.
10: Shading
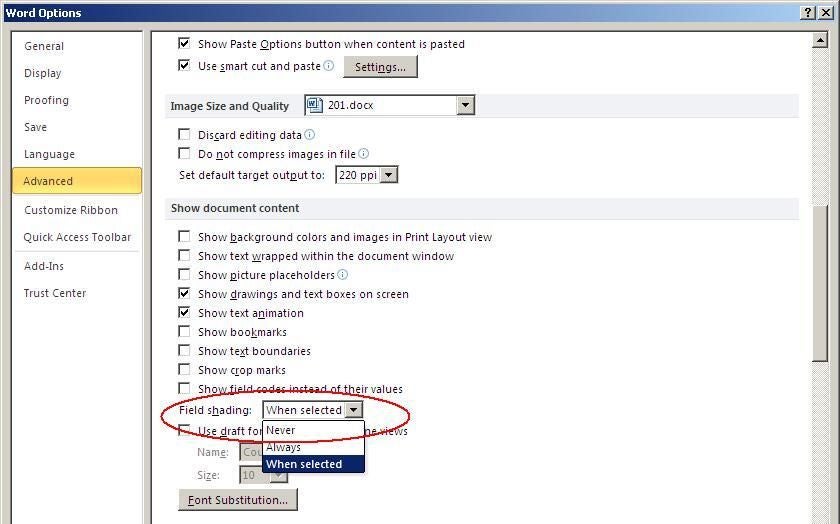
Word shades a field’s background when you select it. There are two other shade options: Never and Always. Changing this setting to Always while you’re creating the document is helpful. Once the document is complete, you can reset it to When Selected or Never.
To reset this default, do the following:
- Click the File button and choose Options. In Word 2007, click the Office button and choose Word Options. In Word 2003, choose Options from the Tools menu, click View, and skip to #3.
- Choose Advanced in the left pane.
- In the Show Document Content section, choose the appropriate option from the Field Shading drop-down, shown in Figure E.
- Click OK.
Figure E

Change this setting to control field shading.
You can also set the document to display field codes instead of their resulting values by selecting that option in the same section.
Keyboard shortcuts
You’ve already learned a few keyboard shortcuts for working with fields, but there are more. Table A provides a comprehensive list of keyboard shortcuts for manipulating fields.
Table A


