
Over the last year I’ve been working hard in my spare time
writing a multiplayer game for mobile devices. It’s slow going, and often after
putting in eight or more hours at my day gig (where I also write applications),
I start thinking I need to get a new hobby that doesn’t involve computers, cell
phones, or tablets.
Still, I do it not just because I enjoy seeing my games out
there in the market, but also because game programming is unique in that it
often tends to veer from the standard platform conventions. Game developers
frequently find themselves thinking creatively, particularly when it comes to
user experience and user interface.
What’s all this got to do with transparent progress dialogs
on Android? Well, Android’s out-of-the-box progress dialog is anything but
exciting (Figure A).
Figure A
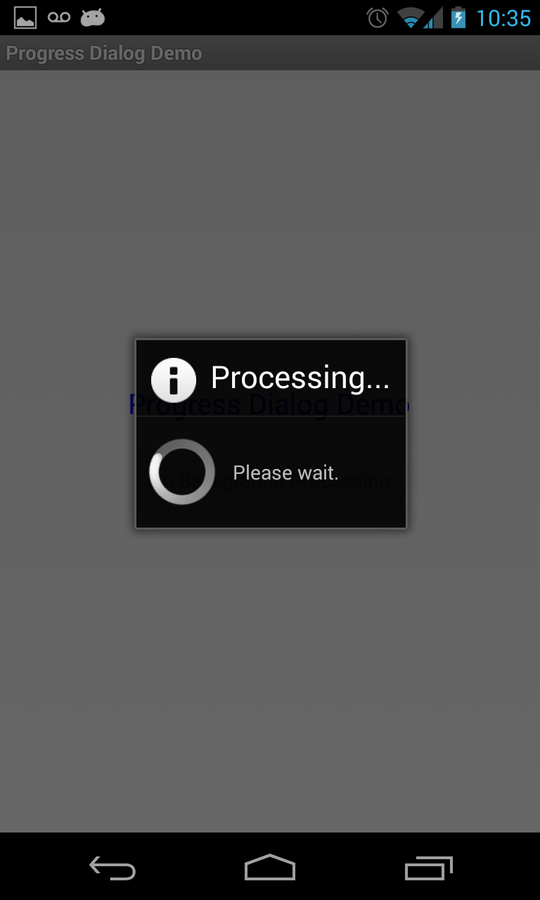
See what I mean?
For my game I needed the functionality of a blocking
progress dialog without the dialog part. After poking around the Android
documentation, a number of developer forums, and a lot of trial and error, I
succeeded in creating a transparent progress dialog that simply animates an
image of my choosing. This tutorial walks you through the steps, so you
can do the same. If you prefer, you can download and
import the project directly in Eclipse.
1. Create a new Android project in Eclipse targeting Android
2.2 or better.
2. In the /res/layout folder, create a linear layout in
activity_main.xml. Add a text label and a button.
activity_main.xml
<LinearLayout xmlns:android="http://schemas.android.com/apk/res/android"
android:layout_width="match_parent"
android:layout_height="match_parent"
android:orientation="vertical">
<TextView
android:layout_width="match_parent"
android:layout_height="wrap_content"
android:gravity="center_horizontal"
android:padding="8dp"
android:textSize="20sp"
android:text="Transparent Progress Indicator" />
<Button
android:layout_width="wrap_content"
android:layout_height="wrap_content"
android:text="Check it out!"
android:layout_marginTop="40dp"
android:layout_gravity="center"
android:id="@+id/the_button" />
</LinearLayout>
3. In the /res/values folder, open styles.xml, which is
where you will add the style for our transparent dialog. Be sure to specify the
parent attribute, or you will have problems at runtime.
styles.xml
<resources>
<!–
Base application theme, dependent on API level. This theme is replaced
by AppBaseTheme from res/values-vXX/styles.xml on newer devices.
–>
<style name="AppBaseTheme" parent="android:Theme.Light">
<!–
Theme customizations available in newer API levels can go in
res/values-vXX/styles.xml, while customizations related to
backward-compatibility can go here.
–>
</style>
<!– Application theme. –>
<style name="AppTheme" parent="AppBaseTheme">
<!– All customizations that are NOT specific to a particular API-level can go here. –>
</style>
<!– Transparent dialog –>
<style name="TransparentProgressDialog" parent="@android:Theme.Dialog">
<item name="android:windowFrame">@null</item>
<item name="android:windowBackground">@android:color/transparent</item>
<item name="android:windowIsFloating">true</item>
<item name="android:windowContentOverlay">@null</item>
<item name="android:windowTitleStyle">@null</item>
<item name="android:windowAnimationStyle">@android:style/Animation.Dialog</item>
<item name="android:windowSoftInputMode">stateUnspecified|adjustPan</item>
<item name="android:backgroundDimEnabled">true</item>
<item name="android:background">@android:color/transparent</item>
</style>
</resources>
4. Create a /drawable folder in the /res directory and add an
image to represent our spinner. The animation is a simple rotation, so you’ll
want to use something that is exactly as wide as it is tall. Here’s the image I
chose (Figure B).
Figure B

5. Now you can implement your MainActivity.java file. First,
you override the on create and wire up your button handler. Note that in the on
create you are instantiating a dialog and a handler; these reference an inner
class that you will get to shortly. The last thing MainActivity.java is
responsible for is releasing the handler and the dialog when the activity gets destroyed.
MainActivity.java
package com.authorwjf.transparentprogressdialog;
import android.os.Bundle;
import android.os.Handler;
import android.app.Activity;
import android.app.Dialog;
import android.content.Context;
import android.view.Gravity;
import android.view.View;
import android.view.View.OnClickListener;
import android.view.ViewGroup.LayoutParams;
import android.view.WindowManager;
import android.view.animation.Animation;
import android.view.animation.LinearInterpolator;
import android.view.animation.RotateAnimation;
import android.widget.ImageView;
import android.widget.LinearLayout;
public class MainActivity extends Activity implements OnClickListener {
private TransparentProgressDialog pd;
private Handler h;
private Runnable r;
@Override
protected void onCreate(Bundle savedInstanceState) {
super.onCreate(savedInstanceState);
setContentView(R.layout.activity_main);
h = new Handler();
pd = new TransparentProgressDialog(this, R.drawable.spinner);
r =new Runnable() {
@Override
public void run() {
if (pd.isShowing()) {
pd.dismiss();
}
}
};
findViewById(R.id.the_button).setOnClickListener(this);
}
@Override
public void onClick(View v) {
pd.show();
h.postDelayed(r,5000);
}
@Override
protected void onDestroy() {
h.removeCallbacks(r);
if (pd.isShowing() ) {
pd.dismiss();
}
super.onDestroy();
}
}
6. Add the inner class just below your on destroy method.
The constructor builds your transparent dialog, and the show method displays it
and starts the animation running.
private class TransparentProgressDialog extends Dialog {
private ImageView iv;
public TransparentProgressDialog(Context context, int resourceIdOfImage) {
super(context, R.style.TransparentProgressDialog);
WindowManager.LayoutParams wlmp = getWindow().getAttributes();
wlmp.gravity = Gravity.CENTER_HORIZONTAL;
getWindow().setAttributes(wlmp);
setTitle(null);
setCancelable(false);
setOnCancelListener(null);
LinearLayout layout = new LinearLayout(context);
layout.setOrientation(LinearLayout.VERTICAL);
LinearLayout.LayoutParams params = new LinearLayout.LayoutParams(LayoutParams.MATCH_PARENT, LayoutParams.WRAP_CONTENT);
iv = new ImageView(context);
iv.setImageResource(resourceIdOfImage);
layout.addView(iv, params);
addContentView(layout, params);
}
@Override
public void show() {
super.show();
RotateAnimation anim = new RotateAnimation(0.0f, 360.0f , Animation.RELATIVE_TO_SELF, .5f, Animation.RELATIVE_TO_SELF, .5f);
anim.setInterpolator(new LinearInterpolator());
anim.setRepeatCount(Animation.INFINITE);
anim.setDuration(3000);
iv.setAnimation(anim);
iv.startAnimation(anim);
}
}
Load the resulting application to a device or the emulator
to have a look (Figure C).
Figure C
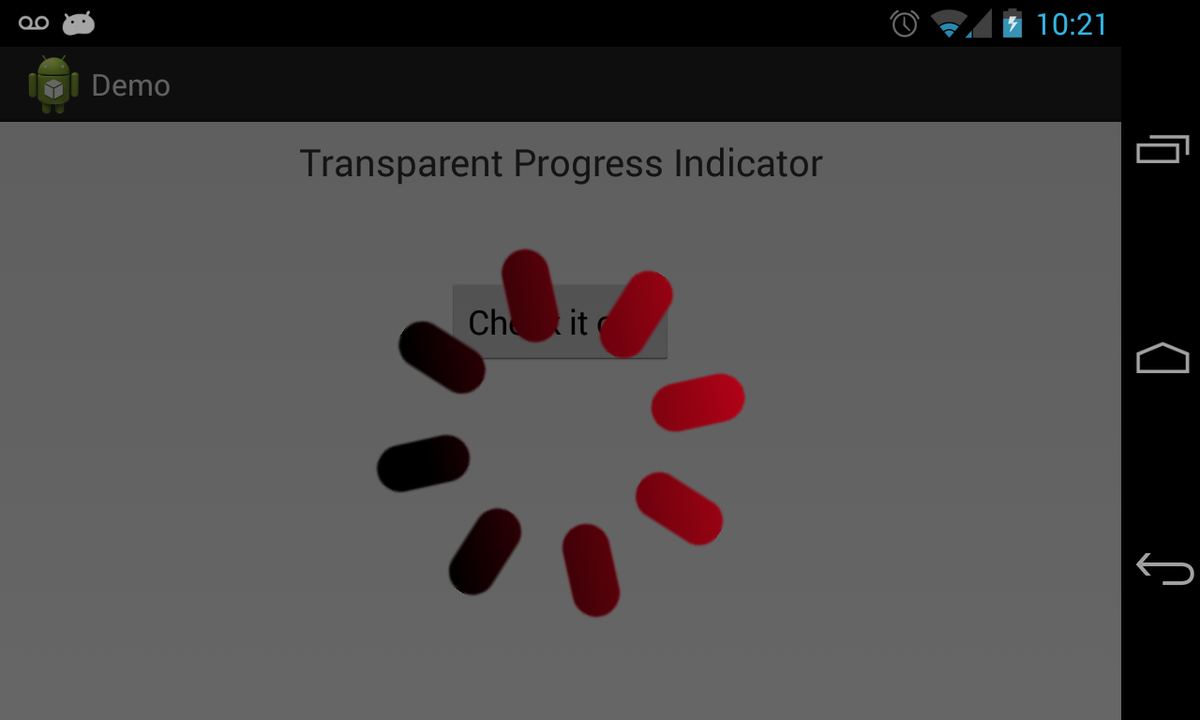
It’s not every day you want a big red sunburst in the middle
of your application UI, but the point is you can put any image of any size there.
You can apply any of Android’s built-in animations, and adding floating text is
as easy as instantiating a text view in the class constructor and pushing it
into the layout.
Once you have a chance to
play around with it, share your thoughts in the discussion thread.