


In this table-themed HTML tutorial, I’ll explain how to make a basic table, add and remove borders, create layouts, make cells the shape and size you want, place cell contents, and add color.
It’s easy to follow and designed for beginners. I have included images so you can see what the HTML 5 code should look like.
I’d also recommend using this free HTML Code Editor. Enter your code in the left-hand section, and the preview will appear on the right. It’s a great site to use if you plan to explore the world of HTML in the future.
Create a basic table
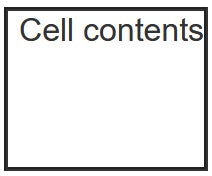
Before you can do fancy stuff with table layout, you must create a table. The <table> and </table> tags enclose all the other elements of a table. Each row in a table is set up with a <tr> (table row) tag, which is followed by a <td> (table data) tag for each cell in that row. The following code sets up a simple 2-by-2 table:
<table>
<tr>
<td>Cell contents </td>
<td>Cell contents</td>
</tr>
<tr>
<td>Cell contents</td>
<td>Cell contents</td>
</tr>
</table>
The <table>, <tr>, and <td> tags all have various attributes that let you control the look of the table itself as well as the placement of its contents. (Read the rest of our table tips to get acquainted with them.) In the absence of those attributes, the table defaults to fit around the cell contents. You’ll notice I added on the third line as I wanted a space between the words. Thus, in most browsers, the code above yields a borderless table that looks like this:

SEE: 5 Essential HTML Rules for Beginners (TechRepublic)
Add and remove borders
Tables don’t have to contain text only, of course. Most of the complex layouts you see on the Web combine images and text inside various table cells — you just can’t see the lines, or borders, between the cells. The border attribute of the <table> tag allows you to assign a thickness (in pixels) to the border lines.
To make a table with a border of 2 pixels, just add border=”2″ to the <table> tag. To make an invisible border, set the border attribute to 0. (Although most browsers default to a table border of 0, specifically stating it ensures that the border will be invisible in all browsers.)
Below are two examples of what this looks like. On the left are the codes for one table with a 2-pixel border and another table with an invisible border. The finished products are on the right.
Example one:
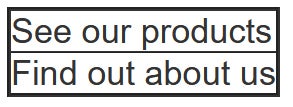
<table border=”2″>
<tr>
<td>See our products</td>
</tr>
<tr>
<td>Find out about us</td>
</tr>
</table>
Example two:
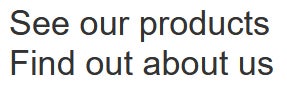
<table border=”0″>
<tr>
<td>See our products</td>
</tr>
<tr>
<td>Find out about us</td>
</tr>
</table>
Here’s a useful trick — design the table with a visible border, which will show you just how your elements are broken up. When you have everything in place, change the border attribute to 0.
SEE: AI-Generated Code is Causing Outages and Security Issues in Businesses (TechRepublic)
Create table layouts
Two attributes for laying out table content were cellpadding and cellspacing. However, in HTML 5, those attributes are no longer supported. That’s not a problem; using the style sheet language Cascading Style Sheets will help. CSS is good to know because it can be used to specify the presentation and styling of a document.
The CSS section in our example starts with <style> and ends at </style>. The wording should be self-explanatory, as the border is set at 2 pixels and is solid black, while the padding is set at 10 pixels. The latter controls the distance (in pixels) between the cell’s contents and its sides.
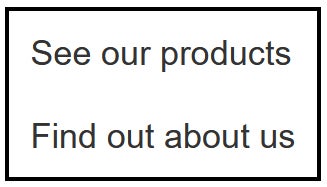
<style>
table {
border: 2px solid black;
border-collapse: collapse;
}
td {
padding: 10px;
}
</style>
<table>
<tr>
<td>See our products</td>
</tr>
<tr>
<td>Find out about us</td>
</tr>
</table>
Make cells the shape you want
HTML doesn’t stick you with plain grids for your table layout. With the rowspan and colspan attributes of the <td> tag, you can make a given cell span the height or width of several other cells. To use these attributes, simply assign them a value based on the number of cells you want to span.
For instance, the following table has two rows of three columns each:

<table border=”2″>
<tr>
<td>Cell contents</td>
<td>Cell contents</td>
<td>Cell contents</td>
</tr>
<tr>
<td>Cell contents</td>
<td>Cell contents</td>
<td>Cell contents</td>
</tr>
</table>
To make the first cell span all three columns, add colspan=”3″ to its <td> tag and delete the other two <td> tags in that row:

<table border=”2″>
<tr>
<td colspan=”3″>Cell contents</td>
</tr>
<tr>
<td>Cell contents</td>
<td>Cell contents</td>
<td>Cell contents</td>
</tr>
</table>
If you’d like to make that first cell span two rows instead, add rowspan=”2″ to its <td> tag and delete the first <td> tag from the second row:

<table border=”2″>
<tr>
<td rowspan=”2″>Cell contents</td>
<td>Cell contents</td>
<td>Cell contents</td>
</tr>
<tr>
<td>Cell contents</td>
<td>Cell contents</td>
</tr>
</table>
Of course, you can make your tables far more complex than these examples. If you choose to do so, it’s always a good idea to sketch out your tables before you create them.
Make cells the size you want
Table cells size themselves to their content by default. But what if you want cells of a different size? Enter the width and height attributes of the <td> tag. Just specify the size in pixels, and you’re all set. To make a cell 100 pixels wide and 80 pixels high, for example, you’d do this:

<table border=”2″>
<tr>
<td width=”100″ height=”80″>Cell contents</td>
</tr>
</table>
Note that width and height are only suggested attributes. That is, they take effect only if the cell’s set width or height doesn’t conflict with other cells in the same column or row.
SEE: Quick Glossary: Web Browsers (TechRepublic Premium)
Precisely place cell contents
Once you start changing the shape and size of table cells, the cells no longer shape themselves around their contents. Thus, to place elements where you want within such table cells, you need two attributes of the <td> tag: align, which places objects left, right, or center within a cell; and valign, which moves them up and down using the top, middle, and bottom instructions. (By default, elements align horizontally to the left and vertically in the middle.) For instance, to align text to the top right in a 100-by-80-pixel cell, you’d use the following code:
<table border=”2″>
<tr>
<td width=”100″ height=”80″ align=”right” valign=”top”>Cell contents</td>
</tr>
</table>
Note: when you’re placing objects in table cells, and you want them to align properly, don’t leave space after the opening <td> or before the closing </td> of a cell. The cell’s contents should touch the <td> tags to ensure proper alignment, especially when you’re working with images.
Make your table colorful
Sick of having your table blend in with your page? Then change its background color! It used to be a case of adding the bgcolor attribute to the <table> tag and assigning it a standard hexadecimal color code or a one-word color name. However, this attribute is no longer supported in HTML 5. That means we turn to CSS again.
For example, this code creates a simple table with a pale blue background:
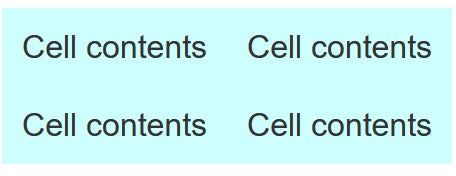
<style>
table {
background-color: #CCFFFF;
}
td {
padding: 10px;
}
</style>
<table>
<tr>
<td>Cell contents</td>
<td>Cell contents</td>
</tr>
<tr>
<td>Cell contents</td>
<td>Cell contents</td>
</tr>
</table>
Place your table on the page
In addition to formatting elements within a table, you can control where your table appears on the page. Two <table> attributes can help you out:
- The align attribute aligns the table left, right, or center on the page (left is the default).
- The width attribute lets you specify a fixed amount of pixels for the table’s width (by using a number, as in <table width=”65″>) or lets you make the table occupy a percentage of the browser window’s width (by assigning a percentage, as in <table width=”90″>).
Thus, the following code sets up a table 150 pixels wide and centered on the page:
<table width=”150″ align=”center”>
The code below sets up a table three-quarters the width of the browser window, aligned on the right side of the page:
<table width=”75%” align=”right”>
TechRepublic Academy offers more info about HTML, CSS
As you can see, with basic knowledge of HTML, tables can be constructed with ease. In fact, when you get more familiar with HTML, you’ll find some of it can be replaced with CSS.
If you’re keen to learn more about HTML and CSS, then head over to TechRepublic Academy. There are plenty of training courses available on that site. Happy hunting!
Contributions by Donald St. John, with additional material and advice from Cormac Foster, Mark Kaufman, Charity Kahn, and Matt Rotter.