


This article is also available as a TechRepublic download.
Numerous
remote administration and connectivity tools exist to help support technicians
and IT administrators troubleshoot, maintain, and access systems in different
locations. Some are easy to use and require no firewall configuration. Others
possess expensive and potentially prohibitive licensing requirements, while
delivering more advanced functionality.
Often,
VNC—which stands for Virtual Network Computing—is the remote administrative
tool of choice for IT professionals. In its earlier iterations, VNC offered a
simple, relatively straightforward method of affordably implementing fairly
secure access to remote systems.
Over
time, the open source community revised and improved the remote access tool.
Developer Constantin Kaplinsky,
in particular, maintained a project dedicated to delivering an improved VNC remote administration tool that addressed VNC’s shortcomings. The result is a more capable
application known as TightVNC.
Where to get TightVNC
Advertised
as an OS-independent client/server package enabling remote network access to
graphical desktops, TightVNC is a free tool
organizations can use to solve remote connectivity needs. The software is
distributed under the GNU General Public License. The self-installing
Windows package can be downloaded
from SourceForge.net.
Linux, UNIX, and Java (viewer only) versions are also available.
TightVNC enhancements
Among
the enhancements in TightVNC not found in standard
VNC implementations are the ability to transfer files from the local system to
the remote workstation (referred to as the server, in VNC parlance) or vice
versa and adjustable compression levels to better mate connection speeds with
the work being performed via the remote connection.
Other
improvements include improved cursor handling (cursor movements are all
processed locally to prevent performance issues), optimization for slower
Internet connections, JPEG compression enabling better display performance, Web
browser improvements that support up to 24-bit color modes, tightened security
through the use of two passwords (one for full control and another for read-only access), and automatic SSH connectivity within UNIX.
Installing TightVNC
To
install TightVNC on the workstation or server you
wish to access remotely, begin by downloading the self-installing TightVNC package. Once you have the installation file ready
(the current version at the time of this writing is tightvnc-1.2.9-setup.exe), follow these steps:
- Double-click the executable file. The Welcome To TheTightVNC Setup Wizard
will appear. Click Next. - Review the terms of the GNU General Public License,
then click Next to acknowledge your acceptance of
those terms. - Specify the location where you wish to place the
application’s files and then click Next. - Specify whether you wish to perform a full
installation, a compact installation, or a custom installation. In this
example, we’ll perform a full installation by accepting the default
settings and clicking Next. - Specify whether the Setup program should create a Start
Menu folder and the name you wish to use for the folder and then click Next. - Configure additional settings. By default .vnc
files are associated with TightVNC Viewer. If
you want the system to serve as a VNC server, or host system, check
the box for Register TightVNC Server as a system
service. Then, click Next. The Ready To Install Screen will appear (Figure A).
|
Figure A |
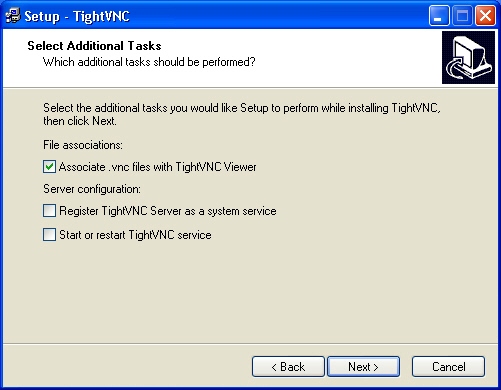 |
| The TightVNC Setup program enables registering TightVNC Server As A System Service during installation. |
- Click Install to set up TightVNC.
The application will install itself, and then you will see the Completing TheTightVNC Setup Wizard. - Click Finish to complete TightVNC
installation. On systems configured to operate as servers, or hosts for
remote connections, it’s also helpful to reboot Windows.
Configuring the TightVNC host
Once TightVNC is installed, follow these steps to configure the host system:
- Ensure TightVNC is set to
start as a system service. Doing so ensures TightVNC
is active should you wish to connect remotely, even if no user is present
or sitting at the remote workstation. The Register
As A System Service option can be selected when installing TightVNC, as shown in the previous steps. - Configure a password for TightVNC
sessions. You can enter the password by double-clicking the VNC icon from
within the Windows System Tray and specifying the password in the
Incoming Connections section of the Current User Properties dialog box (Figure B).
|
Figure B |
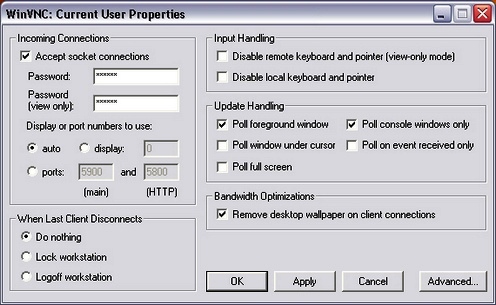 |
| Use the WinVNC: Current User Properties dialog box to configure connection options. |
- Specify additional settings, such as whether you wish
to disable the use of empty passwords, enable loopback connections, and log
session information to WinVNC logs, by
clicking the Advanced button in the WinVNC: Current User Properties dialog box. Once
you’ve configured settings as you wish, click Apply, then click OK to close
all open windows (Figure C).
|
Figure C |
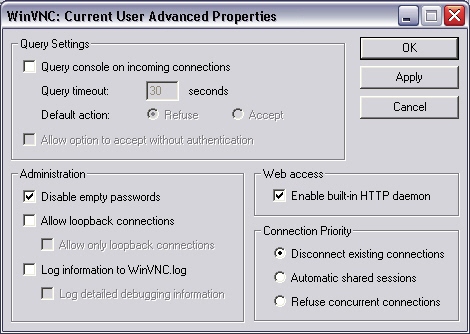 |
| Advanced TightVNC connection options are configured using the Current User Advanced Properties menu. |
- Confirm the Windows Firewall (and any other software-
and hardware-based firewalls) are configured to allow the TightVNC traffic. In Windows, click Start | Control
Panel | Windows Firewall and select the Exceptions tab. Confirm that the WinVNC options are checked;
otherwise, Windows Firewall will block your connection attempts.On other firewalls, port 5900 may be required to enable VNC traffic to pass
properly. (Other VNC implementations sometimes use ports 5500 and 5800.)
For best security, administrators should test configurations to determine
the minimum ports that need be opened to enable the connection to work
within their specific environments.
Connecting to a TightVNC host
Connect
to a TightVNC-enabled remote host by installing TightVNC on a local system and following these steps:
- Open a TightVNC Viewer on the
local system by clicking Start | All Programs | TightVNC
| TightVNC Viewer. The Connection Details window
will appear (Figure
D). Enter the name of the remote VNC server to which you wish to
connect. If you’ve changed the default port, you can specify the new port
using this format: 192.168.1.1:9500.
|
Figure D |
 |
| Enter the IP address of the system to which you wish to connect within the Connection Details screen. |
- Click Options to configure additional settings. The
Connection Options dialog box appears (Figure E). Configure any required options (such as
hiding the remote cursor and restricting pixels to 8 bits on slow networks), then click OK. You’ll be returned to the Connection Details screen.
Click OK to connect to the remote system.
|
Figure E |
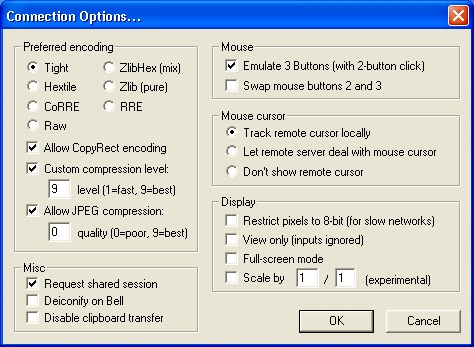 |
| Configure connection options using the settings provided in this dialog box. |
- Enter the session password configured within the remote
system’s WinVNC: Current User Properties menu
and click OK. The remote system’s screen will then appear on the local
system, thereby providing the ability to view and configure the remote
system using the local workstation or server (Figure F).
|
Figure F |
 |
| Once the proper session password is supplied, the remote workstation’s desktop appears on the local system. |