I’ve covered setting up two-step verification on Google before. I’ve even covered migrating two-step verification from device to device. However, in the never-ending pursuit of higher and better security, as you might expect, Google has changed things up a bit. Although the process is the same for the most part, it retains that similarity with just enough variance as to make it a bit confusing for some. To clear that up, I thought I’d revisit the topic once again. Why? Because it’s one of great importance. Everyone should be making use of two-step verification on Google (and on every account you use that offers the option). If you’re not using two-step authentication, get on the train now and start.
If you’re unsure of what two-step verification is, let me explain.
What is two-step verification?
So you use Google. When you log in, you enter your email address followed by a password. When you enter that password correctly, you are allowed into your account. But say Google gets hacked or you unwittingly hand out your password to someone and they, in turn, hand it out to another. With your password in the wild, your account can easily be breached without you knowing it. You can change your password, but it could be too late. Maybe someone logs in before you and changes the password to lock you out. With two-factor authentication, that become exponentially harder. How? Simple. With two-step verification setup, the log in process looks like this:
- You enter your username
- You enter your password
- You are prompted to enter an authentication code or to authorize the login from your mobile device
Without the authentication code, or authorization from your mobile device, you (or someone else) cannot gain access to your account. That is why two-step verification is important.
Because Google has changed the way two-step verification is setup, it alters the landscape of how you migrate your two-step authorization from one device to another. Let’s walk through the process of making that change.
What you’ll need
Obviously you’ll need to have your Google account setup to work with two-step authentication. You will also need to have the Google Authenticator installed on the new device as well as a barcode scanner (such as QR Code Reader).
The steps
Here we go.
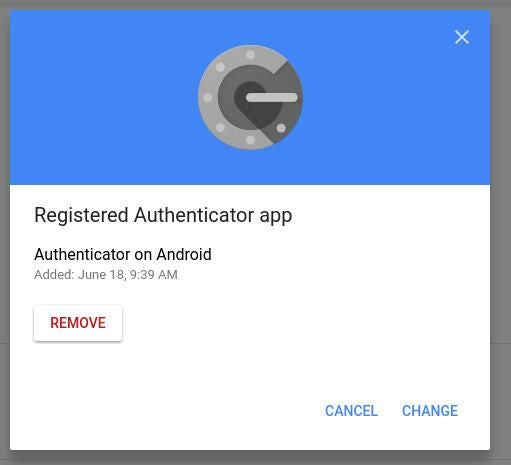
The first thing you must do is log into your Google account. Once there, click on your profile icon (upper right corner of any Google app) and then click My Account (or just go directly to the My Account page). In the account page click Sign In & Security. On the new page, scroll down a bit until you see 2-Step Verification (under Password & sign-in method). Click on that entry and then click the Sign In button (you may have to re-enter your account password here). In the new window, locate and click the edit button associated with the Authenticator app. When prompted (Figure A), click Change.
Figure A

Migrating the Google Authenticator to a new device.
Select the type of phone you have (either Android or iPhone) and click NEXT. When you see the QR code, open the barcode scanner on your new device and scan the code. You will then be prompted to open the link derived from the scanned code. Do so and then tap OK when asked to save the key for your account. That’s it. You’ve officially migrated Google two-step verification from one device to another with the new Google process.
Enable two-step immediately
I cannot repeat this enough. Enable two-step verification on every account you have. Google, Facebook, Amazon, Dropbox, ssh, Nextcloud, any service that offers two-step verification, you owe it to yourself and to your data to enable it asap. Don’t leave your accounts open for nefarious doings. Even if you use the strongest passwords possible, those accounts can still be hacked. By employing two-step verification, that likelihood is exponentially decreased.
