


Image: Jack Wallen
GlusterFS is a network file system capable of handling petabytes of data and thousands of users. For your data center Linux servers, GlusterFS might well be the file system you need for on-premises storage.
More about data centers
- Stargate Norway: OpenAI’s First AI Data Center in Europe
- AI Data Centers’ Soaring Energy Use: Who Pays for Higher Utilities Costs?
- China’s Submerged AI Data Center Could ‘Influence Global Sustainable Computing’
- Google to Power Data Centers With Nuclear Energy by 2030 in First-Of-A-Kind’ Agreement
I’m going to show you how to set up three Ubuntu servers that will represent a single namespace, using GlusterFS. I’ll be demonstrate on Ubuntu 18.04 and will assume you already have three Ubuntu Servers ready to go.
And with that said, let’s get GlusterFS up and running.
SEE: Quick glossary: Storage (Tech Pro Research)
The layout
I have three Ubuntu 18.04 servers at the following addresses:
- 192.168.1.206
- 192.168.1.207
- 192.168.1.208
Mapping addresses
Open up the hosts file on each server with the command sudo nano /etc/hosts and then add the following (modifying to fit your IP address scheme):
192.168.1.206 gfs01

192.168.1.207 gfs02

192.168.1.208 gfs03
Save and close those files.
To make matters clearer, change the hostnames for each server to represent that which is mapped in the hosts file.
Add the necessary repository
On each server, issue the following commands to add the necessary dependency, repository, and key:
sudo apt install software-properties-common -y

wget -O- https://download.gluster.org/pub/gluster/glusterfs/3.12/rsa.pub | apt-key add -

sudo add-apt-repository ppa:gluster/glusterfs-3.12
Installing, starting, and enabling GlusterFS
From the terminal on gfs01 and gfs02, issue the following command to install GlusterFS:
sudo apt install glusterfs-server -y
Now we can start and enable GlusterFS with the commands:
sudo systemctl start glusterd

sudo systemctl enable glusterd
Configure GlusterFS
The first thing to do is to create a trusted pool. This is done on gfs01 with the command:
sudo gluster peer probe gfs02
You should immediately see peer probe: success.
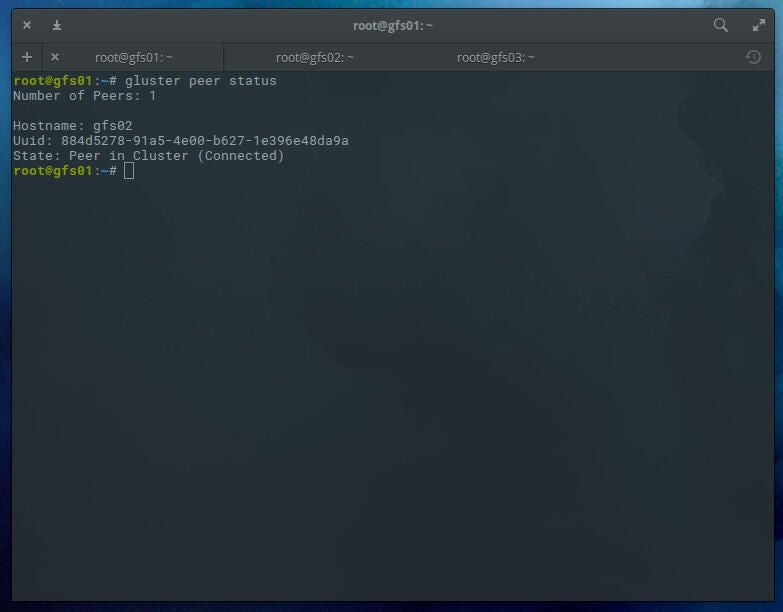
You can check the status of peers with the command:
sudo gluster peer status
You should see that 1 peer has been added (Figure A).
Figure A
Create a distributed GlusterFS volume
With our pool created, we must create a distributed GlusterFS volume. I would recommend creating this volume on a partition that isn’t within the system directory, otherwise sync errors may occur. Create a new directory on both gfs01 and gfs02 with the command:
sudo mkdir -p /glusterfs/distributed
Next we can create the volume. We’ll create a volume named v01 with replicas gfs01 and gfs02 with the command (issued on gfs01):
sudo gluster volume create v01 replica 2 transport tcp gfs01:/glusterfs/distributed gfs02:/glusterfs/distributed
After the distributed filesystem has been created, you need to start the volume with the command:
sudo gluster volume start v01
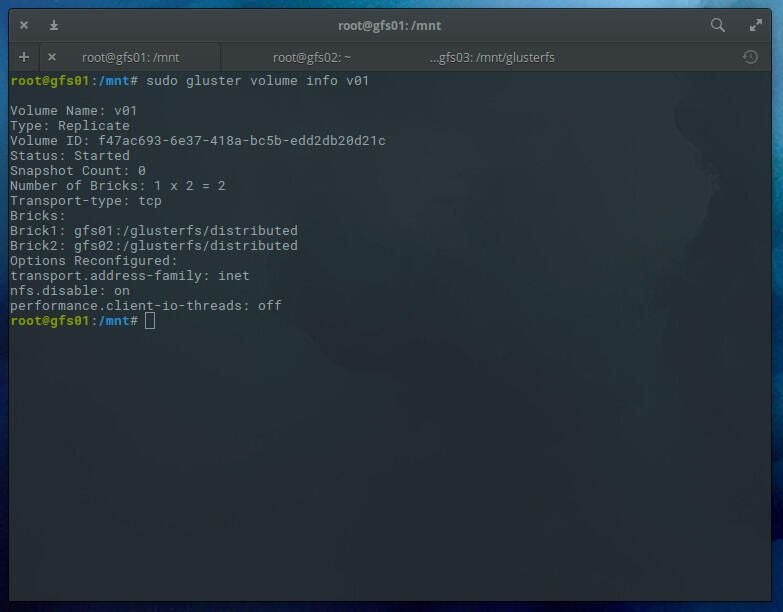
You can check the status of the volume with the command:
sudo gluster volume info v01
You should see the volume has been started (Figure B).
Figure B
The GlusterFS client
We’re going to use gfs03 as our client. To install the necessary package, issue the command:
sudo apt install glusterfs-client -y
After the installation completes, create a mount point with the command:
sudo mkdir -p /mnt/glusterfs
Mount the distributed glusterfs volume with the command:
sudo mount -t glusterfs gfs01:/v01 /mnt/glusterfs/
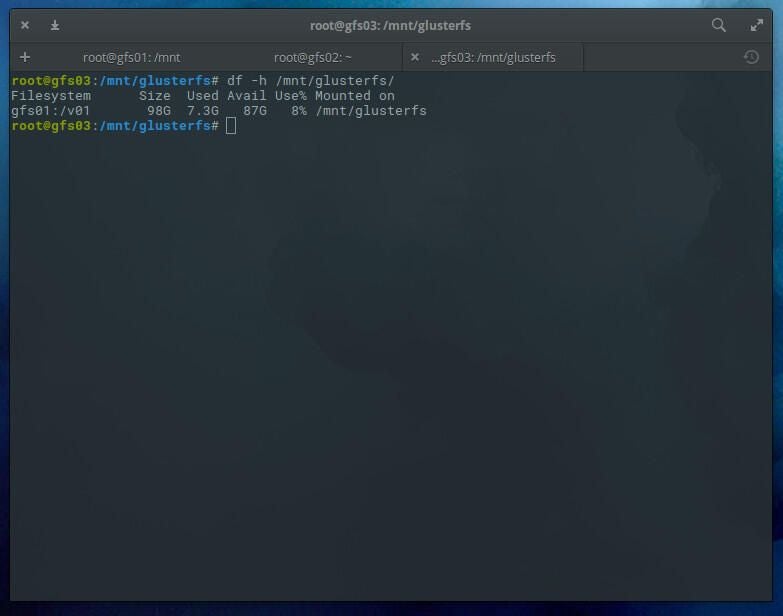
Check the volume with the command:
df -h /mnt/glusterfs
You should see the volume has been successfully mounted (Figure C).
Figure C
To make this mount happen upon reboot, and add the following line to the gfs03 /etc/fstab file:
gfs01:/v01 /mnt/glusterfs glusterfs defaults,_netdev 0 0
Now, should you have to reboot your server, the GlusterFS volume will automatically mount.
Testing
On gsf01, issue the command:
sudo mount -t glusterfs gfs01:/v01 /mnt
On gsf02, issue the command:
sudo mount -t glusterfs gfs02:/v01 /mnt
Now go back to gfs03 and create a test file with the command:
sudo touch /mnt/glusterfs/testing
Go back to both gfs01 and gfs02 and issue the command:
ls /mnt
You should see the empty testing file created on gfs03.
At this point, any file created within the mounted volume will be automatically distributed to the nodes. You can create files on gfs01 or gfs02 at /mnt or gfs03 at /mnt/glusterfs, and they will automatically sync.
And that is a GlusterFS distributed file system that offers significant scaling and reliability.