


If you use VirtualBox in your data center, you’ve probably run into a situation where you needed to move a file from guest to host or vice versa. When you can’t figure that out, you wind up having to use Dropbox or some other third-party solution. You don’t have to.
VirtualBox has the ability to share folders between guest and host to make moving files back and forth much more efficient. Although there are a few steps involved, it doesn’t take long to set up. Let’s do just that.
SEE: Virtualization Policy (Tech Pro Research)
Installing the Guest Additions
First, you must install the Guest Additions. Without installing this software, your guest will not be able to recognize the necessary vboxsf file system, thus rendering your guest/host unable to share folders.
More about data centers
- Stargate Norway: OpenAI’s First AI Data Center in Europe
- AI Data Centers’ Soaring Energy Use: Who Pays for Higher Utilities Costs?
- China’s Submerged AI Data Center Could ‘Influence Global Sustainable Computing’
- Google to Power Data Centers With Nuclear Energy by 2030 in First-Of-A-Kind’ Agreement
The steps for installing the Guest Additions will vary depending upon the host operating system. I’ll demonstrate how to do this using a Ubuntu Linux 16.04 host. Here are the steps.
- Boot the guest OS.
- Once booted, click Devices | Insert Guest Additions CD Image.
- When prompted, click Run.
- Type your user password and click Authenticate.
- Allow the installation to complete.
- When prompted, hit the Enter key on your keyboard.
One last step is to add your user to the vboxsf group using this command:
sudo usermod -aG vboxsf $(whoami)
At this point, the Guest Additions have been installed, and you can continue.
Creating the shared folder
You must know where the folder is on the host that you plan on sharing. For example, let’s say we’re going to use ~/Public on a Linux host operating system–this will be the folder the host can see and use.
With the guest still booted, click Devices | Shared Folders | Shared Folder Settings. In this new window, you’ll create a new Transient Folder. Click the + button and, in the resulting window (Figure A), select the Folder Path drop-down.
Figure A
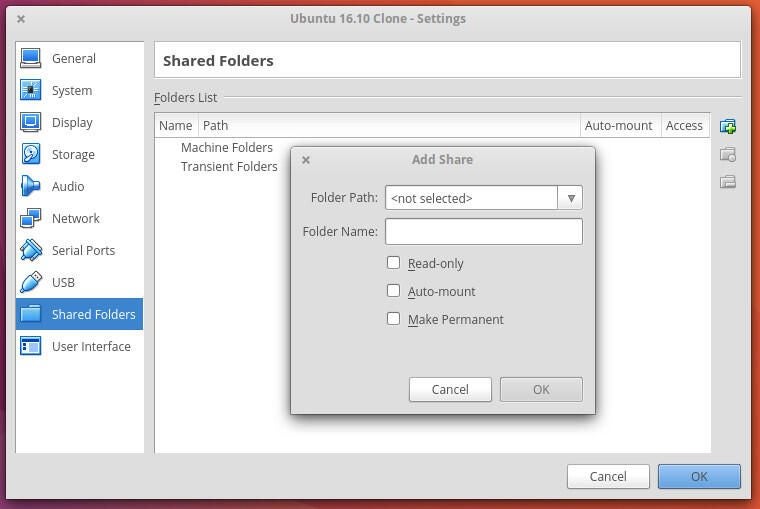
When you click the Folder Path drop-down, select Other and then navigate and select the folder on the host (in our case, ~/Public). In the Folder Name area, type Public, or whatever name you want the shared folder to appear as on the guest. Click to enable Auto-mount and then click OK. Click OK in the VirtualBox Settings window, and your folder is ready to be mounted.
Mounting the shared folder
You will mount the shared folder from within the guest. Since we’re using a Linux guest, the process for mounting our newly shared folder will be the following.
- Open a terminal window.
- Mount the shared folder with the command sudo mount -t vboxsf Public ~/Public.
- Open your file manager, and you should see the contents of ~/Public (from the host) in the folder ~/Public (on the guest).
Because you checked Auto-mount when you created the shared folder, it will automount at boot (and be listed as, in our case, sf_Public). Because you added your user to the vboxsf group, you will have access to the share without having to change any permissions.
That’s it! You’re able to share between VirtualBox guest and host. You’ll have to go through this process for all of your guests, but once it is set up, they will always have access to the shared folder.