


So you’ve got a dead power supply and want to know why. The problem could be something simple, like a blown fuse or loose wire. If so, you might be able to fix the supply for less than $1. This article will outline how to replace a bad power supply fuse, saving you the cost of a whole new supply.
WARNING!
Working on a power supply should not be taken lightly or attempted by someone with little electrical experience. Even when the supply is unplugged, its components can remain charged and SHOCK YOU. If you are in doubt about your abilities, let an experienced repair technician do the work or simply replace the entire power supply.
If you do decide to open a power supply, remember to UNPLUG IT FIRST. Also, DO NOT WEAR A SHORTING BRACELET when working inside a power supply. You do not want to be in the current path of a discharging capacitor. Remember that power supplies are not the high-dollar items they once were and an hour of a tech’s labor is sometimes more than the cost of a new supply. If you do feel confident to work on a power supply, you do so AT YOUR OWN RISK.
Finding the fuse
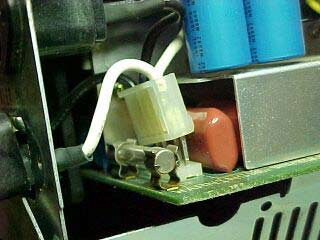
Most power supplies contain very few user-serviceable parts. The one possible exception is the fuse. Every supply I’ve opened has contained a fuse. Some are mounted in spring clip holders on the circuit board inside the supply as shown in
Figure A. A few even have a holder with a twist-off cap mounted through the supply’s housing and are easily changed without removing the cover.
| Figure A |
 |
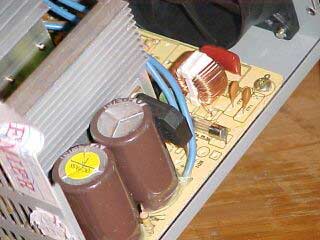
Most of them, however, are soldered directly to the circuit board as shown in Figure B and are not something a novice tech should attempt to replace. The replacement process requires you to remove the circuit board from the housing, unsolder the blown fuse from the circuit board, and then solder the new fuse back in place.
| Figure B |
 |
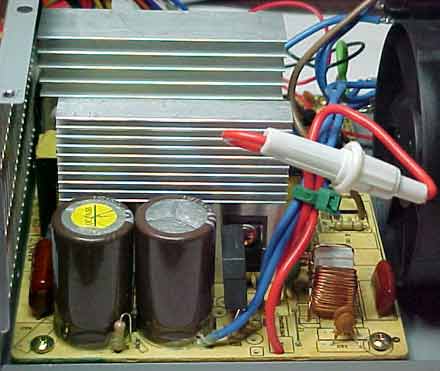
Working on the underside of these circuit boards in close proximity to a possibly charged capacitor, shown in Figure C, should not be taken lightly.
| Figure C |
 |
If in doubt about your ability, let an experienced repair tech do it or just replace the power supply. However, if you feel that you are competent to do the replacement, here’s how.
Remove and open the supply
To begin, unplug the line-voltage power cord, open the computer’s case, and unplug all the low-voltage cables from all the drives and the motherboard.
Remove any peripheral cards that might be obstructing the power supply. Remove the screws holding the power supply to the case. (Normally, there are four of them.) Support the supply as you take out the last mounting screw, as you don’t want to drop it on the motherboard, and then remove the power supply from the case. Check the date stamped on the warranty/safety seal (see Figure D).
If it is still under warranty, you might want to consider returning it for a new unit. If the warranty has expired, you may break the seal and open the power supply. This entails removing four to six screws. When separating the power supply’s case, be careful not to skin or scrape the wires.
| Figure D |
 |
Determining if the fuse is bad
Once the supply’s case is opened, you will be able to see the major components (see Figure E). Fuses are normally found along one edge of the board and are readily identifiable.
| Figure E |
 |
Use an ohmmeter to verify that the fuse is indeed blown before removing the board from the case (see Figure F). A blown fuse will have infinite resistance on the meter, while a good fuse will read 0.1 to 10 ohms. Once you determine that the fuse was blown, take a minute to look over the other components on the board.
| Figure F |
 |
Any obvious signs of smoke or a burn mark on or near any other component means there are other problems that contributed to the fuse blowing. If that’s the case, replacing the fuse will probably NOT solve the problem. At that point, you should forget about replacing the fuse and, instead, install that spare power supply you’ve been saving.
Replacing the fuse
Having determined that a blown fuse is the only obvious problem, your next move will depend on how the fuse is attached. If a spring clip holder holds the fuse in place, you can easily replace the fuse by using a plastic fuse-puller. If the fuse is soldered in place, your next step is to remove the circuit board from the supply’s case to access the board’s underside.
WARNING!
Handle the power supply’s circuit board by its edges and DO NOT touch any of the soldered pins on the bottom of the board. Hitting the wrong pin by mistake can create a shock hazard.
Plug in your soldering iron and set it out of the way while it heats. Double-check the location of the fuse before touching the hot soldering iron to its pins to remove them. Some manufacturers print the value of the fuse right next to the fuse on the circuit board (see
Figure G), but some don’t. If the value isn’t printed, you will have to remove the old fuse to read its values to know which size to reinstall.
| Figure G |
 |
Carefully apply the tip of the hot (about 700 degrees) soldering iron to the short piece of tinned wire soldered to each end of the fuse and gently push it up through the printed circuit board as the solder softens (see Figure H). Once the old fuse is free, you can identify it.
| Figure H |
 |
To directly attach the new fuse, you will have to solder similar pins to the ends of the new fuse. To do this, buff each end of the new fuse with emery paper to dull the chrome plating. Dab the end of a piece of stripped 24-gauge wire about six inches long with flux and tin it with resin core solder. Do the same to each end of the new fuse and then solder the wire to the fuse ends.
After making each joint, cut off the tinned wire, leaving about œ inch attached to the fuse. Cut off any excess under the board after you have soldered the fuse to it. Use the ohmmeter to test the new fuse once it is in place.
Instead of resoldering the fuse directly to the board, another option is to install a fuse holder. I started installing $2 fuse holders (see Figure I) because a two-inch wire is easier for me to work with than one only Πinch long, plus this gets the fuse up off the board and makes replacing it much easier.
| Figure I |
 |
If the fuse tests good, you can put the power supply back together and reinstall it in the PC to test it. Barring other problems, this should bring that dead power supply to life. Total time for this procedure is 30 to 45 minutes (plus the time it takes to get a new fuse); total cost for the repair is around 50 cents for the fuse and $2 for a fuse holder, if you use one.
Play it safe
Remember, working on a power supply is not for the novice tech. If you’re not totally confident in your ability to safely do the job, let someone else do it!
Rate this article!
Now it’s your turn to tell us how we’re doing. Your opinions are important to us. Post a comment or write to Van Glick.