Outlook lets you arrange components to suit the way you work. In this way, Outlook is more flexible than any of the other apps, but many users still want more control. Specifically, they want to change the font types and sizes used by the interface. Sometimes you can, and sometimes you can’t. In addition, there’s no set way to do so throughout all the windows. This article lists the areas where you can adjust the font type and size and how to do so. (Customizing the Reading pane is possible, but the instructions for doing so are beyond the scope of this article. Watch for a future article on this topic.)
Use Windows settings
Not every window can be manipulated in every version of Outlook. Often, you must turn to the Windows settings and these are inconsistent, at best. Try them when there’s no direct Outlook route, but check the results carefully. These settings impact everything, not just Outlook. Be prepared to reset them and give up.
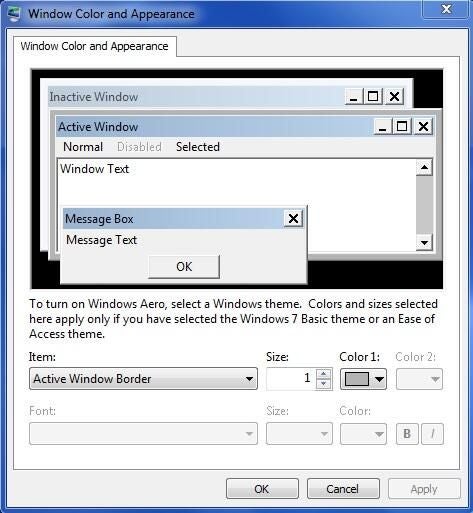
Finding these options are different in every version of Windows, and it gets harder as you upgrade. Windows XP is the easiest: right-click the desktop, choose Properties, click the Appearance tab, and then click Advance. In Windows Vista, right-click the desktop, choose Personalize, and then click Window Color and Appearance. In Windows 7, 8, and 8.1, enter “Windows Color” in the Start Search, and then click Advanced Appearance Settings. You’re looking for the dialog shown in Figure A. Using the Item drop-down, choose the component you want to alter. If allowed, Windows will enable the Font controls below. Continue by choosing the appropriate font type, size, color, and other attributes (when available). You might need to reboot to see any change.
Figure A
Navigation pane
Outlook 2010 users can change the font type and size for the Navigation pane using the View tab as follows:
- Click the View tab.
- In the Layout window, click the Navigation Pane drop-down and choose Options (Figure B).
Figure B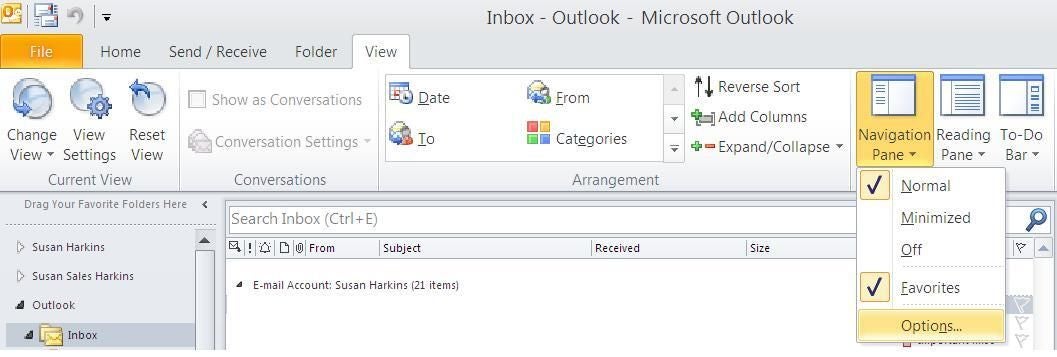
- In the resulting window (Figure C), click the Font button. This window needs a bit of explanation. The individually checked items suggest that you can set the font for each item, but you can’t. What you set for one, you set for all.
Figure C
- Change the settings appropriately (Figure D). (SnowCaps is a stark difference in styles, making the change easily discernible, so I don’t recommend using it!)
Figure D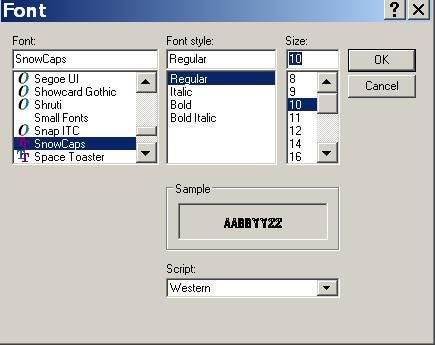
- Click OK twice to apply the changes (Figure E).
Figure E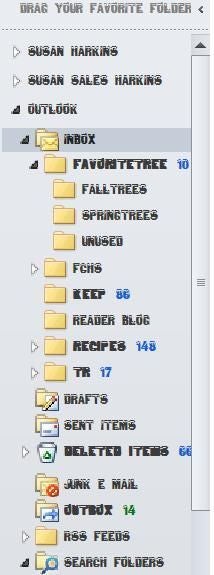
Try to be sensible and choose a readable font — not something ridiculous like SnowCaps! You can revert anytime by clicking Reset in the Navigation Pane Options dialog (Figure C).
Other versions can change font type and size using Windows settings. Remember, when using the Windows settings, results are limited.
SEE: 15 essential support sites for Windows admins (Tech Pro Research)
Mail items
Outlook’s list of mail comprises a large part of the Mail window. You can change the font type and size for some items, as follows (Outlook 2010 and 2013):
- Click the View tab.
- Click View Settings in the Current View group.
- Click Conditional Formatting.
- In the resulting window (Figure F) select the item, and then click the Font button below.
Figure F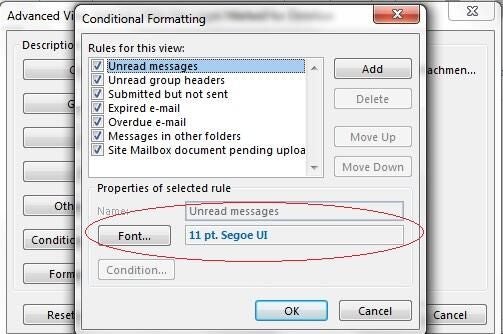
- Choose font type and size. You can even change the color (sometimes).
- Click OK three times.
In Outlook 2007 and 2003, choose Arrange By from the View menu, select Custom, and then click Automatic Formatting.
Changing the font type and size of your mail items can help you identify messages with a quick glance.
Calendar
You can change the font type in most Calendar (2010) windows as follows:
- In the Calendar window, click the View menu.
- Click Other Settings.
- You can change the font for the time, day of week, and month (Figure G) by clicking the appropriate Font button, making your changes, and clicking OK.
Figure G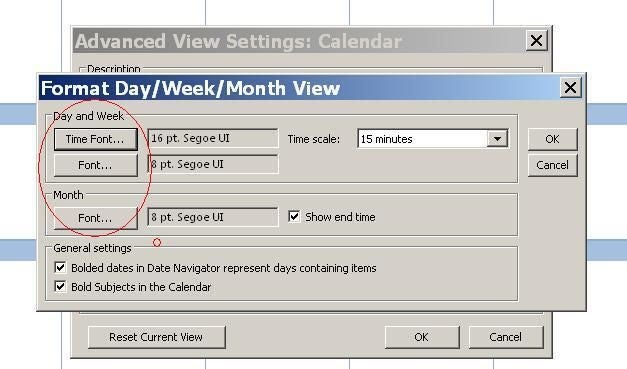
- Click OK to return to the calendar.
What you can change directly via Outlook is different by version. For example, in 2013, you can change only the appointment font this way.
Date Navigator
The Date Navigator is a small calendar that appears in several spots: the To-Do Bar, when hovering over Calendar in Outlook 2013, and the Navigation pane in some windows. You can control the font type and size in Outlook 2010 as follows:
- Click the File tab, and choose Options.
- Click Calendar in the left pane.
- Click Font (Figure H) in the Display Options section.
Figure H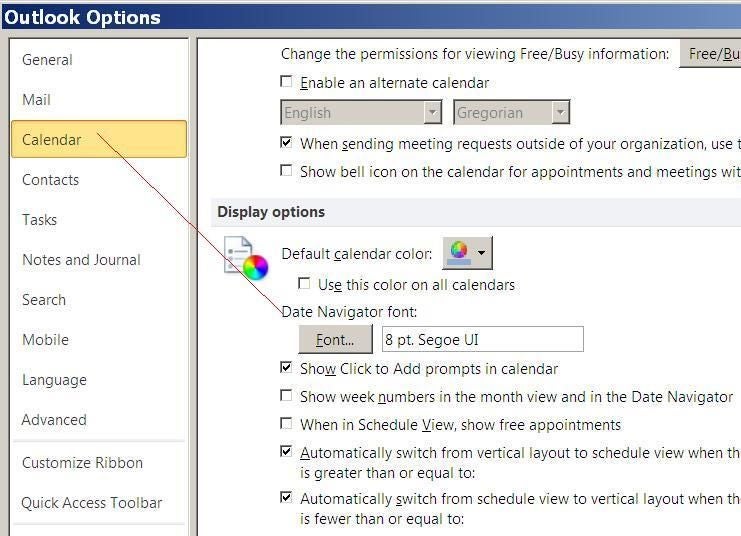
- Make your changes, and click OK twice to return to Outlook.
In Outlook 2007, choose Options from the Tools menu, click the Other tab, click the Advanced Options button, and then click the Font button next to the Date Navigator option. For Outlook 2013, use the Windows DPI settings (not an option for the meek).
Notes
To change the default font type and size for Notes, do the following:
- Click the File tab and choose Options.
- Choose Notes and Journal in the left pane.
- In the Notes Options section (Figure J), click Font.
Figure J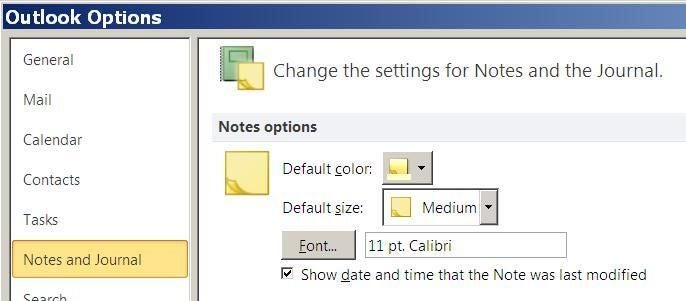
- Make your changes, and click OK.
In Outlook 2007 and 2003, choose Options from the Tools menu, and then choose Notes Options. To the best of my knowledge, Notes are customizable in 2013.
To-Do bar
The To-Do bar isn’t a single object; it comprises several components: the Date Navigator, Appointments, People, and the Task List. Changes are limited to the following:
- If you change the Date Navigator using the instructions shown earlier, those changes will be visible in the To-Do bar.
- In Outlook 2013, you can use the Windows DPI settings for the People component (again, not for the meek).
Writing email
Composing email isn’t part of the interface configuration, but changing the font type and size for email content and replies is still a common requirement. You can do so as follows (Outlook 2013 and 2010):
- Click the File tab and choose Options.
- In the left pane, selection Mail.
- In the Compose Messages section, click the Stationary and Fonts button.
- Click the appropriate button under New mail messages and Replying or forwarding messages (Figure I).
Figure I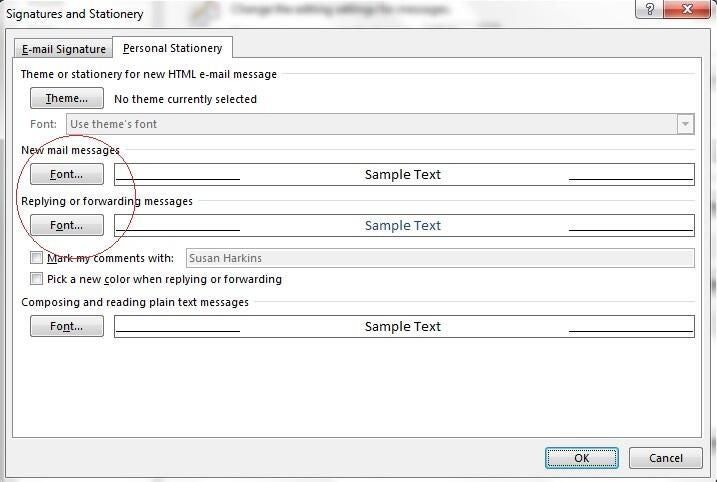
- Make the appropriate changes, and click OK three times to return to Outlook.
In Outlook 2007 and 2003, choose Options from the Tools menu, and then click the Mail Format tab.
Limited possibilities
The truth is, changing Outlook’s interface display properties is a bit convoluted, and this article probably isn’t as comprehensive as I’d like. Many areas that you might want to customize aren’t covered in this article. If you can’t find an option in this article, it doesn’t mean customization isn’t possible. It means that I don’t know about it. Keep looking, and please share what you find in the Comments section below; you might help other readers (and me).
Send me your question about Office
I answer readers’ questions when I can, but there’s no guarantee. When contacting me, be as specific as possible. For example, “Please troubleshoot my workbook and fix what’s wrong” probably won’t get a response, but “Can you tell me why this formula isn’t returning the expected results?” might. Please mention the app and version that you’re using. I’m not reimbursed by TechRepublic for my time or expertise, nor do I ask for a fee from readers. You can contact me at susansalesharkins@gmail.com.
Affiliate disclosure: TechRepublic may earn a commission from the products and services featured on this page.
