If you’ve been developing on Android for a while, you are likely familiar with orientation changes. For the most part, orientation changes are handled as part of the standard activity life cycle. But what happens when you need to detect orientation changes but leave the activity locked in either portrait or landscape mode?
Your first inclination is probably to handle orientation changes yourself via the manifest. The official documentation might even give you the impression this is possible using the android:configChanges=”orientation” annotation.
However, when you override onConfigurationChanged in your activity, you’ll run into a bit of a chicken and egg problem. If you call through to the parent, the orientation will change. If you first cancel the orientation change, you’ll stop getting subsequent notifications.
The only answer is to monitor the device orientation manually using the sensor manager. I’ll show you how to do that in this tutorial. Follow along with the step-by-step instructions, or download and import the project directly into Eclipse.
1. Create a new Android project in Eclipse. Target SDK 9 (Gingerbread) or better.
2. In the AndroidManifest.xml file, lock the activity orientation to portrait.
AndroidManifest.xml
3. In the /res/layout directory, add a few text views to the activity_main.xml layout.
activity_main.xml
4. Now let’s code up /src/MainActivity.java. Pay particular attention to the onSensorChanged function. Notice the code that truncates the number of returned data points? This is a workaround for a large number of Samsung devices in the market that seem to crash whenever more than four vectors are passed to Sensor Manager, despite the Sensor Manager being the one to return more than four vectors.
MainActivity.java

package com.authorwjf.pitchandroll;
import android.hardware.Sensor;
import android.hardware.SensorEvent;
import android.hardware.SensorEventListener;
import android.hardware.SensorManager;
import android.os.Bundle;
import android.widget.TextView;
import android.widget.Toast;
import android.app.Activity;
public class MainActivity extends Activity implements SensorEventListener {
private SensorManager mSensorManager;
private Sensor mRotationSensor;
private static final int SENSOR_DELAY = 500 * 1000; // 500ms
private static final int FROM_RADS_TO_DEGS = -57;
@Override
protected void onCreate(Bundle savedInstanceState) {
super.onCreate(savedInstanceState);
setContentView(R.layout.activity_main);
try {
mSensorManager = (SensorManager) getSystemService(Activity.SENSOR_SERVICE);
mRotationSensor = mSensorManager.getDefaultSensor(Sensor.TYPE_ROTATION_VECTOR);
mSensorManager.registerListener(this, mRotationSensor, SENSOR_DELAY);
} catch (Exception e) {
Toast.makeText(this, "Hardware compatibility issue", Toast.LENGTH_LONG).show();
}
}
@Override
public void onAccuracyChanged(Sensor sensor, int accuracy) {
// TODO Auto-generated method stub
}
@Override
public void onSensorChanged(SensorEvent event) {
if (event.sensor == mRotationSensor) {
if (event.values.length > 4) {
float[] truncatedRotationVector = new float[4];
System.arraycopy(event.values, 0, truncatedRotationVector, 0, 4);
update(truncatedRotationVector);
} else {
update(event.values);
}
}
}
private void update(float[] vectors) {
float[] rotationMatrix = new float[9];
SensorManager.getRotationMatrixFromVector(rotationMatrix, vectors);
int worldAxisX = SensorManager.AXIS_X;
int worldAxisZ = SensorManager.AXIS_Z;
float[] adjustedRotationMatrix = new float[9];
SensorManager.remapCoordinateSystem(rotationMatrix, worldAxisX, worldAxisZ, adjustedRotationMatrix);
float[] orientation = new float[3];
SensorManager.getOrientation(adjustedRotationMatrix, orientation);
float pitch = orientation[1] * FROM_RADS_TO_DEGS;
float roll = orientation[2] * FROM_RADS_TO_DEGS;
((TextView)findViewById(R.id.pitch)).setText("Pitch: "+pitch);
((TextView)findViewById(R.id.roll)).setText("Roll: "+roll);
}
}
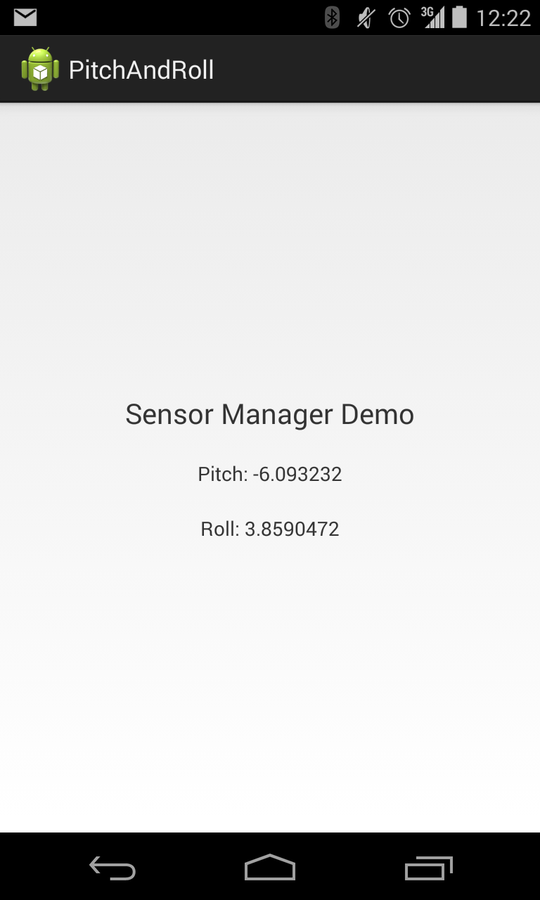
Ready to take the code for a spin? Load it to a device, and rock it from side to side ( Figure A).
Figure A

If you haven’t worked with Android sensors before, here are three tips.
- As with all hardware access, program defensively. Not all devices will have sensors and, in some cases, the vendor implementation will have some quirks.
- When using sensors, don’t poll them more than you need to, especially on devices prior to Android 4.0, where battery consumption is less optimized.
- In a production application, be sure to wire up the on pause and resume functions so you can suspend and restart the sensor manager when the app goes to the background.
