


When administering a database, one of your primary goals is to be the gatekeeper of data. Anything that has to do with how data is stored, saved, updated, and/or deleted will fall into your realm. In today’s business world, most companies store their data in different formats. As a result of this, along with the frequent and expected changes made in the average business, it is not unusual to have to move data from one location to another and/or reformat it on a regular basis.
A powerful set of tools called Data Transformation Services (DTS) can help you perform these tasks in Microsoft SQL Server 2000. DTS can help you import, export, and/or transform data from various sources to single or multiple locations.
New DTS features for SQL 2000
DTS was first released with SQL Server 7.0 and has been vastly improved with the release of SQL Server 2000. Some of the new features include:
- Integration with Windows 2000 security
- The ability of packages to run asynchronously
- HTML Web page source
- New FTP, Execute Package, Dynamic Properties, and Message Queue tasks
- The ability to save packages as Visual Basic files
- Enhanced logging and a new multiphase data pump
To get your hands dirty with DTS, I recommend that you begin by using the DTS wizards. Once you have mastered the wizards, you can move on the DTS Designer and more advanced topics. The DTS wizards in SQL 2000 provide you with the quickest way to move or create packages for data transformation. We’ll start by looking at the two DTS wizards available within SQL 2000:
- Import/Export Wizard
- Copy Database Wizard
Using the Import/Export Wizard
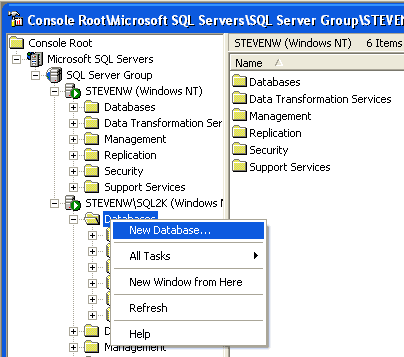
Let’s look at an example of how to use the Import/Export Wizard. In this example, I will import data from the STEVENW/pubs database into the SQL2K/DTS database (my test environment contains a default instance of SQL 2000 called STEVENW and a named instance called SQL2K). To export the data to SQL2K/DTS, I must first create that database. To do this, I open the SQL Enterprise Manager console, right-click on Databases under STEVENW\SQL2K, and select New Database (Figure A).
| Figure A |
 |
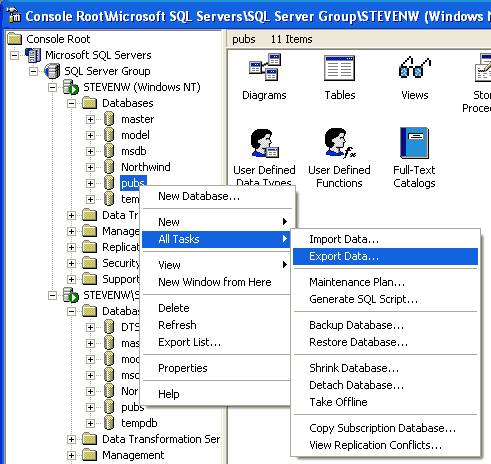
Next, I right-click on the database I want to Import/Export (STEVENW/pubs) and choose All Tasks | Export Data, as shown in Figure B. This brings up the DTS Import/Export Wizard Welcome screen.
| Figure B |
 |
My next step is to choose a data source that matches the format of my source data (Figure C). I also need to enter my source server name (STEVENW), my authentication method, and the database I want to export. The Advanced button offers more advanced OLE DB options for customizing connection settings.
| Figure C |
 |
Configuring the destination database options is the same as choosing a data source, but it’s important to select the correct destination server and database. Once I finish configuring the destination options, I click Next to bring up the screen shown in Figure D. Here, I can specify a Table Copy or Query. For this example, I will copy objects and data between SQL Server Databases.
| Figure D |
 |
Now that I have chosen my options, I can select the objects to copy. Figure E shows the options the Import/Export Wizard offers.
| Figure E |
 |
In this example, I will accept the defaults. Clicking Next brings up the Save, Schedule, And Replicate Package screen. I will run the package immediately and save it to SQL Server (Figure F), although I also have the option of using replication with this package or scheduling it to run at a later date.
| Figure F |
 |
When I click Next, I advance to a screen where I can configure a password and give the package a friendly name. I then move on to the Summary screen to review my information and click Finish. Since I specified the package to run immediately, it begins to copy the data over to the new database.
The Copy Database Wizard
The Copy Database Wizard helps you move or copy a database to another server. To access this wizard, I choose Tools | Wizards | Management | Copy Database Wizard. My next step is to choose the source server and authentication type (similar to what we saw in Figure C). After I make my selections, I click Next and choose my destination server and authentication type. Now I can select the databases I want to move or copy (Figure G).
| Figure G |
 |
When I click Next, the Database File Location window appears (Figure H). I can also choose the Modify button to change the databases’ default location.
| Figure H |
 |
Clicking Next advances me to the Select Related Objects window (Figure I), where I can specify which SQL Server objects I want to move.
| Figure I |
 |
The final two screens let me schedule and review the DTS package I have created prior to kicking it off. Once everything is complete, I can view the log details (Figure J).
| Figure J |
 |
Summary
Walking through the Import/Export Wizard and the Copy Database Wizard is a good way to get familiar with what DTS has to offer. In my next article, I will introduce you to the DTS Designer and show you how you can use it to create customized packages and workflows for transferring and transforming data.