Automate custom Windows Vista installs with vLite
Image 1 of 29
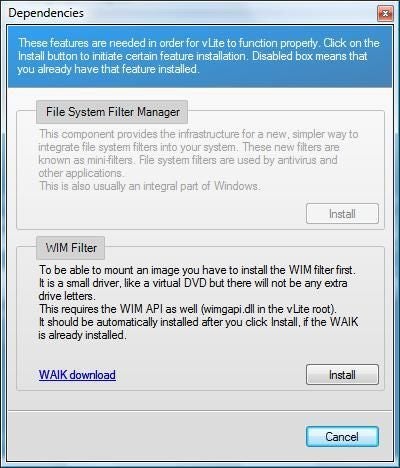
WIM Filter Error Window
This window will pop up if you have already installed the WAIK file but vLite cannot find the wimgapi.dll file. Find the x86 version of the wimgapi.dll file in the folder where you installed it and copy it to the vLite root folder. The x86 version is required even if you are running the 64-bit version of Windows Vista.
Images by Alan Norton for © TechRepublic
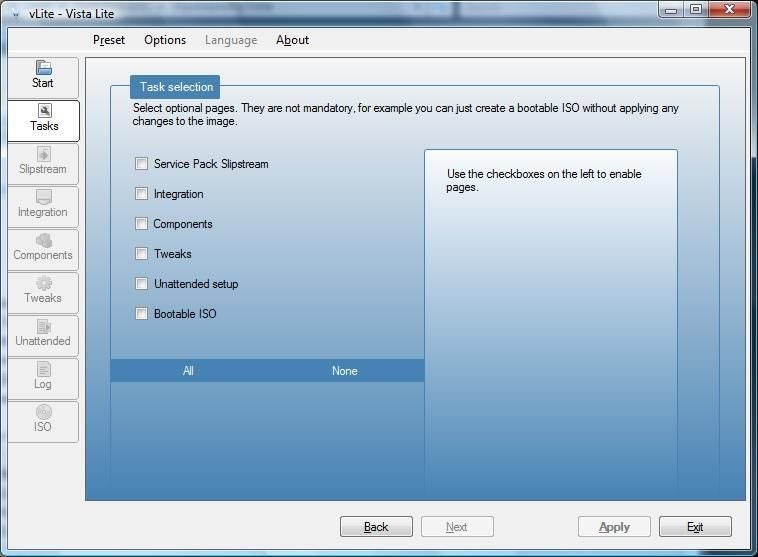
The Tasks Screen
The Tasks window shows the tasks you can perform – Slipstream, Integration, Components, Tweaks, Unattended and ISO. These tasks should be performed in the order that they appear on this screen. If you want to save the changes you make in vLite for a future session use Preset on the menu bar to save your settings.
Images by Alan Norton for © TechRepublic
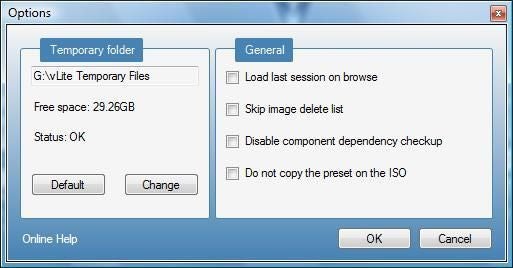
Change the Default Temporary vLite Folder
It is a good idea to change the default temporary folder to one on a non-system logical drive where you have at least 3.6GB (3,865,470,566 Bytes) of unused disk space when slipstreaming Windows Vista x86 SP1. A minimum of 6GB (6,442,450,944 Bytes) is required for temporary file space when integrating SP1 into Windows Vista x64. Select Options from the menu to get to the Options window. If you have a RAID 0 volume, choose a folder on a logical drive on the striped RAID volume for improved performance.
Images by Alan Norton for © TechRepublic
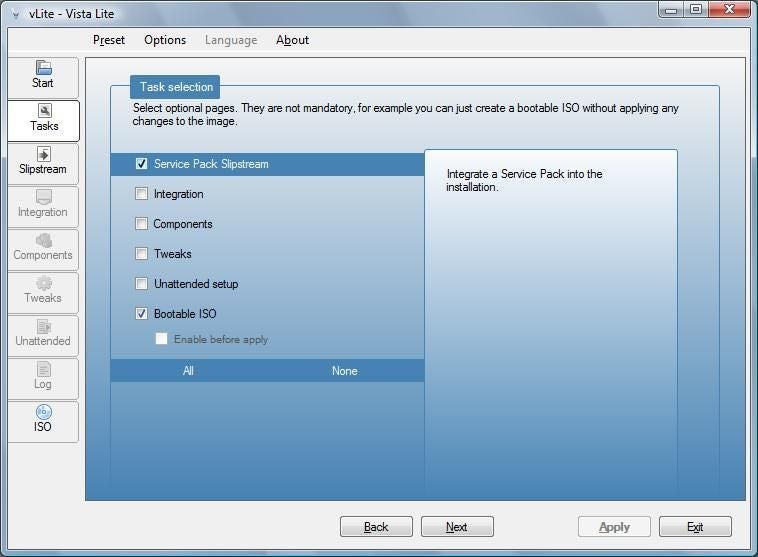
How to Slipstream SP1
I couldn’t resist adding one ‘how-to’ screenshot. The key to slipstreaming SP1 is to check the Service Pack Slipstream and Bootable ISO tasks. If you are slipstreaming SP1, these tasks must be done before any other tasks.
Images by Alan Norton for © TechRepublic
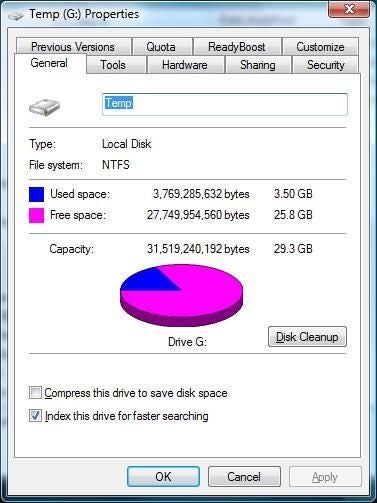

Actual Disk Space Used Slipstreaming SP1 for Vista x86
Actual Disk Space Used Slipstreaming SP1 for Vista x86
The properties for the logical drive Temp shows that vLite created 3.5GB of temporary files when slipstreaming SP1 for Vista x86. This is close to but not the exact maximum space vLite created during the slipstreaming process.
Images by Alan Norton for © TechRepublic
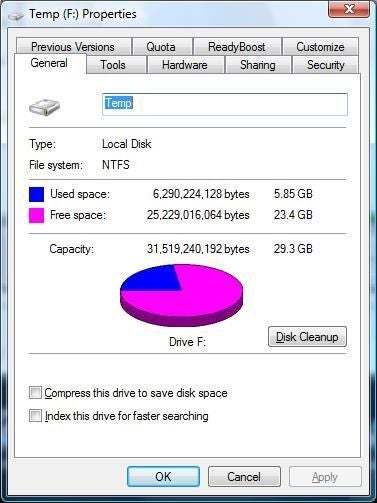

Actual Disk Space Used Slipstreaming SP1 for Vista x64
Actual Disk Space Used Slipstreaming SP1 for Vista x64
The properties for the logical drive Temp shows that vLite created 5.85GB of temporary files when slipstreaming SP1 for Vista x64. This is close to but not the exact maximum space vLite created during the slipstreaming process.
Images by Alan Norton for © TechRepublic
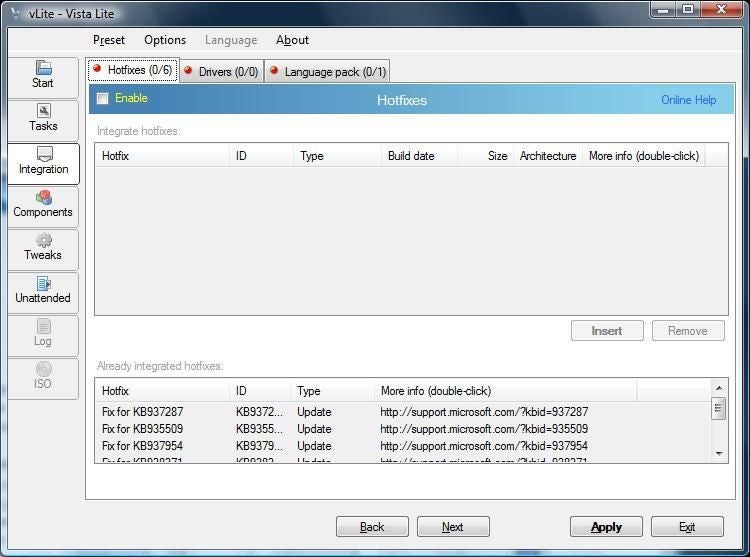
The Integration / Hotfixes Screen
The Integration screen has three tabs that allow you to add ‘hotfix’ files (CAB and MSU files), driver files like RAID drivers (INF files) and language packs (CAB files). You must click the Enable button hidden away below the tabs in order to add these files.
Images by Alan Norton for © TechRepublic
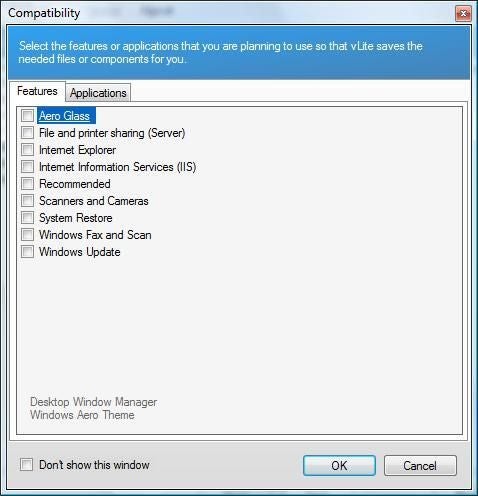
The Components / Features Pop-up Screen
This window will pop up when performing the Components task allowing you to check the features that you don’t want to remove. You can click the Don’t show this window check box if you don’t want to see this pop-up window again. The components for the features that you select on this screen will not be shown in the Components screen tree list.
Images by Alan Norton for © TechRepublic
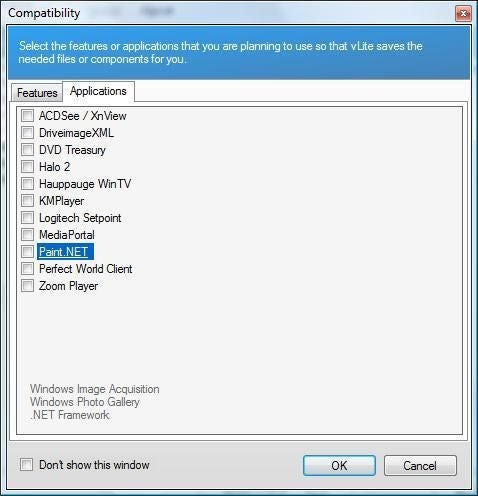
The Components / Applications Pop-up Screen
This window will pop up when performing the Components task allowing you to check the applications that you don’t want to remove. You can click the Don’t show this window check box if you don’t want to see this pop-up window again. The components for the applications that you select on this screen will not be shown in the Components screen tree list.
Images by Alan Norton for © TechRepublic
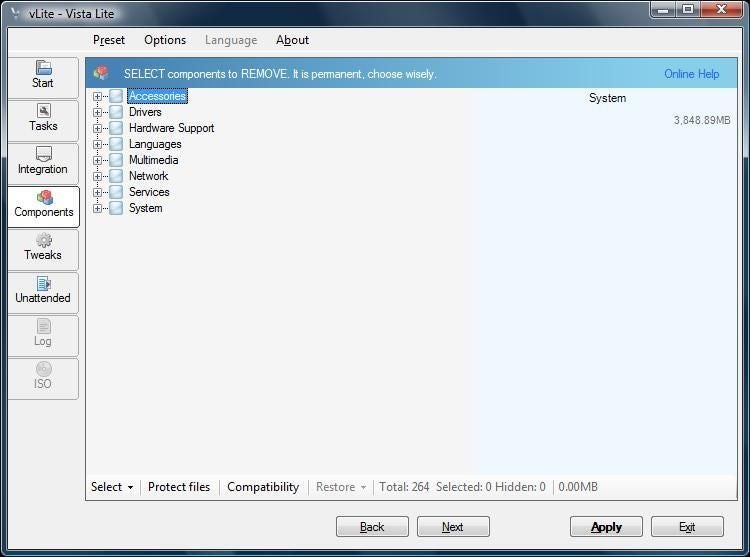
The Components Screen
The Components screen allows you to remove components from the Accessories, Drivers, Hardware Support, Language, Multimedia, Network, Services and System categories. Do not check the boxes next to one or more of these items. Expand the items in the tree list and remove each component one by one. The following screenshots will show you the components for each of the component categories on this screen.n
nCaution: Think carefully before removing any components. Removing components will mean that you cannot add service packs after SP1. Also, items like IE that you may not normally use may be necessary in the future. For example, some Microsoft Web pages require IE in order to work properly.n
Images by Alan Norton for © TechRepublic
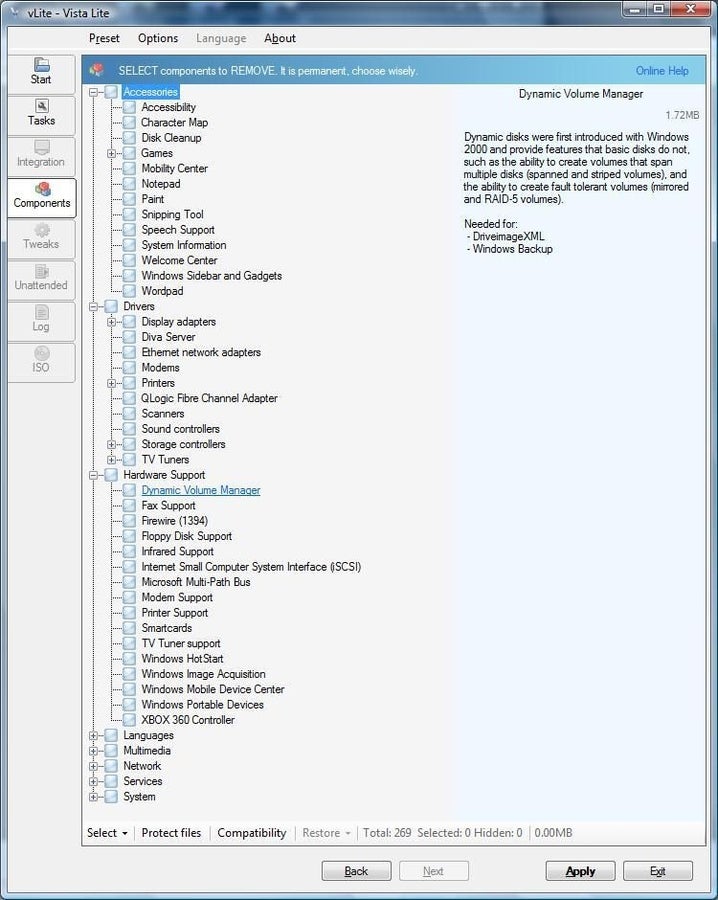

The Components / Accessories, Drivers and Hardware Support Screen
The Components / Accessories, Drivers and Hardware Support Screen
Check the boxes next to the Accessories, Drivers and Hardware Support components that you want to remove. Please note that there are multiple components for some of these items like Games. Expand the tree to select each component on a one by one basis. The Dynamic Volume Manger component is highlighted in this screenshot to show you the detailed information that is available for each component. Also note that dependencies for this component are listed in the right pane.
Images by Alan Norton for © TechRepublic
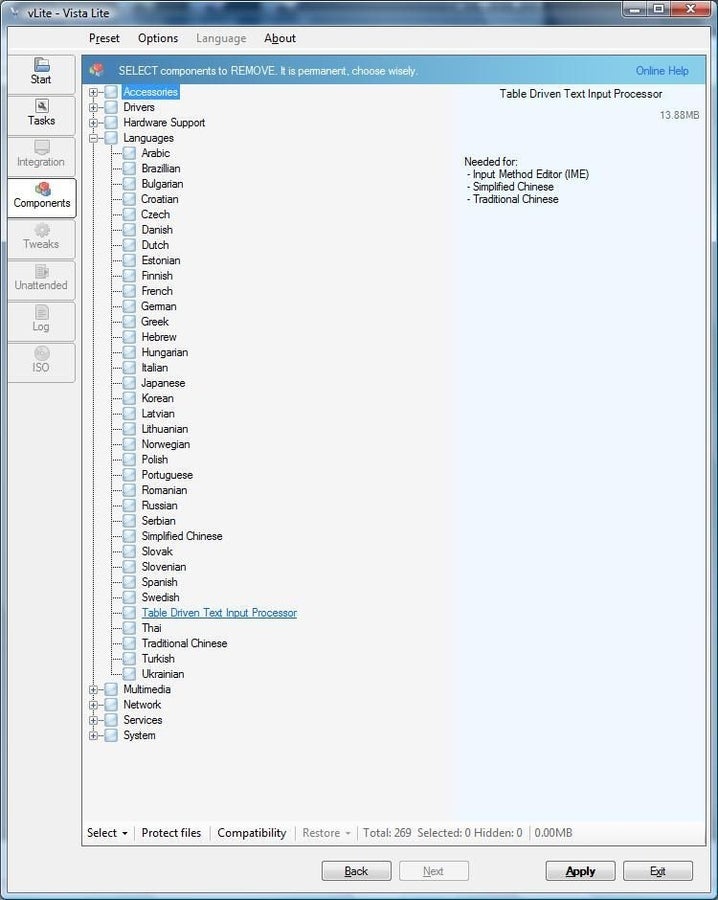
The Components / Language Screen
This screen shows you language components that can be removed. The right pane displays more information about the item highlighted in the Components tree. The Language category is one component category that you might want to remove all of the items in the tree list. Check the box next to Languages in the tree list to select all items. Please note that the Table Driven Text Input component has been highlighted. It is one component you should consider keeping.
Images by Alan Norton for © TechRepublic
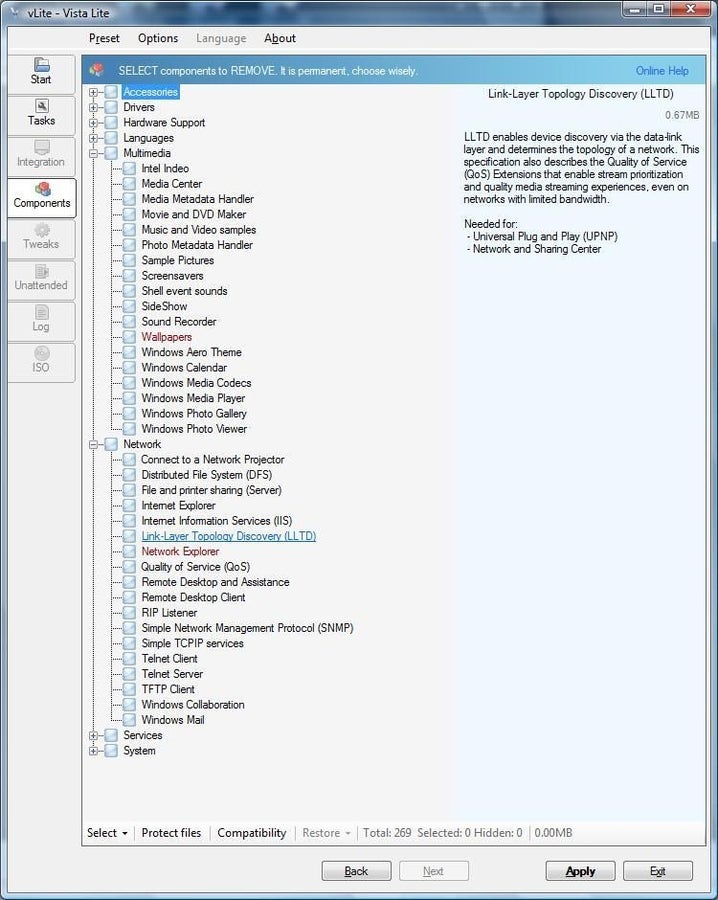
The Components / Multimedia and Network Screen
Check the boxes next to the Multimedia and Network components that you want to remove. Remove Wallpapers and Network Explorer with extra care and only after reading the notes in the right pane. The Link-Layer Topology Discovery (LLTD) component is highlighted in this screenshot. Please note that dependencies for this component are listed in the right pane.
Images by Alan Norton for © TechRepublic
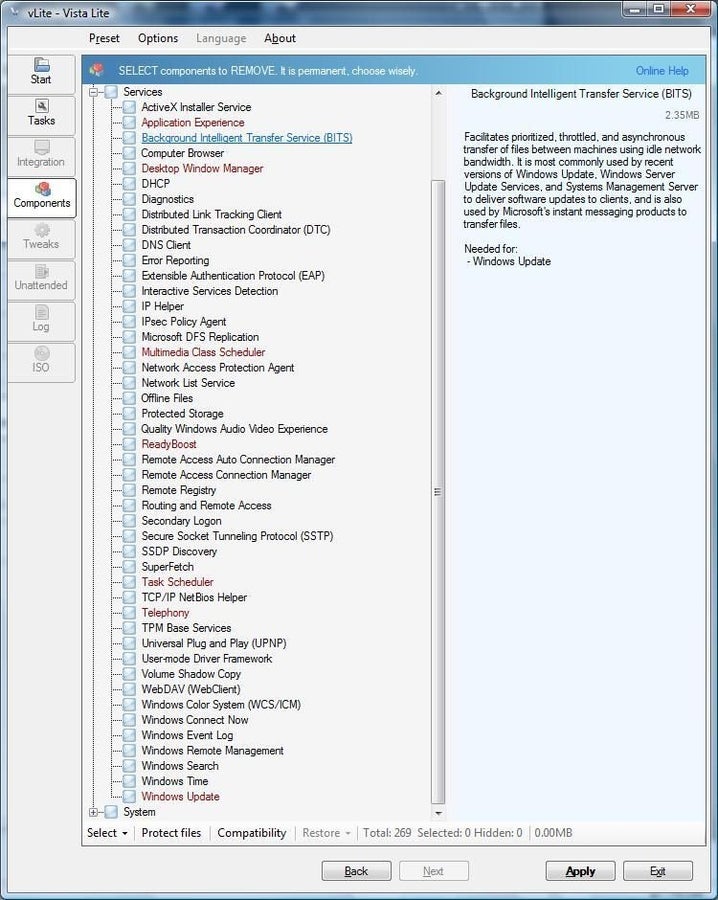
The Components / Services Screen
Check the boxes next to the Services components that you want to remove. Remove Application Experience, Desktop Window Manager, Multimedia Class Scheduler, Ready Boost, Task Scheduler, Telephony and Windows Update with extra care and only after reading the notes in the right pane. The Background Intelligent Transfer Service (BITS) component is highlighted in this screenshot. Please note that dependencies for this component are listed in the right pane.
Images by Alan Norton for © TechRepublic
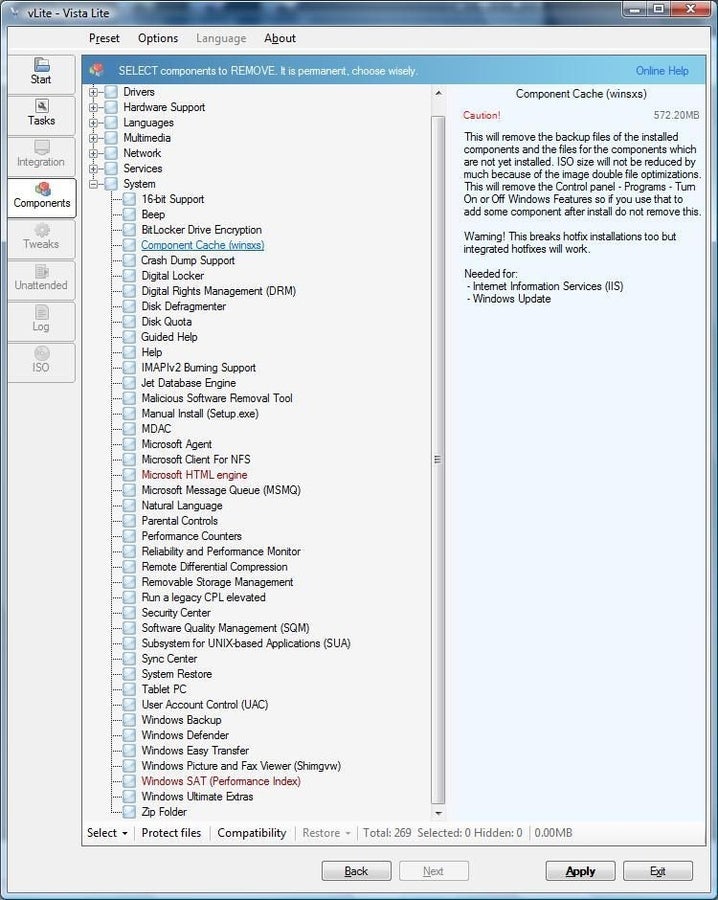
The Components / System Screen
Check the boxes next to the System components that you want to remove. Remove Component Cache (winsxs), Microsoft HTML Engine and Windows SAT (performance index) with extra care and only after reading the notes in the right pane. Please note that the Component Cache (winsxs) component is highlighted in this screenshot and the information in the right pane details a Caution!, Warning, and Dependencies list for this component.
Images by Alan Norton for © TechRepublic
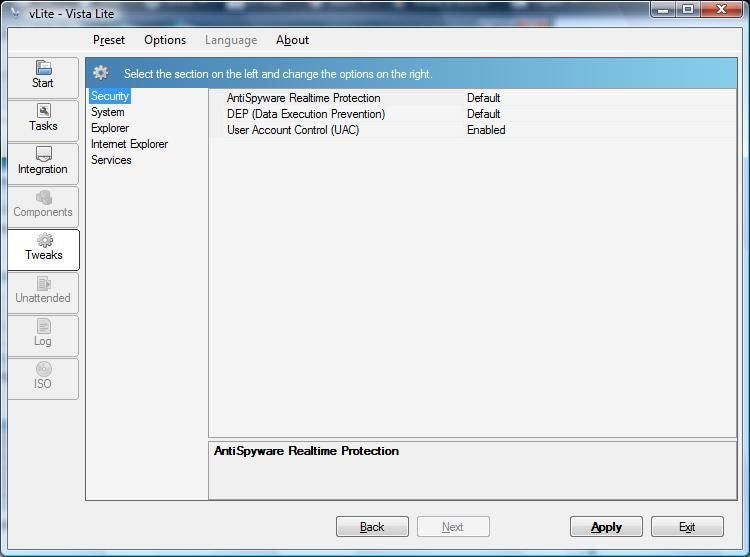
The Tweaks / Security Screen
You can personalize or tweak Vista’s security items before installation in this screen. The Tweaks | Security, System, Explorer, Internet Explorer and Services categories are shown in the left pane. The right pane lists each item in the category. Double-click each item in the right pane if you want to change the setting. The bottom pane shows information about the item selected. The Tweaks | Security category is shown in this screenshot. The AntiSpyware Realtime Protection item information is shown in the bottom pane.
Images by Alan Norton for © TechRepublic
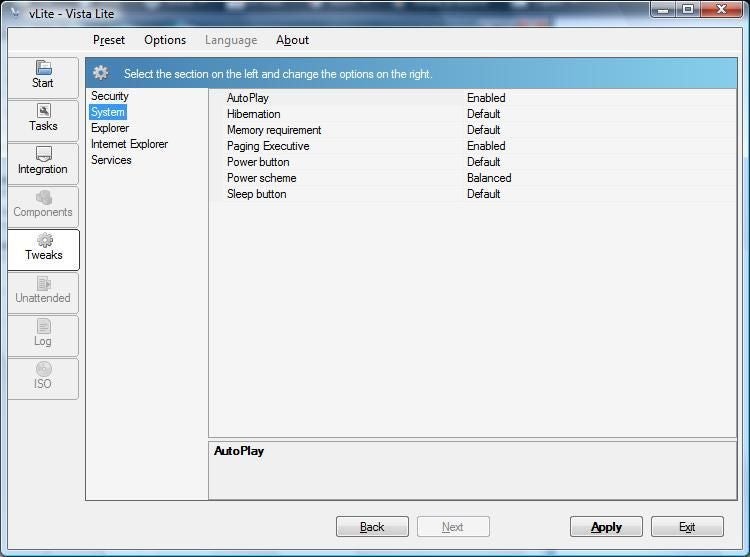
The Tweaks / System Screen
You can personalize or tweak Vista’s system items before installation in this screen. Double-click each item in the right pane if you want to change the setting. The Tweaks | System category is shown in this screenshot. The AutoPlay item information is shown in the bottom pane.nn
Images by Alan Norton for © TechRepublic
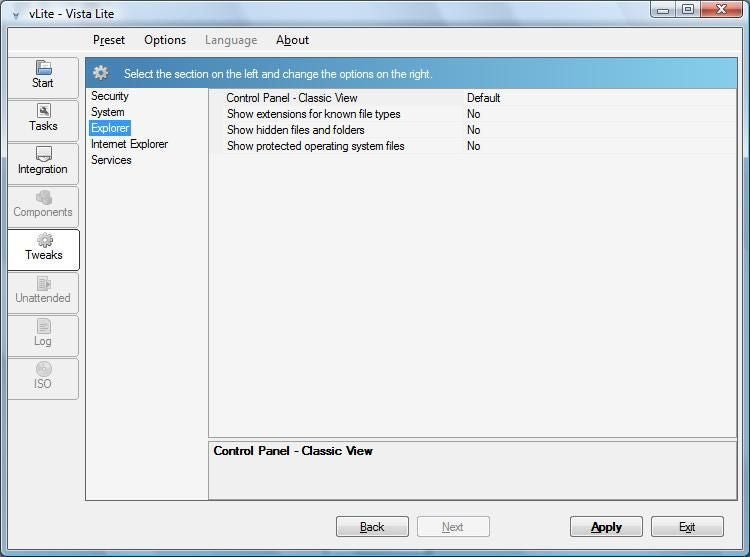
The Tweaks / Explorer Screen
You can personalize or tweak Vista’s Explorer items before installation in this screen. Double-click each item in the right pane if you want to change the setting. The Tweaks / Explorer category is shown in this screenshot. The Control Panel u2013 Classic View item information is shown in the bottom pane.
Images by Alan Norton for © TechRepublic
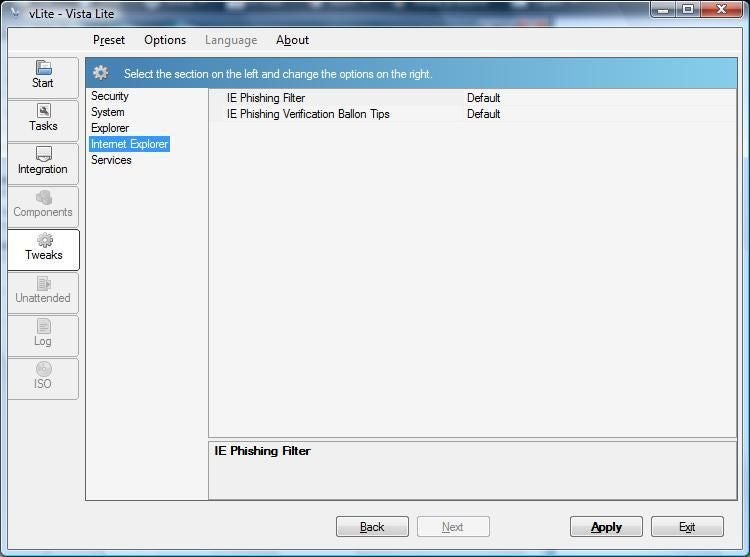
The Tweaks / Internet Explorer Screen
You can personalize or tweak Vista’s Internet Explorer items before installation in this screen. Double-click each item in the right pane if you want to change the setting. The Tweaks | Internet Explorer category is shown in this screenshot. The IE Phishing Filter item information is shown in the bottom pane.
Images by Alan Norton for © TechRepublic
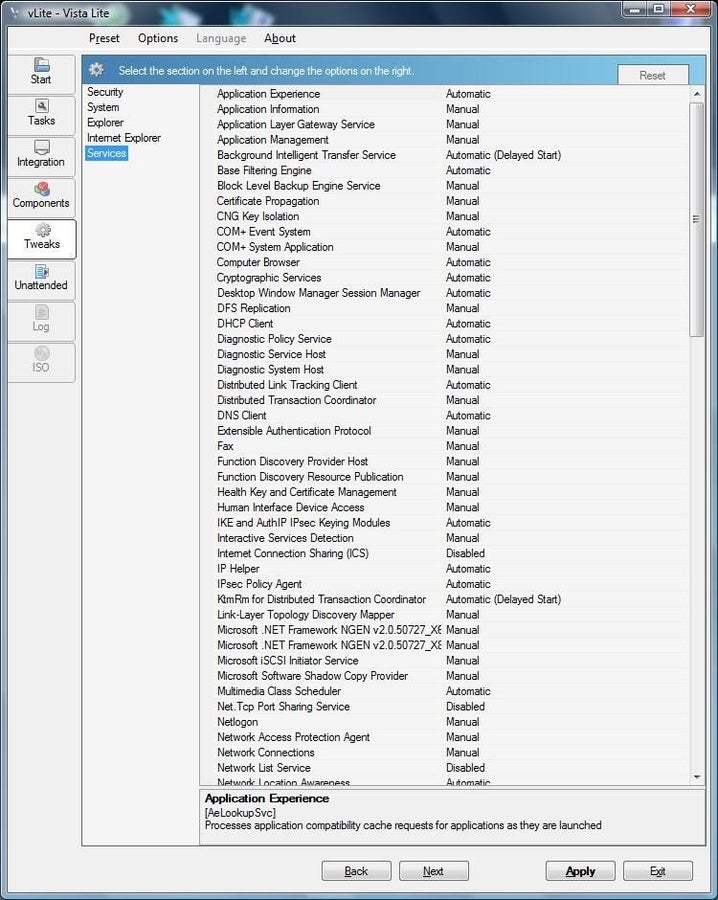
The Tweaks / Services Screen
You can personalize or tweak Vista’s services items before installation in this screen. Double-click each item in the right pane if you want to change the setting. The Tweaks | Services category is shown in this screenshot. The Application Experience item information is shown in the bottom pane.
Images by Alan Norton for © TechRepublic
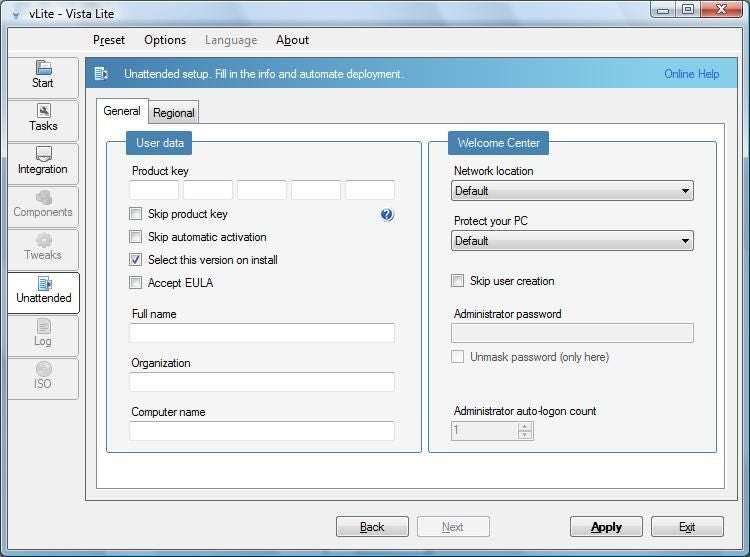
The Unattended / General Screen
You can enter your product key or skip the product key, skip automatic activation, select the version on install and automatically select the EULA on the Unattended / General screen. The name Unattended is somewhat of a misnomer. The standard Vista install doesn’t require a lot of babysitting u2013 and almost anything else is more important than babysitting your Vista install. You don’t really gain that much by using the Unattended task option. It is more of an auto-complete or fill-in-the-blank function that saves you from having to type in your Product key, Full name, Organization, Computer name etc. each time that you do a reinstall.
Images by Alan Norton for © TechRepublic
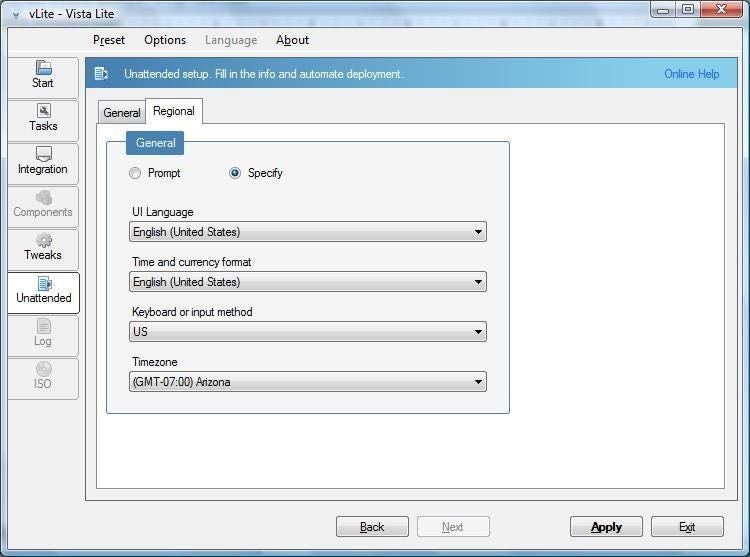
The Unattended / Regional Screen
This is a screen that most U.S. residents can skip. I live in one of the only states in the U.S. that doesn’t change their clocks for daylight savings time. During my first test of the Unattended task the system clock was one hour off. In later builds I selected the Specify radio button and changed the Timezone to Arizona if it wasn’t already selected. Verify the Timezone before closing this window.
Images by Alan Norton for © TechRepublic
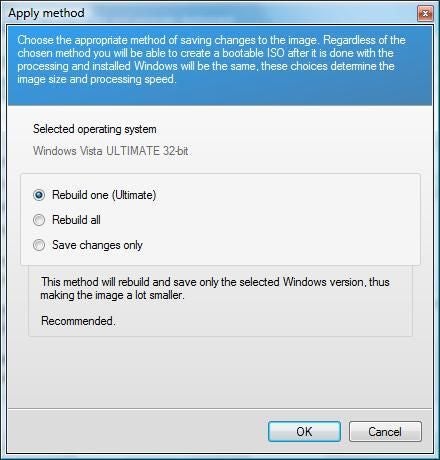
The Apply Method / Rebuild One Pop-up Screen
Click the Apply button when you have completed all of the modifications and you are ready to build the ISO image. When clicking the Apply button, this window will pop up. The Rebuild one (version name) method is the default option and the best option for most people. It creates the smallest ISO file by rebuilding only the version that you selected when starting vLite.
Images by Alan Norton for © TechRepublic
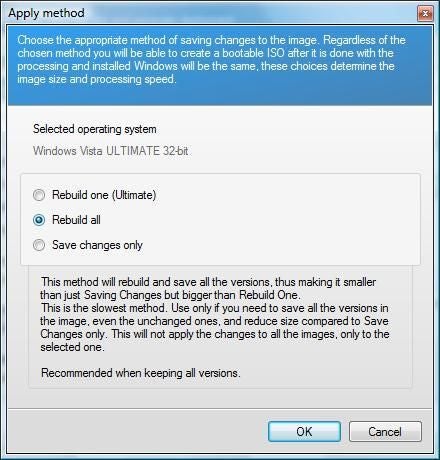
The Apply Method / Rebuild All Pop-up Screen
When clicking the Apply button, this window will pop up. The Rebuild all method is the slowest and will rebuild all versions.
Images by Alan Norton for © TechRepublic
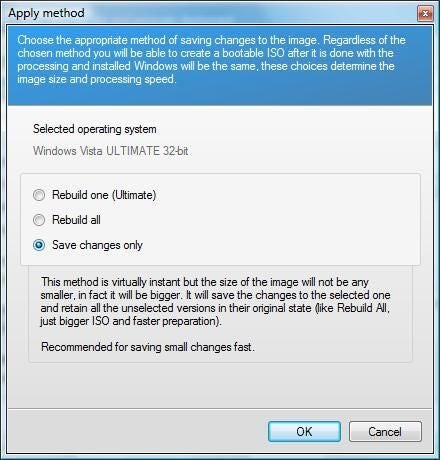

The Apply Method / Save Changes Only Pop-up Screen
The Apply Method / Save Changes Only Pop-up Screen
When clicking the Apply button, this window will pop up. The Save changes only method is fast because it only saves the changes you make but creates a larger ISO file.
Images by Alan Norton for © TechRepublic
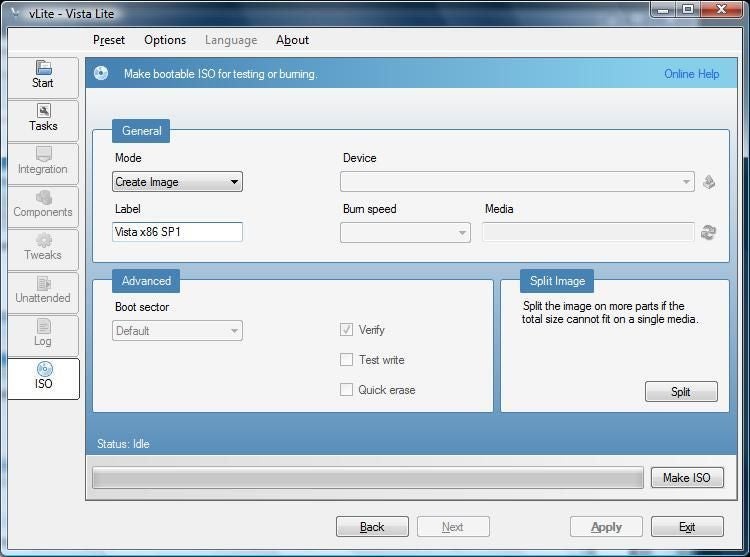
The ISO / Create Image Screen
Choose Create Image from the Mode drop-down box. Enter a label that makes sense like Vista x86 SP1 in the Label text box. After selecting the options in the General section, click the Make ISO button near the bottom right of the window.
Images by Alan Norton for © TechRepublic
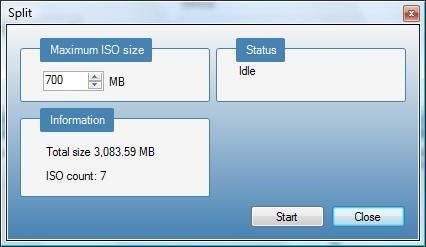
The ISO / Split Image Screen
Click the Split button in the Split Image section if you are warned that the ISO image may be too large for one disc. The Maximum ISO size defaults to 700MB u2013 the typical maximum size of a CD. You can burn the ISO image to CDs but as you can see in this example, I would need seven ISO images for seven CDs. Enter the ISO size in MB when using DVDs. Verify the ISO count before clicking the Start button.
Images by Alan Norton for © TechRepublic
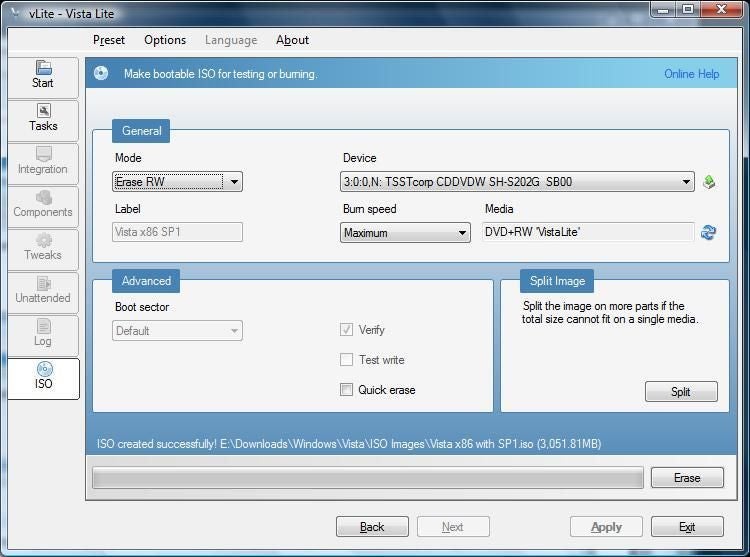
The ISO / Erase RW Screen
You can erase a RW disc with this option. Choose Erase RW from the Mode drop-down box. After selecting the options in the General section, click the Erase button near the bottom right of the window.
Images by Alan Norton for © TechRepublic
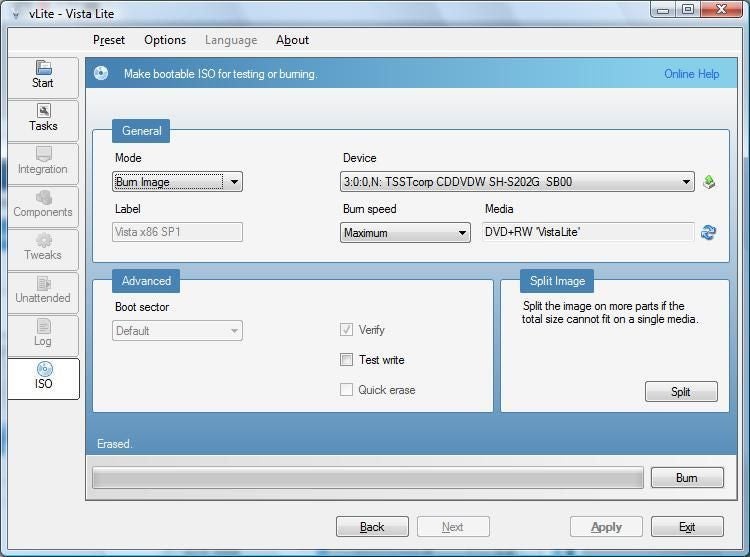
The ISO / Burn Image Screen
You can burn directly to a disc or discs using the Mode drop-down box Direct Burn option, but I recommend creating an ISO image first. After creating the ISO image you can still use the Burn Image option to burn a disc. This option is really helpful if you haven’t installed disc-burning software. Choose Burn Image from the Mode drop-down box. You might want to consider changing the Burn speed to a lower value if your optical drive likes to create coasters or if you are using media that isn’t exactly top-notch. After selecting the options in the General section, click the Burn button near the bottom right of the window.n
nIf you use the Mode drop-down box Burn Image option the Verify check box is gray meaning that this option is unavailable. You should consider copying all of the files on the disc to a Temp folder on your hard disc to verify that they can be read.n
nNote: If you are using RW media it may take a while for the status bar to begin moving – be patient. I am fairly certain that this occurs when the media that you are using has not been fully formatted – and it takes quite a while to fully format a DVD. If you have previously chosen Erase RW, the disc will still require a full format.n
nThis is one area where vLite falls short. It does not show you a status of the format or indicate in anyway what is happening. If the media you are using has already been fully formatted, the status bar will begin moving immediately showing you the status of the burn. If you have already installed software that specializes in burning discs, you might want to use it to burn the ISO image.n
Images by Alan Norton for © TechRepublic
-
Account Information
Contact Mark W. Kaelin
- |
- See all of Mark W.'s content
