Having a Windows Vista install DVD with the latest service packs can be very helpful – especially if you reinstall Windows more than a couple of times a year or if you have to deploy Windows Vista to multiple computers. Alan Norton shows how he creates one – just follow these steps.\n
\nYou can get an in-depth description of these steps in the TechRepublic Microsoft Windows Blog or in the corresponding free TechRepublic Download.\n
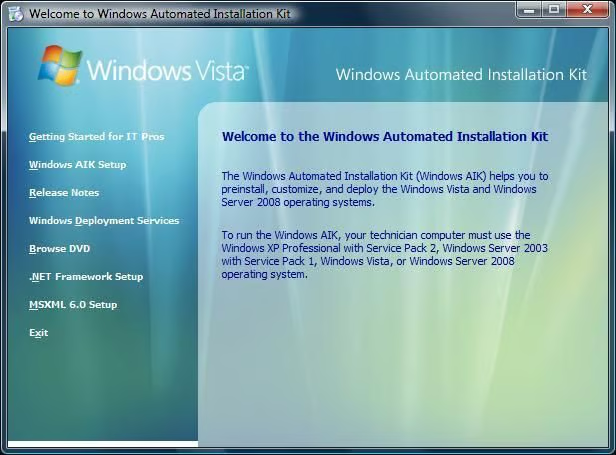
\nInstall the Windows Automated Installation Kit (WAIK)\n
\nDownload and install a disk burning utility capable of burning ISO files if needed.\n
\nDownload the WAIK ISO file and burn the WAIK ISO to a DVD. Run the startcd.exe program on the DVD and select Windows AIK Setup from the Welcome to Windows Automated Installation Kit window. The installation is large. Install to a non-system logical drive if possible.\n \n
Images by Alan Norton for TechRepublic
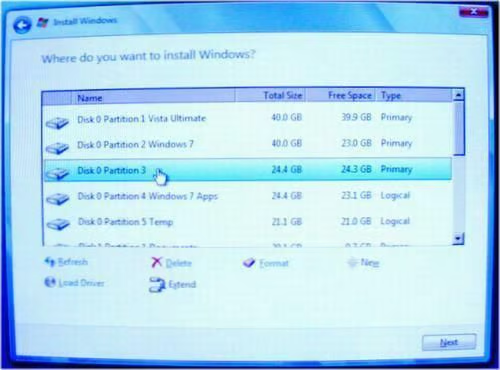
Reinstall Vista to a Non-boot Partition\n
\nFormat a non-boot partition. I chose the Vista Ultimate Apps partition, disk 0 partition 3 to reinstall Vista. That is the perfect partition to choose because the apps would have to be reinstalled anyway and the partition is large enough. The format is destructive so you need to choose a partition that you have already backed up and can temporarily use. Reinstall Vista.\n
Images by Alan Norton for TechRepublic
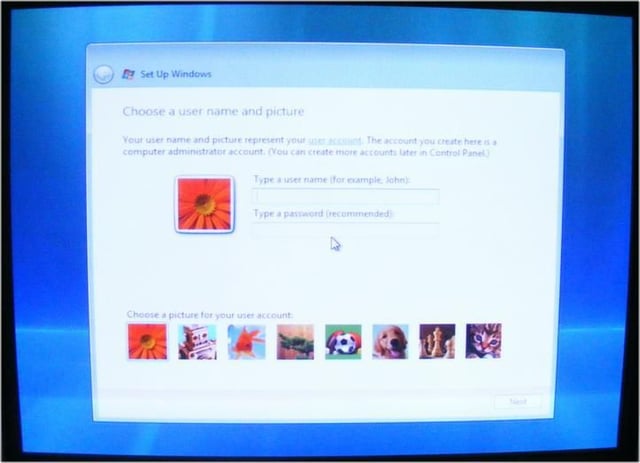
The Windows Vista Out Of Box Experience Screen\n
\nJust before the Vista installation completes, this screen appears called the Out Of Box Experience (OOBE) screen. Press [CTRL][SHIFT][F3]. The computer will reboot and you should end up at the Vista desktop.\n
Images by Alan Norton for TechRepublic
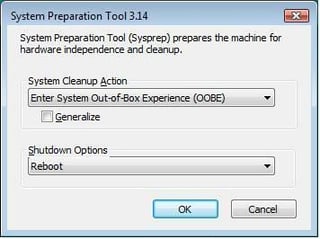
The System Preparation Tool 3.14 Window\n
\nYou should see the System Preparation Tool 3.14 window open on the desktop. Do not close this window.\n
Images by Alan Norton for TechRepublic
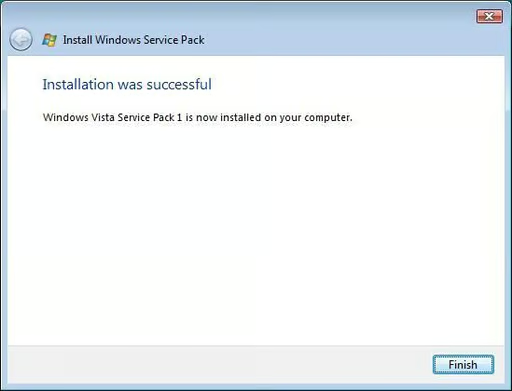
SP1 Successfully Installed\n
\nInstall SP1. When complete, you should see this screen.\n
Images by Alan Norton for TechRepublic
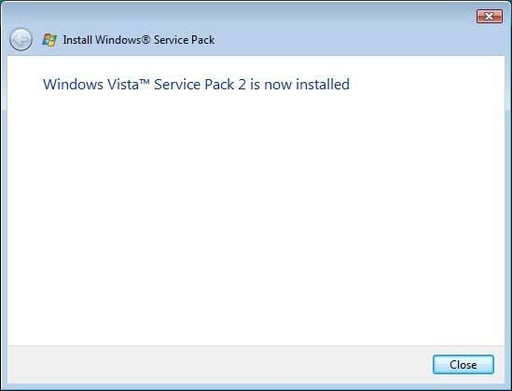
SP2 Successfully Installed\n
\nInstall SP2. When complete, you should see this screen.\n
Images by Alan Norton for TechRepublic
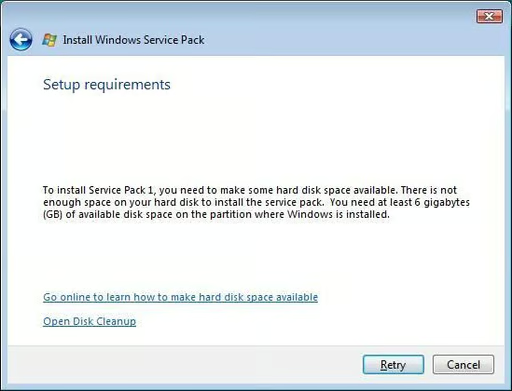
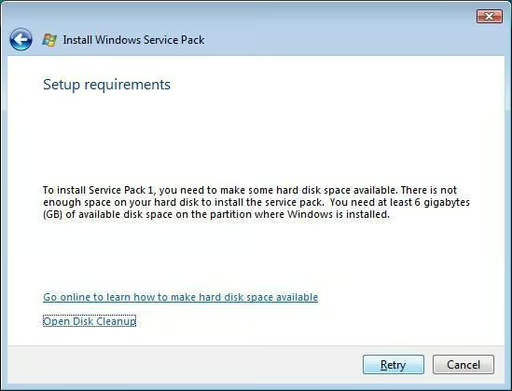
Insufficient Disk Space to Install Service Pack\n
\nWhen installing SP1 or SP2 you might see a Setup Requirements window if you do not have enough disk space. Select the Open Disk Cleanup option.\n
Images by Alan Norton for TechRepublic
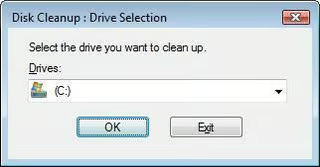
Choose Drive to Clean Up\n
\nSelect the drive to clean up. This should always be the default value, C: drive.\n
Images by Alan Norton for TechRepublic
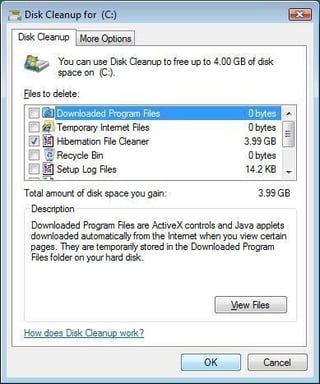
Select Only Hibernation File Cleaner Option\n
\nCheck the Hibernation File Cleaner option and uncheck all other options. Click the OK button when done. This will free up 3.99GB and it should be enough to allow the service pack install to continue.\n
Images by Alan Norton for TechRepublic
Select Retry\n
\nClick retry. The service pack install will continue if you have freed up enough disk space to continue.\n
Images by Alan Norton for TechRepublic
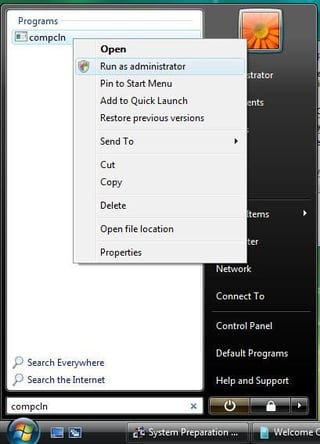
Perform CompCln (optional)\n
\nRun the compcln utility as an administrator. This will remove the RTM and SP1 files needed to rollback SP1 and SP2 making them both permanent. This step is optional for the x86 version but recommended. It is required for the x64 version if you want the install files to fit on one DVD. CompCln will free up over one GB of disk space for the x86 version of Vista and two GBs for the x64 version of Vista.\n
Images by Alan Norton for TechRepublic
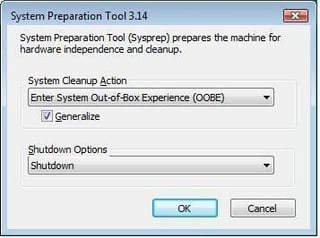
Sysprep and Shutdown\n
\nIf you use the recommended method, select OOBE/Generalize/Shutdown in the System Preparation Tool 3.14 window. Click the OK button to perform the Sysprep and shut down the system. Do NOT boot back into the new Vista install.\n
Images by Alan Norton for TechRepublic
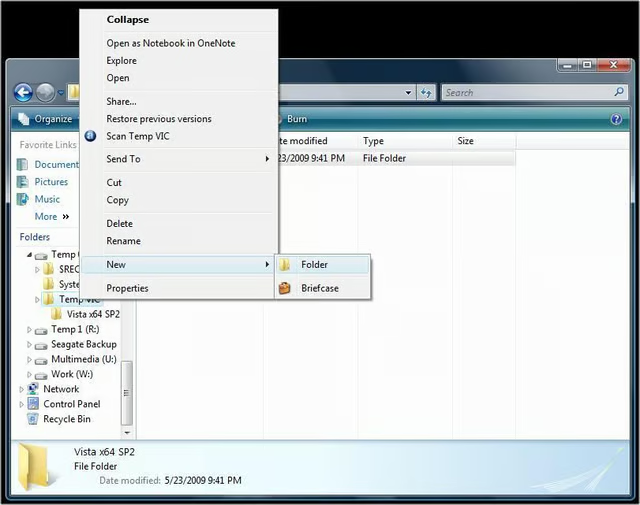
Create Temp Folders\n
\nCreate the following temp folders:\n
\n\\Temp VIC\n\\Temp VIC\\Vista x86 SP2 or \\Temp VIC\\Vista x64 SP2\n\\Temp VIC\\ISO\n
Images by Alan Norton for TechRepublic
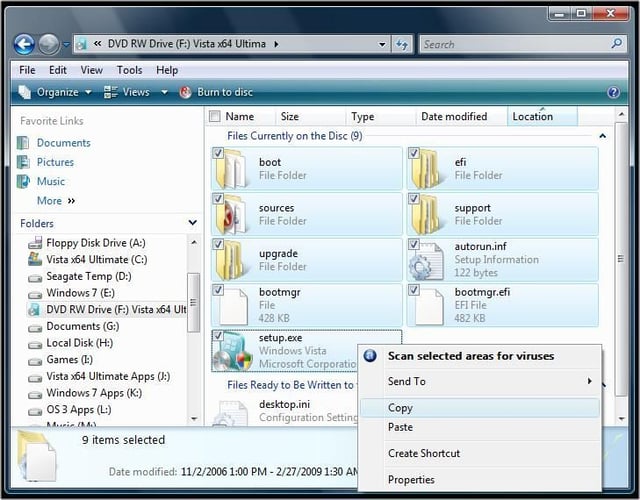
Copy Vista Install Files\n
\nHighlight the folders and files of the Vista RTM DVD and copy them to the clipboard.\n
Images by Alan Norton for TechRepublic
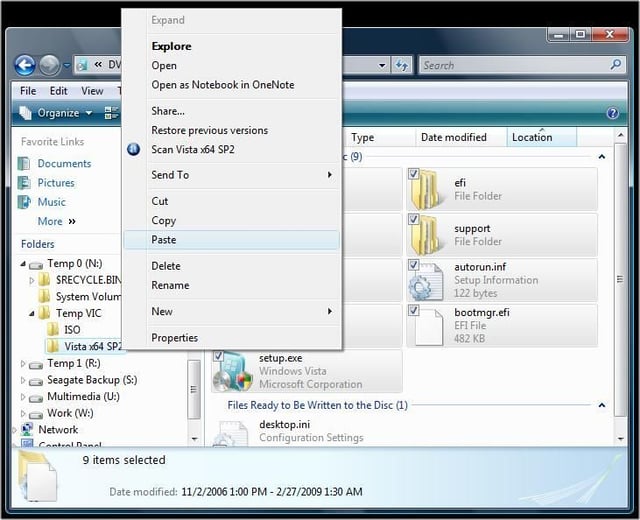
Paste Vista Install Files\n
\nNavigate to the \\Temp VIC\\Vista x86 SP2 or \\Temp VIC\\Vista x64 SP2 folder and paste the Vista install files.\n
Images by Alan Norton for TechRepublic

Open the Windows PE Tools Command Prompt window as administrator.
Images by Alan Norton for TechRepublic
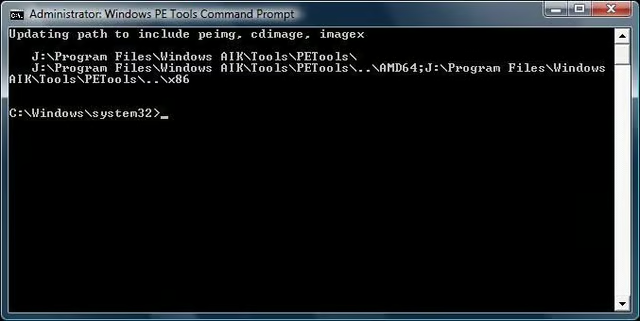
Windows PE Tools Command Prompt\n
\nThe Windows PE Tools Command Prompt window sets paths to the utilities included in WAIK including ImageX that is needed to capture the Windows image.\n
Images by Alan Norton for TechRepublic
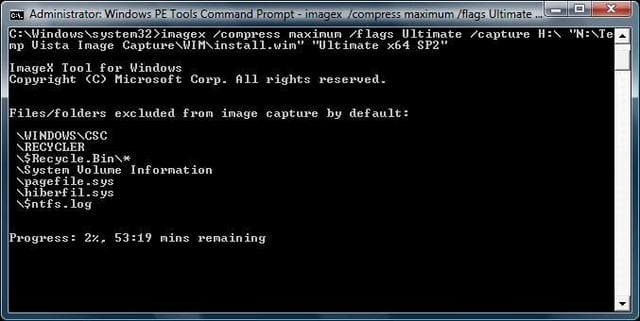
Enter ImageX Command\n
\nEnter the command for imagex including the switches as detailed in the original article and press [Return].
Images by Alan Norton for TechRepublic
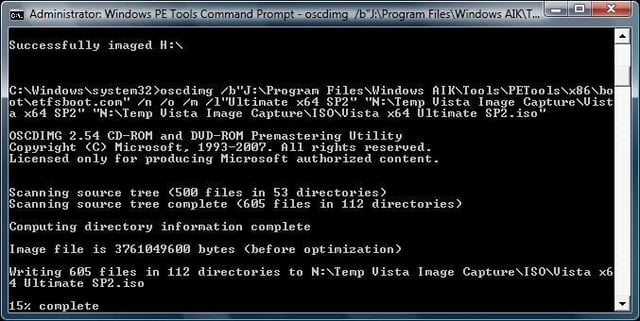
Run OSCDImg to Make a Bootable ISO File\n
\nRun the oscdimg utility to make a bootable ISO file.\n
Images by Alan Norton for TechRepublic
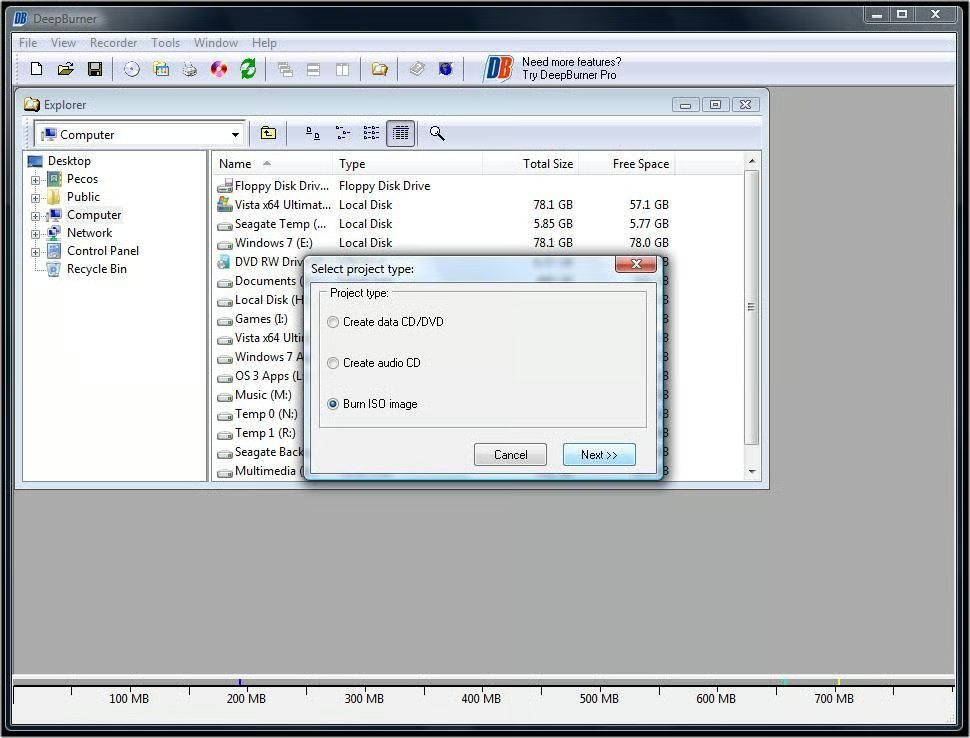
Burn ISO to DVD\n
\nUse your favorite disc burning software to burn the ISO file to a DVD.\n
Images by Alan Norton for TechRepublic
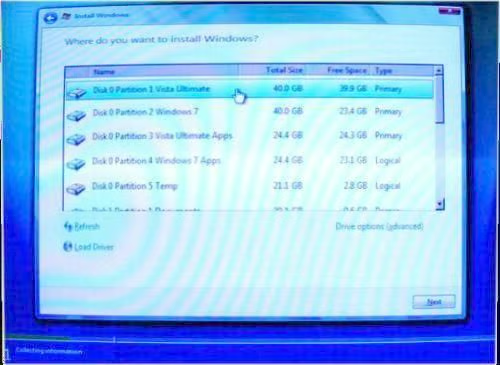
Reinstall Vista SP1 SP2\n
\nReinstall Vista onto the original partition \u2013 the boot partition in this example.\n
Images by Alan Norton for TechRepublic
Verify that SP1 and SP2 Have Been Installed\n
\nOpen the Installed Updates window. Verify that the KB updates in this screen shot appear in your list of installed updates.\n
Images by Alan Norton for TechRepublic
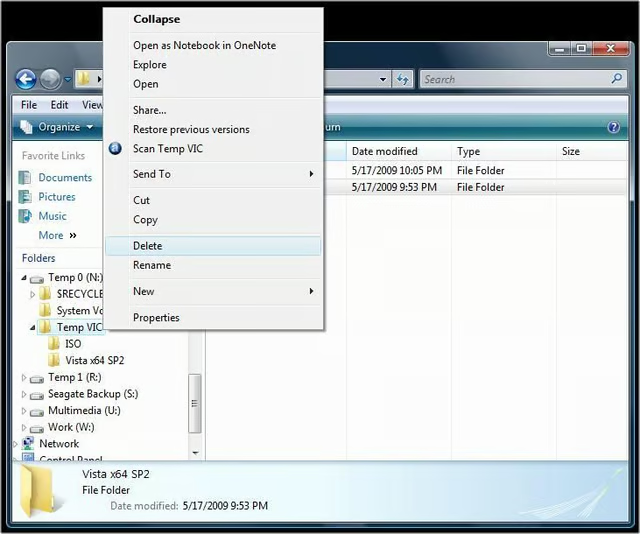
Post Testing and Cleanup\n
\nSelect and delete the \\Temp VIC folder when finished and you are sure that Vista will install properly.\n
Images by Alan Norton for TechRepublic

You can contact me at mail@pecos-softwareworks.com. I began my career as little more than a data retrieval and reporting person. Early in my career I did whatever I could to be productive, creating spreadsheets in Framework and charts in GraphWriter. I was PC oriented and soon learned how to tap into the data on the mainframe to produce the charts via a data download to the PC. I found a niche building client/server systems where I was responsible for each phase of the project life cycle. \ \ I am fortunate to have enjoyed a broad background in IT including interfacing PC's and shop floor insertion machines to the mainframe database. I have also been an independent contractor, perhaps the most satisfying part of my career. I transitioned several mid-frame systems to a PC network based Access/Visual Basic system in the contract position and learned what it takes to be successful on your own. \ \ My last position was an analyst/programmer for a large IT service provider in support of their global help desk reporting team including a role as project lead. \ \ I consider myself lucky to have been in at the beginning of the personal computer revolution. I am currently semi-retired and learning a new skill, professional writing.


