All hard disk drives fail. The only question is when. While numerous recovery utilities exist, Get Data Back from Runtime Software proves to be the Right Tool for simplifying the process. Here’s how it works.
You may click here to download a free demo version of the software.
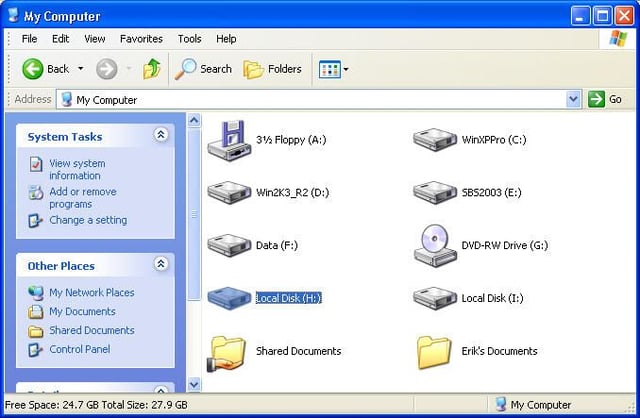
Data recovery begins with identifying a failed disk requiring rescue. Here you can see a failed hard disk connected to this Windows XP system registers as the H drive (although it’s not immediately evident this hard disk is experiencing trouble).
Keep in mind that any software-based recovery tool (such as Get Data Back) requires that the hard drive’s physical properties remain intact. In other words, a hard disk must still be able to power up, spin and read data to enable recovery using software-based tools.
Here is where it becomes evident this hard disk is experiencing trouble. There’s actually 22GB of data on this disk with which the user had been working.
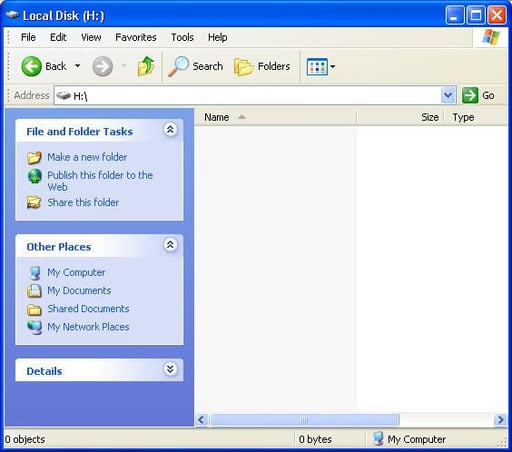
Yet, when connected to a properly functioning Windows system, the drive reads as containing no data, as shown here. Obviously this hard disk, when placed in another system, would fail to boot. Even if it were only a data drive, Windows finds no files (as evidenced by the 0 objects and 0 bytes status bar counters).
Get Data Back, produced by Runtime Software, is available in two versions (there’s also a third RAID Reconstructor product available).
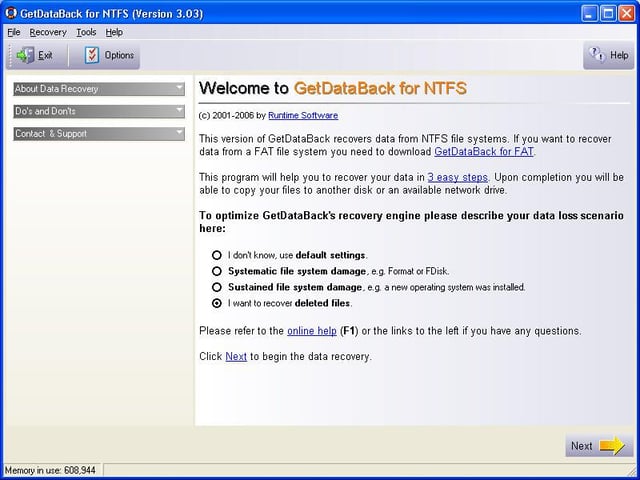
Here you can see the NTFS edition’s opening screen. Users of the $79 application begin recovery efforts by specifying the current data loss scenario. Options include using default settings, recovering from systematic file system damage such as occurs when a disk is formatted, recovering from systained file damage as can result when a new OS is installed, or simply recover deleted files.
For this example we’ll walk through recovering deleted files. In this case, all the hard disk’s files were deleted and new files were written over the original information we’re seeking to recover.
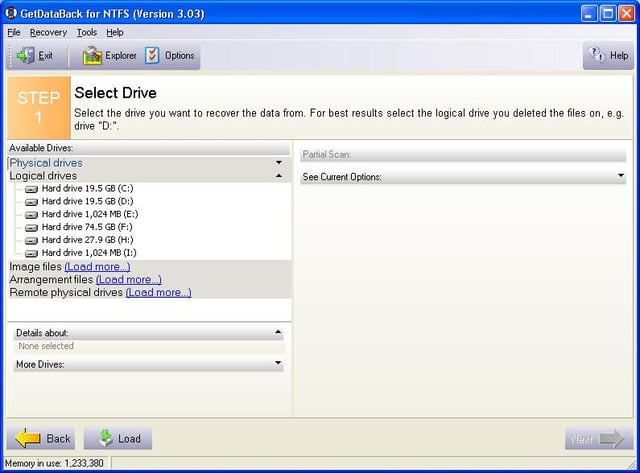
Get Data Back lists all of the available drives, as can be seen here.
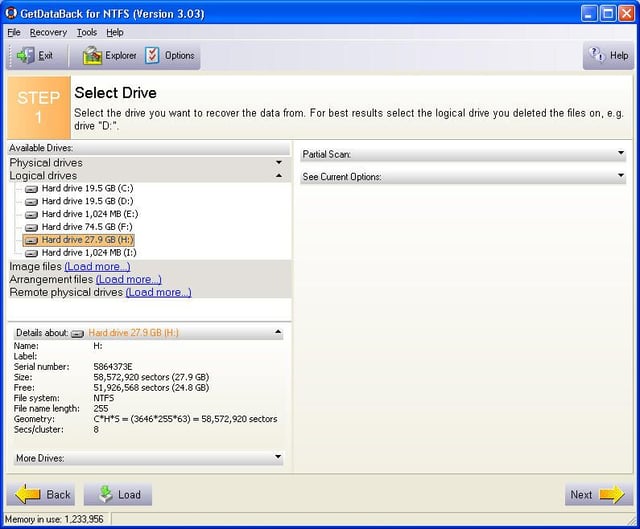
To begin data recovery efforts, the specific drive must be selected. In this case, we’re working with the disk that registered within Windows as the H drive, hence that’s what we select.
As soon as the H drive is highlighted, Get Data Back displays additional information within its Details pane regarding that drive. Here you can see Get Data Back recognizes the H drive’s file system as NTFS.
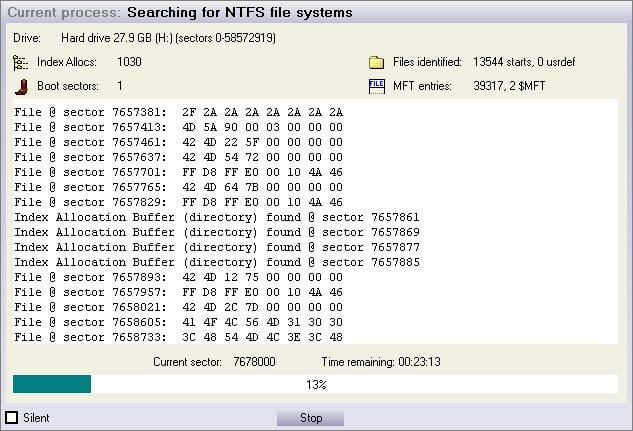
Once the specific drive is highlighted and a user clicks Next, Get Data Back begins searching for NTFS file system data. In addition to displaying the results of its search, Get Data Back tracks the number of files it has identified, the current sector within which it is working, and the total time remaining, among other information.
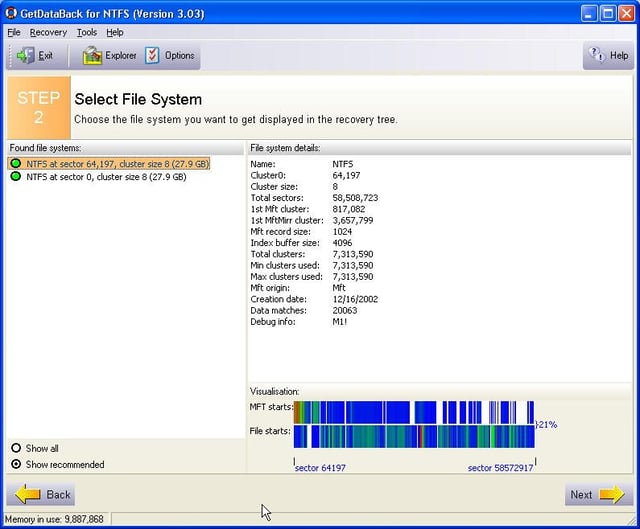
When the file system search completes, Get Data Back displays the results of the search. In this case, the recovery application found two NTFS sectors containing information. Users can choose to show all the information a search returns, or just the recommended information, using the provided radio buttons at the menu’s bottom left corner.
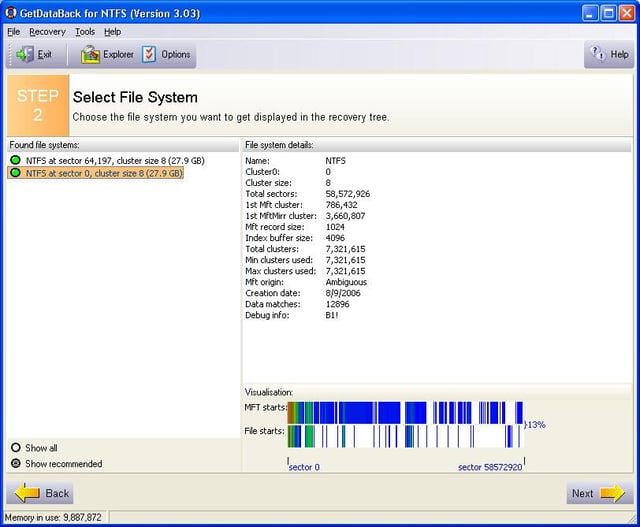
While two NTFS file systems were found in the search, the first contains much more data. Selecting that file system and clicking Next continues the recovery operation.
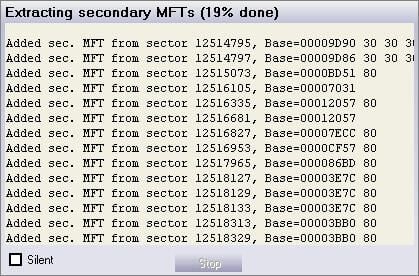
Once the file system is selected and a user clicks Next, Get Data Back begins rebuilding master file tables (MFT) and recreating the directories, folder structures, and files it found.
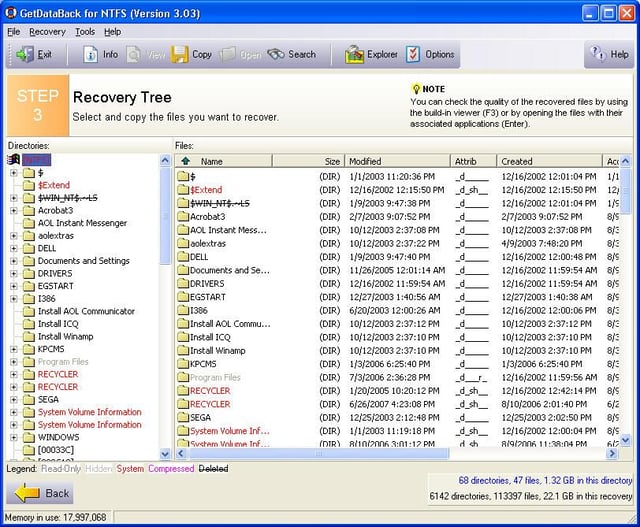
Get Data Back’s Third Step, the Recovery Tree (in addition to the simple but powerful recovery wizards), is what helps make the low-cost recovery application the right tool for rescue operations.
Essentially the program recovers and presents rescued data within the same file folder formats within which the data was contained. Doing so greatly simplifies locating critical files lost to failed, corrupted or accidentally deleted or formatted disks.
The program also codes the files it recovers. Read-only files are listed as gray, system files are displayed in red, compressed files are listed in purple and deleted files that were recovered are listed using Windows’ strike-out font.
For example, locating a specific user’s documents is easy. Just navigate to the traditional user folder location (within root\\Documents and Settings) and, if all has worked well, Get Data Back will have found the deleted or lost files.
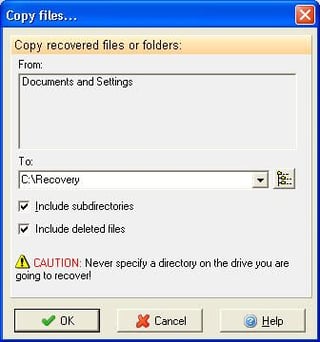
Once the appropriate files are selected within Get Data Back’s Recovery Tree, users can copy the rescued files and folders using the Copy function. Get Data Back prompts users to specify the location where the recovered files should be placed. The recovered files should always be placed on a second hard drive (never the drive that’s experiencing trouble) in order to protect against further loss.
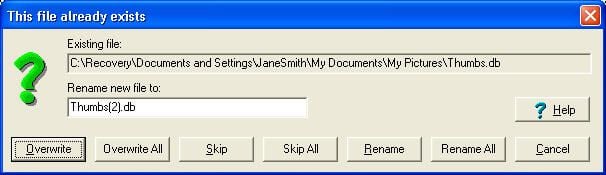
In the event Get Data Back recovers multiple files with the same name, the application will prompt users for guidance. Users can choose to overwrite existing files (likely not recommended), skip the issue, or rename files as they’re recovered.

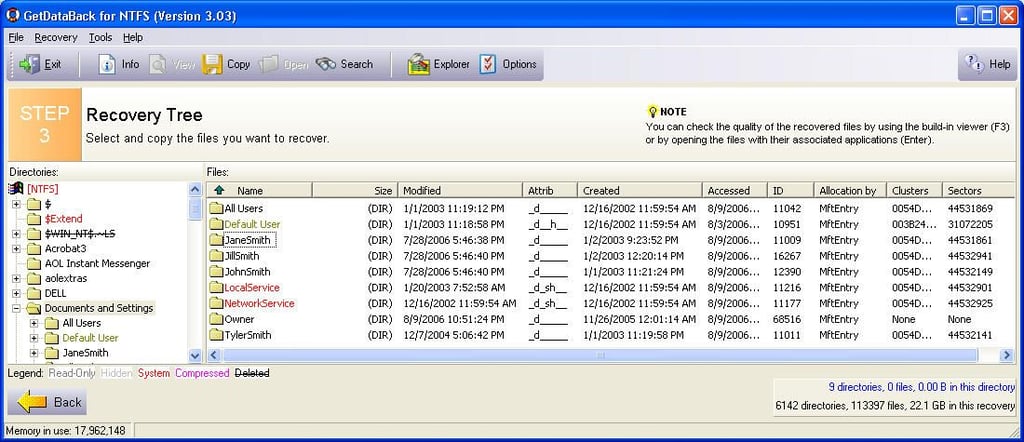
Drilling down within a recovered and restored data tree demonstrates that Get Data Back not only recovers everything it finds within a folder’s substructure, but that the program does the best it can to replicate the file structures it finds on damaged or simply user-corrupted hard disks.
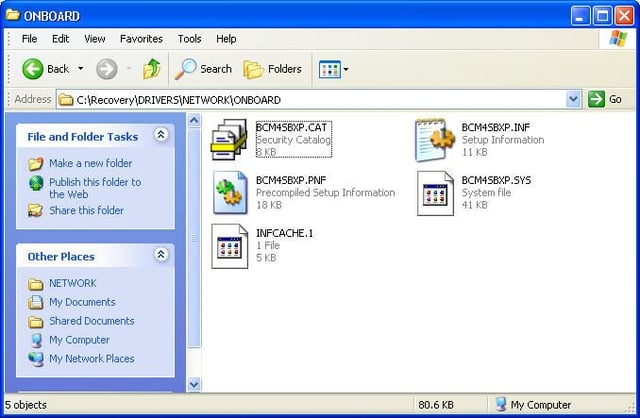
Drilling even deeper into folders and subfolders eventually brings the user to the ultimate goal: the actual files that were deleted or lost.

Users seeking assistance using Get Data Back will find the Help files well written. The Help files are broken into logical sections that match specific wizard steps, making it easy to find assistance or explanations based on the recovery stage in question.
Toll-based telephone technology support (in English, French and German) is available, as is support via e-mail.
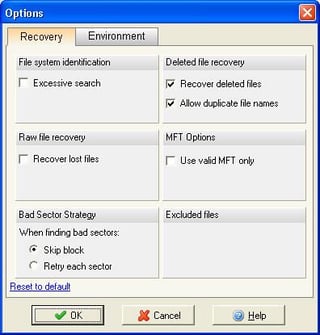
In keeping with its simple format, Get Data Back’s user-configurable options are limited. Available Recovery options are visible here, while environmental options, meanwhile, include specifying default save directories, log file locations and temporary directories.
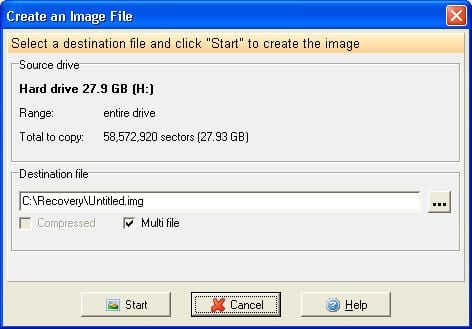
Should users wish to create an image file of recovered data, instead of copying recovered files to another hard drive, they can do so. Get Data Back includes a Create an Image File option, shown here.
When creating an image file, users need to specify the source drive and range and the destination file location and name.
When recovering data, Get Data Back tracks all the information it finds. Trying to locate specific files within 20 or more gigabytes of data can prove difficult, however.
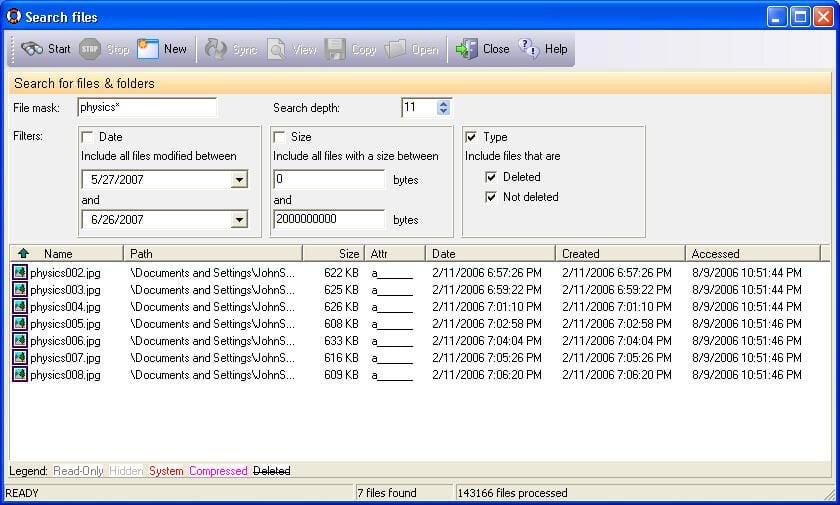
Thankfully Get Data Back includes a Search feature that enables users to search recovered files before actually copying the data to a new location. Here you can see the result of a simple search of recovered data aimed at locating a half-dozen images.
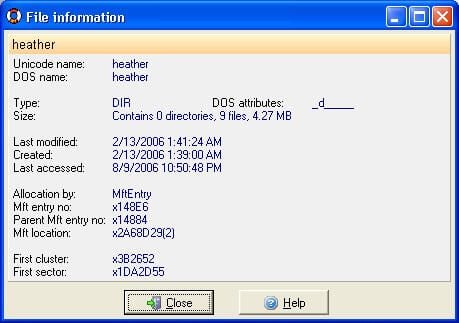
Before copying or recovering rescued data, users and administrators can review additional information about individual files. In addition to displaying created and modified dates, Get Data Back lists disk attributes, the file’s master file table, cluster and sector locations and file type information.

Recovery options take time to complete. The larger the hard drive, the longer the process will take to complete.
Rather than have to repeat a time consuming recovery operation, Get Data Back enables users to save the results of rescue sessions and save them to a functioning hard disk to be revisited later.
Get Data Back’s ability to recover data using simple wizards, combined with its directory-based recovery trees and ability to save restoration sessions, make it the Right Tool for recovering data from corrupted disks.

Erik Eckel is a managing partner at Louisville Geek and president of Eckel Media Corp. He previously served as Executive Editor at TechRepublic. He received Microsoft Engineer accreditation from Sullivan University and earned his Bachelor's Degree in English from the University of Louisville. He's earned Network+, Windows NT 4.0 MCP+I and MCSE, and Windows 2000 Professional MCP accreditations.


