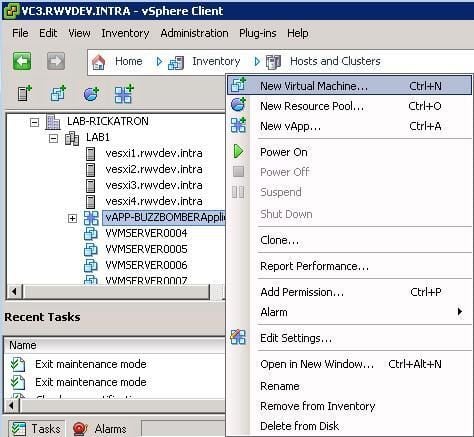
The first step is the inevitable right-click to create a virtual machine. But where can it be created? If vCenter Server is used, virtual machines can be created either directly on a host, in a datacenter, in a cluster, or in a vApp. Whether this is the start of a new virtual machine template or a server for an experiment, the behavior is similar in each situation and starts with the right-click. If scripting is your persuasion, of course there is a PowerShell outlet for that.
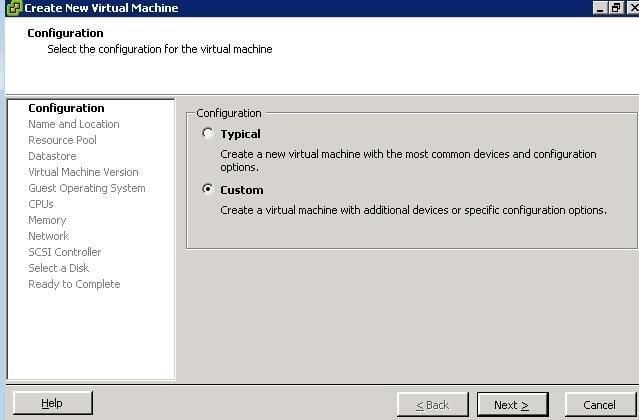
The next option will be whether or not to select a custom configuration for the virtual machine. The menu options for a custom virtual machine make it easier to utilize the new vSphere features. The typical virtual machine’s selection has seven decision points, compared to the custom virtual machines’ fourteen. Besides, what techie doesn’t always select custom anyway?
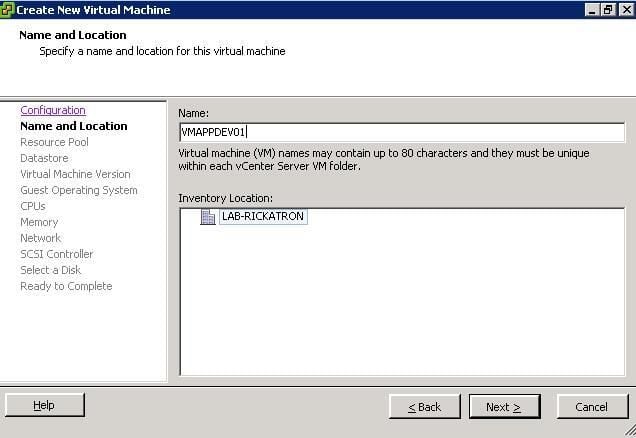
The next step in creating a virtual machine is assigning a name to the virtual machine. This isn’t the name of the guest operating system, but it is a good idea to keep them the same. Further, why not make the server name of virtual machines (and physical systems!) self-documenting? In this case, VMAPPDEV01 is a development virtual machine application server which is the first in its series. Instead of APP, you can put in something like “FILE” for a file server, “DOCO” for a domain controller, or something else that is self-documenting in your environment.
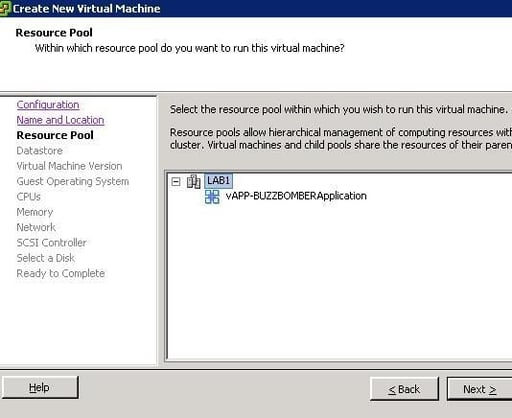
After the virtual machine has a name, a basic location needs to be selected. If VMware’s DRS is used in a cluster, they are enumerated in the resource pool to select for the virtual machine. If DRS is not used, host resource pools are available. Likewise, a vApp is a valid destination as well. If multiple datacenters are in use within the same vCenter Server; the context of the datacenter that the right-click initiated will be displayed.
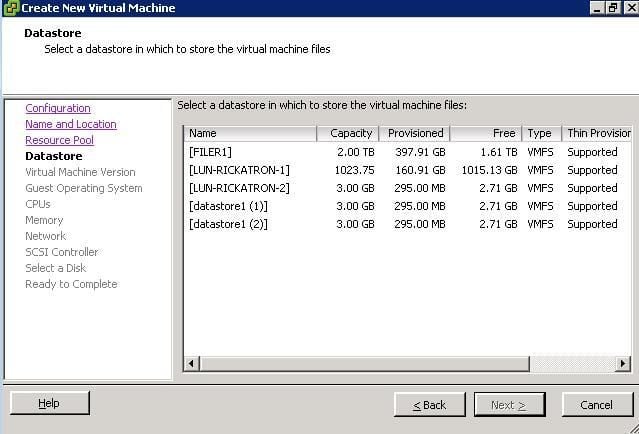
Storage is one of the most critical decision points for virtualization. Planning on the big scale and the small scale are important. The next screen of the wizard asks in which datastore to put the virtual machine. In vSphere clusters, a datastore that is accessible to multiple hosts should be used and ensure that adequate space is available. If Thin Provisioning is utilized, ensure that the provisioned amount is not too much greater than the capacity of the disk. Managing over-subscription is an art that is directly reflective of your virtual machine’s behavior.
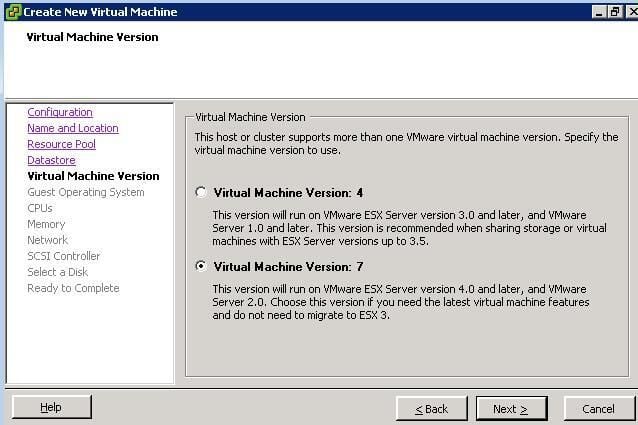
For vSphere installations, definitely select a virtual machine version 7. This will be used in all virtual machines that are running on ESX or ESXi hosts version 4 or higher. It is confusing that VMware Infrastructure 3 (VI3) virtual machines are a version 4 virtual machine, yet vSphere 4 virtual machines are a version 7 virtual machine. Further, version 7 is the gateway to the new vSphere features.
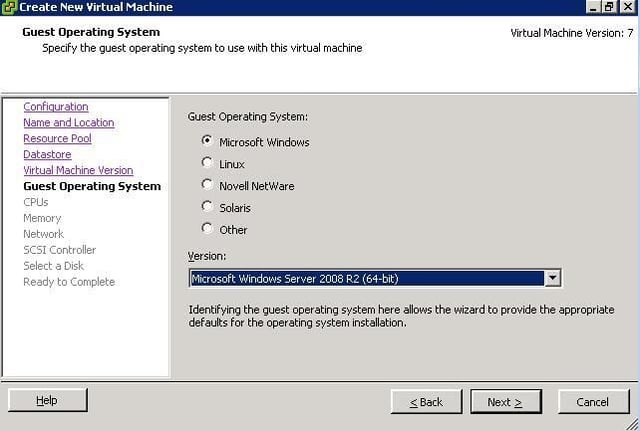
Deciding which operating system should run on the virtual machine is important. For current server operating systems, this will set important options such as 64-bit execution mode. Windows Server 2008 R2 is available only in x64, so selecting the correct operating system will ensure the optimal performance of the virtual machine from the base configuration. This starts with the virtual machine BIOS that is assigned to each virtual machine. vSphere supports a number of new operating systems, including DOS, SCO OpenServer, SCO UnixWare, OS/2, FreeBSD, Windows 3.1 and others.
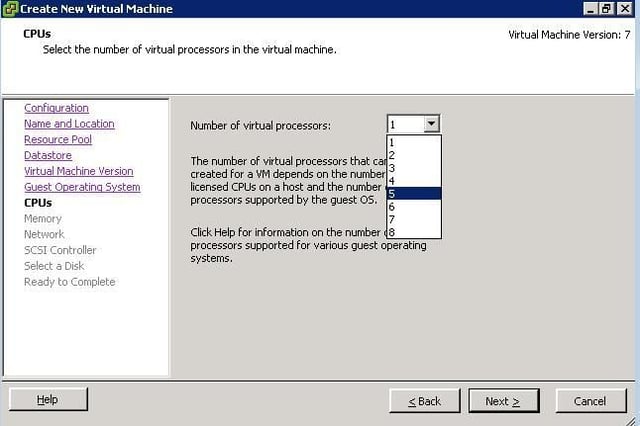
Selecting the number of virtual machine processors is an important step of the virtual machine provisioning process. As a general rule, only allocate the required number of processors. If you can get away with assigning only one virtual processor, do it. vSphere supports up to 8 vSMP for a virtual machine as well as the 3 vSMP option. VI3 only offered 1, 2 or 4 vSMP.
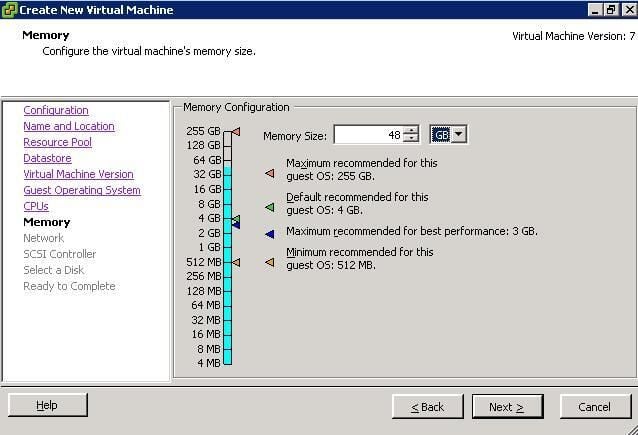
Without question, the most critical decision point in creating a virtual machine is the amount of virtual memory to assign a guest. Like vSMP, memory allocation should be exactly what the application and operating system require. vSphere supports up to 255 GB of RAM on a virtual machine. VMware’s memory management technologies allow oversubscription of the guest compared to the host’s RAM inventory, which means there may be swapping involved if the allocations exceed the available memory after the other memory management technologies such as the balloon driver, transparent page sharing, and memory compression.
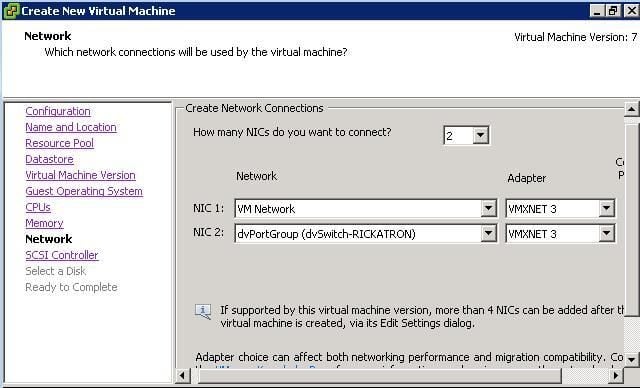
Selecting what type of network interface and on what virtual switch the virtual machine will reside is the next part of the provisioning process. vSphere includes the VMXNET3 virtualized network adapter that is optimized for virtual machines. Once VMware Tools are installed, the VMXNET3 driver will connect at 10 GBps; even if your line rate is only 100 MBps! You can also select the new distributed virtual switch option for the virtual machine.
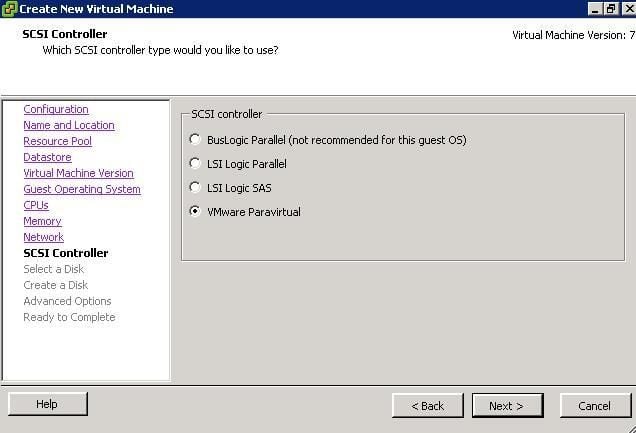
A virtual machine has a driver associated with its disk access. vSphere gives four options for this function, with the new VMware Paravirtual driver being again purpose-built for virtual machines. vSphere now supports the VMware Paravirtual driver to be used on boot volumes for selected operating systems (including most current Windows versions). The Paravirtual driver requires some additional consideration for being made bootable, see VMware KB 1010398.
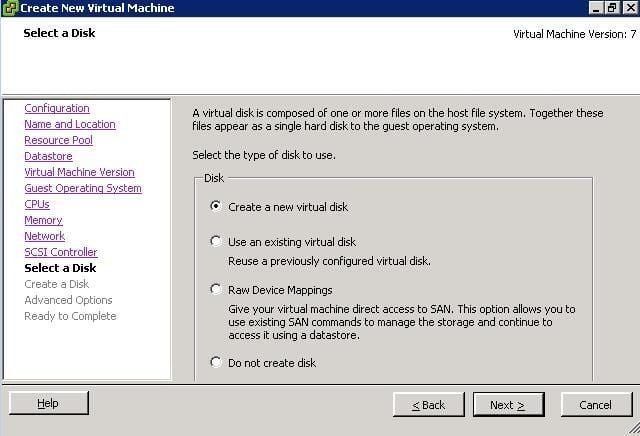
You can then create a new virtual disk file (VMDK) for the virtual machine. I prefer to use the VMDK option instead of Raw Device Mappings (RDMs) in most situations. Should you have a virtual disk file ready to use, the previously configured disk option can also be utilized.
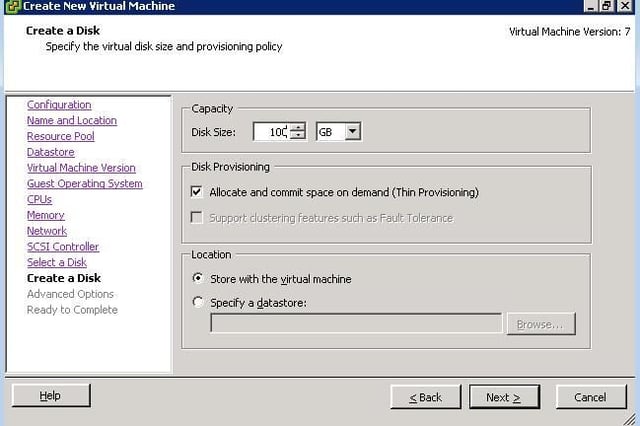
When determining the size for the virtual machine, the wizard only creates one VMDK file. If multiple VMDKs are to be used, they can be completed at the end of the wizard. There are a few key options to choose when creating the VMDK. Size is important, especially if the Thin Provisioning option is not selected. I prefer to use Thin Provisioning for most situations, as only the actual consumed storage of the guest operating system is reflected in the VMDK. If the virtual machine is to be a Fault Tolerant virtual machine, Thin Provisioning is not available and the VMDK is formatted as a zeroed thick file. You can also specify that the VMDK file reside in a different datastore as the configuration and memory swap file associated with the virtual machine.
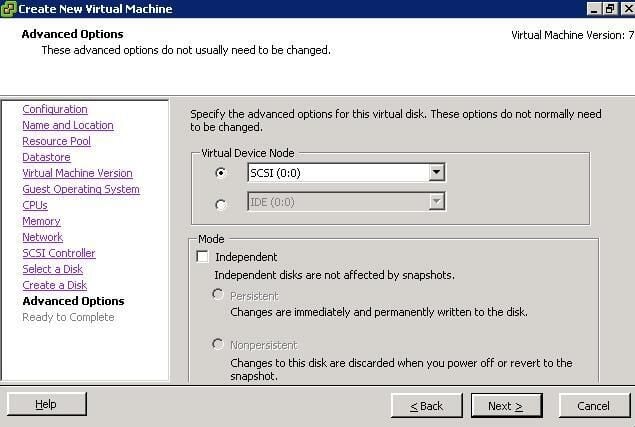
Just like a physical SCSI bus, the virtual SCSI bus has node IDs. Here you can configure the VMDK file’s location on the bus of the virtual machine. Each virtual machine maintains its own virtual SCSI bus addressing. So, this virtual machine may live on the SCSI 0:0 address and on the same host the next virtual machine will also have a SCSI 0:0 address; yet be on separate virtual busses.
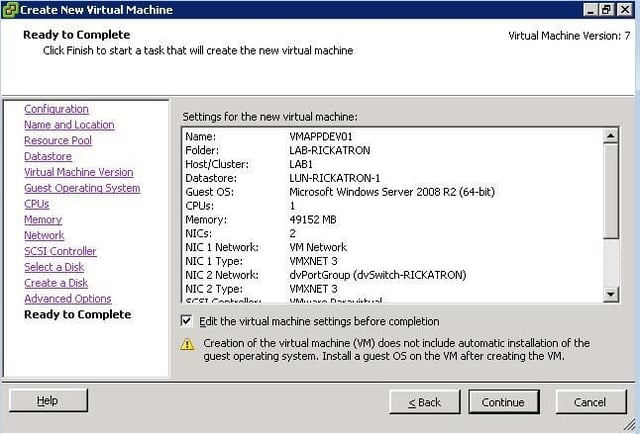
The summary of the virtual machine is presented at this point. Even though the custom wizard is thorough, I still go into the “Edit the virtual machine settings before completion” option for a few more customizations to the virtual machine.
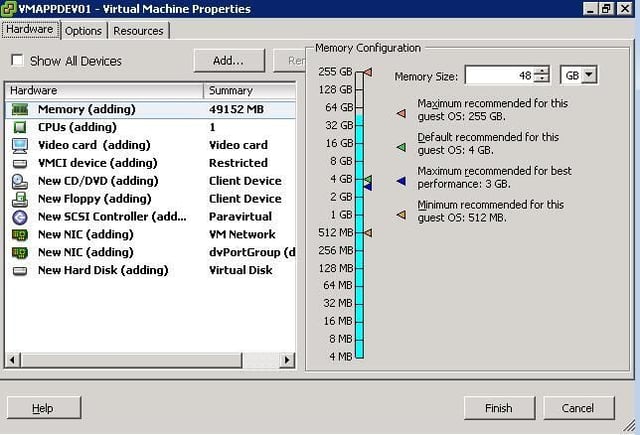
The virtual machine hardware inventory is presented here, and I always make a few customizations. One option is to remove the floppy drive. If the VMware Paravirtual SCSI driver is used, I’ll need the virtual floppy to pass the driver to the installation process. If not, I’ll remove it here. The most common other tasks in this screen are to add additional VMDK files for additional drives for the virtual machine, of which some may be on different datastores.
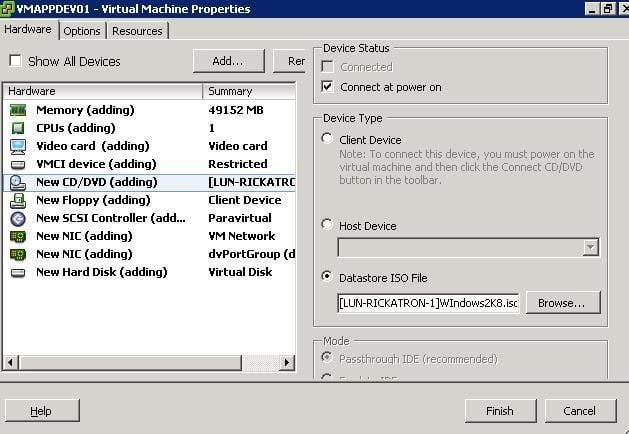
The final step to make the virtual machine usable is to map the virtual CD-ROM device to a file of an operating system installer. The most common situation is to map it to an .ISO file. PXE deployments can be used as well. Be sure to check the “Connect at power on” option at the top to ensure that the mapping is correct.
Click the Finish button and the virtual machine is created! At that point, it can be powered on and the operating system installed.

Rick Vanover is an IT Infrastructure Manager for Alliance Data in Columbus, Ohio. Rick's IT certifications include VMware VCP, Microsoft Windows Server 2008 MCITP, Windows Server 2003 MCSA and others. \ \ Previous experiences included working for Dematic Corp (formerly Siemens L&A, Siemens Dematic, Rapistan)in Grand Rapids, MI in various capacities deploying custom software solutions to the material handling industry using a mix of current hardware and software products. You can reach Rick at b4real@usa.net. Follow rick on Twitter at @RickVanover


