How to create deadlines in Microsoft Project 2007
Image 1 of 6
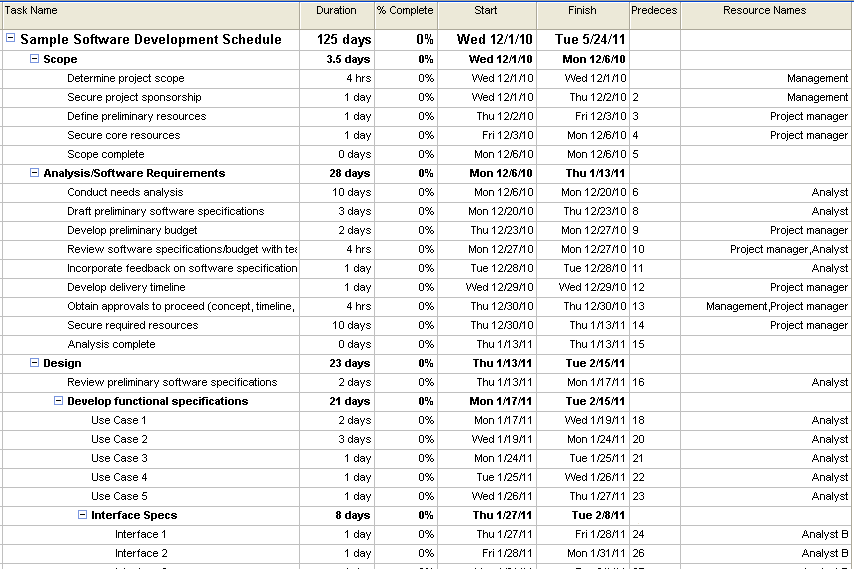
Sample project schedule
IT project teams rarely have the luxury of deciding a project’s end date. The team is usually handed a high-level scope with an expectation to deliver by the end date, while keeping project costs within a fixed budget. The end date is often based on management commitments, government mandates, political pressure, or unrealistic or unmanaged expectations.
A common reaction from project managers is to conduct a high-level analysis, provide a high-level estimate, and push back on the mandated deadline. Pushing back on a management deadline without supporting data is futile and will make you appear inexperienced. Fortunately, there is a better way to validate whether the deadline can be met. In this tutorial, I show how to create and then validate a deadline in Microsoft Project.
This TechRepublic gallery is also available as an IT Leadership blog post.
Step 1: Build a detailed project schedule
The key to validating a deadline is a realistic project schedule. Analogous and top-down estimation techniques are useful for high-level budget and duration forecasts; however, if you are going to determine whether a deadline is realistic, you’ll need a detailed project schedule.
Management will often question if all the dependencies and resource constraints have been considered, so be sure to verify that: the plan has well-defined dependencies, resources are accurately leveled, and the project calendars accurately reflect working times. At this stage in the project, you may not have all the specific resource names defined, but you should have a good idea of the number of resources and roles. This figure is a sample project schedule.
Screenshot by Dr. Andrew Makar for TechRepublic
Insert Column
Step 2: Insert the Deadline column
To insert the Deadline column, follow these steps:
1. Click the Predecessor column or the column where you want the Deadline column to appear.
2. Select Insert | Column from the Insert menu and choose the Deadline column from the Field Name drop-down menu.
3. Click the OK button.
Screenshot by Dr. Andrew Makar for TechRepublic
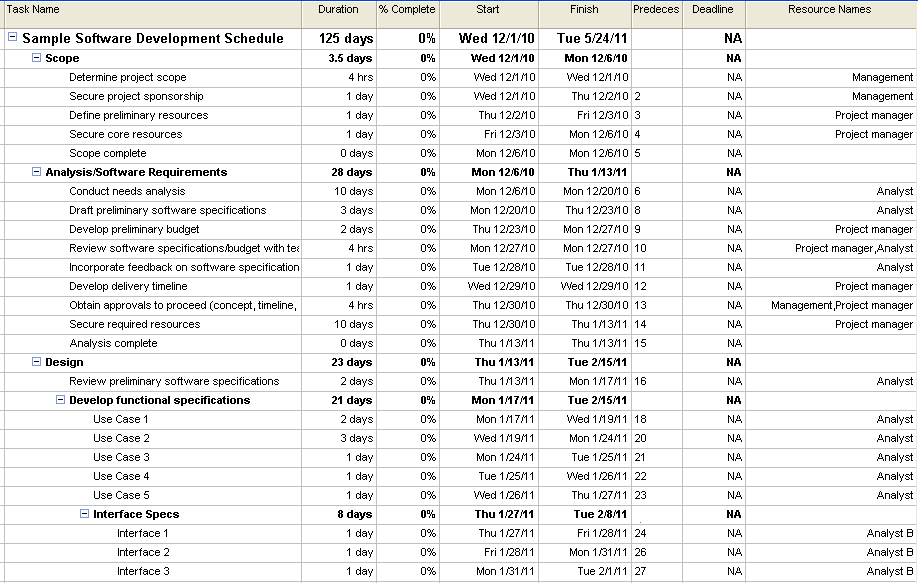
Deadline column
This figure depicts the Deadline column in the Gantt Chart view.
Screenshot by Dr. Andrew Makar for TechRepublic
Select a deadline date
Step 3: Assign a deadline to the 1st level task
The first deadline you should assign is to the highest level task in the project schedule. This is usually row 1 in the project schedule, though if you have the Show Project Summary task option checked, you’ll see a row 0 in Microsoft Project. Since you can’t assign a deadline to a Project Summary task (row 0), you’ll need to turn it off by going to Tools | Options | View tab.
If the project schedule doesn’t use the View Project Summary task option, you’ll still want to ensure all the tasks in the project are indented under row 1. By indenting all the tasks under row 1 task, Microsoft Project will roll up all the finish dates to row 1. You will be assigning a project deadline to row 1, as it represents the end date of the project.
To assign the deadline, follow these steps:
1. Click the Deadline cell on the desired task.
2. Use the drop-down calendar to assign a date or enter a date manually.
Screenshot by Dr. Andrew Makar for TechRepublic
Deadline in Gantt Chart
Deadlines appear in the Gantt Chart view as an inverted green arrow. In this example, the deadline is 6/30/2011, and the current project schedule has a forecasted finish of 5/24/2011. Based on the underlying tasks, the deadline of 6/30/2011 will be met.
Screenshot by Dr. Andrew Makar for TechRepublic
Missed Deadline
If the deadline can’t be met, the Indicators column will flag the tasks with a red diamond and an exclamation icon.
At this stage in project schedule development, you’ve built an initial schedule that has a deadline established for the end date. The next step is to refine the schedule and validate that the deadline can still be met.
Step 4: Refine the project schedule
Before you meet with the project sponsor requiring the deadline, you should review the schedule and refine it further to accommodate any additional risks, resource changes, duration changes, dependencies, etc. Once you have a valid project schedule that meets or exceeds the project deadline, you have enough information and proof to validate or reject the project deadline. By watching the Indicator column, you can quickly determine if a project deadline can be achieved.
Step 5: Integrate deadlines, milestones, and baselines
Deadlines can be applied to any task in the project schedule. Once you produce a valid project schedule, I recommend adding deadlines to specific milestones to represent drop dead dates. By analyzing the critical path and key milestones, additional deadlines can be defined. A deadline date doesn’t necessarily need to match a forecasted milestone or be the same as a task’s baseline finish date; a project can still miss its baseline finish date and still not miss its deadline. The Deadline column is just another tool to add a meaningful indicator into your project schedule. You still need to add the appropriate milestones and baselines to the project schedule.
Why not use the Must Finish By Constraint?
You may wonder why the project schedule should use a deadline instead of Microsoft Project’s Must Finish By Constraint. You can assign a Must Finish By Constraint to various tasks across the project schedule, but the problem with this approach is that you lose the ability to develop a dynamic schedule. By establishing a constraint-based schedule, you’ll experience constraint warning messages as you continue to refine the project schedule. You should build the project schedule to be fluid and dynamic. As the project executes, the schedule will change, and the deadline flags will provide the appropriate information without creating constraint problems during schedule development.
Conclusion
By incorporating these “requests” as deadlines in the schedule, you can competently develop a schedule that meets the deadline or provides a realistic project finish date. Once your team reviews a realistic schedule with the project sponsors, you can have meaningful scope or resource discussions that support or extend the desired deadline.
In my next TechRepublic article, I’ll show how to use multiple deadlines to manage your project schedule.
Screenshot by Dr. Andrew Makar for TechRepublic
-
Account Information
Contact Dr. Andrew Makar
- |
- See all of Dr. Andrew's content


