\n\tI’ve always been a fan of the all-in-one PC design. It packs the power of a desktop into a device the size of thick LCD. And while they may not have enough muscle for hardcore gaming, they can calculate your spreadsheet formulas and process or documents with ease.
\n
\n\tUnfortunately, most of the all-in-one computers that I’ve seen are extremely difficult, or nearly impossible, to upgrade or service, and many have a tendency to overheat. But while attending CES 2011, I found an all-in-one that stands out as an enterprise-class machine–the HP Compaq 6000 Pro All-in-one Business PC. Follow along as I crack open this enterprise-class all-in-one machine.
\n
\n\tPhoto by: Bill Detwiler / TechRepublic
\n\tCaption by: Bill Detwiler
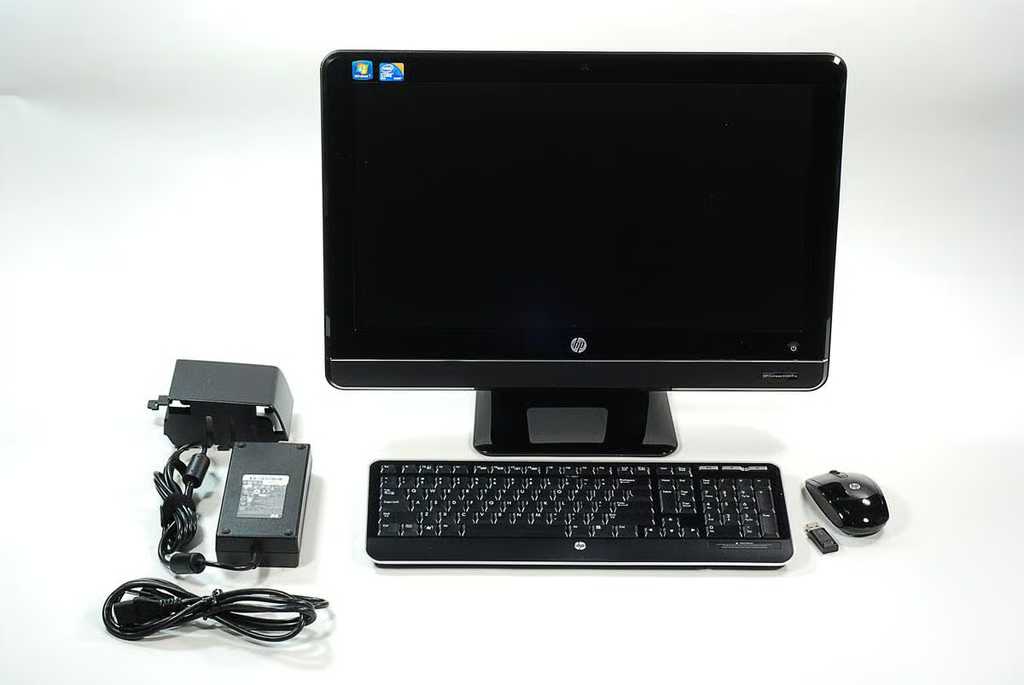
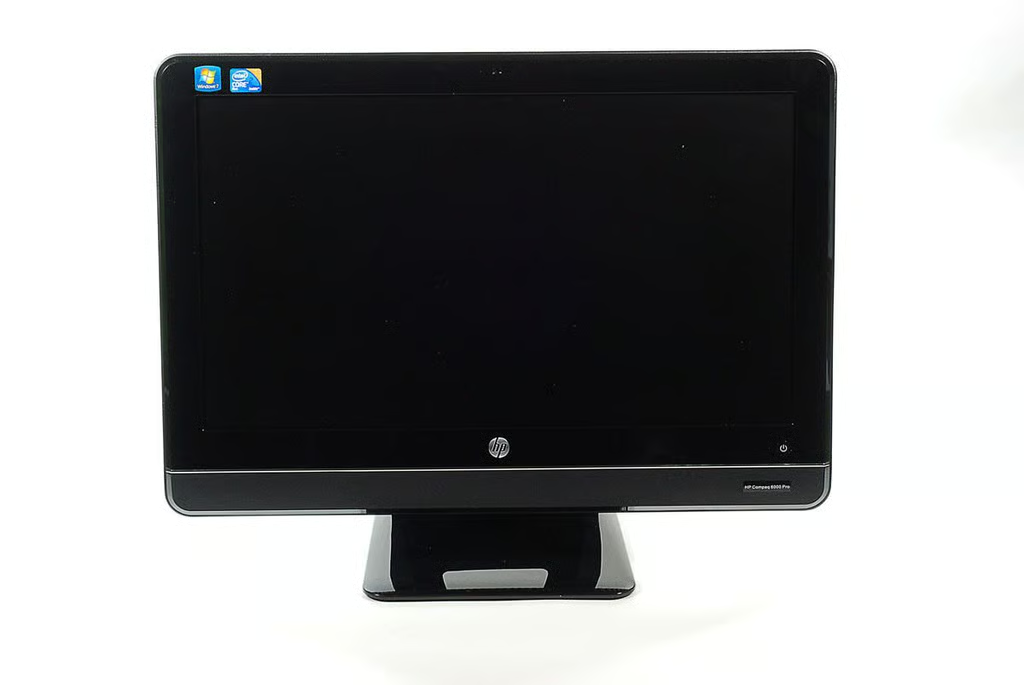
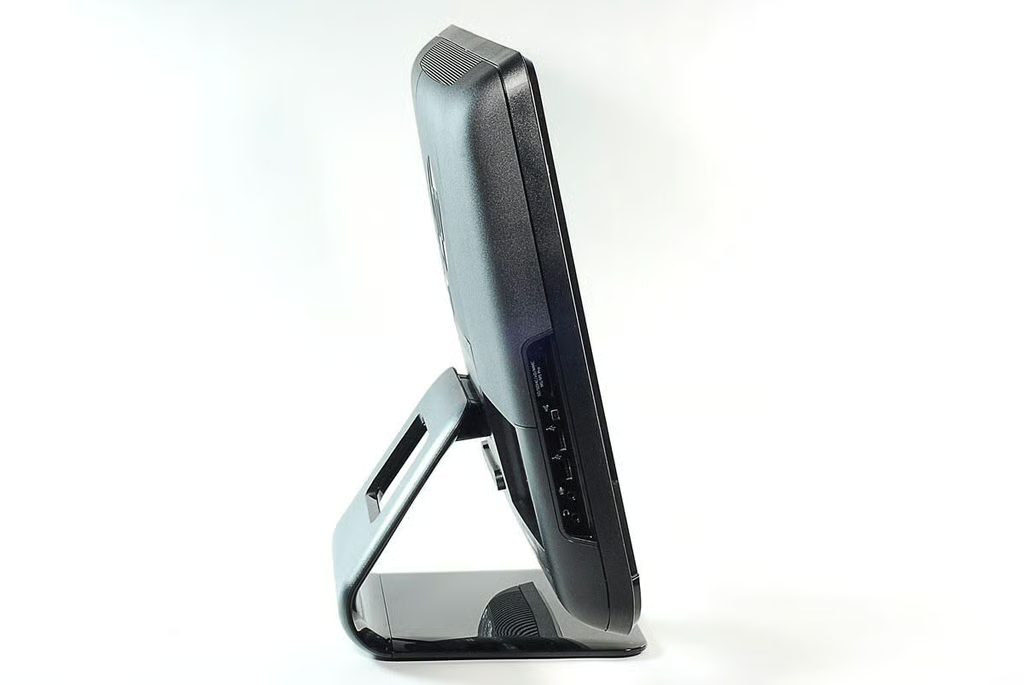
\n\tThe HP Compaq 6000 Pro All-in-one Business PC has a starting weight of 18.2 lb and measures, 21.5 in wide, 2.6 in deep, and 16.9 in high.
\n
\n\tPhoto by: Bill Detwiler / TechRepublic
\n\tCaption by: Bill Detwiler
\n\tPhoto by: Bill Detwiler / TechRepublic
\n\tCaption by: Bill Detwiler
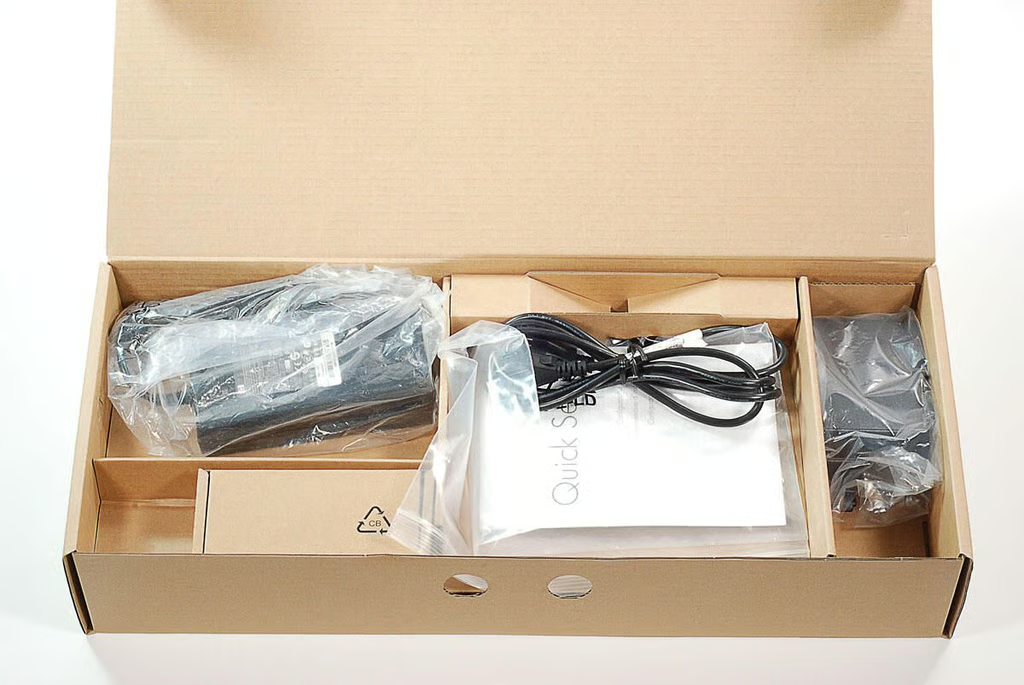
\n\tThe HP Compaq 6000 Pro All-in-one Business PC comes with a wireless mouse/keyboard and power cord and adapter.
\n
\n\tPhoto by: Bill Detwiler / TechRepublic
\n\tCaption by: Bill Detwiler
\n\tAs of this writing, the HP Compaq 6000 Pro All-in-one Business PC is customizable with a variety of hardware and operating systems and starts at $839 (US). Our test machine cost $1,139 (US) and had the following specifications:
\n
\n\t
\n\t
\n\t
\n\t
\n\t
\n\t
\n\t
\n\t
\n
\n
\n\tPhoto by: Bill Detwiler / TechRepublic
\n\tCaption by: Bill Detwiler
\n\tThe HP Compaq 6000 Pro All-in-one Business PC is available with the following operating systems:
\n
\n\t
\n\t
\n\t
\n
\n
\n\tPhoto by: Bill Detwiler / TechRepublic
\n\tCaption by: Bill Detwiler
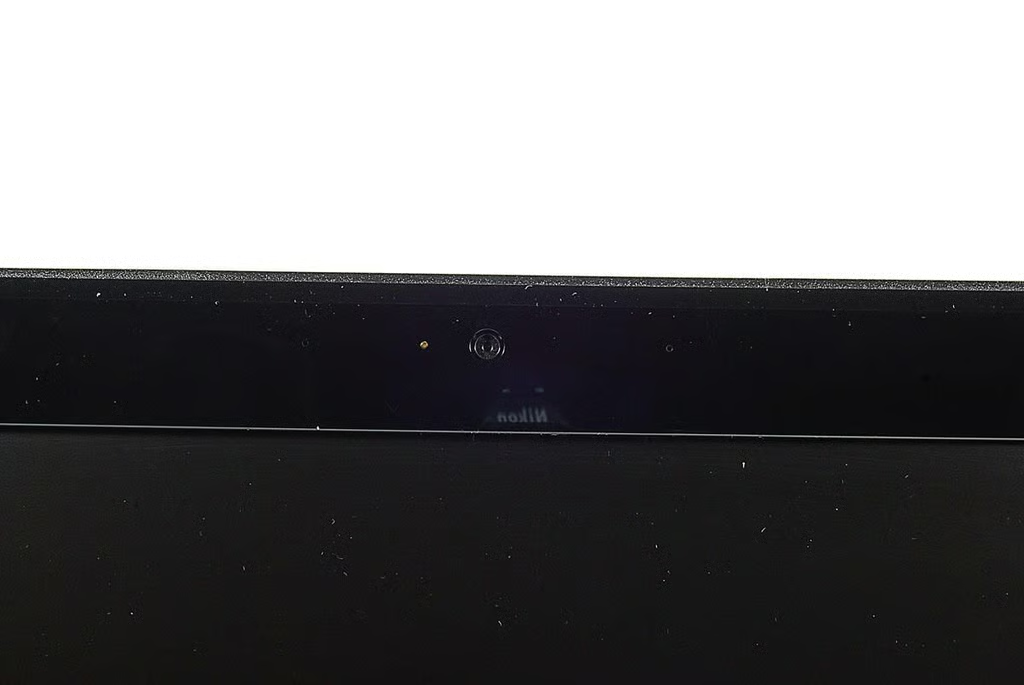
\n\tThe HP Compaq 6000 Pro All-in-one Business PC has an integrated webcam.
\n
\n\tPhoto by: Bill Detwiler / TechRepublic
\n\tCaption by: Bill Detwiler
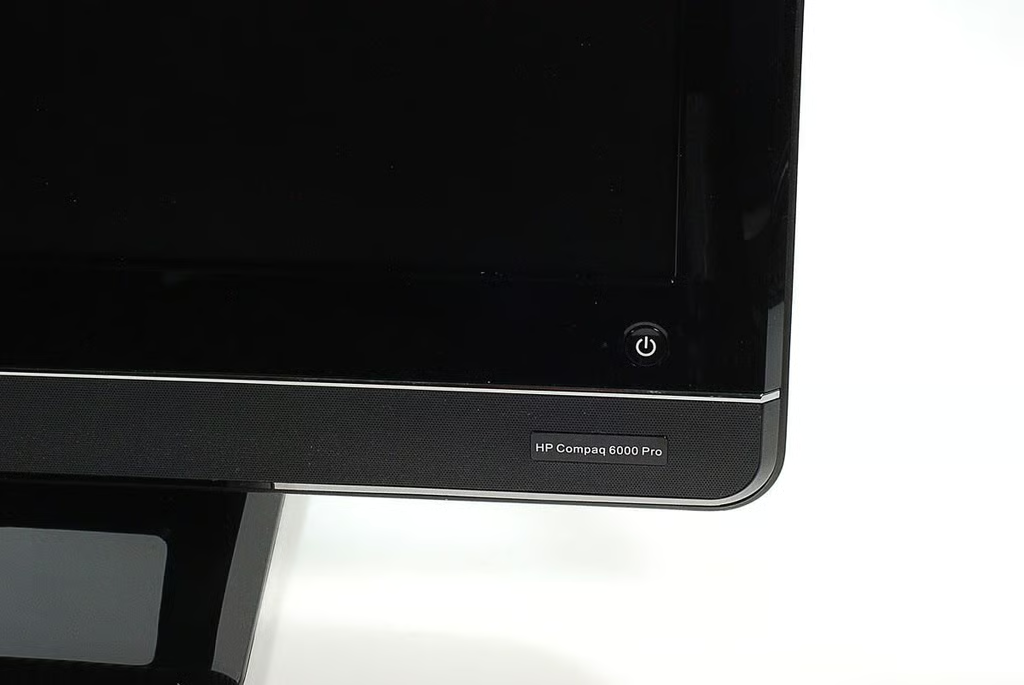
\n\tAlong the HP Compaq 6000 Pro All-in-one Business PC’s right side are the optical drive, eject button, display brightness up and down buttons, and status indicator light.
\n
\n\tPhoto by: Bill Detwiler / TechRepublic
\n\tCaption by: Bill Detwiler
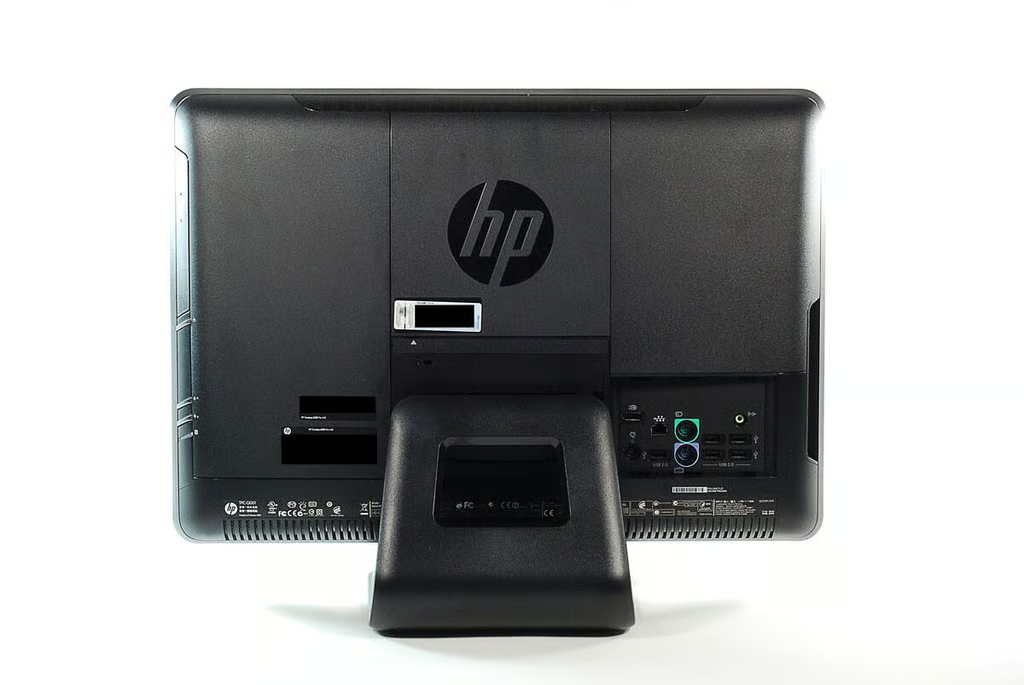
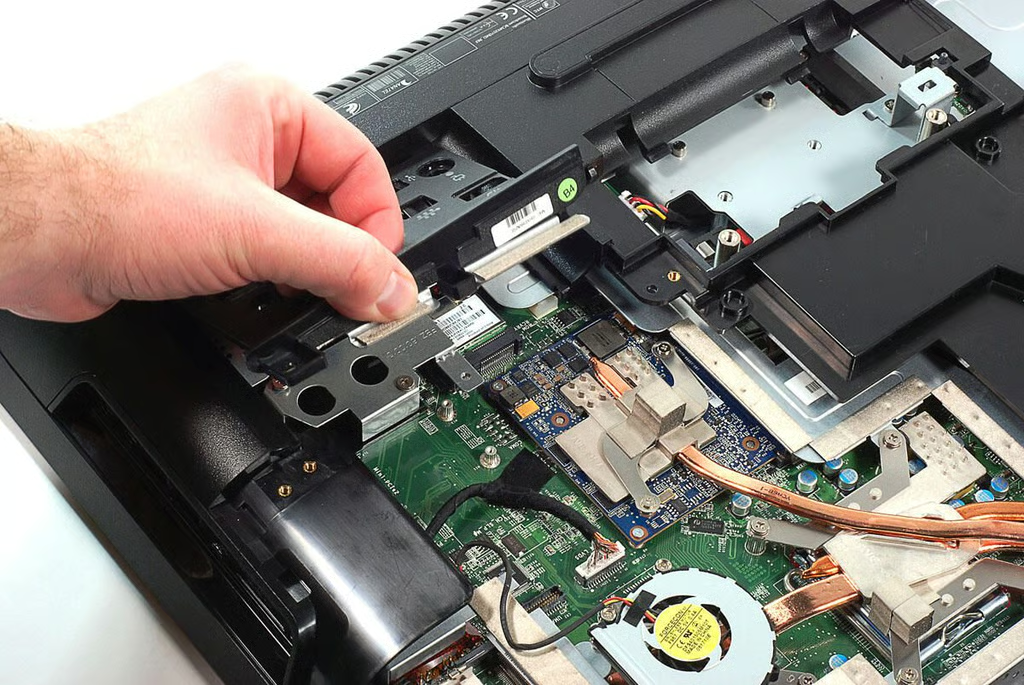
\n\tAlong the HP Compaq 6000 Pro All-in-one Business PC’s left side are the 6-in-1 media reader and several ports. Let’s take a closer look at the ports.
\n
\n\tPhoto by: Bill Detwiler / TechRepublic
\n\tCaption by: Bill Detwiler

\n\tAlong the HP Compaq 6000 Pro All-in-one Business PC’s left side are the 6-in-1 media reader, Firewire port, two USB ports, microphone jack, and headphone jack.
\n
\n\tPhoto by: Bill Detwiler / TechRepublic
\n\tCaption by: Bill Detwiler
\n\tPhoto by: Bill Detwiler / TechRepublic
\n\tCaption by: Bill Detwiler
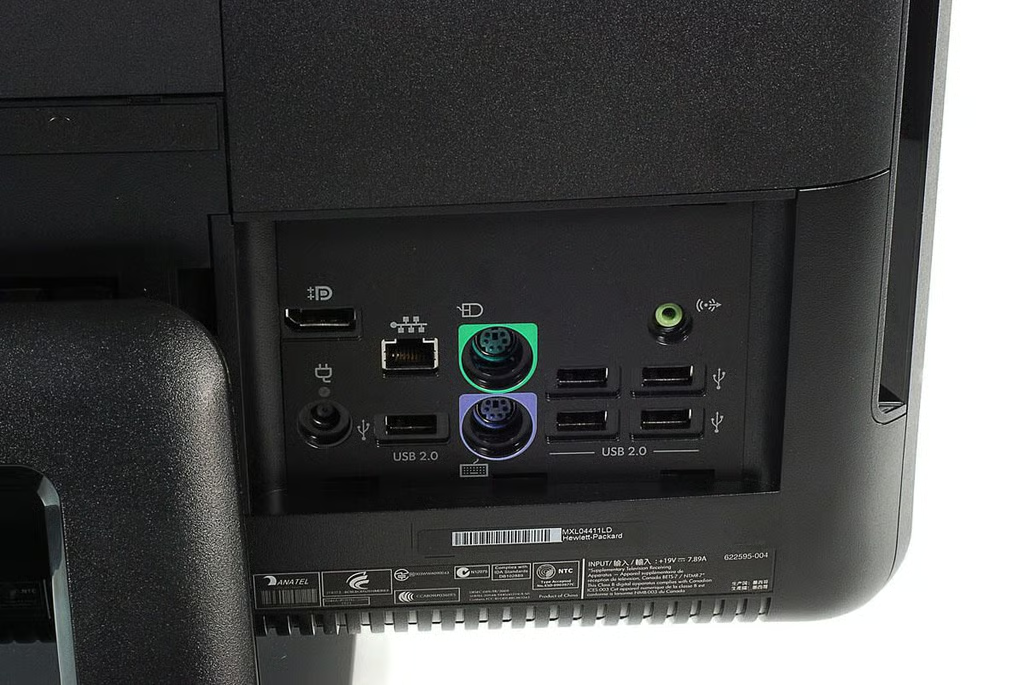
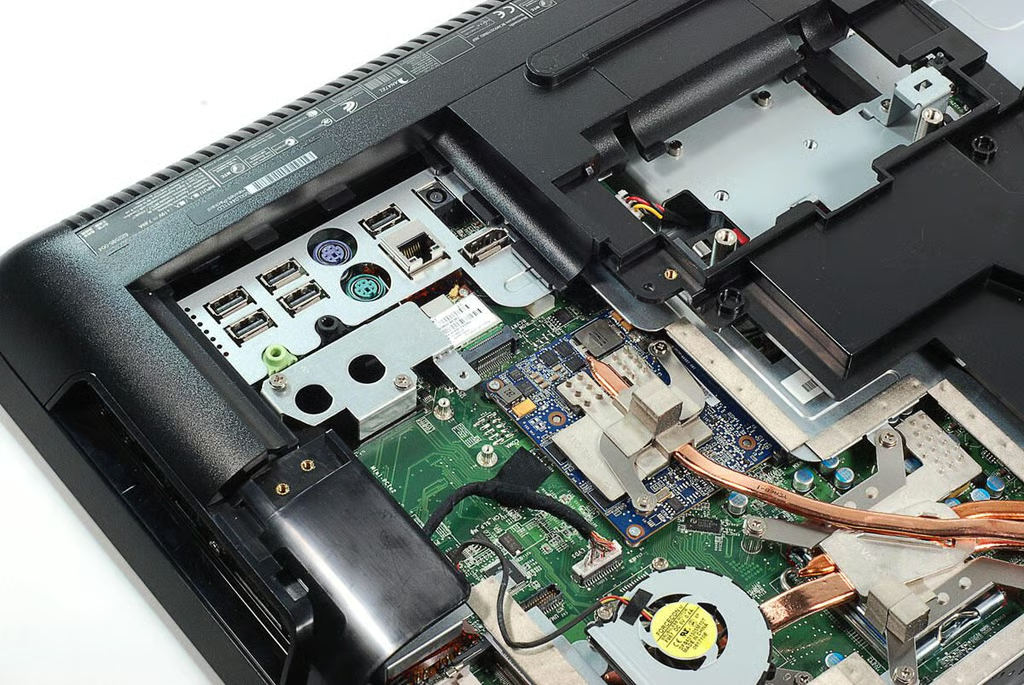
\n\tThe HP Compaq 6000 Pro All-in-one Business PC’s rear ports include a DisplayPort, Ethernet jack, PS/2 mouse and keyboard ports, fiveUSB ports, audio line out jack, and power input.
\n
\n\tPhoto by: Bill Detwiler / TechRepublic
\n\tCaption by: Bill Detwiler
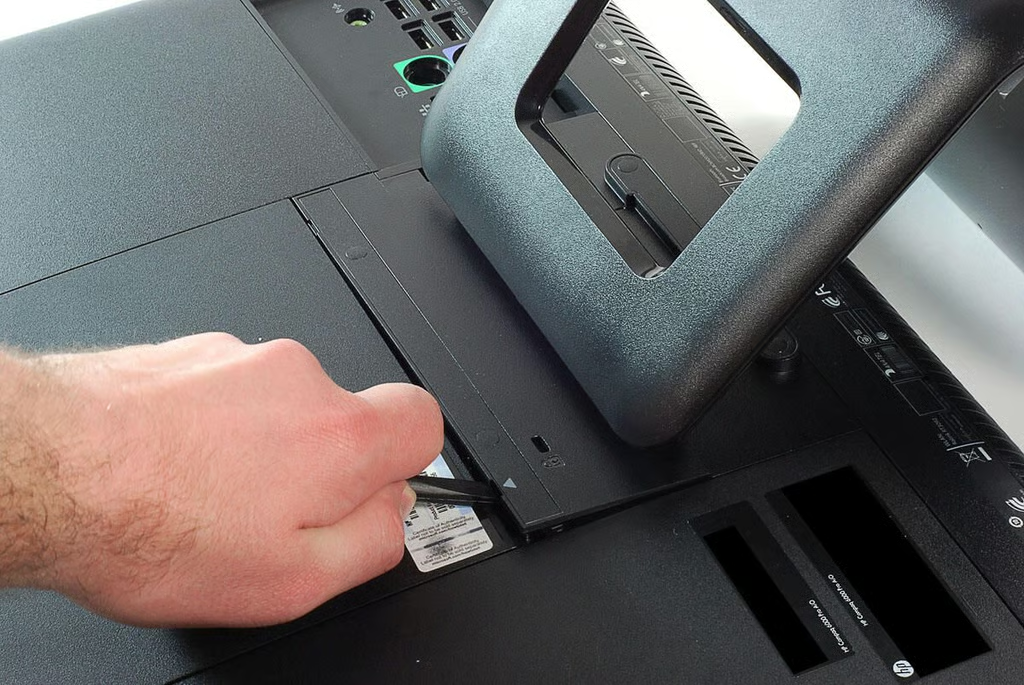
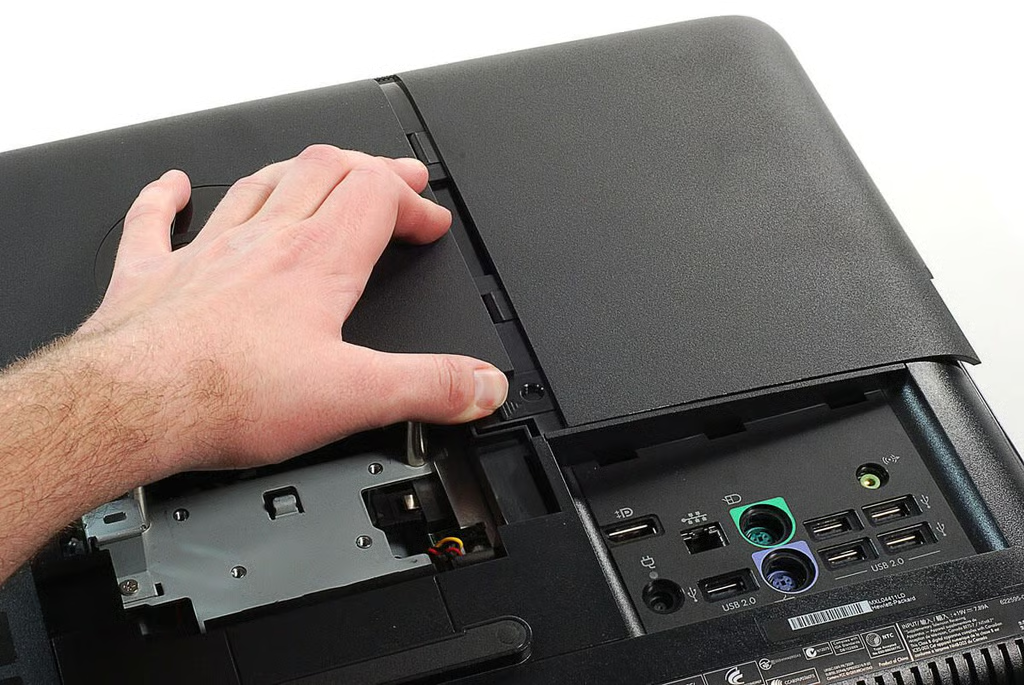
\n\tThe first step in disassembling the HP Compaq 6000 Pro All-in-one Business PC is to remove the plastic panel located just above the stand.
\n
\n\tPhoto by: Bill Detwiler / TechRepublic
\n\tCaption by: Bill Detwiler
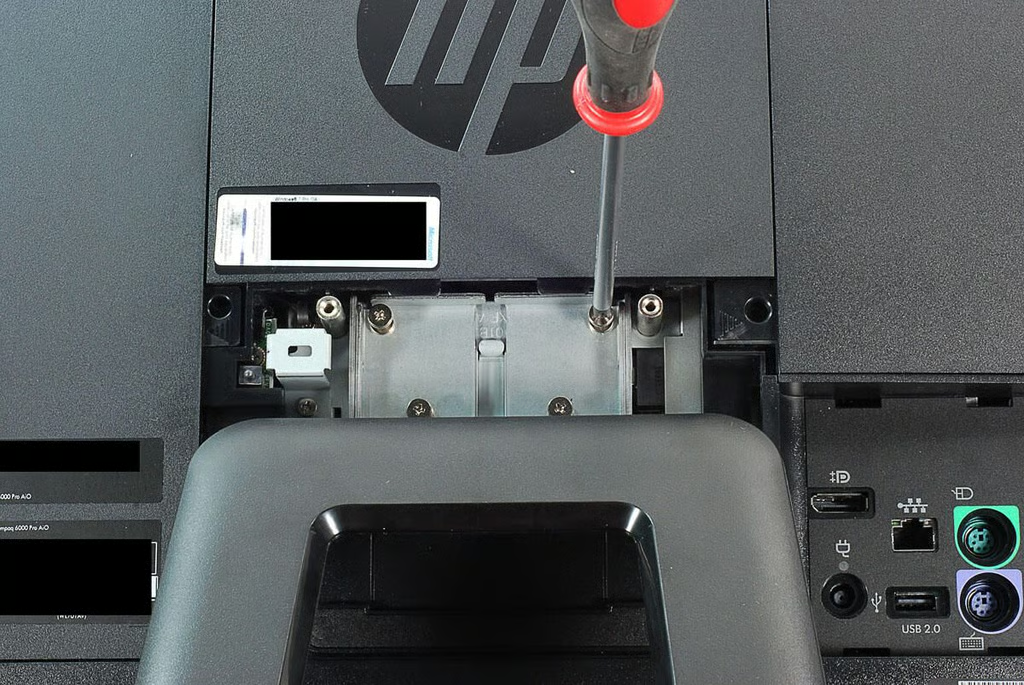
\n\tTo detach the HP Compaq 6000 Pro All-in-one Business PC’s stand, you’ll need to remove four screw posts with standard Phillips heads.
\n
\n\tPhoto by: Bill Detwiler / TechRepublic
\n\tCaption by: Bill Detwiler
\n\tPhoto by: Bill Detwiler / TechRepublic
\n\tCaption by: Bill Detwiler
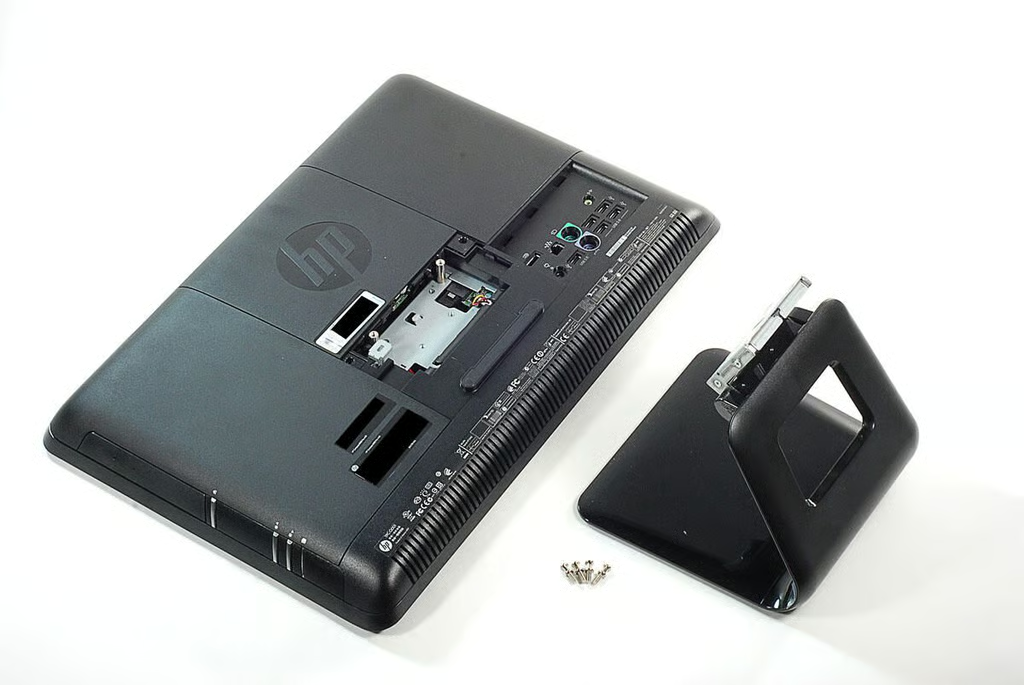
\n\tAfter removing the HP Compaq 6000 Pro All-in-one Business PC’s stand, I slide off the plastic panel covering the RAM chips.
\n
\n\tPhoto by: Bill Detwiler / TechRepublic
\n\tCaption by: Bill Detwiler
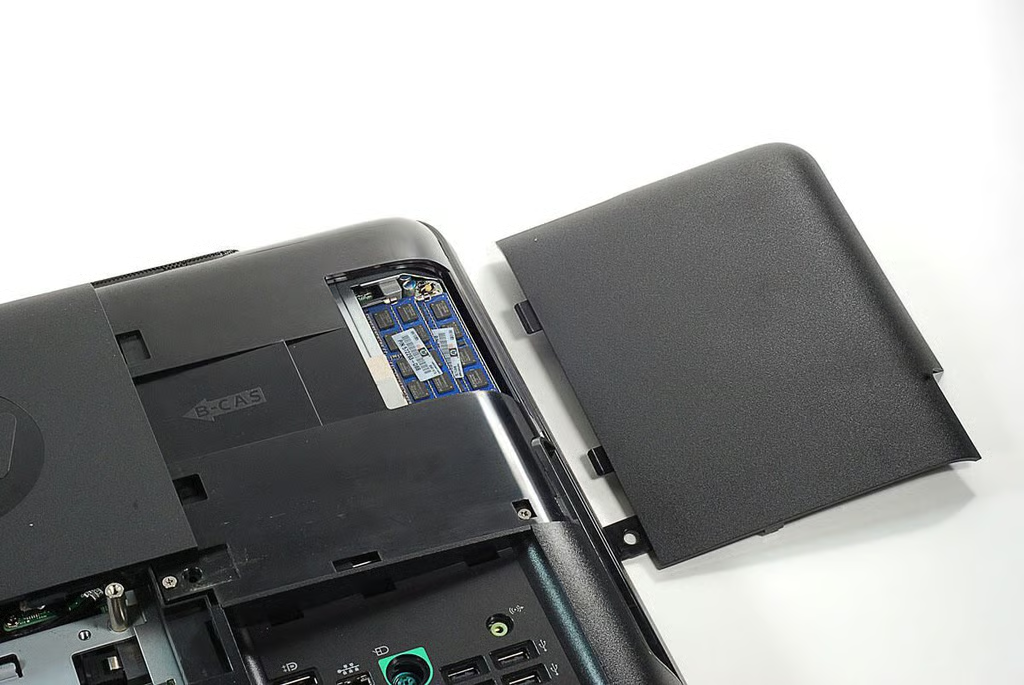
\n\tThe HP Compaq 6000 Pro All-in-one Business PC’s RAM compartment is easily accessed. Our test model came with two Elpida 2GB PC3-10600S-9-10-F1 chips.
\n
\n\tPhoto by: Bill Detwiler / TechRepublic
\n\tCaption by: Bill Detwiler
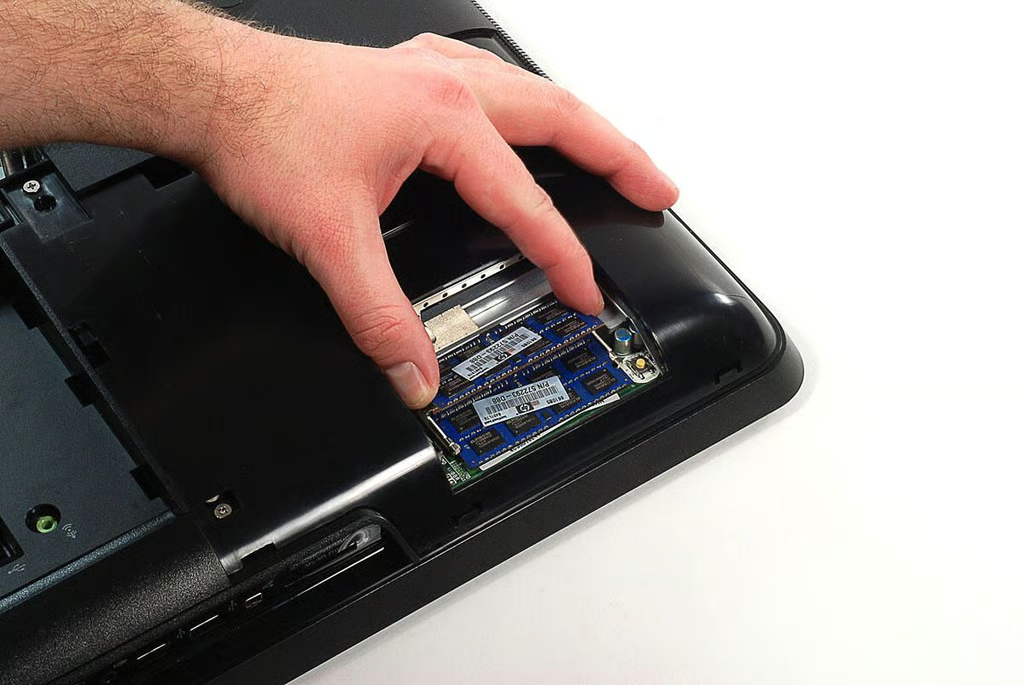
\n\tThe HP Compaq 6000 Pro All-in-one Business PC’s RAM chips are easily removed.
\n
\n\tPhoto by: Bill Detwiler / TechRepublic
\n\tCaption by: Bill Detwiler
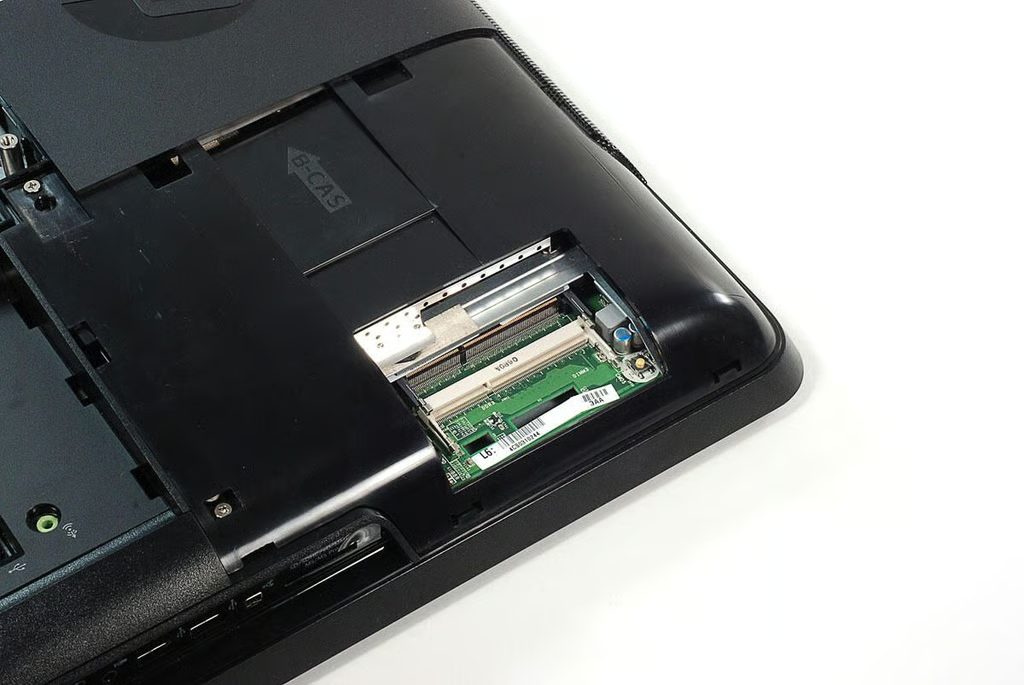
\n\tThe HP Compaq 6000 Pro All-in-one Business PC has two RAM slots and supports up to
\n\t8 GB 1333 MHz DDR3 SDRAM.
\n
\n\tPhoto by: Bill Detwiler / TechRepublic
\n\tCaption by: Bill Detwiler
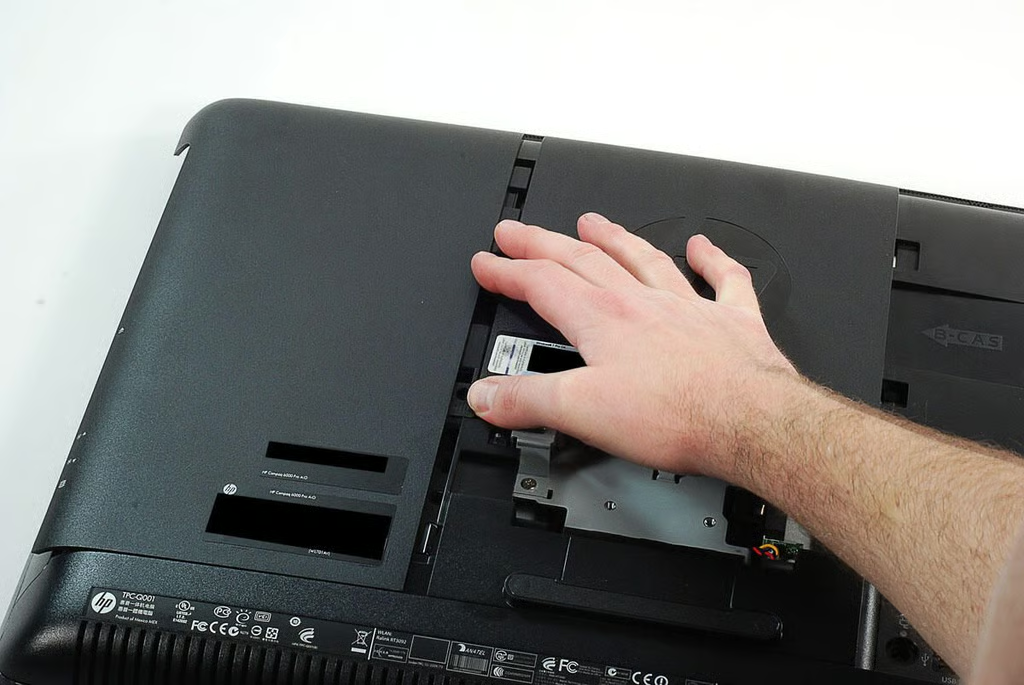
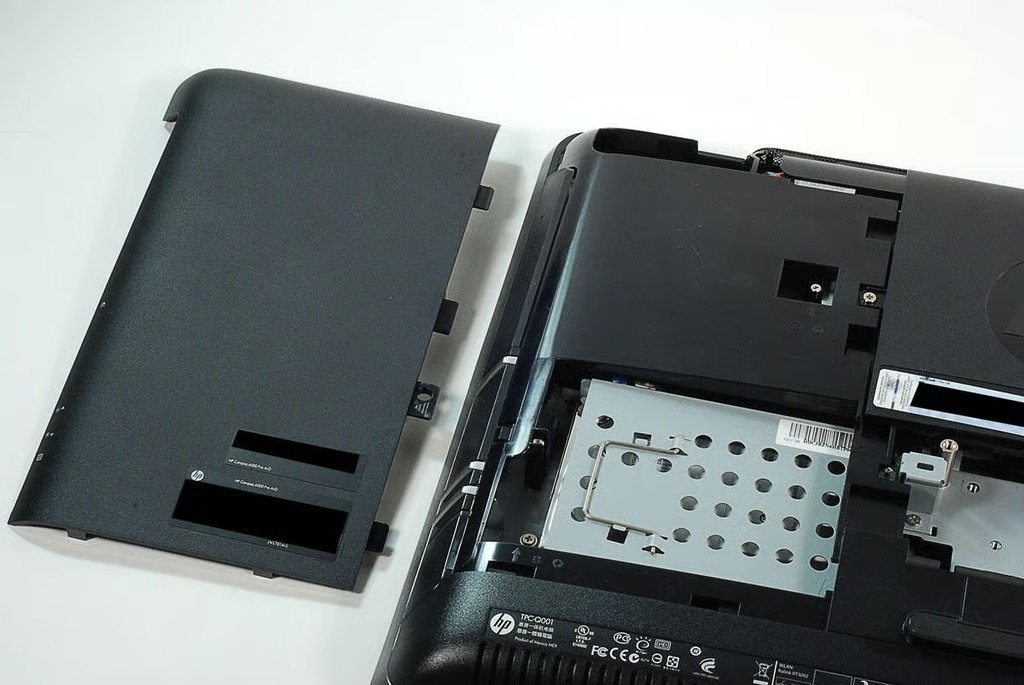
\n\tNext, I removed the plastic cover for the HP Compaq 6000 Pro All-in-one Business PC’s HDD and optical drive compartments.
\n
\n\tPhoto by: Bill Detwiler / TechRepublic
\n\tCaption by: Bill Detwiler
\n\tPhoto by: Bill Detwiler / TechRepublic
\n\tCaption by: Bill Detwiler
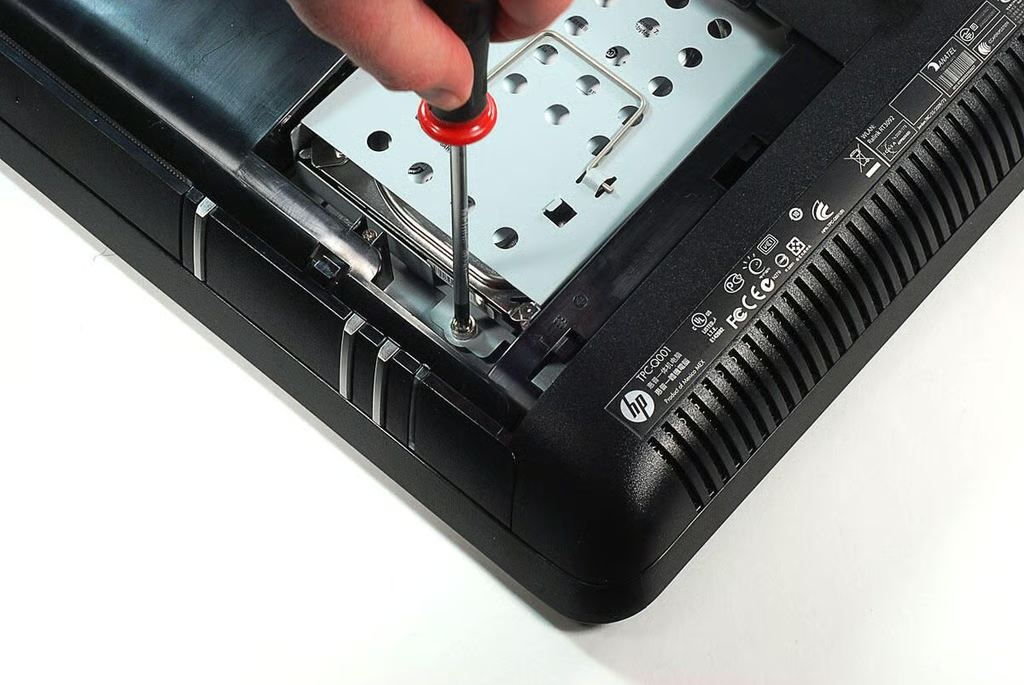
\n\tThe HP Compaq 6000 Pro All-in-one Business PC’s HDD is mounted within a metal enclosure, which is held to the machine’s frame with a single Phillips screw.
\n
\n\tPhoto by: Bill Detwiler / TechRepublic
\n\tCaption by: Bill Detwiler
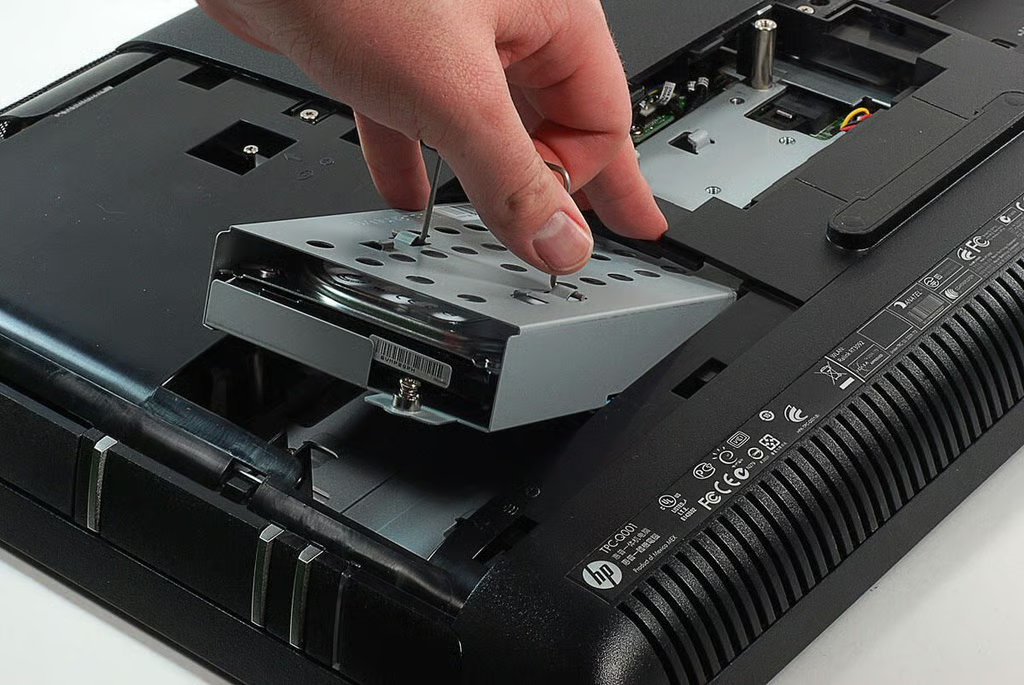
\n\tWith the screw removed, I was able to lift the HP Compaq 6000 Pro All-in-one Business PC’s HDD and enclosure away from the machine.
\n
\n\tPhoto by: Bill Detwiler / TechRepublic
\n\tCaption by: Bill Detwiler
\n\tPhoto by: Bill Detwiler / TechRepublic
\n\tCaption by: Bill Detwiler
\n\tPhoto by: Bill Detwiler / TechRepublic
\n\tCaption by: Bill Detwiler
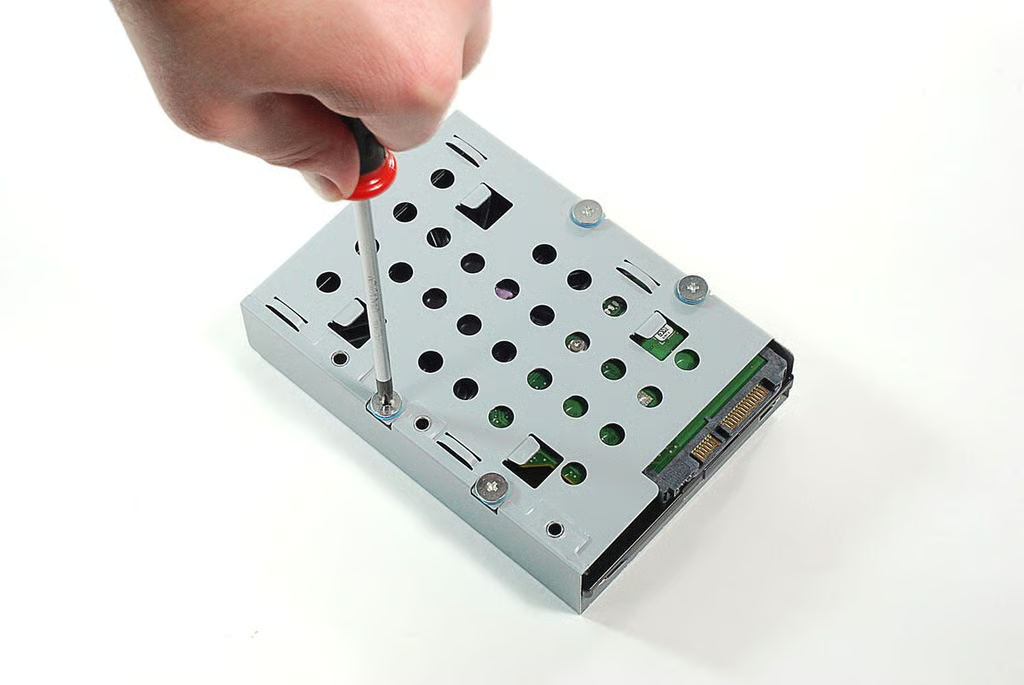
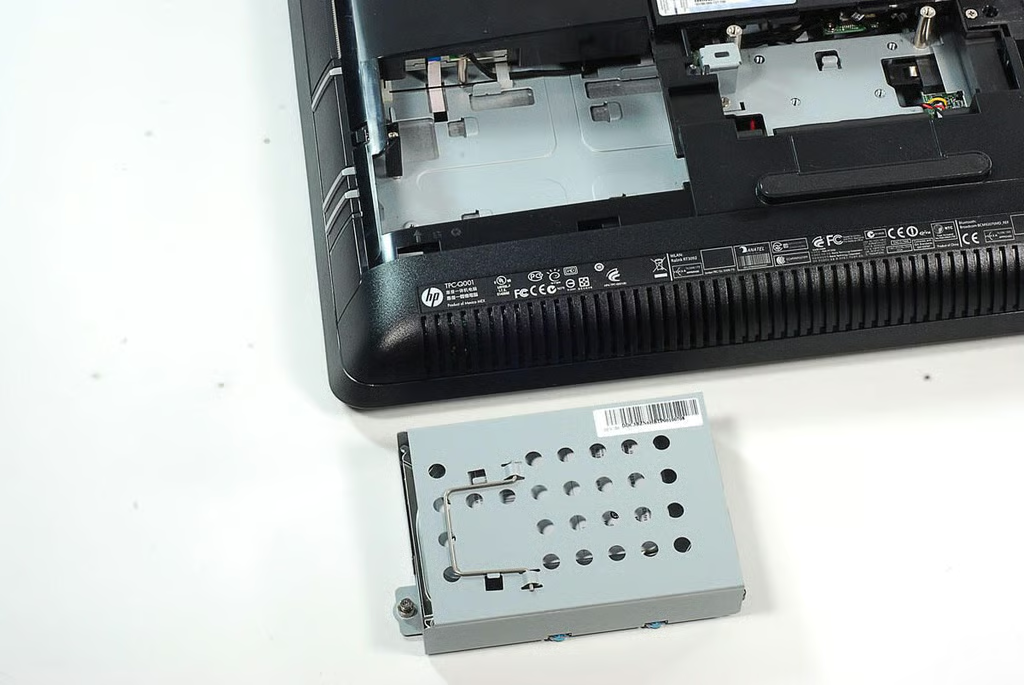
\n\tThe HP Compaq 6000 Pro All-in-one Business PC’s HDD is held to the enclosure with four Phillips screws.
\n
\n\tPhoto by: Bill Detwiler / TechRepublic
\n\tCaption by: Bill Detwiler
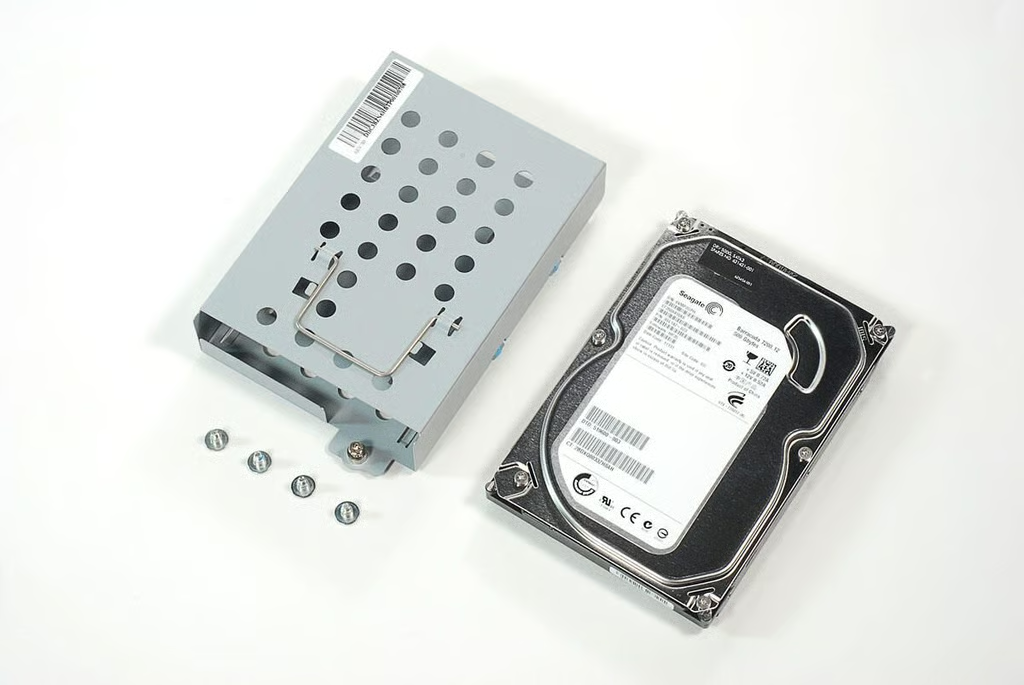
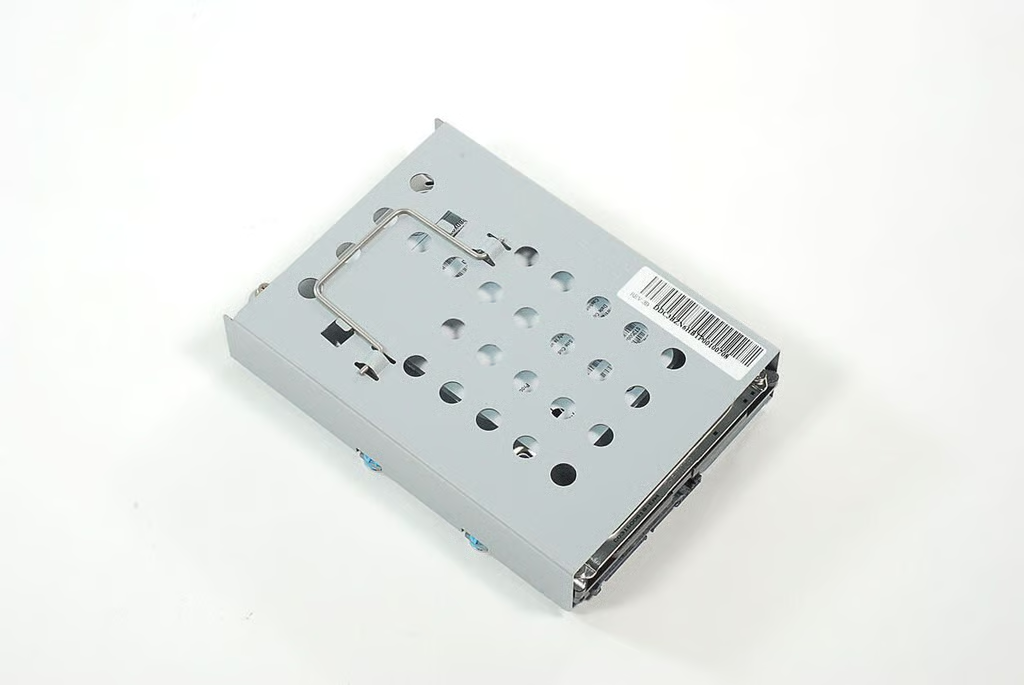
\n\tOur HP Compaq 6000 Pro All-in-one Business PC had a Seagate Barrcuda 500GB 7200RPM HDD. The PC supports SATA hard drives from 250GB up to 1TB. An 80GB solid-state drive is also available.
\n
\n\tPhoto by: Bill Detwiler / TechRepublic
\n\tCaption by: Bill Detwiler
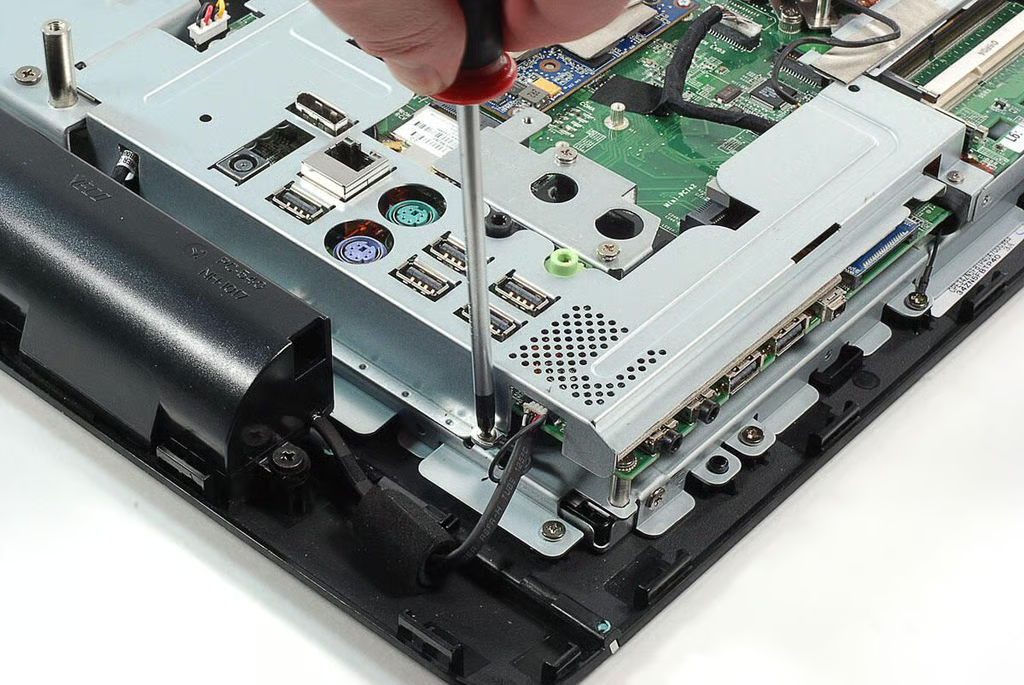
\n\tAfter removing the RAM chips and HDD, I removed several Phillips screws that hold the inner access panel in place. This panel covers the upper-righthand corner of the HP Compaq 6000 Pro All-in-one Business PC’s case.
\n
\n\tPhoto by: Bill Detwiler / TechRepublic
\n\tCaption by: Bill Detwiler
\n\tPhoto by: Bill Detwiler / TechRepublic
\n\tCaption by: Bill Detwiler
\n\tPhoto by: Bill Detwiler / TechRepublic
\n\tCaption by: Bill Detwiler
\n\tWith all the access panel screws removed, you unsnap the panel from the frame and lift it away from the HP Compaq 6000 Pro All-in-one Business PC.
\n
\n\tPhoto by: Bill Detwiler / TechRepublic
\n\tCaption by: Bill Detwiler
\n\tPhoto by: Bill Detwiler / TechRepublic
\n\tCaption by: Bill Detwiler

\n\tWith the HP Compaq 6000 Pro All-in-one Business PC’s inner access panel removed, we get our first look at the motherboard and cooling system.
\n
\n\tPhoto by: Bill Detwiler / TechRepublic
\n\tCaption by: Bill Detwiler
\n\tWith the innter acces panel removed, we can begin removing the screws that hold the HP Compaq 6000 Pro All-in-one Business PC’s rear plastic shell in place.
\n
\n\tPhoto by: Bill Detwiler / TechRepublic
\n\tCaption by: Bill Detwiler
\n\tPhoto by: Bill Detwiler / TechRepublic
\n\tCaption by: Bill Detwiler
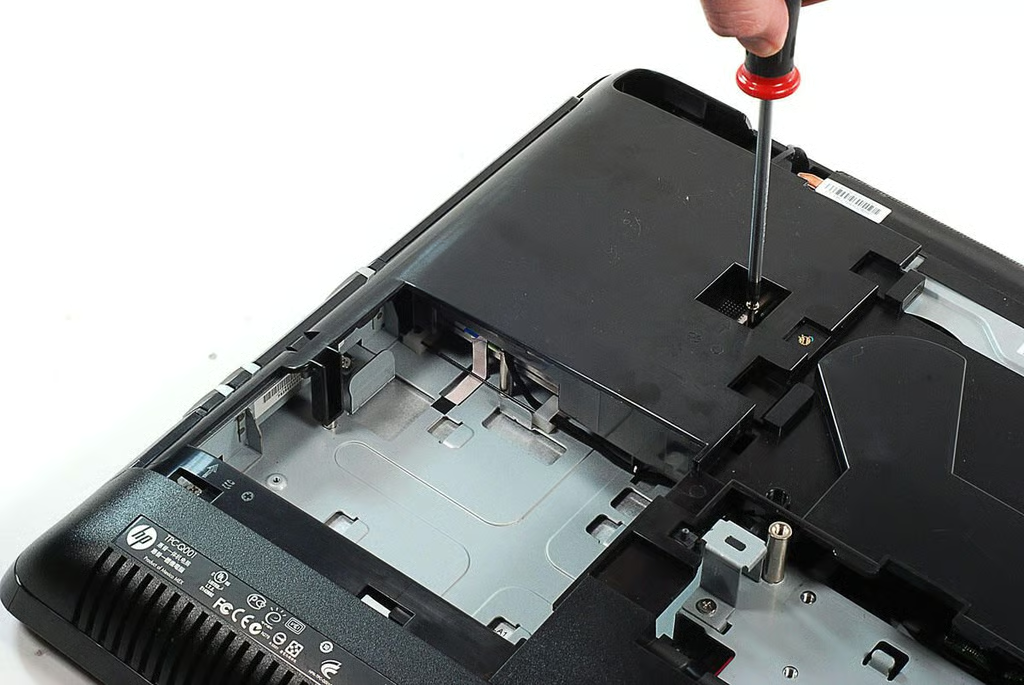
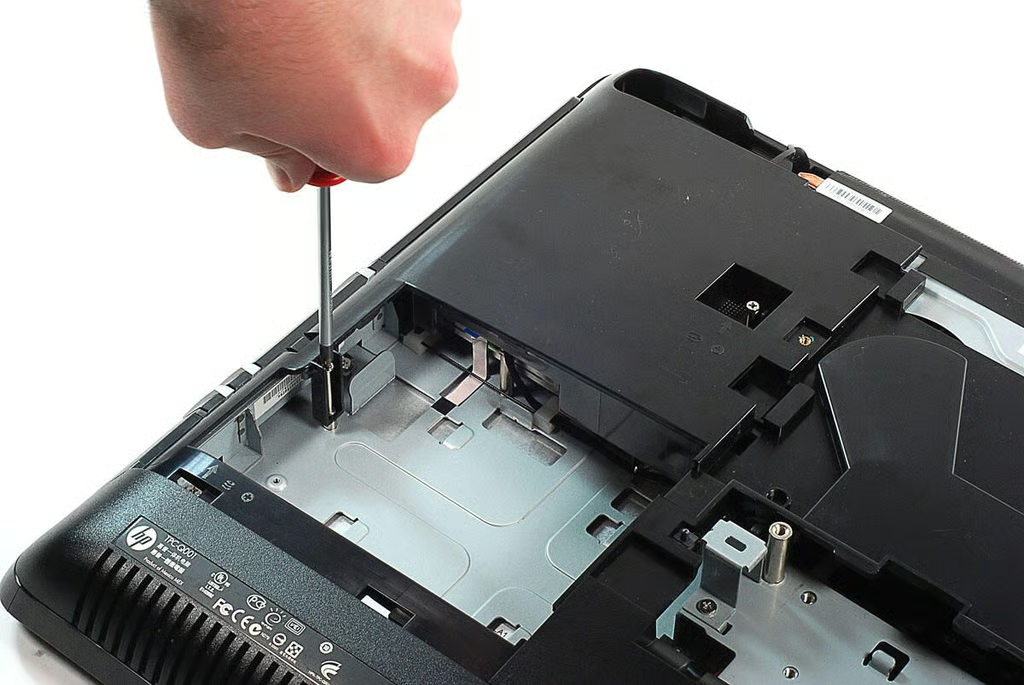
\n\tOne of the screws we’ll need to remove at this point also holds the HP Compaq 6000 Pro All-in-one Business PC’s optical drive in place.
\n
\n\tPhoto by: Bill Detwiler / TechRepublic
\n\tCaption by: Bill Detwiler

\n\tOnce its mounting screw is removed, we can pull the HP Compaq 6000 Pro All-in-one Business PC’s optical drive out of the case.
\n
\n\tPhoto by: Bill Detwiler / TechRepublic
\n\tCaption by: Bill Detwiler
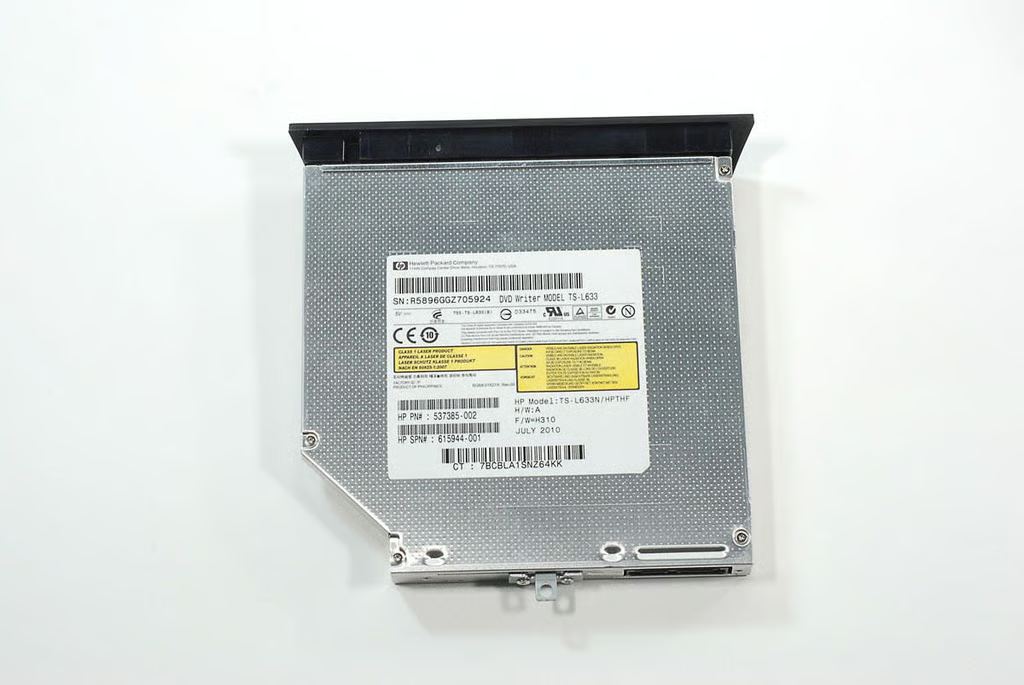
\n\tThe HP Compaq 6000 Pro All-in-one Business PC has a slim tray SuperMulti DVD Burner with Lightscribe Technology.
\n
\n\tPhoto by: Bill Detwiler / TechRepublic
\n\tCaption by: Bill Detwiler
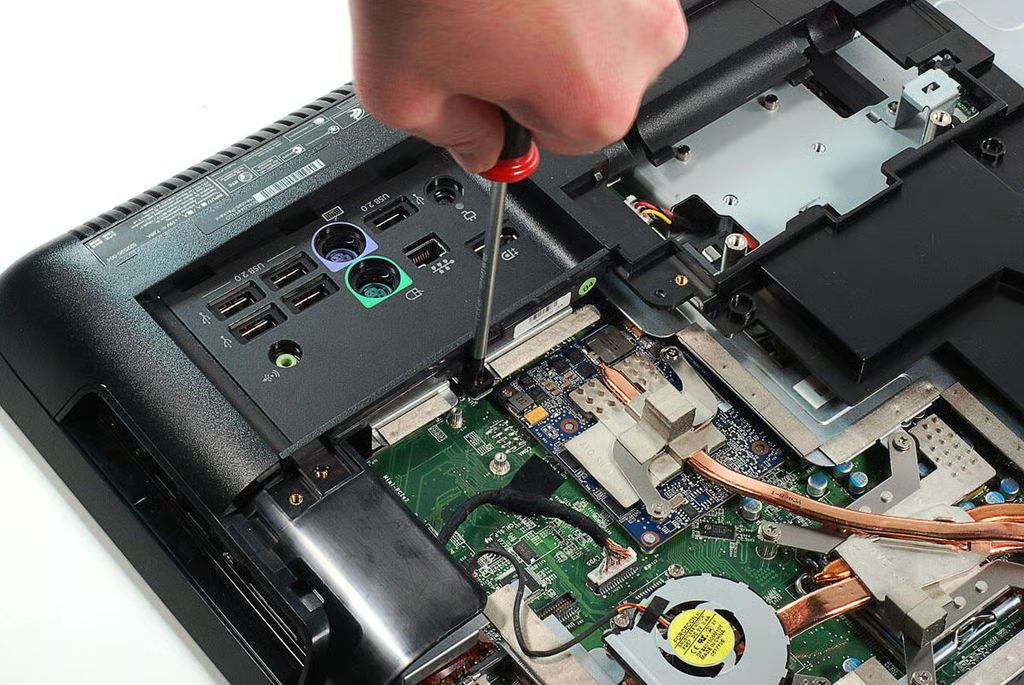
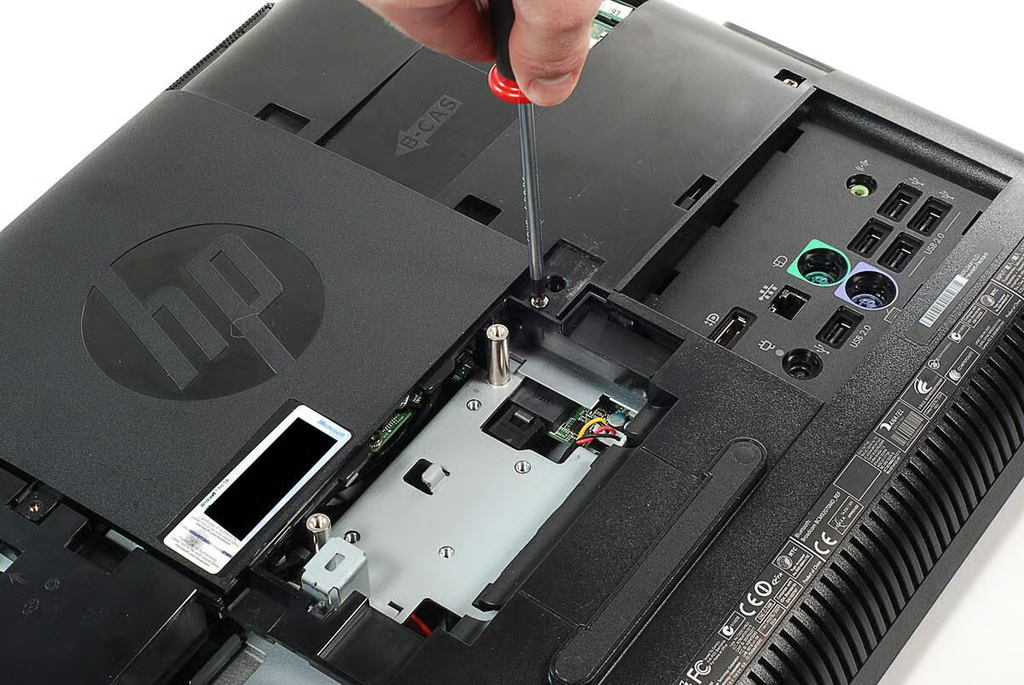
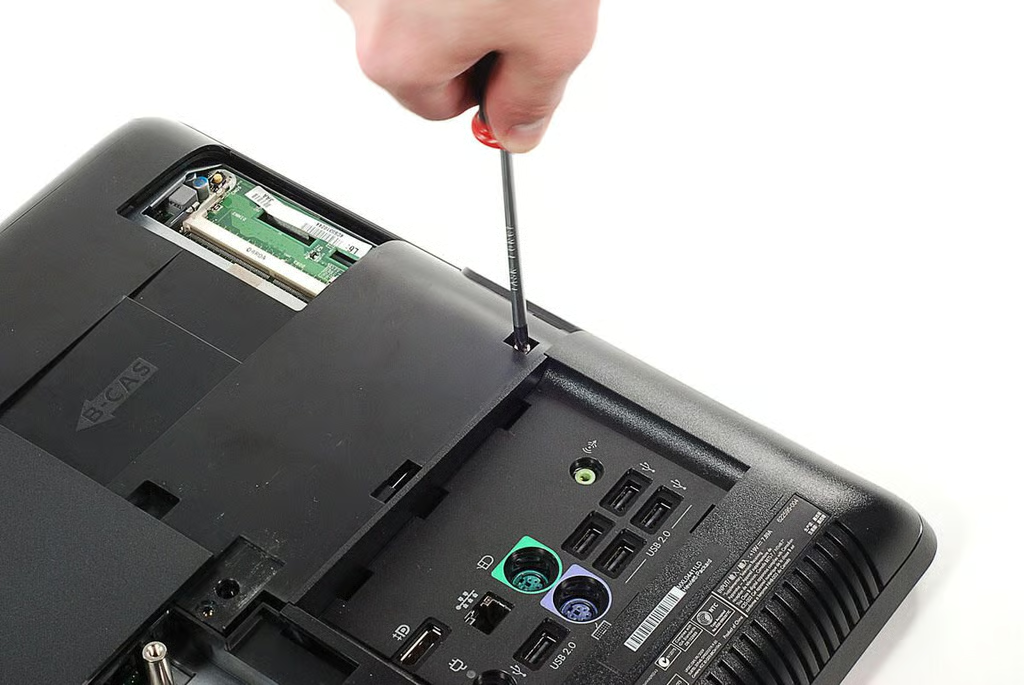
\n\tNext, we’ll remove the screw that holds the plastic cover for the HP Compaq 6000 Pro All-in-one Business PC’s rear port in place.
\n
\n\tPhoto by: Bill Detwiler / TechRepublic
\n\tCaption by: Bill Detwiler
\n\tWe can now lift away the small placstic cover that surrounds the HP Compaq 6000 Pro All-in-one Business PC’s rear ports.
\n
\n\tPhoto by: Bill Detwiler / TechRepublic
\n\tCaption by: Bill Detwiler
\n\tPhoto by: Bill Detwiler / TechRepublic
\n\tCaption by: Bill Detwiler
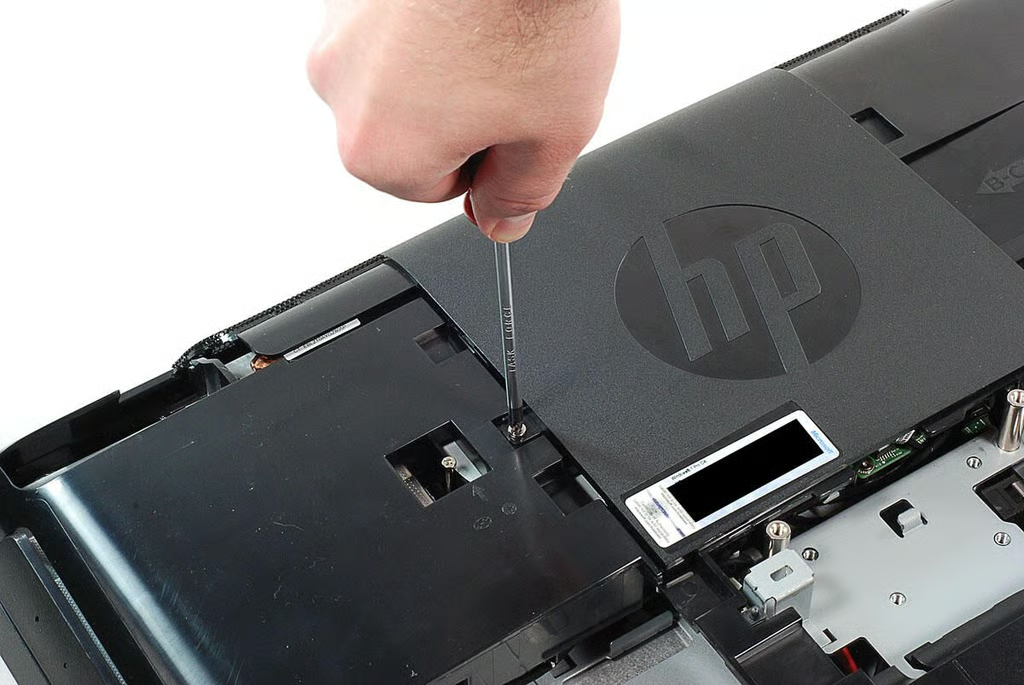
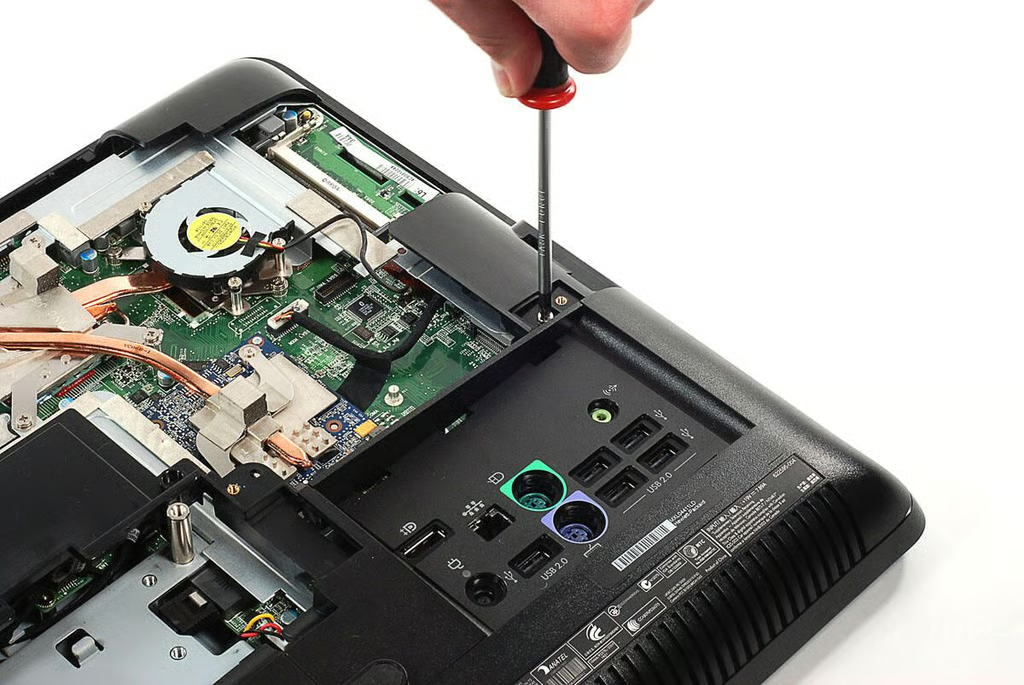
\n\tThe final piece of plastic mounted to the rear of the HP Compaq 6000 Pro All-in-one Business PC is now ready to be removed. But first, we’ll need to remove several Phillips screws that hold the cover to the underlying metal frame.
\n
\n\tPhoto by: Bill Detwiler / TechRepublic
\n\tCaption by: Bill Detwiler
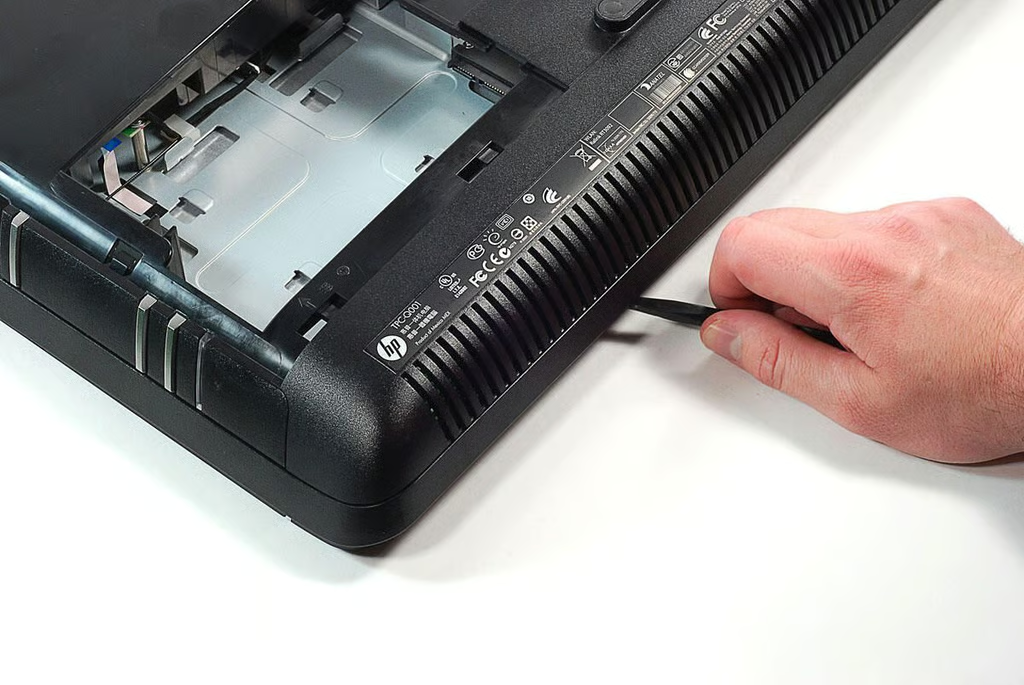
\n\tAfter removing several screws from around the HP Compaq 6000 Pro All-in-one Business PC’s outer edge, I was able to gently pry loose the pastic bezel. I used a plastic spudger to keep from marring the case.
\n
\n\tPhoto by: Bill Detwiler / TechRepublic
\n\tCaption by: Bill Detwiler
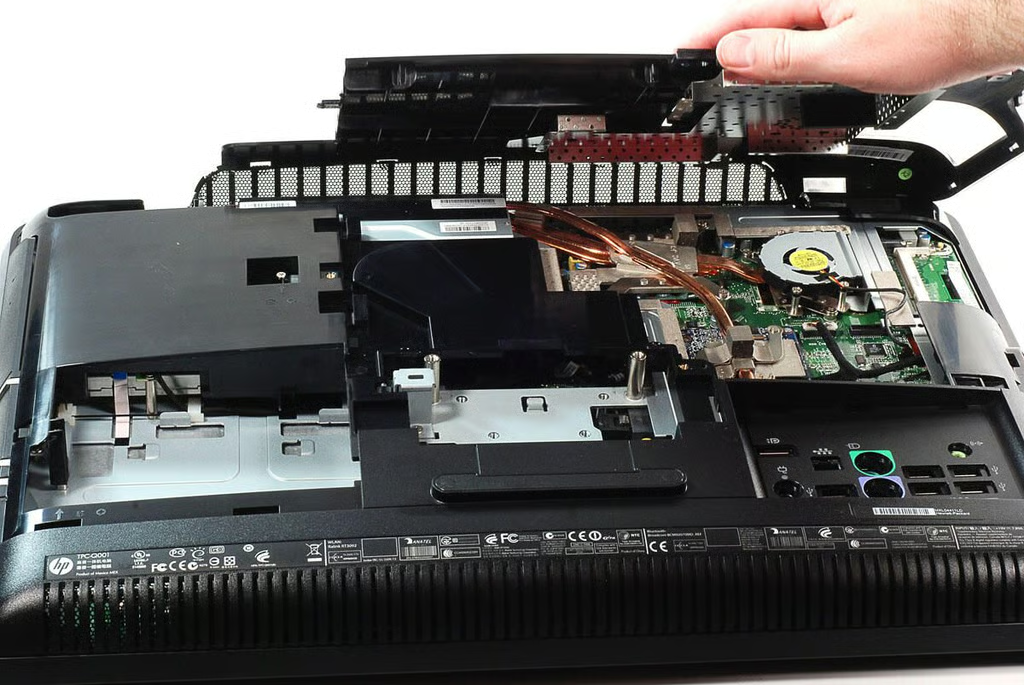
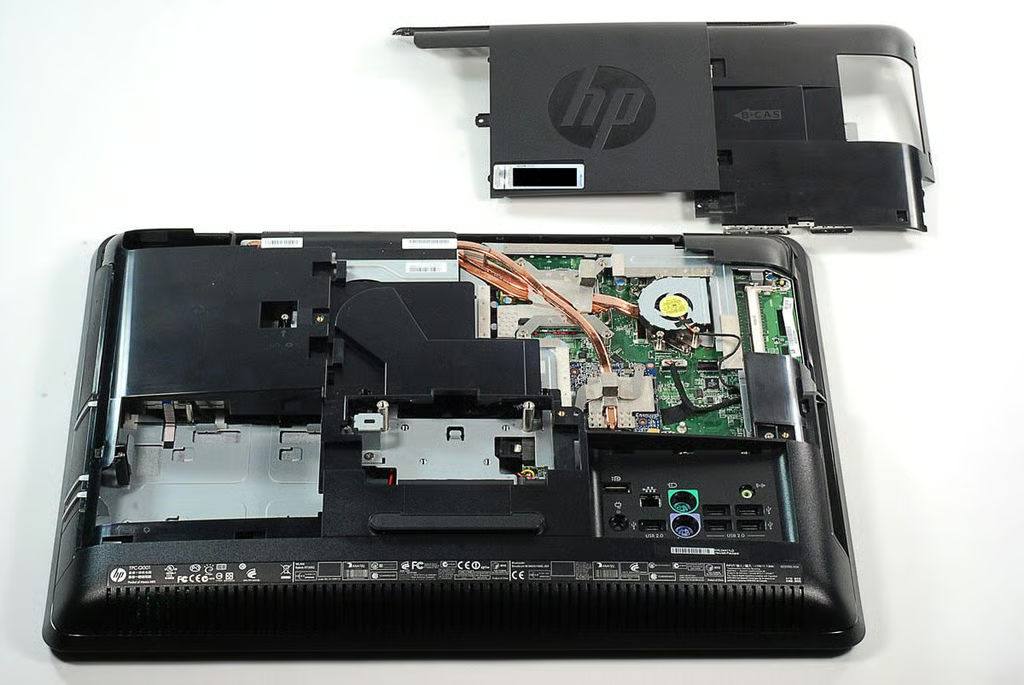
\n\tOnce completely loosened, you can lift the HP Compaq 6000 Pro All-in-one Business PC’s rear bezel away from the machine’s frame.
\n
\n\tPhoto by: Bill Detwiler / TechRepublic
\n\tCaption by: Bill Detwiler
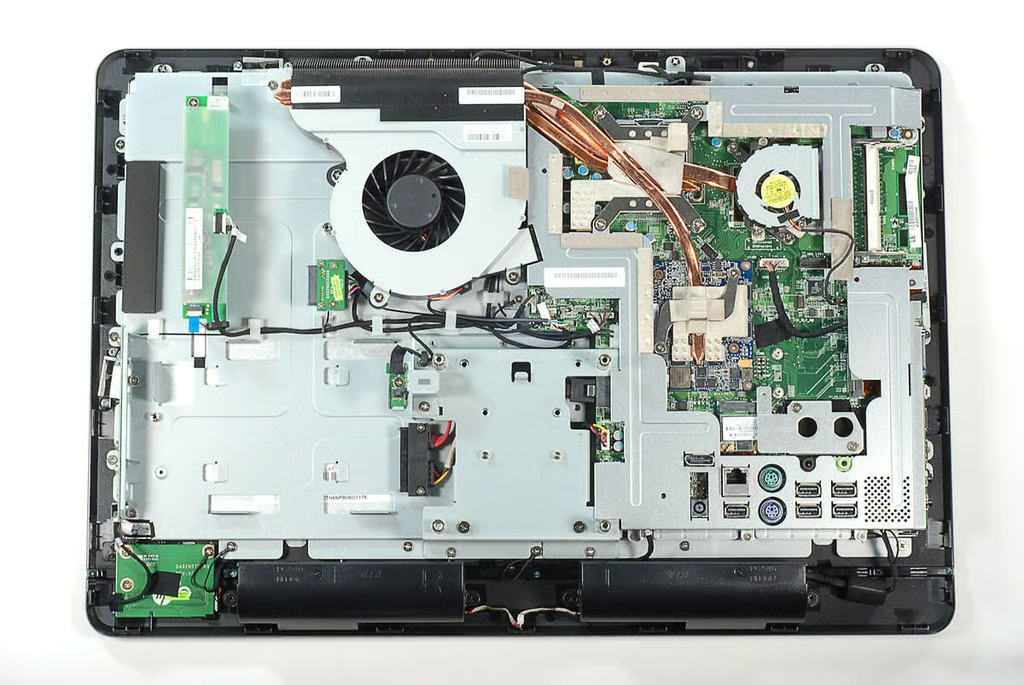
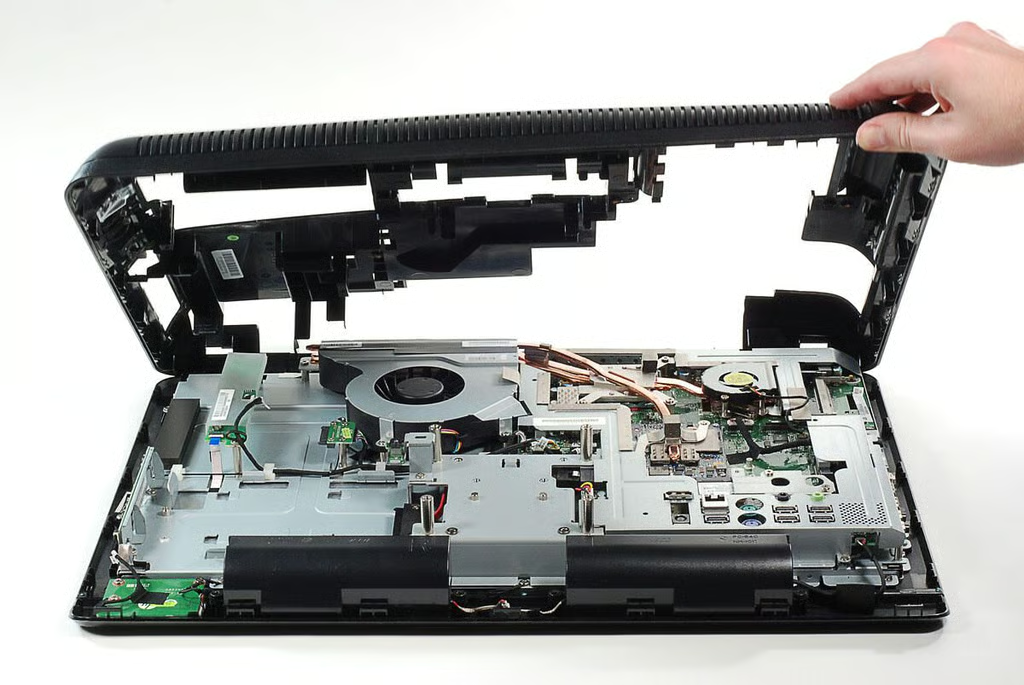
\n\tWith all the rear plastic covers removed, we can see most of the HP Compaq 6000 Pro All-in-one Business PC’s internal components.
\n
\n\tPhoto by: Bill Detwiler / TechRepublic
\n\tCaption by: Bill Detwiler
\n\tAlong the HP Compaq 6000 Pro All-in-one Business PC’s left side (when facing the screen) are the motherobard, cooling tubes, small cooling fan, and RAM slots.
\n
\n\tPhoto by: Bill Detwiler / TechRepublic
\n\tCaption by: Bill Detwiler

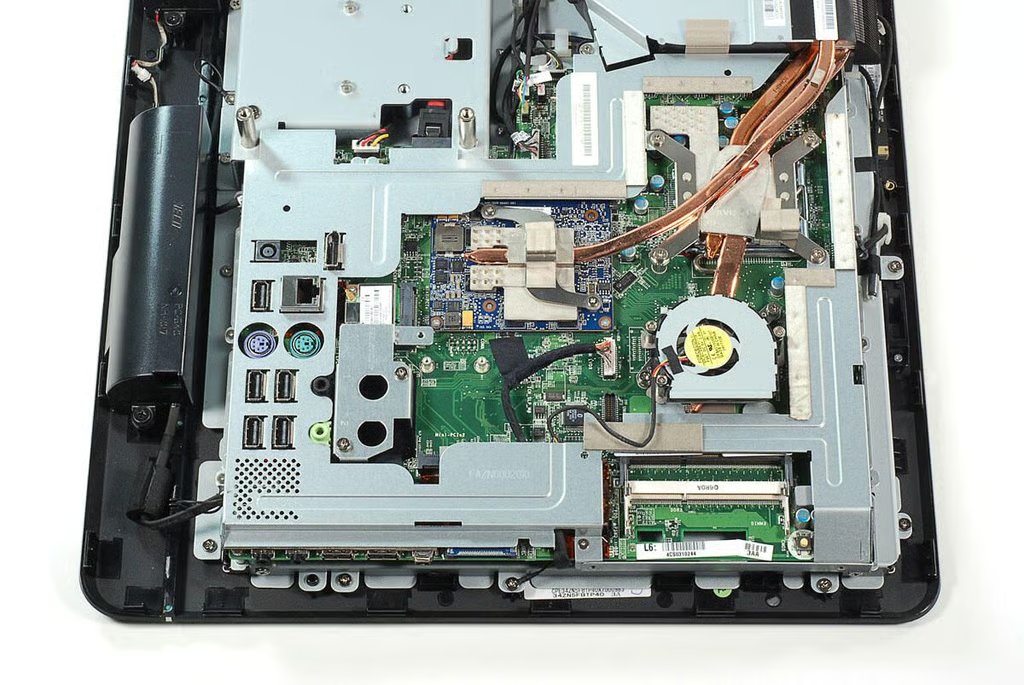
\n\tAlong the HP Compaq 6000 Pro All-in-one Business PC’s right side (when facing the screen) are the main cooling fan, optical drive connector, SATA hard drive connector, power button PCB, LCD brightness buttons and indicator light PCB, and case anti-tamper switch.
\n
\n\tPhoto by: Bill Detwiler / TechRepublic
\n\tCaption by: Bill Detwiler
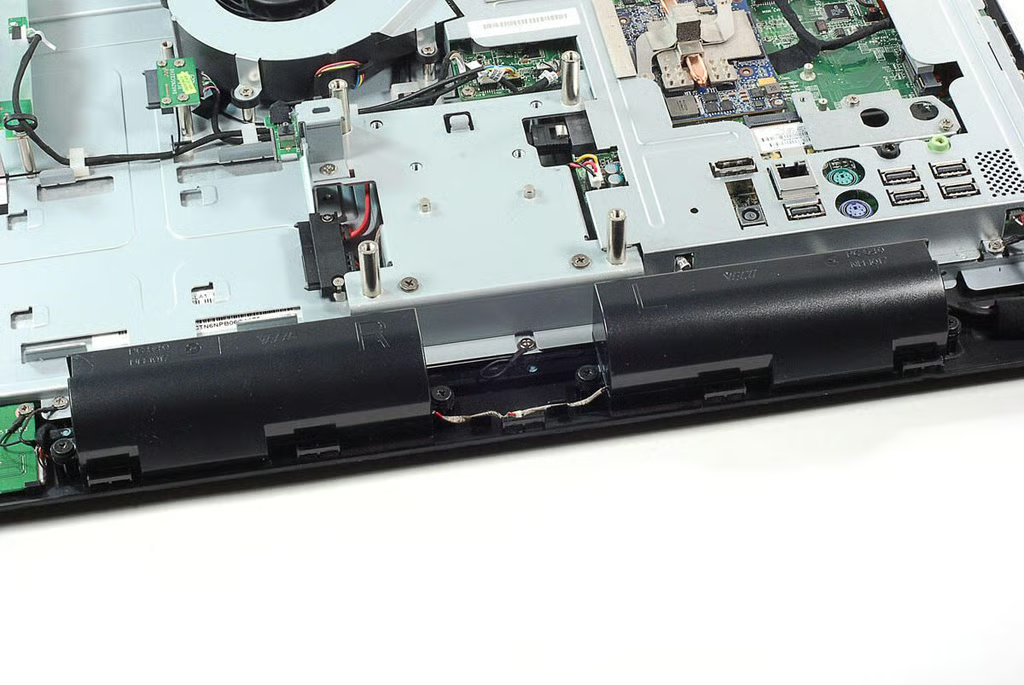
\n\tThe HP Compaq 6000 Pro All-in-one Business PC has two internal speakers.
\n
\n\tPhoto by: Bill Detwiler / TechRepublic
\n\tCaption by: Bill Detwiler
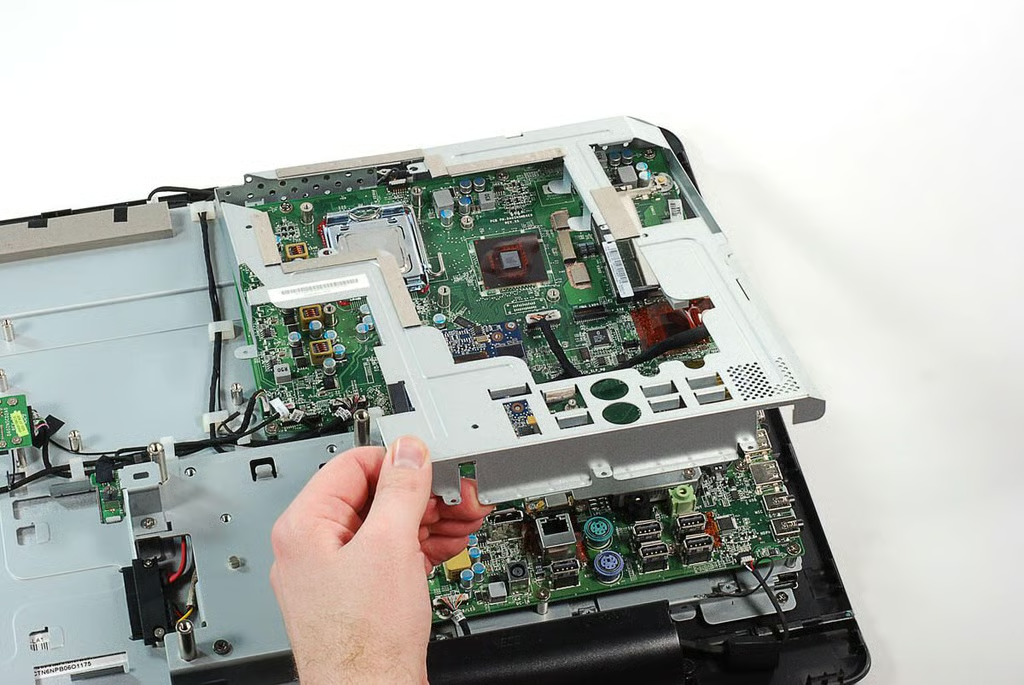
\n\tPart of the HP Compaq 6000 Pro All-in-one Business PC’s metal frame still covers the motherboard. We’ll need to remove to get a good look at the CPU and other chips. The frame is held in place with several Phillips screws.
\n
\n\tPhoto by: Bill Detwiler / TechRepublic
\n\tCaption by: Bill Detwiler
\n\tPhoto by: Bill Detwiler / TechRepublic
\n\tCaption by: Bill Detwiler
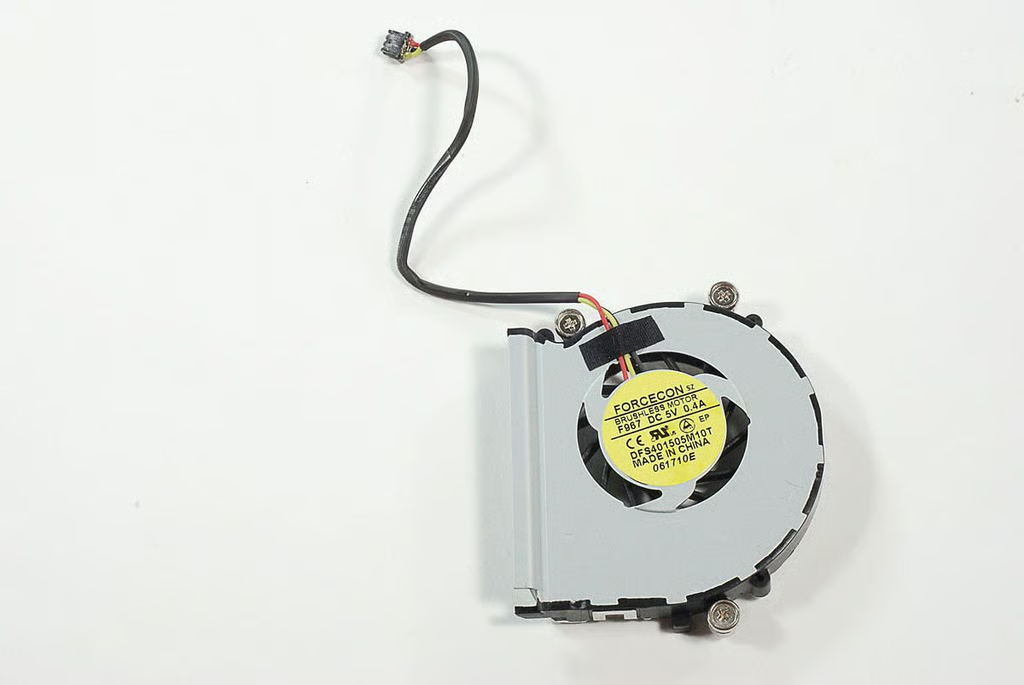
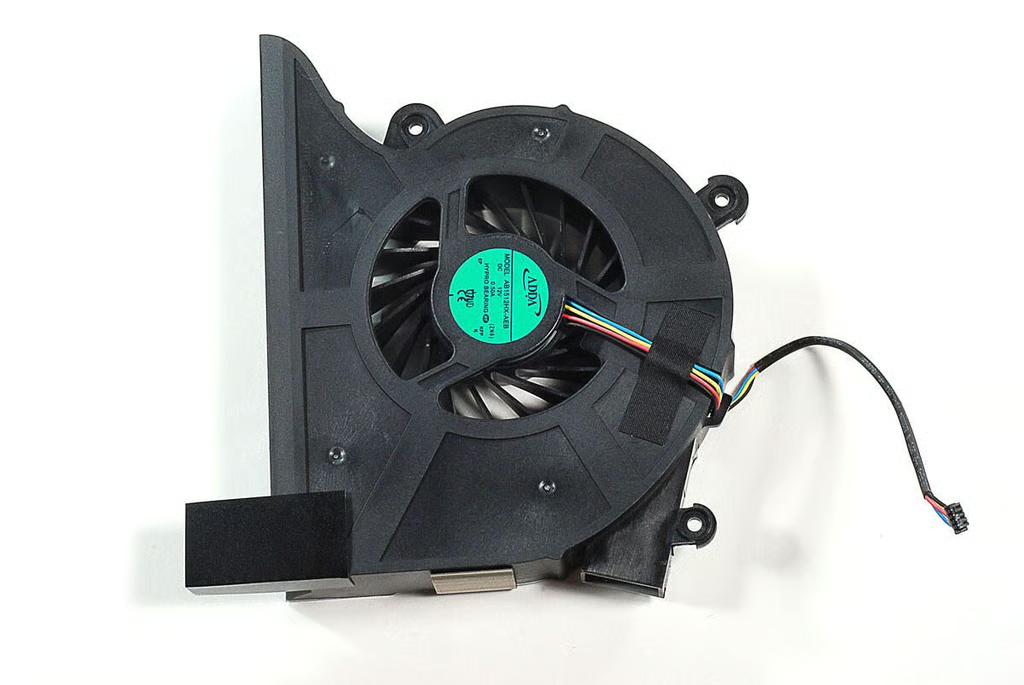
\n\tOne of the metal frame screws are located near the HP Compaq 6000 Pro All-in-one Business PC’s main cooling fan.
\n
\n\tPhoto by: Bill Detwiler / TechRepublic
\n\tCaption by: Bill Detwiler
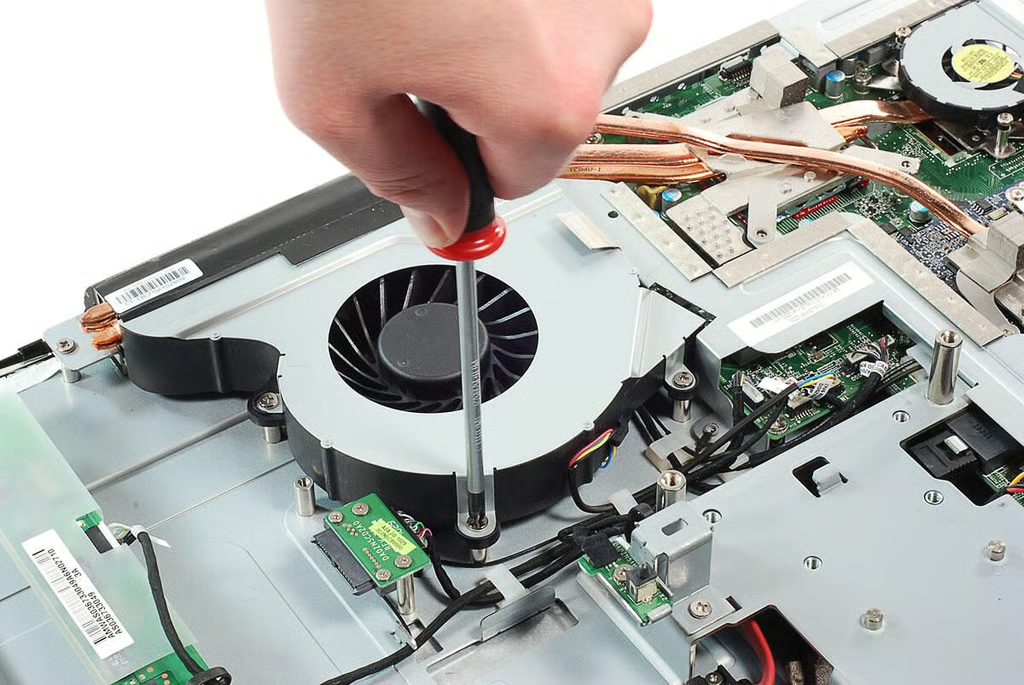
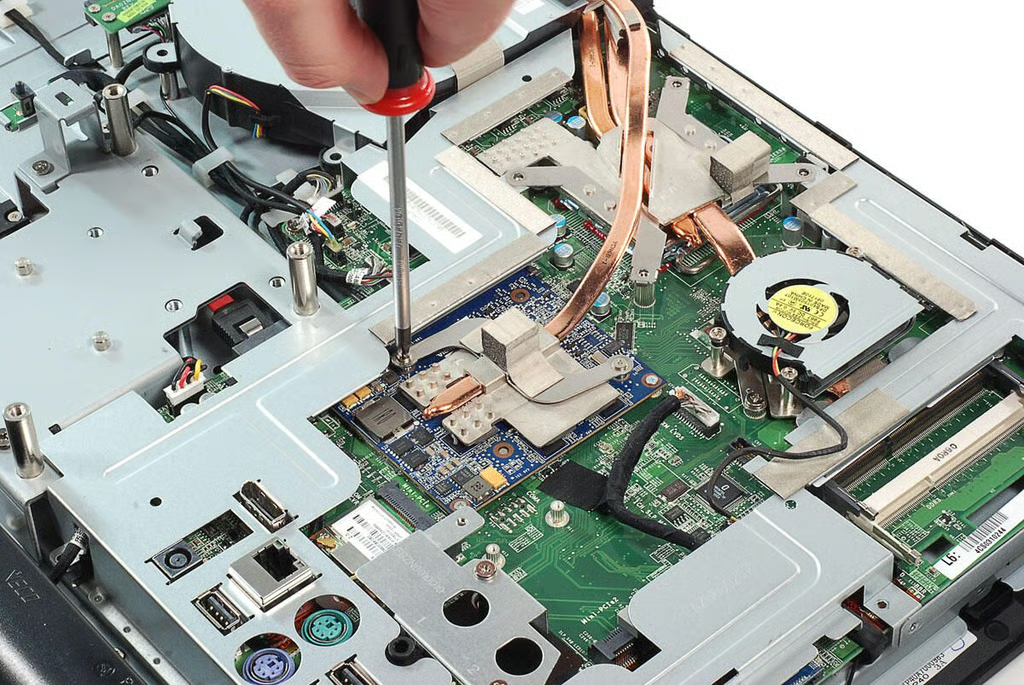
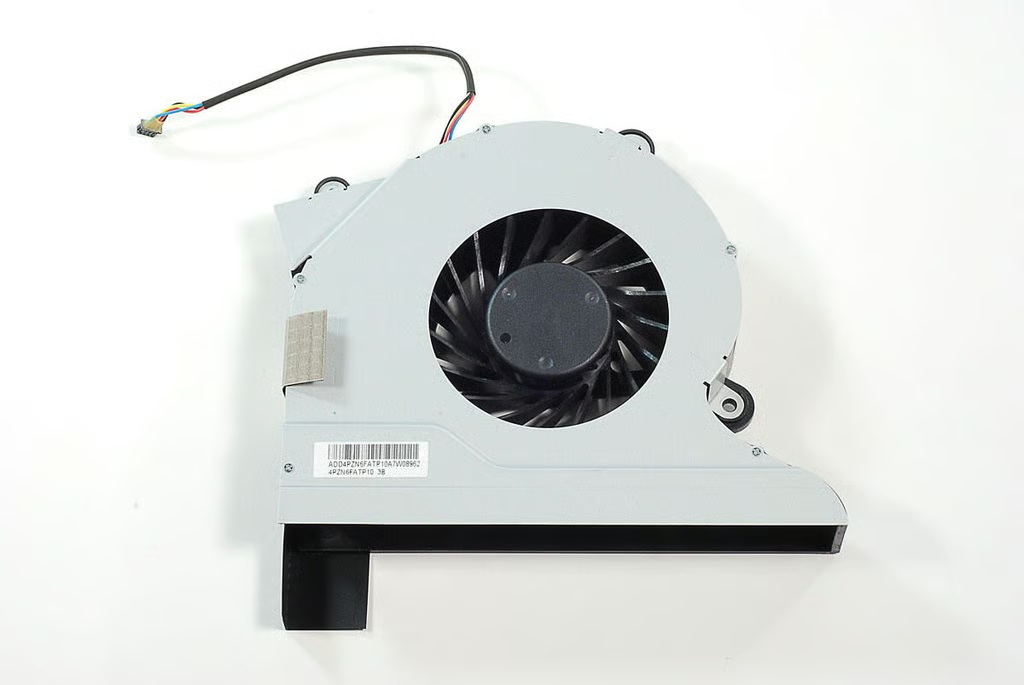
\n\tIn addition to the metal frame screws, I also removed the screws that held the HP Compaq 6000 Pro All-in-one Business PC’s main cooling fan in place.
\n
\n\tPhoto by: Bill Detwiler / TechRepublic
\n\tCaption by: Bill Detwiler
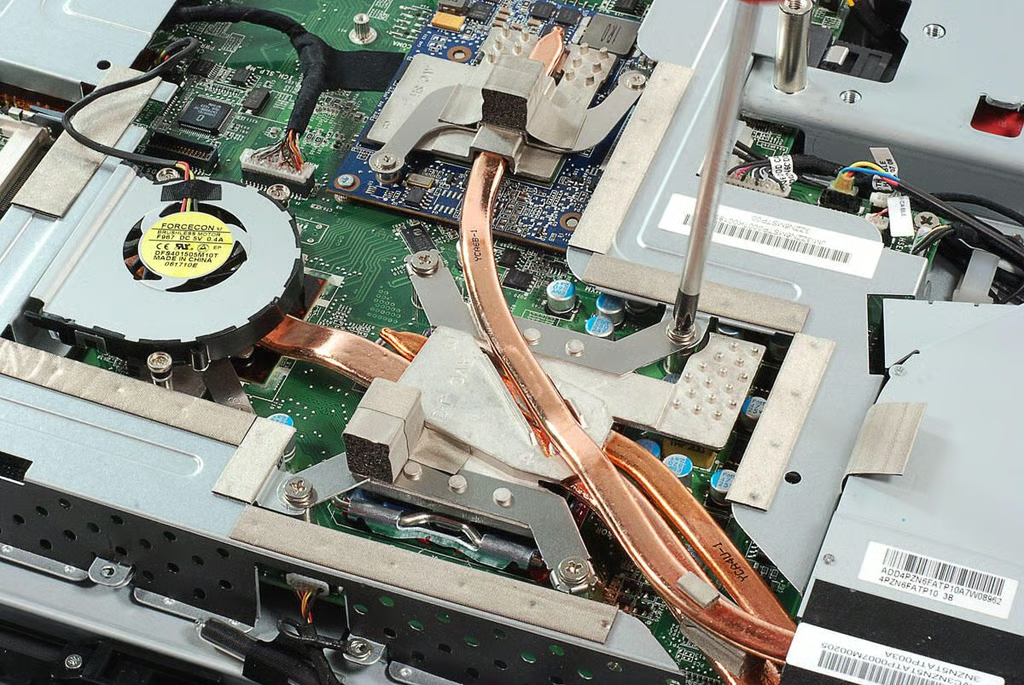
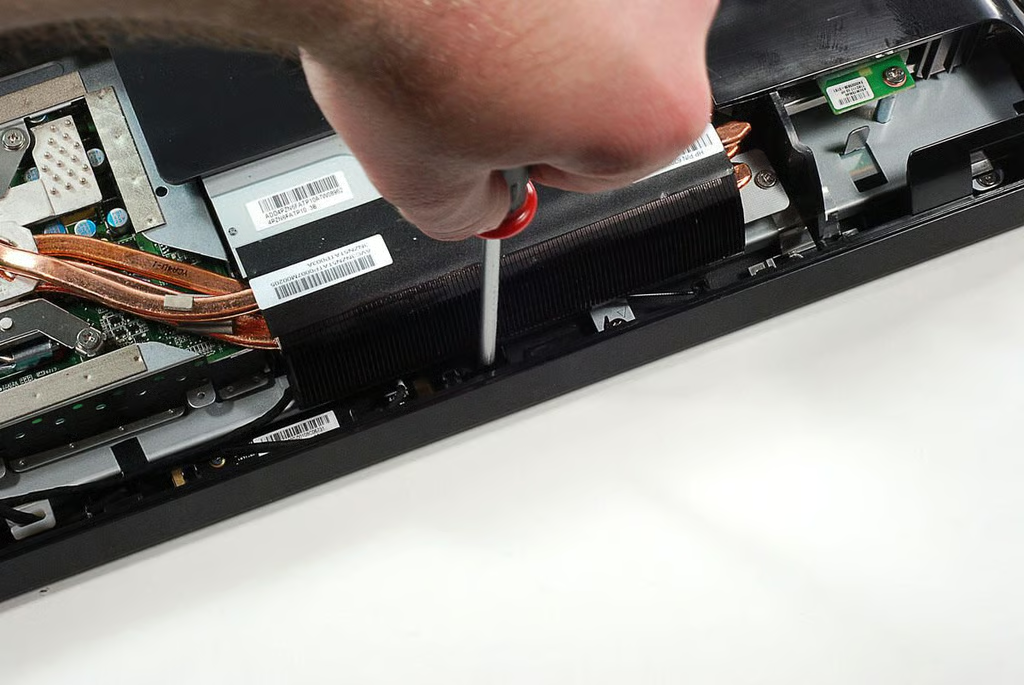
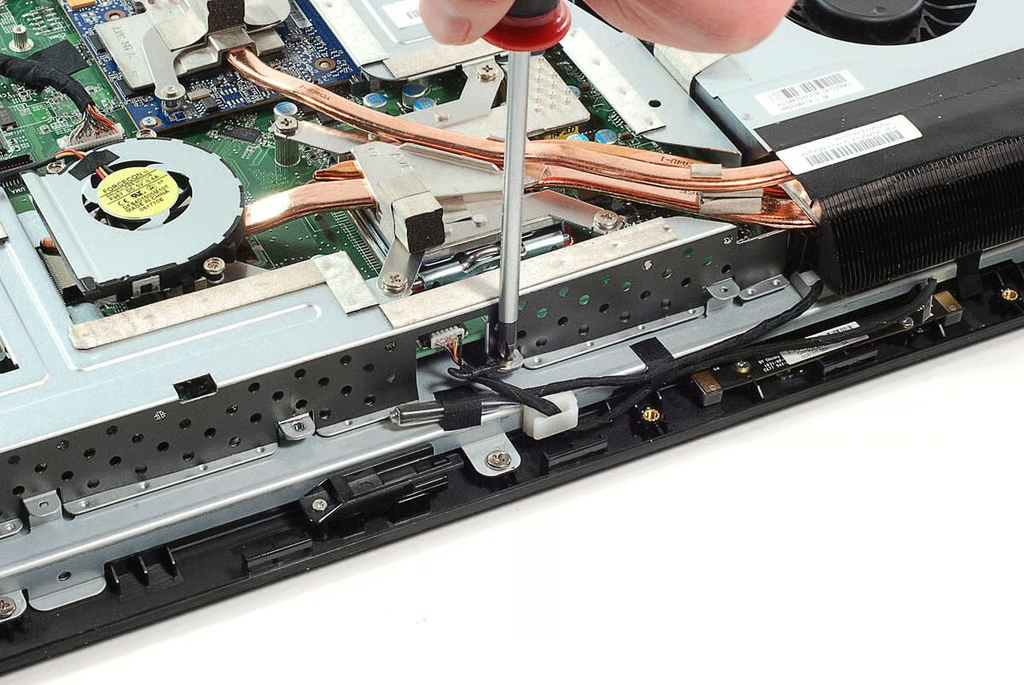
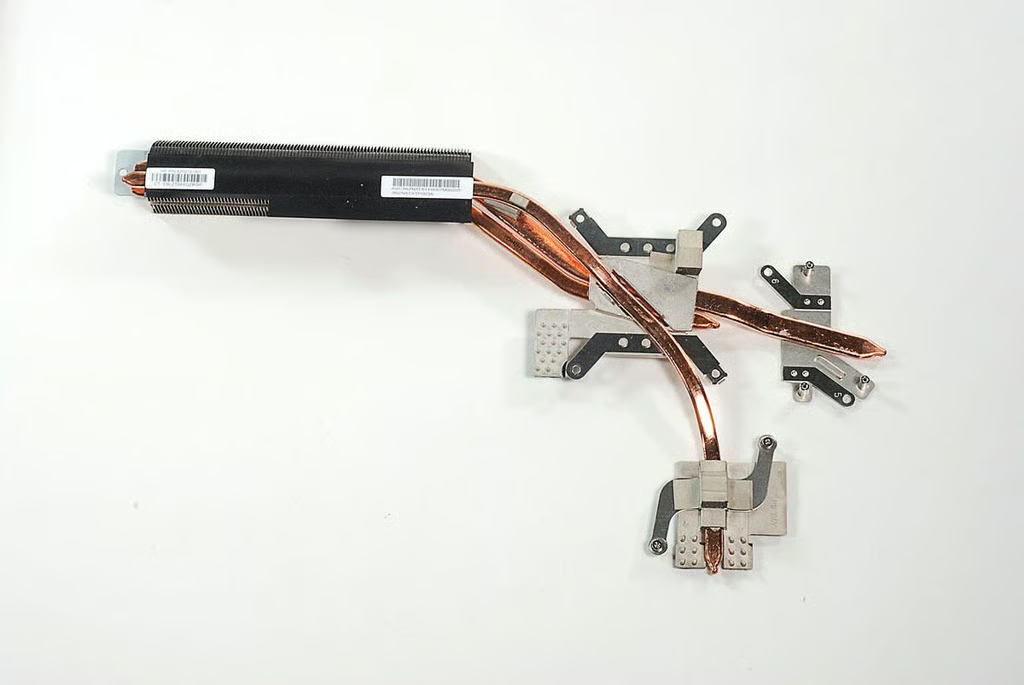
\n\tUnfortunately, the HP Compaq 6000 Pro All-in-one Business PC’s cooling tubes run over the metal frame I’m trying to remove. I’ll need to remove the tubes before lifting off the metal frame.
\n
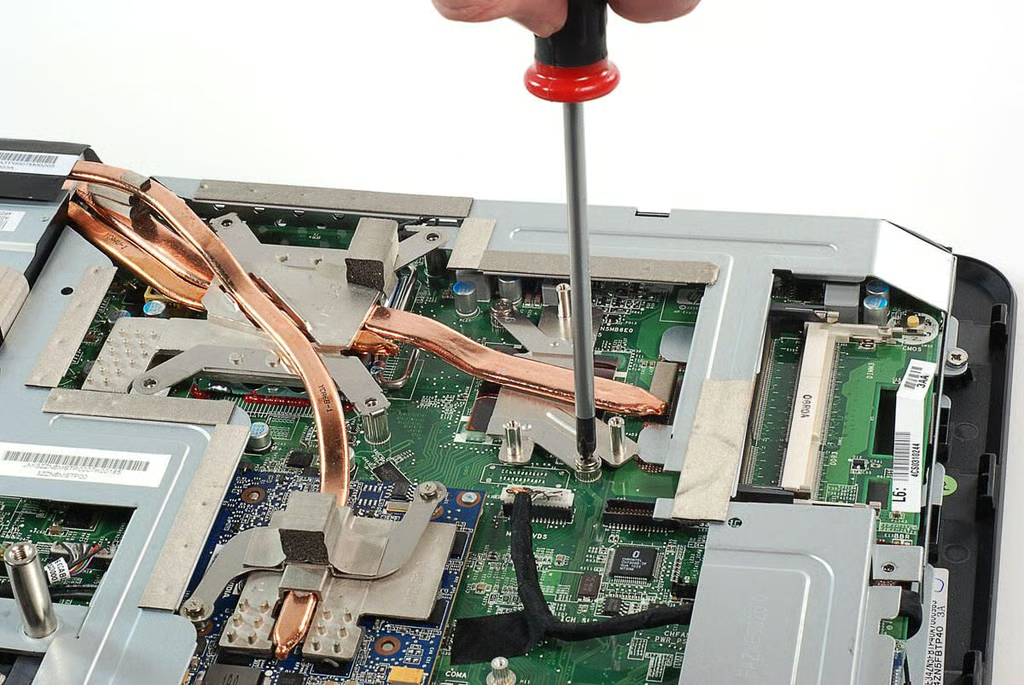
\n\tFour screws hold the cooling tube assembly to the CPU.
\n
\n\tPhoto by: Bill Detwiler / TechRepublic
\n\tCaption by: Bill Detwiler
\n\tTwo screws hold the cooling tube assembly to the HP Compaq 6000 Pro All-in-one Business PC’s GPU.
\n
\n\tPhoto by: Bill Detwiler / TechRepublic
\n\tCaption by: Bill Detwiler
\n\tA small fan and tube from the cooling assembly, cover the Intel AC82Q43 graphics and memory controller hub (north bridge) on the HP Compaq 6000 Pro All-in-one Business PC.
\n
\n\tPhoto by: Bill Detwiler / TechRepublic
\n\tCaption by: Bill Detwiler
\n\tWith the screws removed, we can lift the fan away from the HP Compaq 6000 Pro All-in-one Business PC’s motherboard and disconnect its cable.
\n
\n\tPhoto by: Bill Detwiler / TechRepublic
\n\tCaption by: Bill Detwiler
\n\tPhoto by: Bill Detwiler / TechRepublic
\n\tCaption by: Bill Detwiler
\n\tTwo more screws hold the cooling assembly to the HP Compaq 6000 Pro All-in-one Business PC’s Intel AC82Q43 graphics and memory controller hub (north bridge).
\n
\n\tPhoto by: Bill Detwiler / TechRepublic
\n\tCaption by: Bill Detwiler
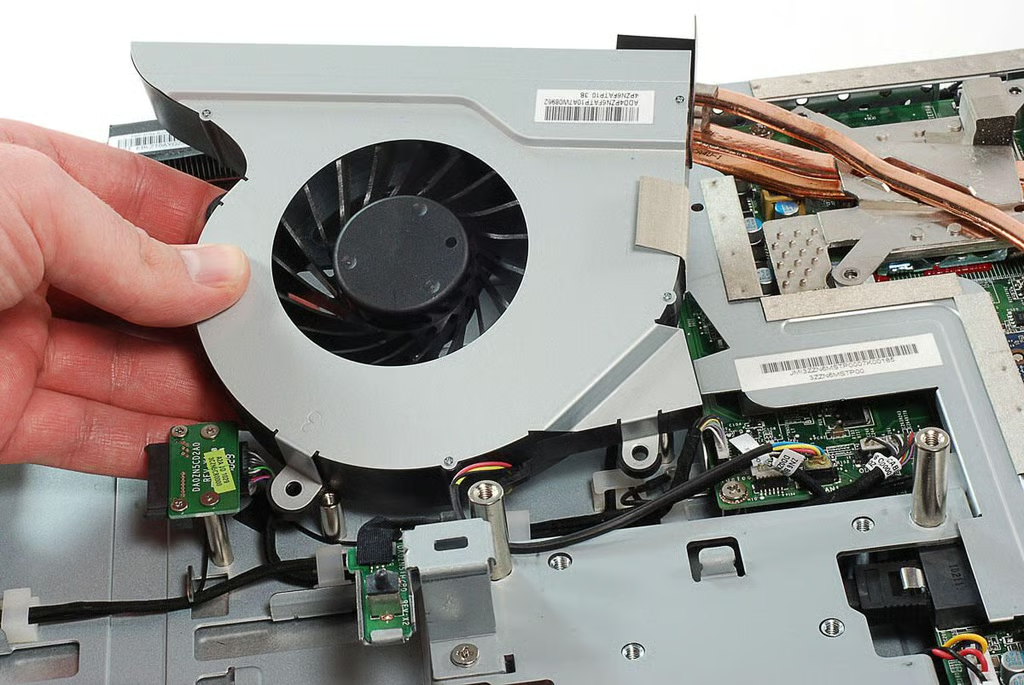
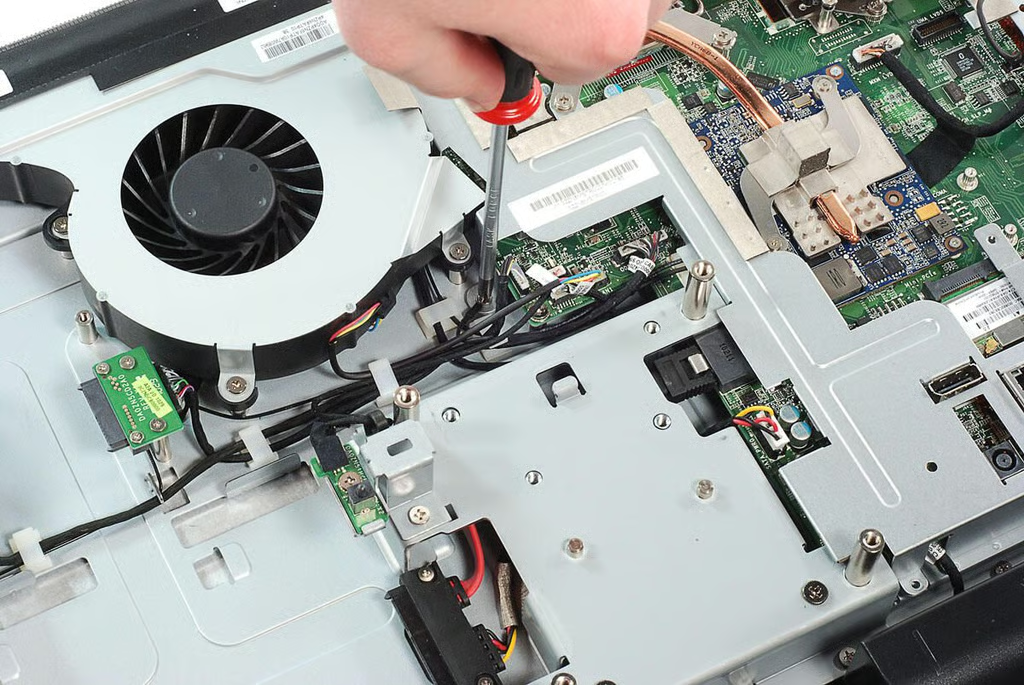
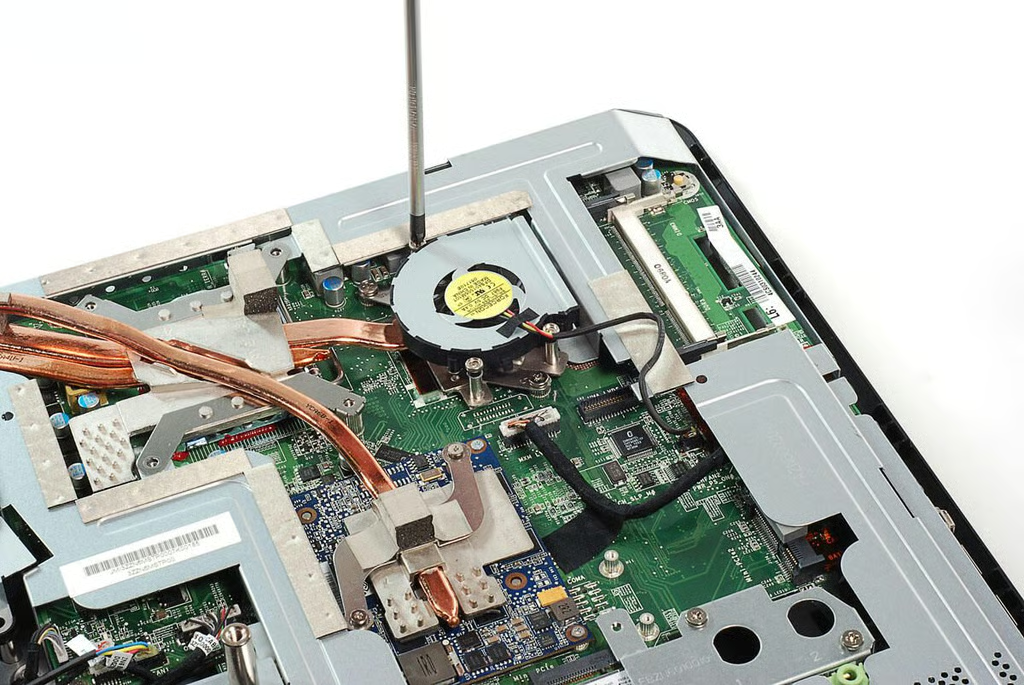
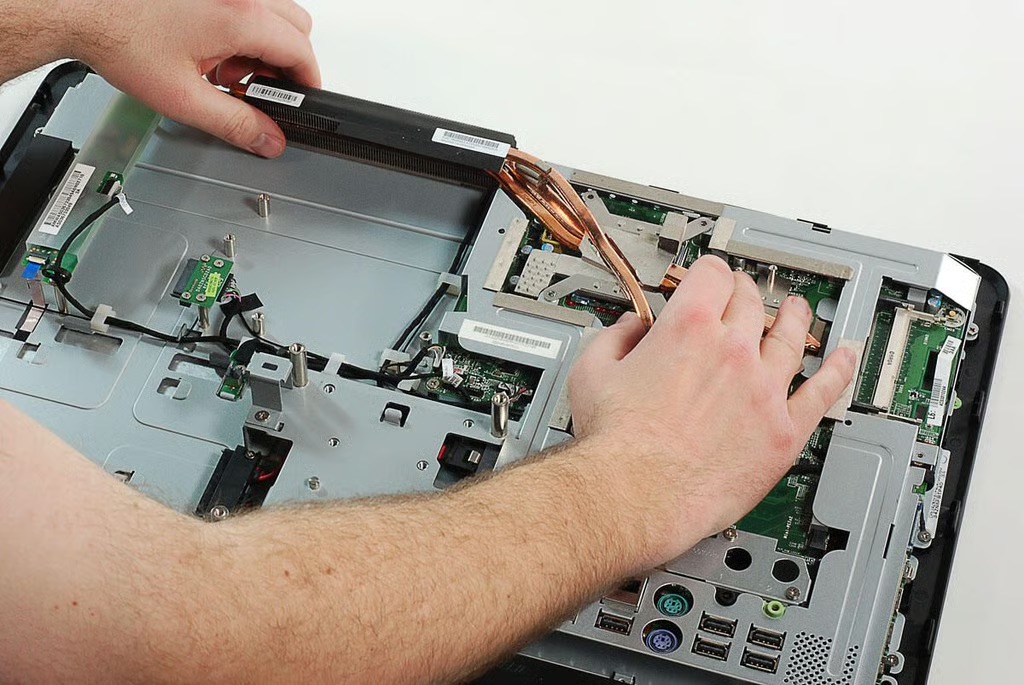
\n\tBefore remove the cooling assembly, I removed the HP Compaq 6000 Pro All-in-one Business PC’s main cooling fan.
\n
\n\tPhoto by: Bill Detwiler / TechRepublic
\n\tCaption by: Bill Detwiler
\n\tPhoto by: Bill Detwiler / TechRepublic
\n\tCaption by: Bill Detwiler
\n\tPhoto by: Bill Detwiler / TechRepublic
\n\tCaption by: Bill Detwiler
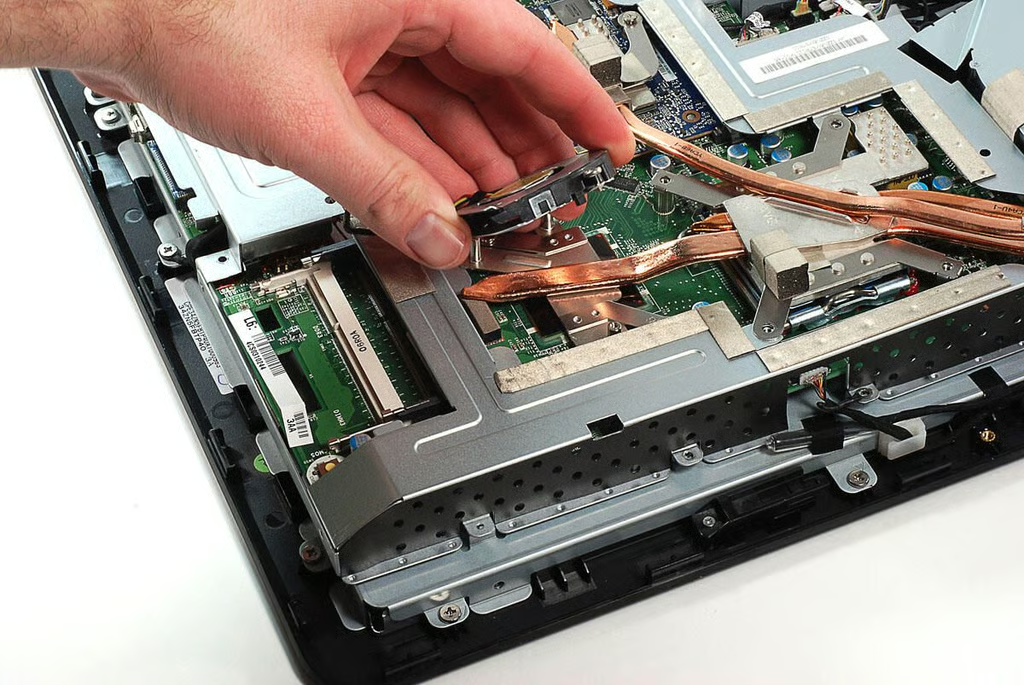
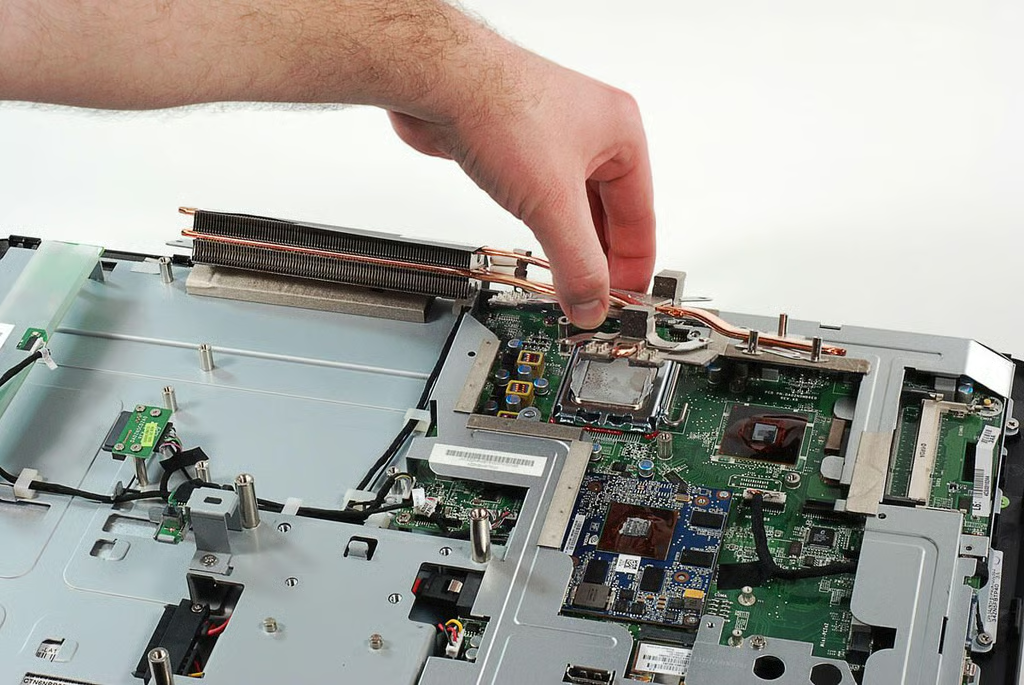
\n\tUsing two hands I gently twisted the HP Compaq 6000 Pro All-in-one Business PC’s cooling assembly to loosen if from the three chips on which it rests.
\n
\n\tPhoto by: Bill Detwiler / TechRepublic
\n\tCaption by: Bill Detwiler
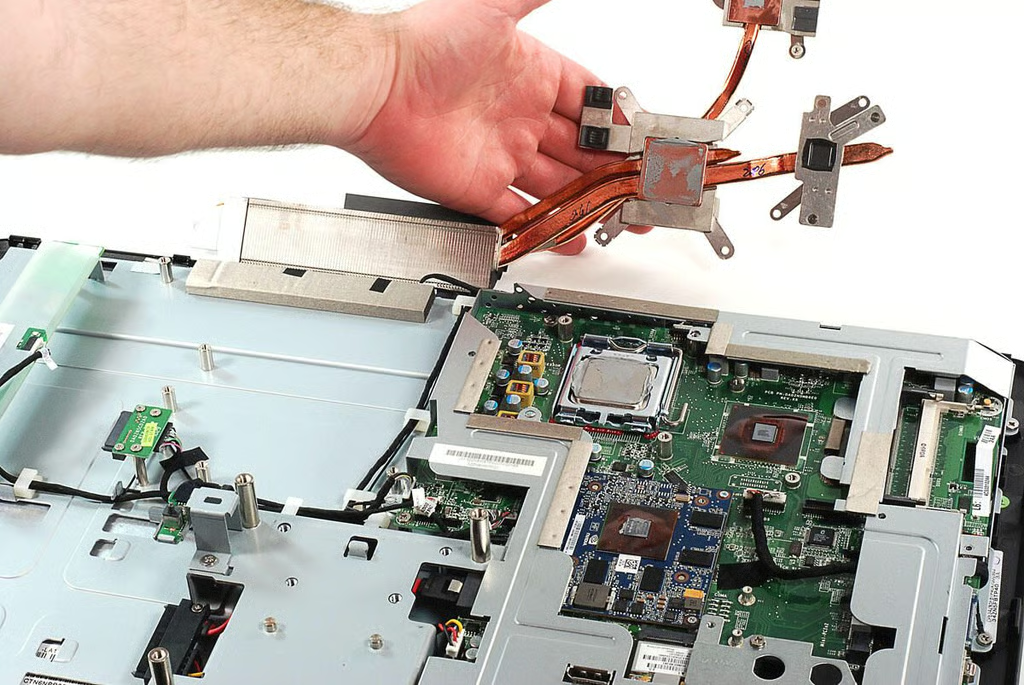
\n\tIn this photo, you can see the thermal paste that remains on the chips after removing the HP Compaq 6000 Pro All-in-one Business PC’s cooling assembly.
\n
\n\tPhoto by: Bill Detwiler / TechRepublic
\n\tCaption by: Bill Detwiler
\n\tMore thermal paste is on the underside of the HP Compaq 6000 Pro All-in-one Business PC’s cooling assembly.
\n
\n\tPhoto by: Bill Detwiler / TechRepublic
\n\tCaption by: Bill Detwiler
\n\tPhoto by: Bill Detwiler / TechRepublic
\n\tCaption by: Bill Detwiler
\n\tPhoto by: Bill Detwiler / TechRepublic
\n\tCaption by: Bill Detwiler
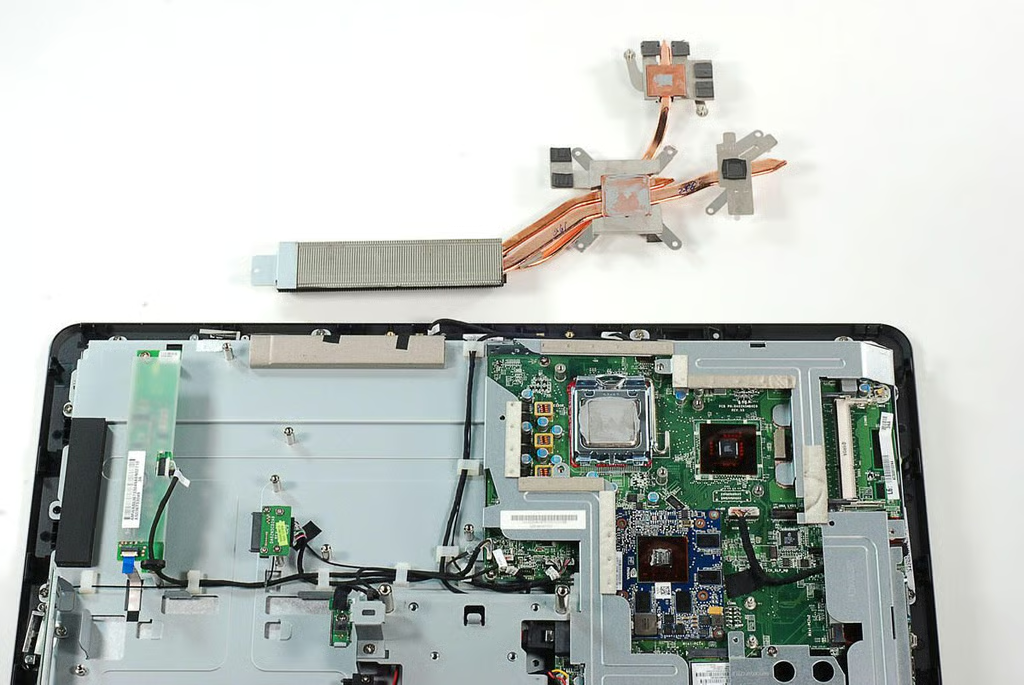
\n\tWith the cooling assembly removed, I was able to lift off the HP Compaq 6000 Pro All-in-one Business PC’s internal metal frame with ease.
\n
\n\tPhoto by: Bill Detwiler / TechRepublic
\n\tCaption by: Bill Detwiler
\n\tPhoto by: Bill Detwiler / TechRepublic
\n\tCaption by: Bill Detwiler

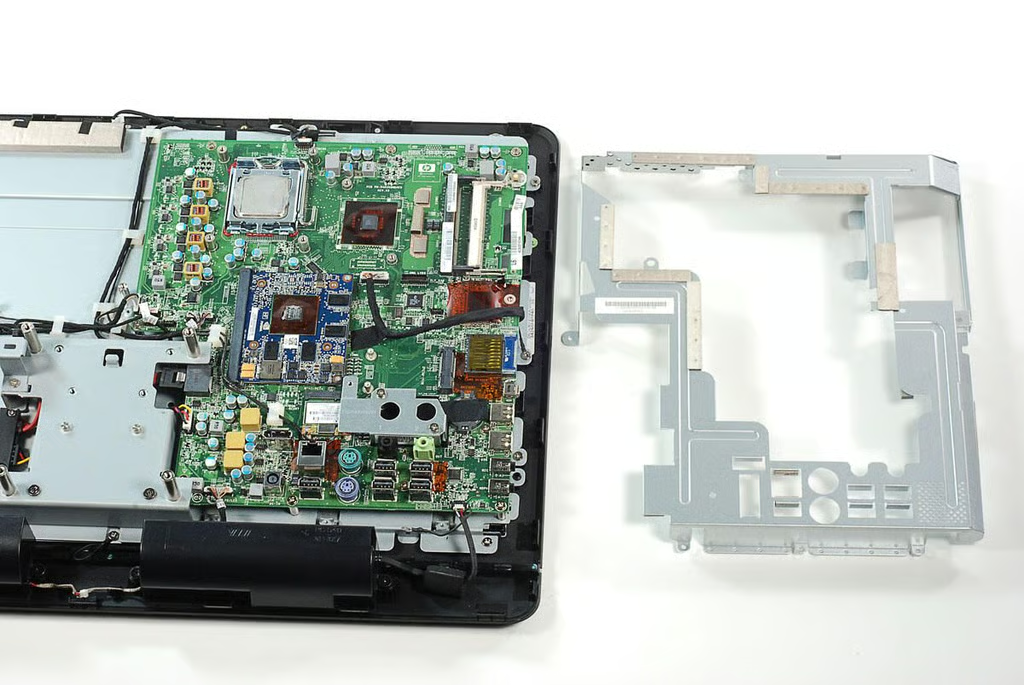
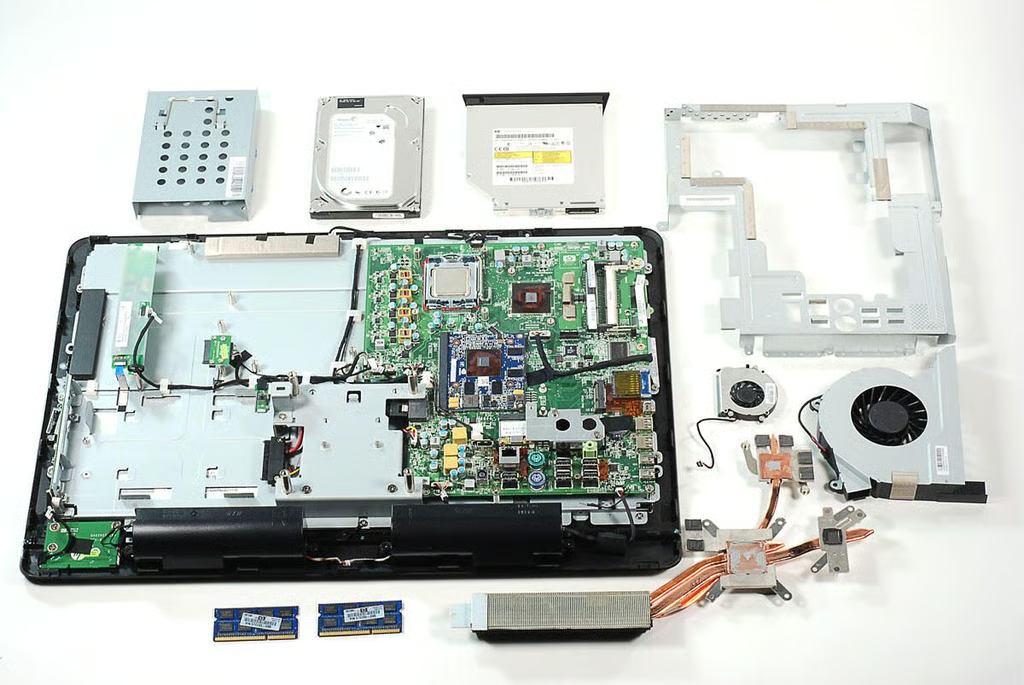
\n\tWith the internal metal frame and cooling assembly removed, we have an unobstructed view of the HP Compaq 6000 Pro All-in-one Business PC’s motherboard.
\n
\n\tPhoto by: Bill Detwiler / TechRepublic
\n\tCaption by: Bill Detwiler
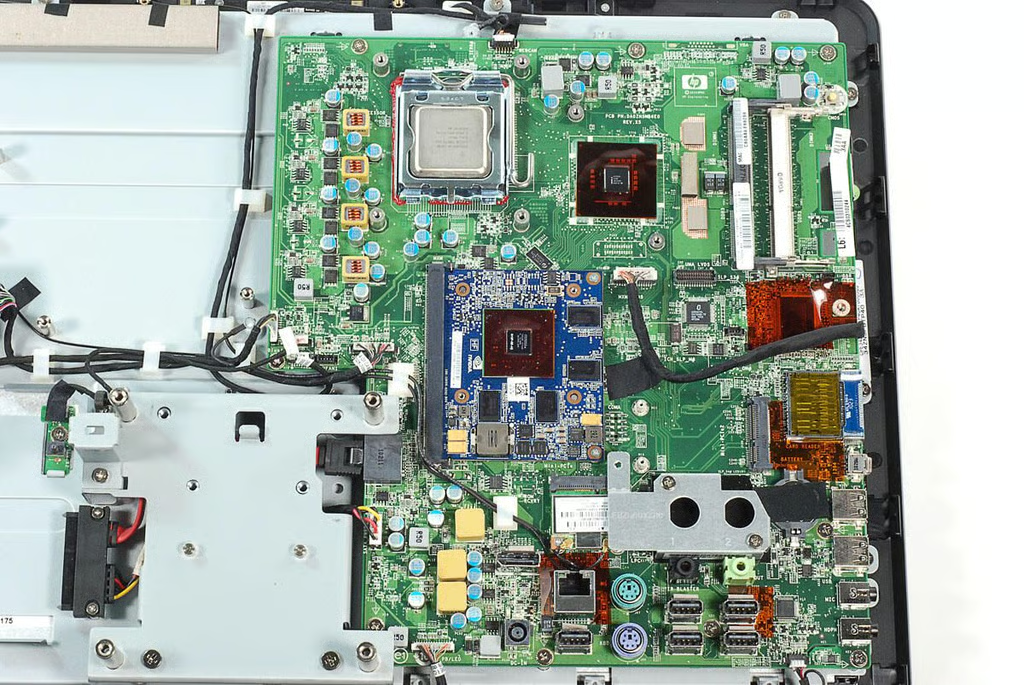
\n\tAfter removing the residual thermal paste from the HP Compaq 6000 Pro All-in-one Business PC’s three main chips, the markings are clearly visible. Let’s take a look around the motherboard and other PCBs.
\n
\n\tPhoto by: Bill Detwiler / TechRepublic
\n\tCaption by: Bill Detwiler
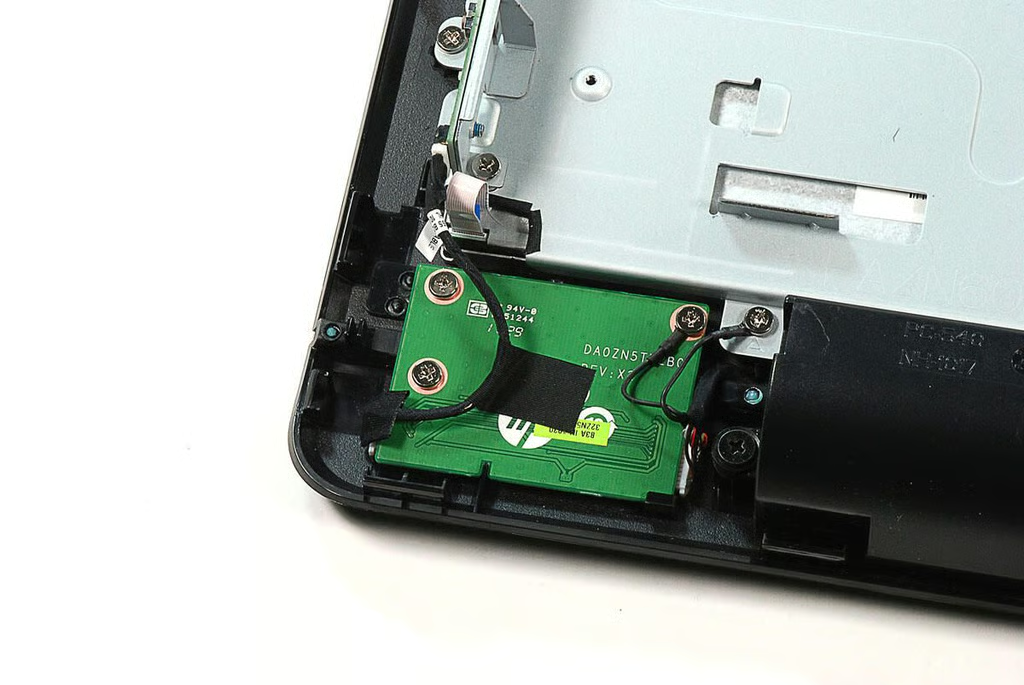
\n\tThis small PCB contains the HP Compaq 6000 Pro All-in-one Business PC’s power button.
\n
\n\tPhoto by: Bill Detwiler / TechRepublic
\n\tCaption by: Bill Detwiler
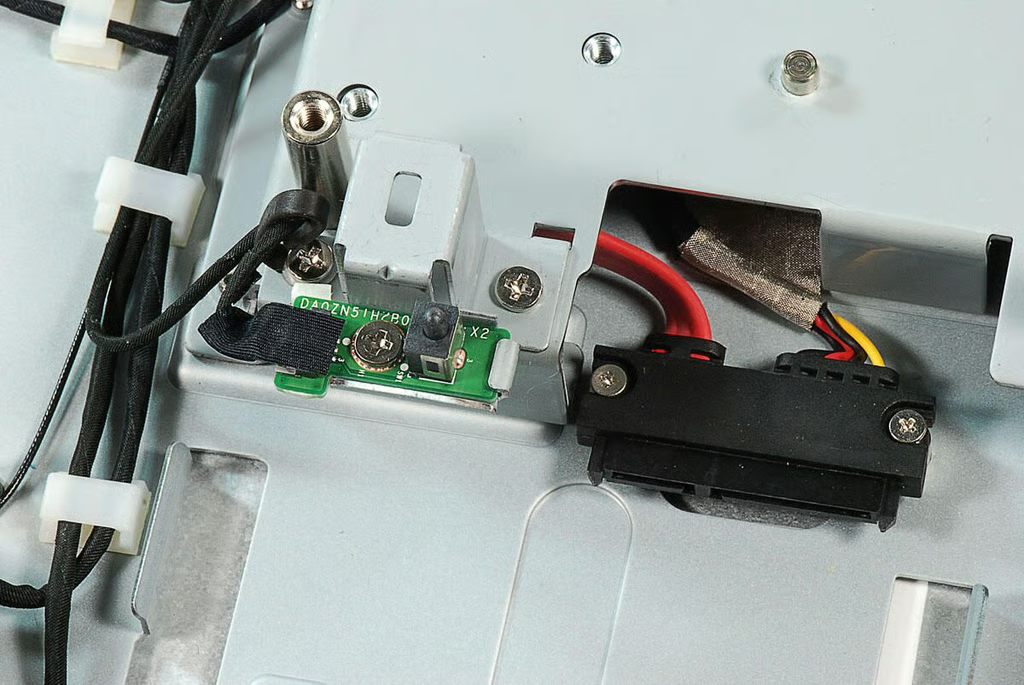
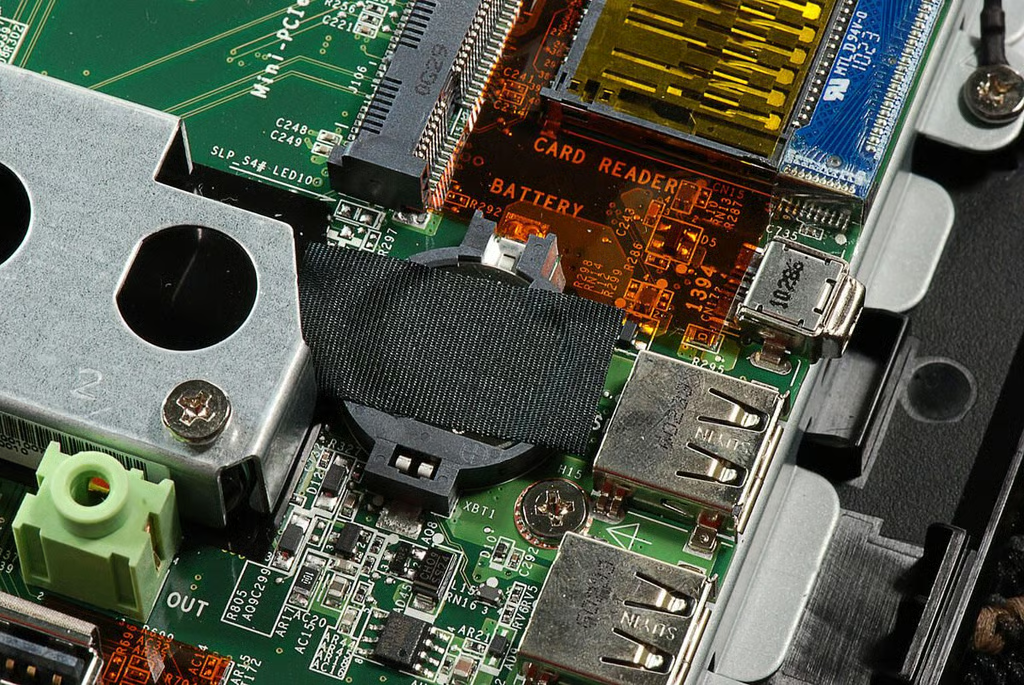
\n\tThis small PCB contains the HP Compaq 6000 Pro All-in-one Business PC’s anti-tamper switch, which will detect the case being opened. To the right of the PCB is the HDD connector.
\n
\n\tPhoto by: Bill Detwiler / TechRepublic
\n\tCaption by: Bill Detwiler
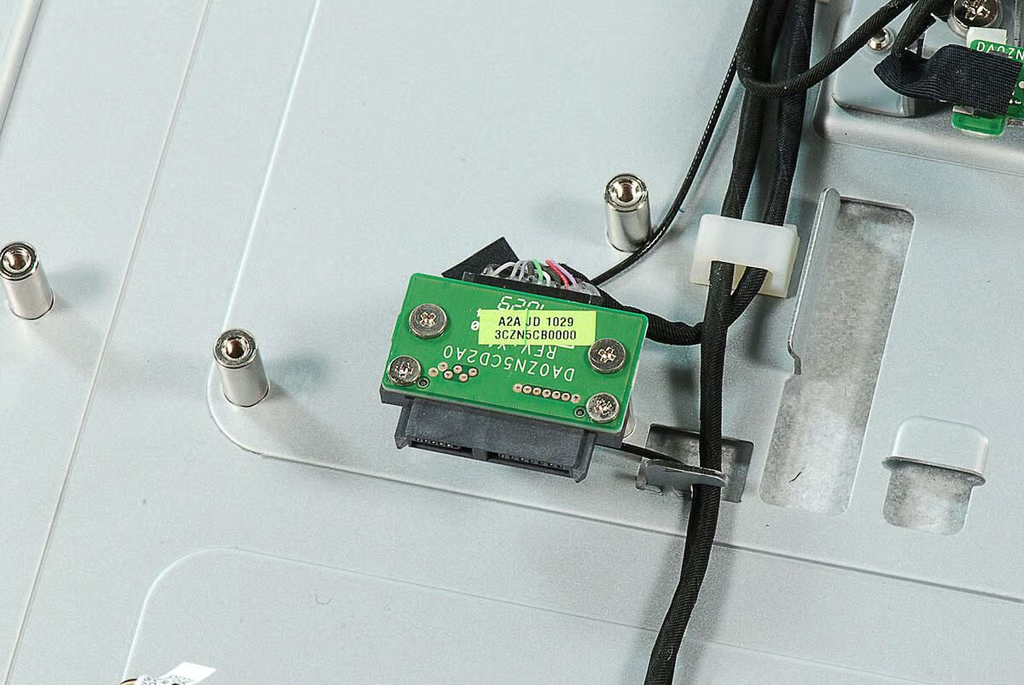
\n\tThis connector is used for the HP Compaq 6000 Pro All-in-one Business PC’s optical drive.
\n
\n\tPhoto by: Bill Detwiler / TechRepublic
\n\tCaption by: Bill Detwiler
\n\tPhoto by: Bill Detwiler / TechRepublic
\n\tCaption by: Bill Detwiler

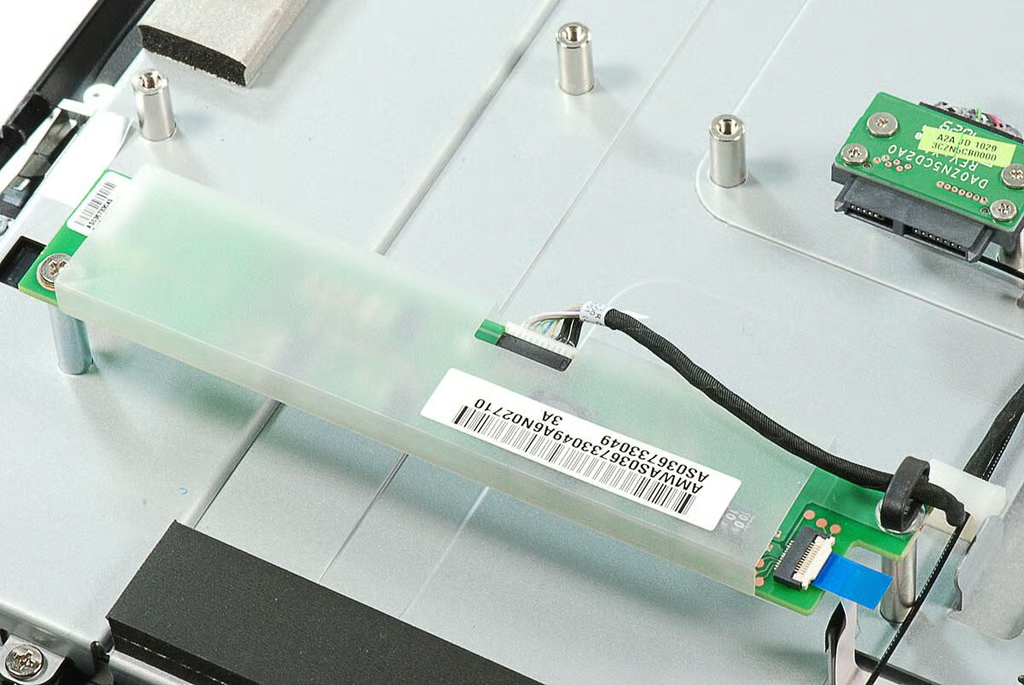
\n\tOur HP Compaq 6000 Pro All-in-one Business PC came with optional support for 802.11 b/g/n Wi-Fi and Bluetooth 2.1.
\n
\n\tPhoto by: Bill Detwiler / TechRepublic
\n\tCaption by: Bill Detwiler
\n\tPhoto by: Bill Detwiler / TechRepublic
\n\tCaption by: Bill Detwiler
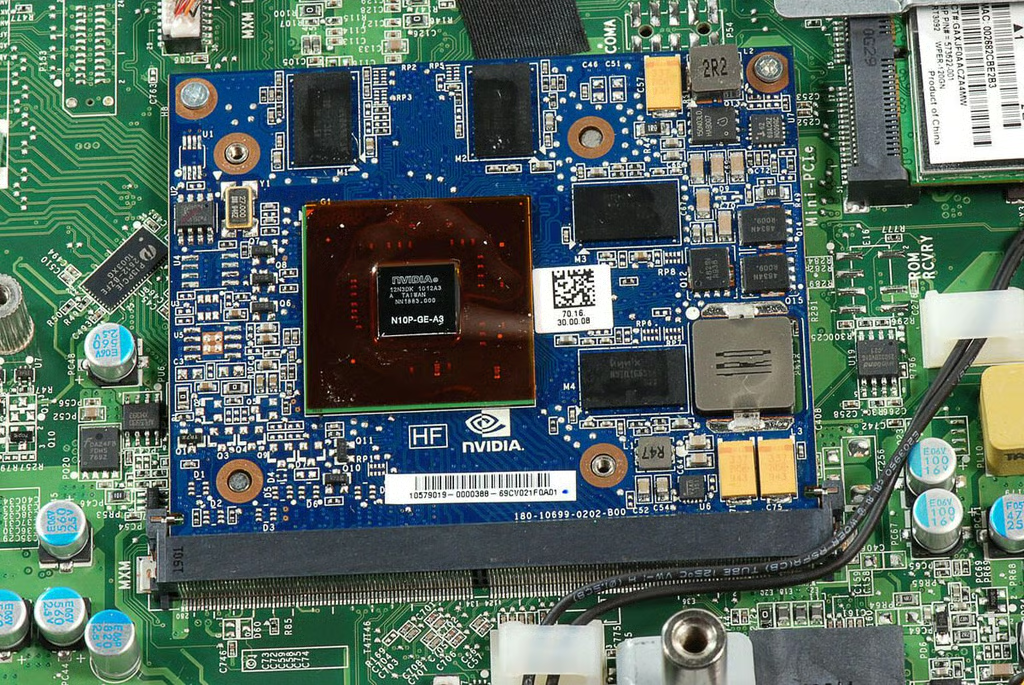
\n\tOur HP Compaq 6000 Pro All-in-one Business PC came with a discrete NVIDIA GeForce GT230 graphics card, but models are available with an integrated Intel Graphics Media Accelerator 4500 HD.
\n
\n\tPhoto by: Bill Detwiler / TechRepublic
\n\tCaption by: Bill Detwiler
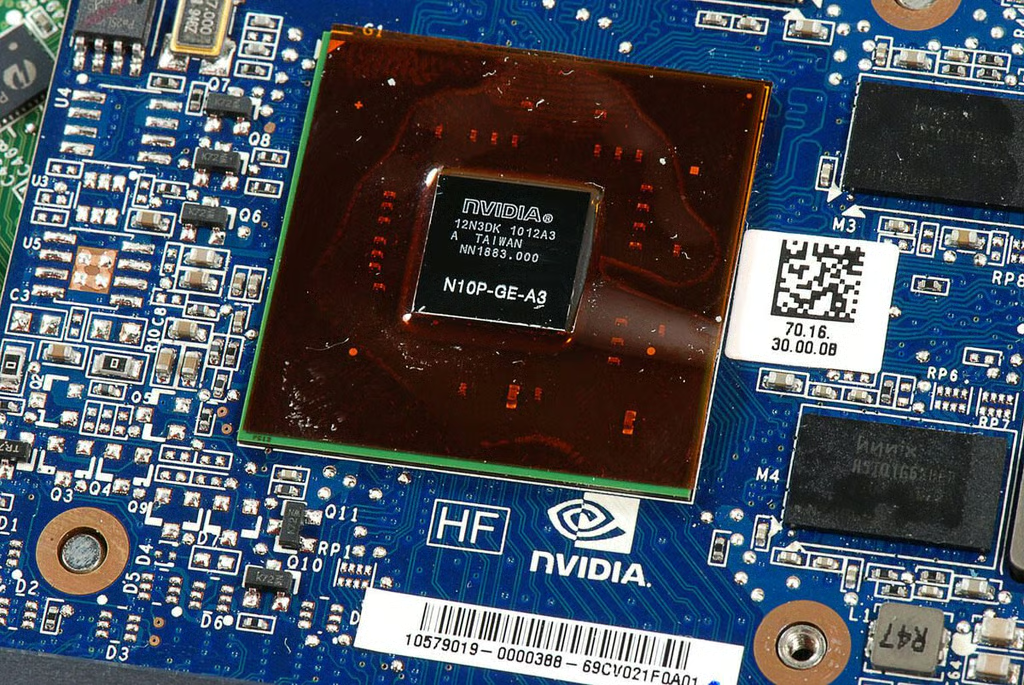
\n\tThis photo shows a close-up shot of the NVIDIA N10P-GE-A3 chip on the GeForce GT230 graphics card. Surrounding this chip are four Hynix chips, which provide the card’s 1GB of dedicated video memory.
\n
\n\tPhoto by: Bill Detwiler / TechRepublic
\n\tCaption by: Bill Detwiler
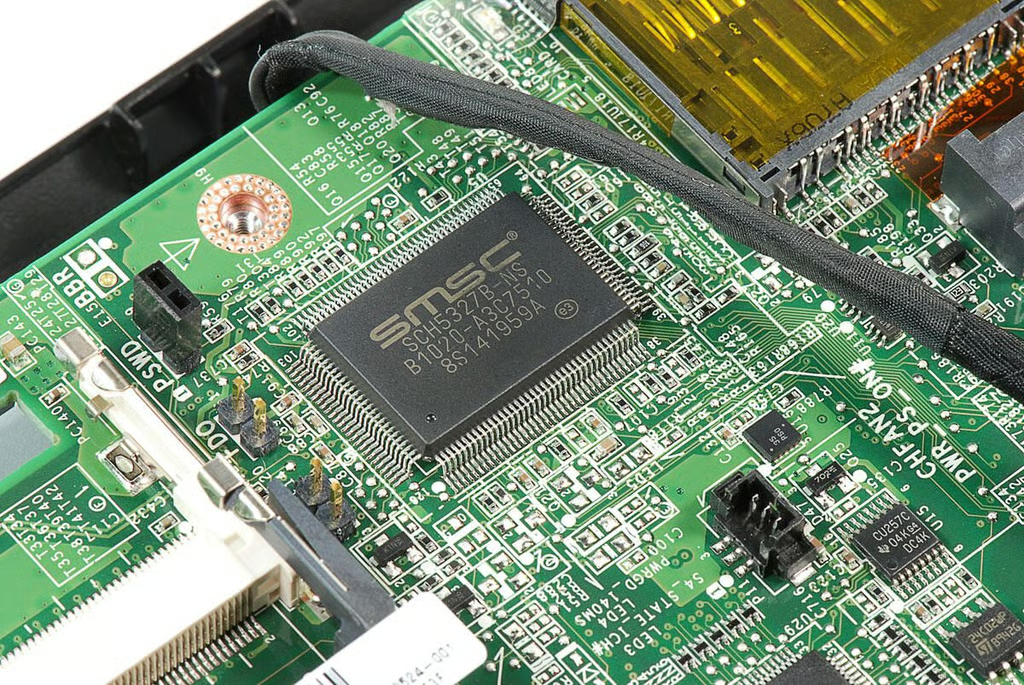
\n\tThis SMSC SCH5327B-NS IC is the HP Compaq 6000 Pro All-in-one Business PC’s I/O controller for PS/2 keyboard and mouse peripherals.
\n
\n\tPhoto by: Bill Detwiler / TechRepublic
\n\tCaption by: Bill Detwiler
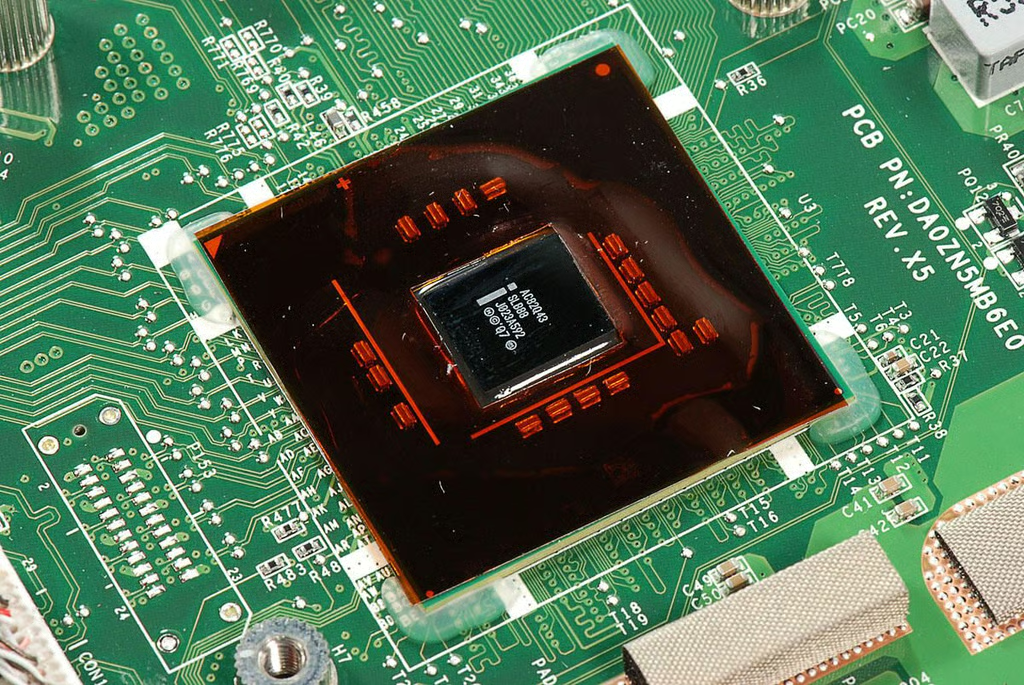
\n\tThis chip with markings AC82Q43 is the graphics and memory controller hub (north bridge) for the HP Compaq 6000 Pro All-in-one Business PC.
\n
\n\tPhoto by: Bill Detwiler / TechRepublic
\n\tCaption by: Bill Detwiler
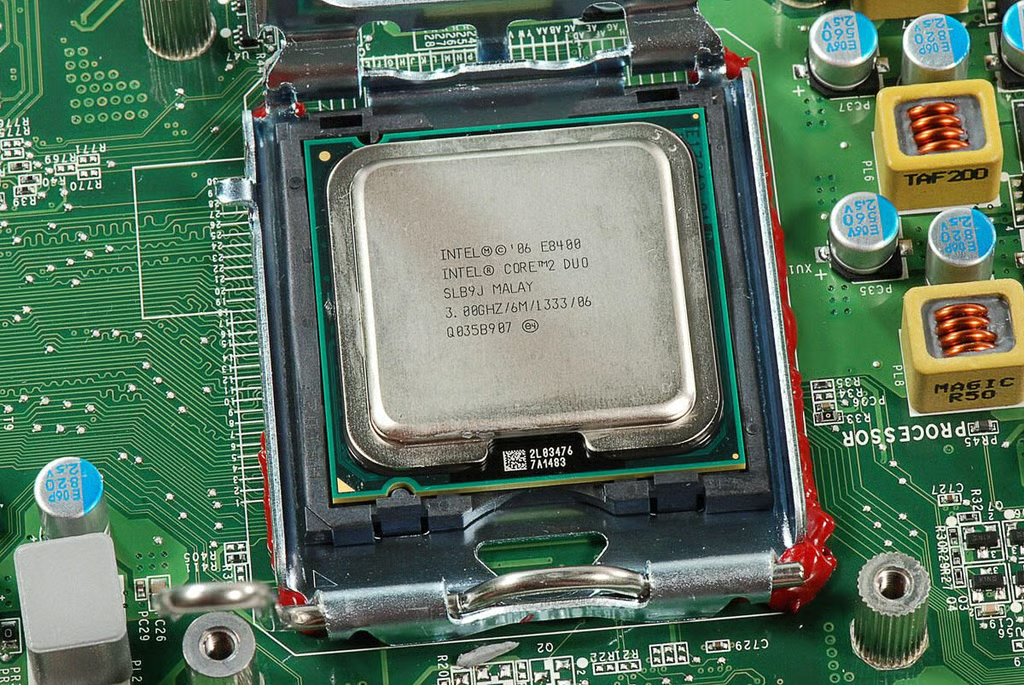
\n\tAt the heart of our HP Compaq 6000 Pro All-in-one Business PC is a 3.00 GHz Intel Core 2 Duo E8400 CPU–shown here with the socket clamp raised.
\n
\n\tPhoto by: Bill Detwiler / TechRepublic
\n\tCaption by: Bill Detwiler
\n\tPhoto by: Bill Detwiler / TechRepublic
\n\tCaption by: Bill Detwiler
\n\tThe HP Compaq 6000 Pro All-in-one Business PC was remarkably easy to disassemble. It uses standard Phillips screws and has easily accessible components. Although the case doesn’t really have any extra room for expansion cards of extra drive, the optical drive, HDD and RAM can be easily replaced and upgraded. Of the all-in-one’s I’ve worked with, the HP Compaq 6000 Pro All-in-one Business PC is definitely the easiest to work on.
\n
\n\tPhoto by: Bill Detwiler / TechRepublic
\n\tCaption by: Bill Detwiler
Bill Detwiler is the Editor for Technical Content and Ecosystem at Celonis. He is the former Editor in Chief of TechRepublic and previous host of TechRepublic's Dynamic Developer podcast and Cracking Open, CNET and TechRepublic's popular online show. Previously, Bill was an IT manager in the social research and energy industries. He has bachelor's and master's degrees from the University of Louisville, where he has also lectured on computer crime and crime prevention.


