\n\tI’ve not used Small Business Server (any version) much over the years, but it is one of the first server series of products to be released on the 2011 server platform. This caused me to take the plunge to Small Business Server recently in my lab to go through the configuration.
\n
\n\tSmall Business Server 2011 is a big download at 6.5 GB. Keep in mind this is more than just an operating system, as a number of critical applications are included in the distribution.
\n
\n\tIf you are considering Small Business Server 2011, check this TechNet page for what is new in this release. You can download a trial of Small Business Server from the TechNet Evaluation Center.

\n\tThe Small Business Server 2011 installation starts much like a Windows Server 2008 R2 system. In fact, you may not notice it is a different product at first glance.
\n
\n\tThe most notable difference is when files are extracted from the large DVD-ROM .ISO file. This would be a good time to go get some coffee!
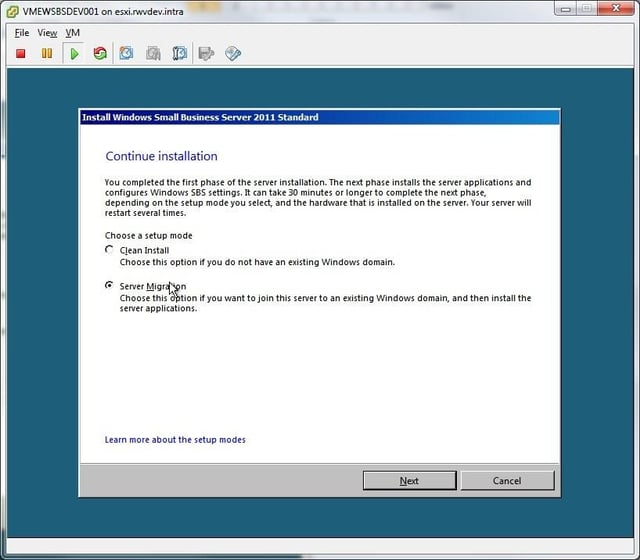
\n\tAfter the long series of installation copy and extraction, the option to perform a clean install or server migration is presented. This is an important option, should the migration path be selected; there are 21 days permitted to have the source server running Windows SBS to run concurrently with the new server. For this example, I’ll select the clean install.
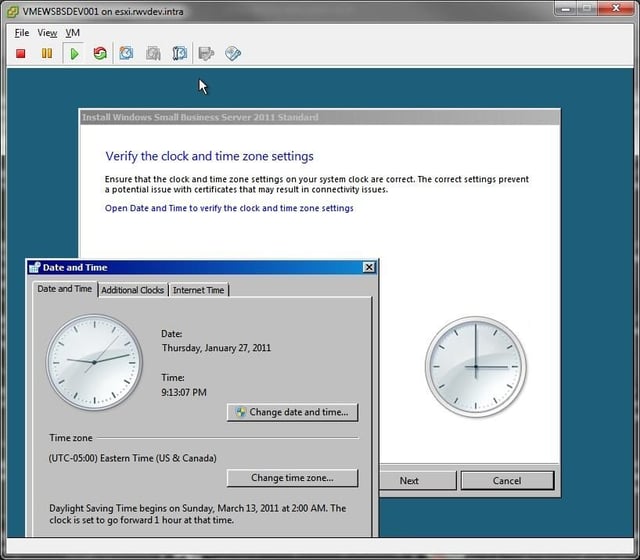
\n\tThe time zone configuration is the next decision point of the installation process. This is important at this part of the Small Business Server configuration for root certificate configuration.
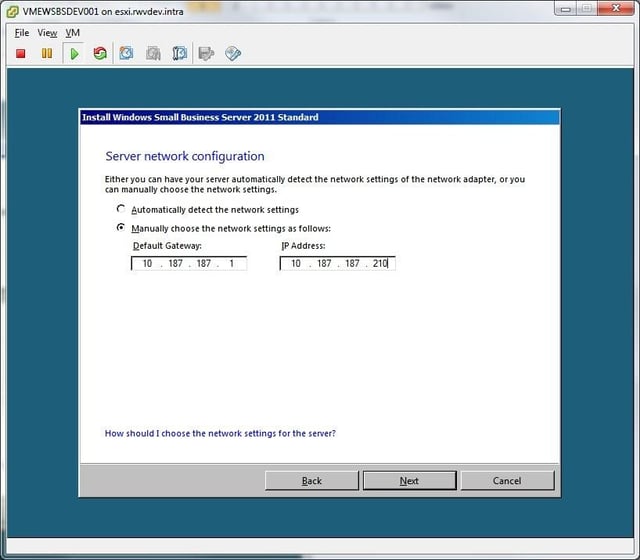
\n\tThe networking options are the next area of configuration during the Small Business Server 2011 setup. The options are rather limited, but nonetheless the most critical parts of the configuration process. The Small Business Server functions as a domain controller as well, so the networking configuration is critical. Further, the next step of the wizard would use this configuration.
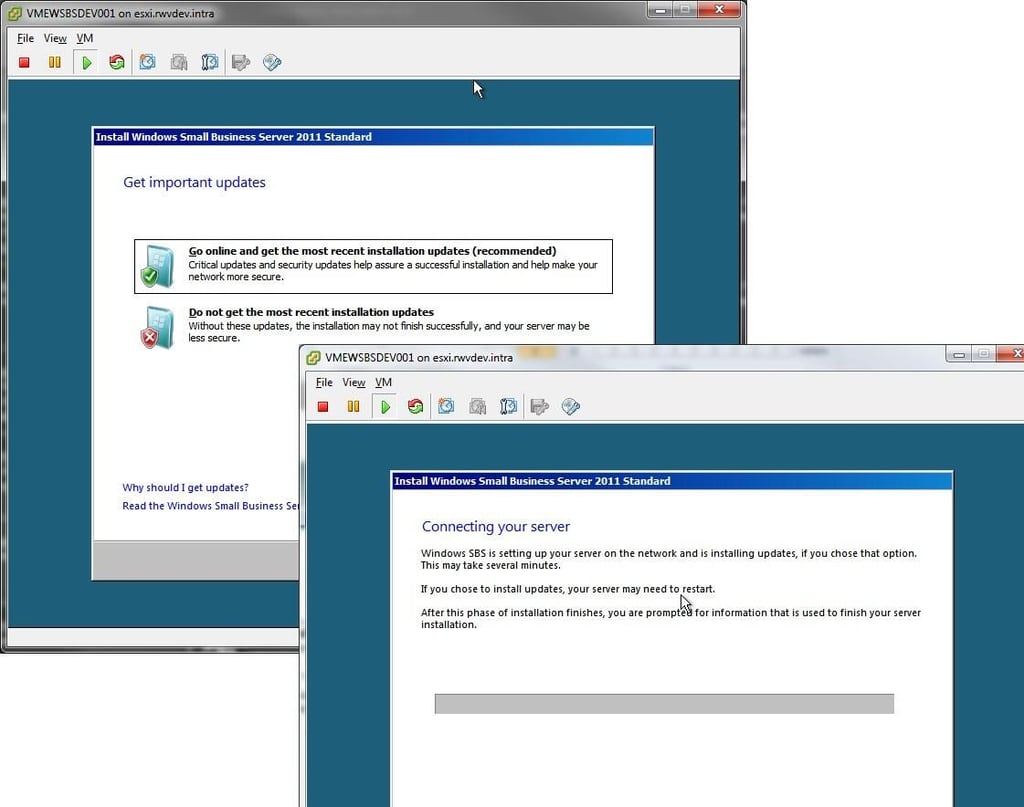
\n\tThe installation has the option to go online and get updates for Small Business Server 2011. Depending on your preference and state of network configuration, this step may not be possible at this point. The safe bet is to perform updates after the installation.
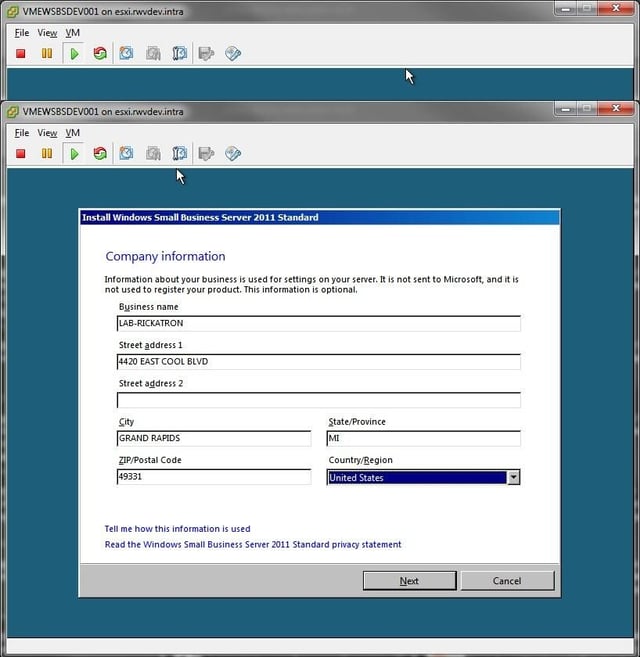
\n\tBasic organizational information is collected in the next step of the Small Business Server 2011 configuration wizard. According to the hotlink on the bottom of the page, this is a pre-loading of configured information for features such as FAX capabilities rather than a registration step with Microsoft.
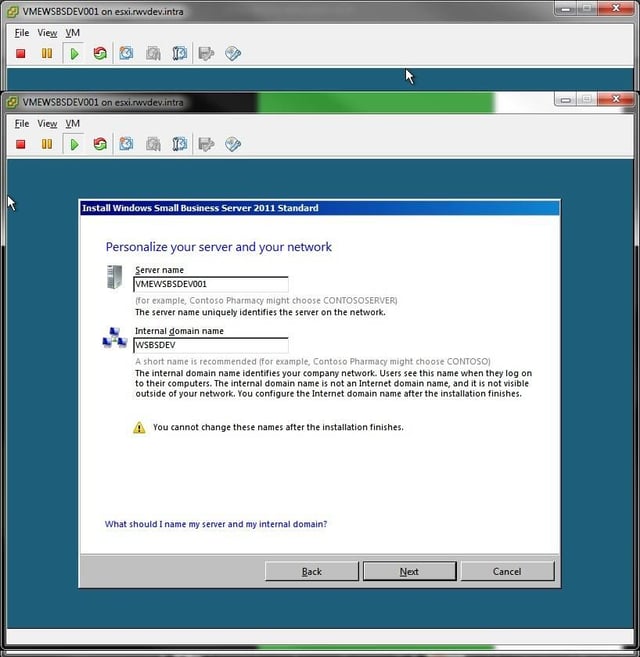
\n\tThe next step in the Small Business Server 2011 configuration is to start putting system-related details into the wizard. The server name and domain name values are very important, as they cannot be changed after the installation is finished. This inconvenient requirement puts the decision process on the administrator for a relevant nomenclature.
\n
\n\tMy recommendation is to make the both of these names generic. Should virtual machines be in use, consider using this blog post as a framework for virtual machine nomenclature.
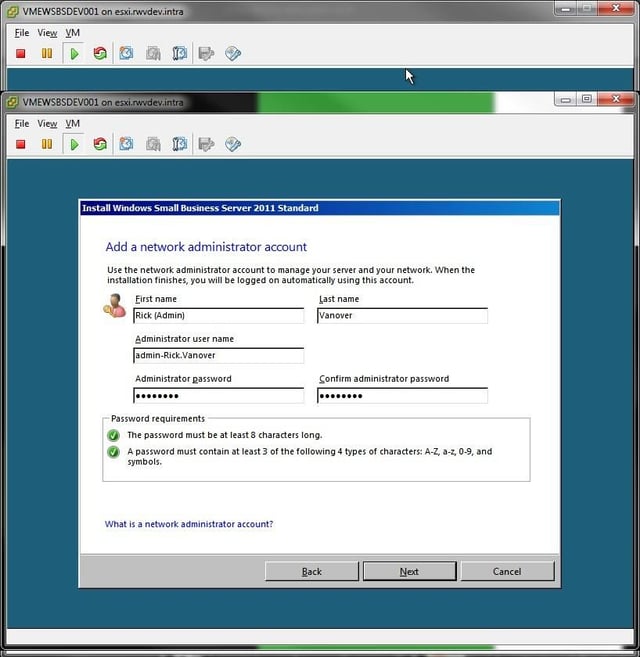
\n\tA network administrator account is then added to the installation. This follows the basic configuration of a user account in terms of password complexity and accepted characters. In the figure above, \u201cadmin-\u201c was pre-pended to the username to use an alias for the specified user. This implies that a normal username of firstname.lastname would also be created for day-to-day use.
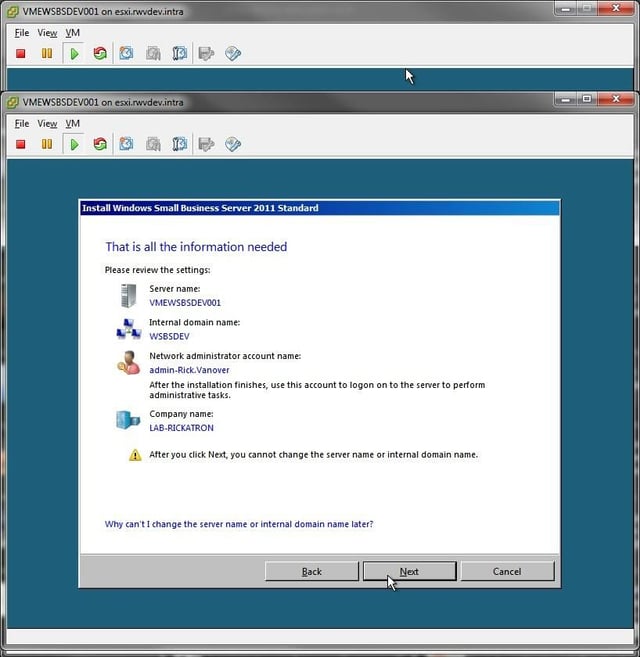
\n\tA useful summary of the configuration wizard is presented before the final steps are configured on the Small Business Server 2011. Curiously, I had to click the link at the bottom that says, \u201cWhy can’t I change the name or internal domain name later?\u201d The help file explains how the Small Business Server 2011 is running Active Directory Domain Services, which is consistent with domain controllers in the other Windows environments. It is a better practice to promote and demote domain controllers rather than rename them. The same practice applies here, except that it would be an additional installation and more complicated migration.
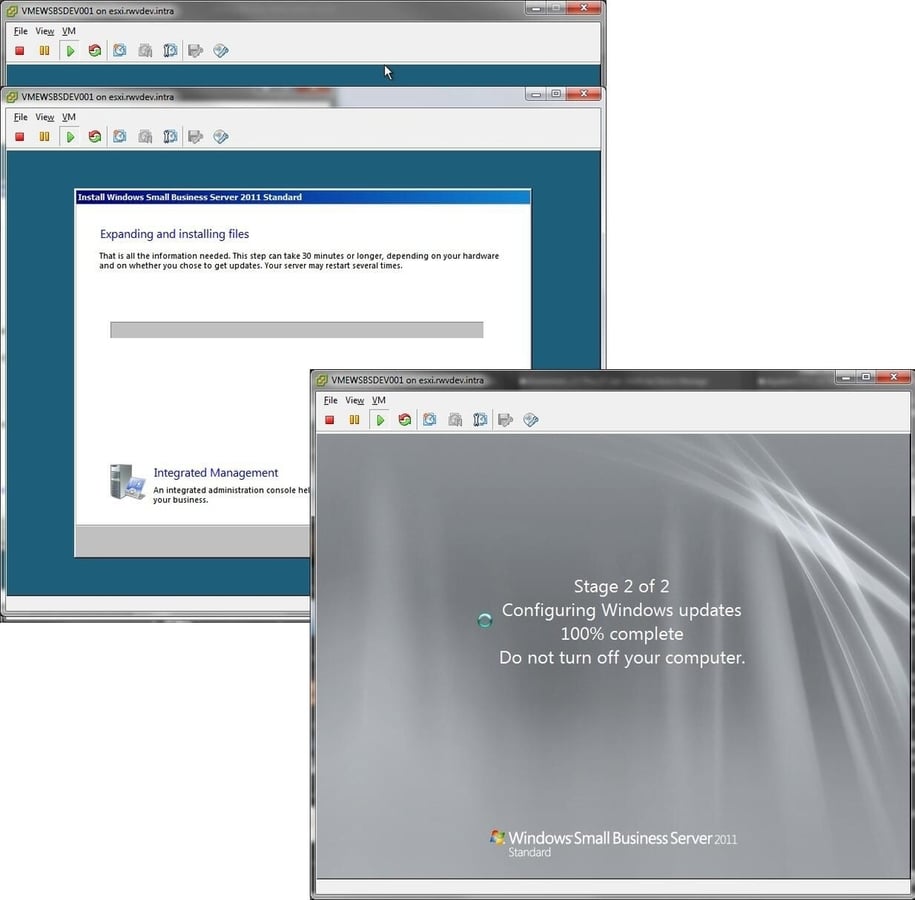
\n\tThe installation then implements the configuration that was specified during the wizard. This step isn’t as long as the file extraction steps before the wizard, but nonetheless takes some time.
\n
\n\tThis example is a VMware vSphere virtual machine running the E1000 virtual network interface. This is important as it will natively be able to connect to Ethernet networks and get to services such as Windows Update. The VMXNET3 interface may not be able to be used until VMware Tools are installed.
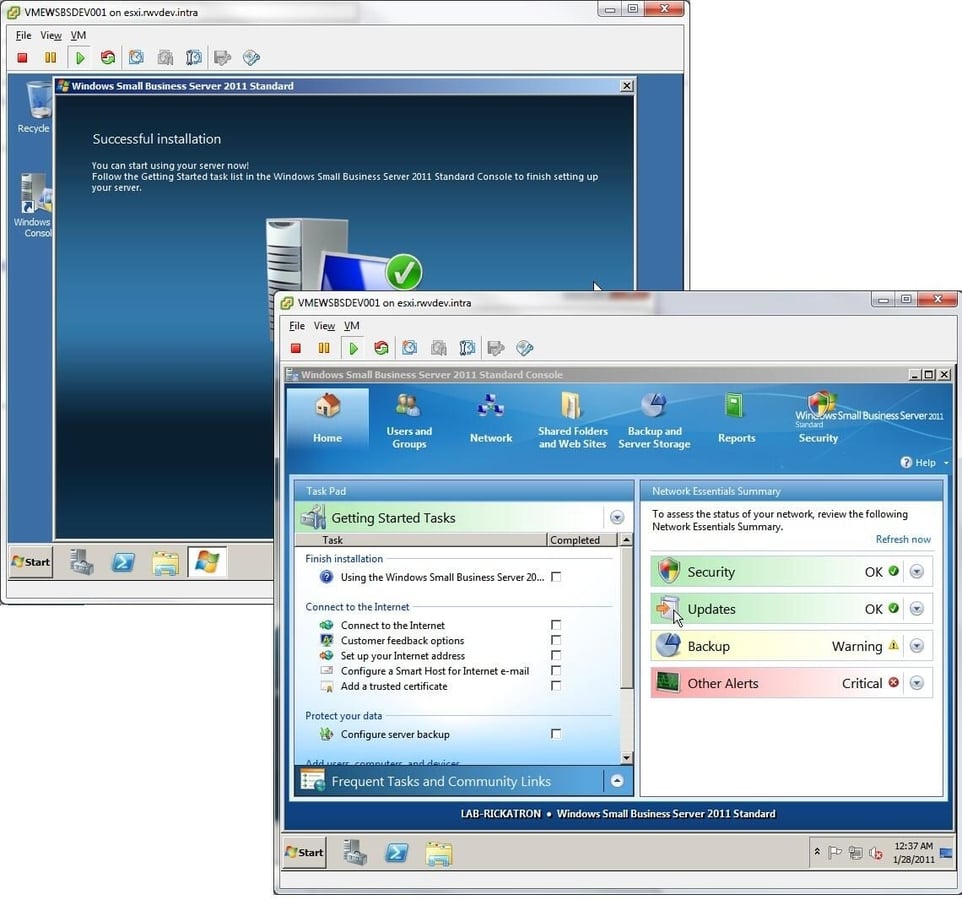
\n\tAfter a generally uninteresting series of configuration and reboot activities, the server is ready to go! You may have to log in as the username and password configured in the previous step. From here, the Windows Small Business Server 2011 Standard Console is the administrative interface for everything on the server. Small Business Server 2011 introduces a number of changes and is the first Windows Server product so tightly integrated with cloud technologies. If you are a candidate for upgrading Small Business Server to the new version, now is the time to go for the evaluation!

Rick Vanover is an IT Infrastructure Manager for Alliance Data in Columbus, Ohio. Rick's IT certifications include VMware VCP, Microsoft Windows Server 2008 MCITP, Windows Server 2003 MCSA and others. \ \ Previous experiences included working for Dematic Corp (formerly Siemens L&A, Siemens Dematic, Rapistan)in Grand Rapids, MI in various capacities deploying custom software solutions to the material handling industry using a mix of current hardware and software products. You can reach Rick at b4real@usa.net. Follow rick on Twitter at @RickVanover


