\n\tThis gallery is also available as a post in the Windows and Office Blog.
\n
\n\tIf you haven’t done so yet, you need to create a recovery drive for your Windows 8 system. Doing so now will save time and effort, not to mention grief, should you encounter a problem with your Windows 8 installation. A Recovery Drive will allow you to boot your system and easily access a number of recovery and troubleshooting tools that you can use to revive an ailing Windows 8 system.
\n
\n\tUnlike its predecessor, Windows 8 allows you to create a Recovery Drive using a USB flash drive, which provides you with new capabilities, such as being able to backup an OEM recovery partition. Of course, you can also create a Recovery Drive on an optical disc – just like you did in Windows 7. While both procedures end up with the exact same Recovery system, they are created from separate user interfaces – the USB Flash drive is created from a new user interface and the optical disc is created from the old System Repair Disc user interface. Why Microsoft didn’t unify the process under one roof, I don’t know.
\n
\n\tThis blog post is also available as a TechRepublic Photo Gallery.
\n
\n\tIn this edition of the Windows Desktop Report, I’ll show you how to create a Recovery Drive in Windows 8 using a USB flash drive. I’ll also show you how to create a Recovery Drive on an optical disc.
\n
\n
\n
\n\tRegardless of whether you are creating a Recovery Drive using a USB flash drive or on an optical disc, it is important to remember that a Recovery Drive is bit specific. In other words, if you create a Recovery Drive in a 64-bit version of Windows 8, you can’t use that drive to boot up and repair a 32-bit version of Windows 8. Likewise, you can’t use a 32-bit Recovery Drive in a 64-bit system.
\n
\n
\n\tTo begin with, you need to know that the USB flash drive you choose to use will become a dedicated Recovery Drive – you won’t be able to use it for anything else. In its base configuration, the contents of the Recovery Drive will require about 256MB of space. However, if you choose to include the OEM recovery partition, you’ll need more space. Thus, if you are creating a basic Recovery Drive, you can use a 1GB USB flash drive. (If you have a smaller sized drive, from the old days, you could use it as well.) If you are going to add OEM recovery partition, you’ll want at least a 16GB USB flash drive.
\n
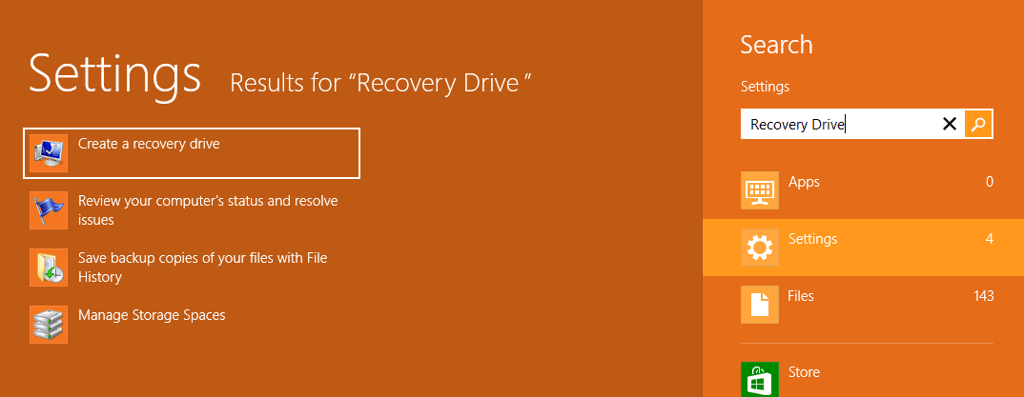
\n\tTo launch the USB flash drive version of the Recovery tool, use the [Windows] + W keystroke to access the Search Settings page, type Recovery Drive in the text box, and click Create a recovery drive, as illustrated in Figure A.
\n
\n\tCredit: Images by Greg Shultz for TechRepublic
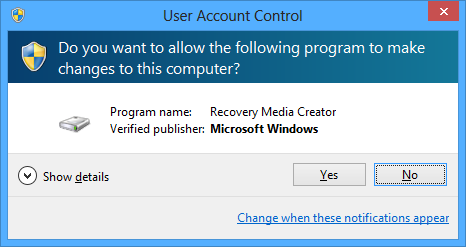
\n\tYou’ll then encounter a UAC, as shown in Figure B and will need to click Yes to continue. As you can see in the UAC dialog box, the program name is shown here as Recovery Media Creator.
\n
\n\tCredit: Images by Greg Shultz for TechRepublic
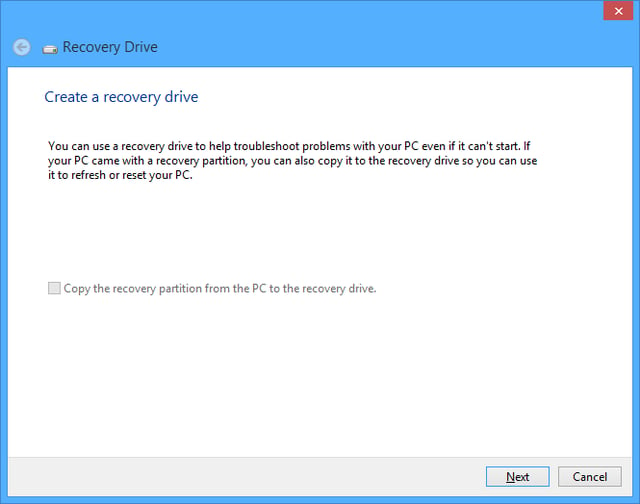
\n\tn a moment, you’ll see the first screen in the Recovery Drive wizard, as shown in Figure C. If your computer came with an OEM recovery partition, the Copy the recovery partition check box will be enabled allowing you to include the contents of the recovery partition on the recovery USB flash drive. (If you select this option, you’ll need a sufficiently large capacity USB flash drive.) To continue, click Next.
\n
\n\tCredit: Images by Greg Shultz for TechRepublic
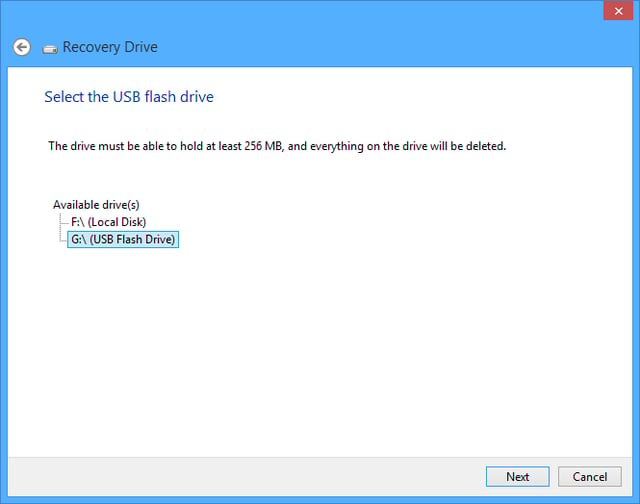
\n\tIn the next screen of the Recovery Drive wizard, you’ll be prompted to select your USB drive. If the drive isn’t already connected to your system, you can insert it now. When you do, Windows 8 will rescan the system and display your drive. Now, as you can see in Figure D, since I am only creating a basic Recovery Drive, the wizard informs me that the drive will only need to hold at least 256MB and that everything currently on the drive will be deleted. Remember, this will become a dedicated Recovery Drive. Once you select your USB flash drive, click Next.
\n
\n\tCredit: Images by Greg Shultz for TechRepublic
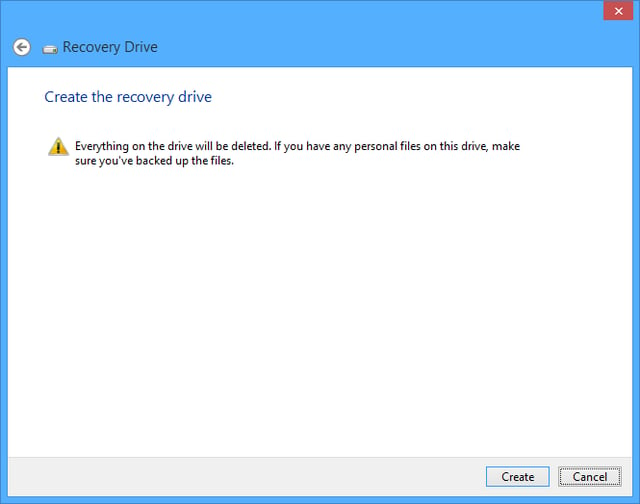
\n\tIn the next screen, as shown in Figure E, you are once again warned that the contents of the drive will be deleted. To continue, click the Create button.
\n
\n\tCredit: Images by Greg Shultz for TechRepublic
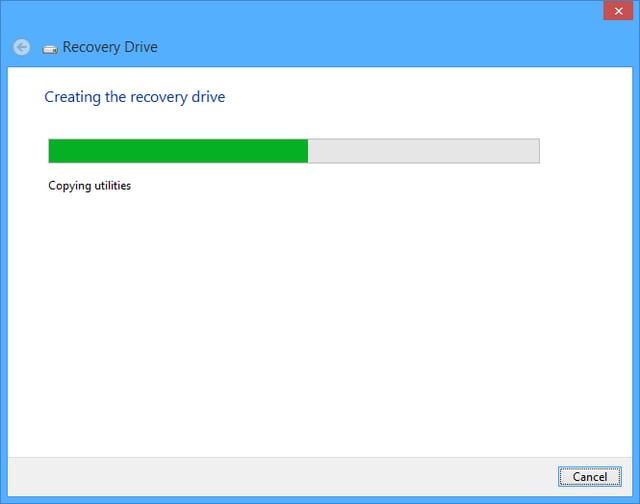
\n\tWhen you do, Windows 8 will format the drive and the begin copying files to the drive, as shown in Figure F. If you are creating a basic Recovery Disk, the process will just take a few minutes. If you are including a recovery partition, go get yourself a cup of coffee – it could take as long as an hour.
\n
\n\tCredit: Images by Greg Shultz for TechRepublic
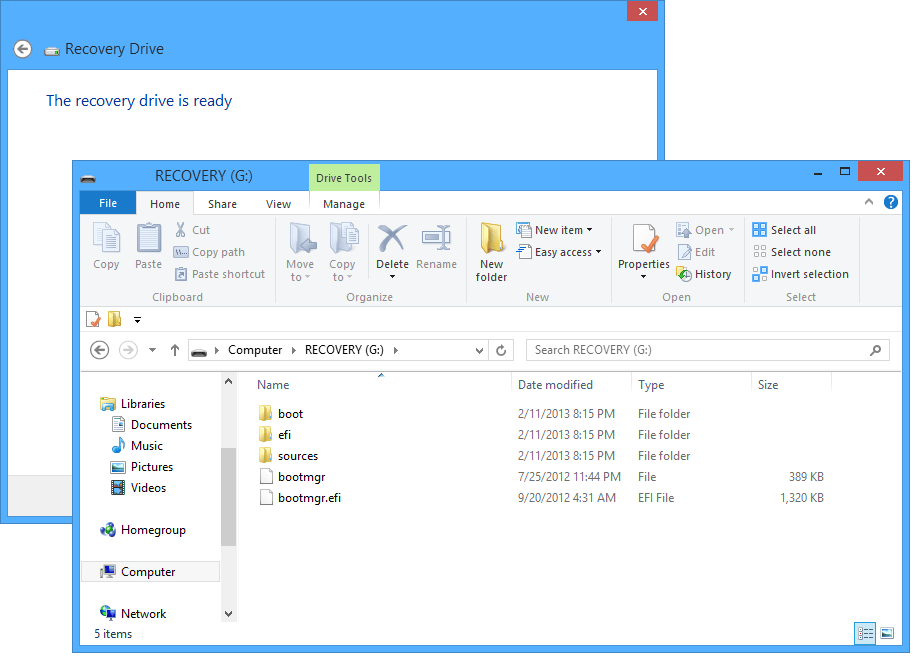
\n\tWhen the process is complete, Windows 8 will open the drive so that you can see the contents, as shown in Figure G. You can then close the Recovery Drive wizard by clicking the Finish button.
\n
\n\tCredit: Images by Greg Shultz for TechRepublic
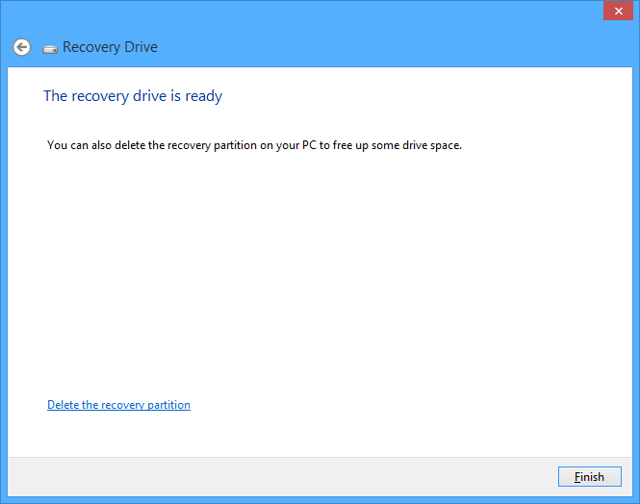
\n\tIf you included a recovery partition on the USB flash drive, when the process is complete, you’ll be prompted to delete the recovery partition from the hard disk to free up space, as shown in Figure H. If you delete the recovery partition, you’ll then have to use Disk Management to extend your system partition into the newly freed up space.
\n
\n\tKeep in mind that, you should only delete the recovery partition if you are really hard up for disk space. The reason that I say that is that without the recovery partition on the hard disk, it is imperative that you not loose or accidentally reformat your USB Flash Disk as it now contains you only copy of the recovery partition. On the flip side, you may want to create a System Image that contains a copy of the recovery partition. I suppose that you could create two USB Flash Disk Recovery disks that include the recovery partition so that you have a backup of your recovery partition.
\n
\n\tCredit: Images by Greg Shultz for TechRepublic
\n\t
\n
\n
\n\tIf you want to use an optical disc to create a Recovery Drive, you’ll launch the Windows 7 File Recovery tool and use the old System Repair Disc interface. Keep in mind that while you will use this legacy interface, you will indeed end up with the same Windows 8 Recovery system created with the new Recovery Drive wizard.
\n
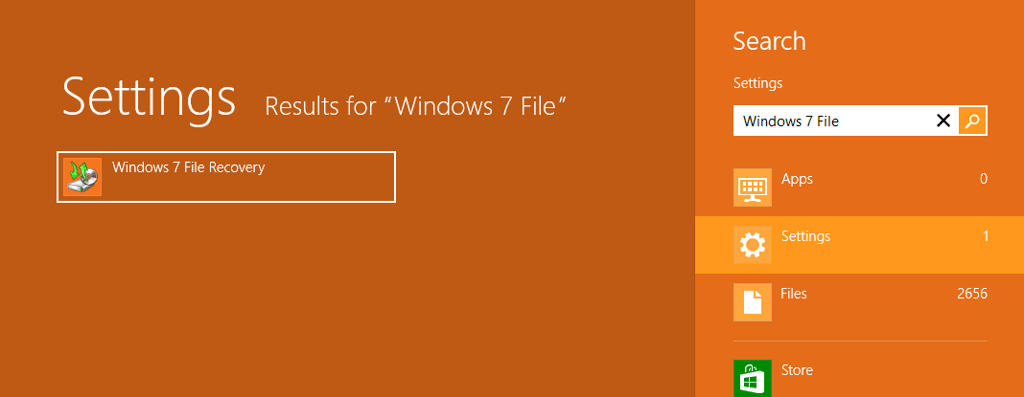
\n\tTo launch the optical disc version of the Recovery tool, use the [Windows] + W keystroke to access the Search Settings page, type Windows 7 File in the text box, and click Windows 7 File Recovery, as illustrated in Figure I.
\n
\n\tCredit: Images by Greg Shultz for TechRepublic
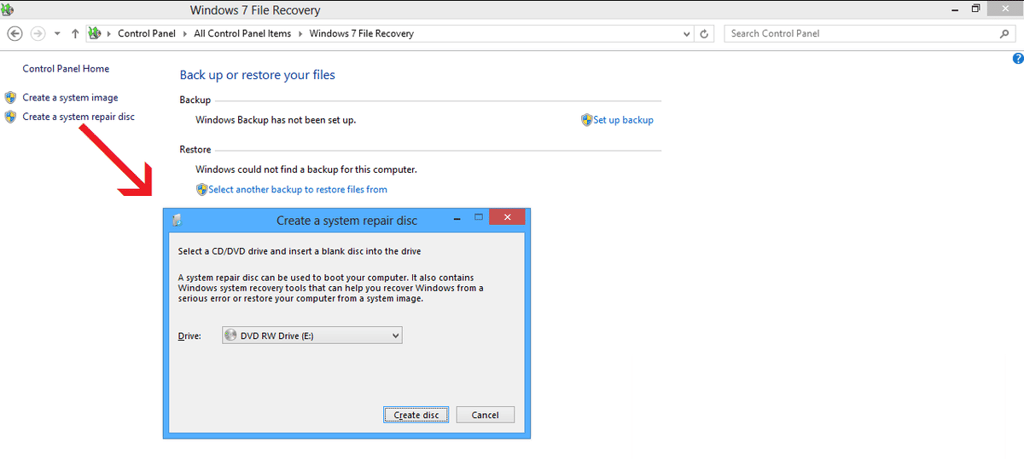
\n\tNow, when you see the Windows 7 File Recovery user interface, select the Create a system repair disc command on the left side of the screen to launch the creation tool. This process is illustrated in Figure J. To start the procedure, click the Create disc button.
\n
\n\tCredit: Images by Greg Shultz for TechRepublic
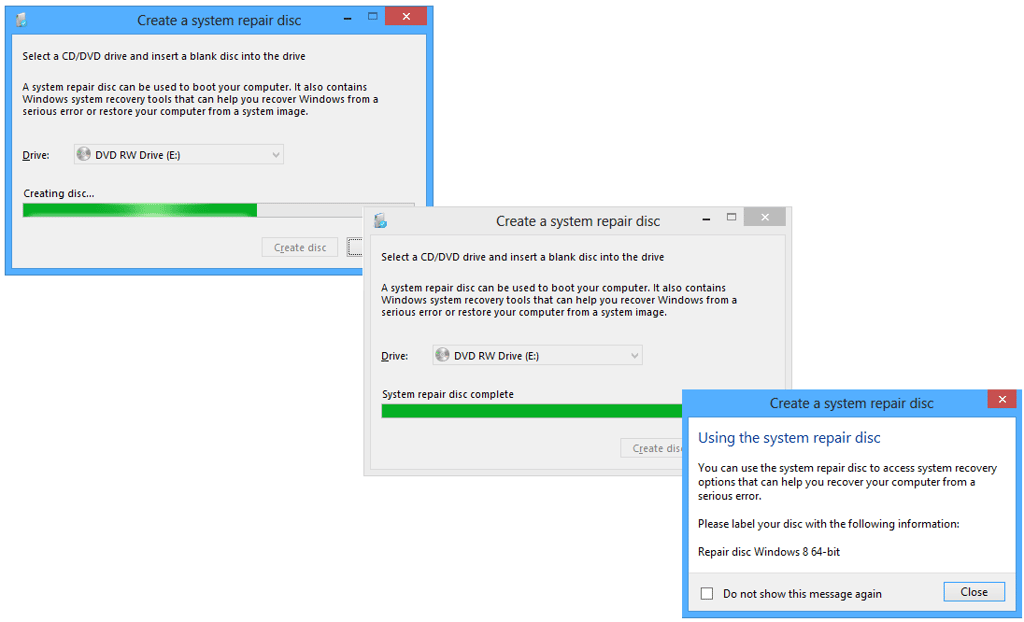
\n\tYou’ll then see the program begin the process of creating the disc. This process is illustrated in Figure K.
\n
\n\tCredit: Images by Greg Shultz for TechRepublic

My first computer was a Kaypro 16 \"luggable\" running MS-DOS 2.11 which I obtained while studying computer science in 1986. After two years, I discovered that I had a knack for writing documentation and shifted my focus over to technical writing.


