Screenshots: Create your own Windows 8.1 DVD - TechRepublic

Screenshots: Create your own Windows 8.1 DVD

  • aa_intro.png

    Get the ISO you need to create your own Windows 8.1 DVD

    This\r\ngallery is also available as a TechRepublic Article.

  • b_gs_11-8.png

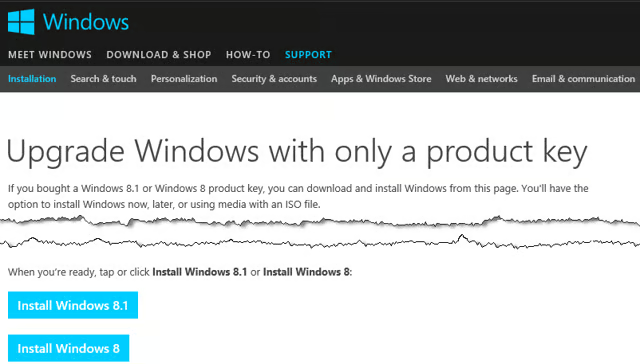
    The Upgrade Windows with only a product key site has links to download both Windows 8 and Windows 8.1

    Well, fortunately some enterprising folks have discovered a\r\nway to trick the Upgrade Windows with only a product key\r\nsite into allowing you to download a Windows 8.1 ISO using a Windows 8\r\nproduct key. While this really cool trick has been published on multiple sites\r\non the Web, not all of these sites give the full set of steps that you need to\r\nperform the operation. For instance, many of the sites direct you to the Upgrade Windows with only a product key\r\nsite as the first step, but they do not mention that in order for this trick to\r\nwork, to be prompted for the product key right away, you have to access the\r\nsite from a computer running Windows 7.

    \r\n\r\n

    So, in this article, I’ll show you the complete procedure\r\nfor downloading a Windows 8.1 ISO using a Windows 8 product key.

    \r\n\r\n

    Note: Even though the end\r\nresult of this trick is have a Windows 8.1 DVD, keep in mind that this DVD can\r\nonly be used to perform a Windows 8 to Windows 8.1 upgrade. You cannot use it\r\nto perform a clean install of Windows 8.1.

    \r\n\r\n

    What you’ll need

    \r\n\r\n

    Before you get started, you’ll need to have access to\r\nseveral things. First you’ll need your Windows 8 Product Key and it has to be\r\nfrom a retail version of the product. In other words, if you received a\r\ncomputer with Windows 8 preinstalled, then you have an OEM Product Key and you\r\ncannot use that type of key for this procedure.

    \r\n\r\n

    So if you either purchased a Windows 8 DVD at your local\r\ncomputer store or downloaded Windows 8 from Microsoft, then you’re all set to\r\ngo.

    \r\n\r\n

    As I mentioned, you’ll need to perform this trick from a\r\nWindows 7 system. As you seek out a Windows 7 system to use, be sure that it is\r\nhas the same processor type as you\r\nare using on the Windows 8 system that you want to upgrade to Windows 8.1. (By\r\nprocessor type, I mean 32-bit vs. 64-bit.) The reason for this is that the\r\nprocessor type in the system that you use to download Windows 8.1, will\r\ndetermine the version of Windows 8.1 that you’ll end up with.

    \r\n\r\n

    For example, if your Windows 8 system is running a 64-bit\r\nprocessor, then you’ll want to use a Windows 7 system with a 64-bit processor.\r\nYou’ll then end up with a 64-bit version of Windows 8.1.

    \r\n\r\n

    Still with me? Okay, then let’s get started.

    \r\n\r\n

    Getting started

    \r\n\r\nOnce you have located a\r\nproper Windows 7 system, fire up your Web browser of choice and point it to the\r\nUpgrade\r\nWindows with only a product key site. When you arrive, you’ll find that the\r\npage contains links to download both Windows 8 and Windows 8.1, as shown in Figure B. Unfortunately, you cannot\r\njust click the Windows 8.1 download button unless you have a Windows 8.1\r\nProduct Key from a retail version of the product. So, you’ll have to use the\r\nfollowing technique.

    \r\n\r\nCredit: Image by Greg Shultz for TechRepublic

  • c_gs_11-8.png

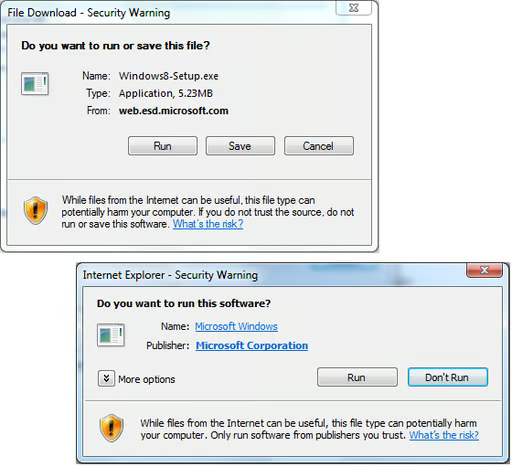
    You click Run in both of these Security Warning dialog boxes

    To begin, click the Install Windows 8 button. When you do,\r\nyou’ll be successively prompted by the two Security Warning dialog boxes shown\r\nin Figure C. You’ll click Run in\r\nboth instances.

    \r\n\r\nCredit: Image by Greg Shultz for TechRepublic
  • d_gs_11-8.png

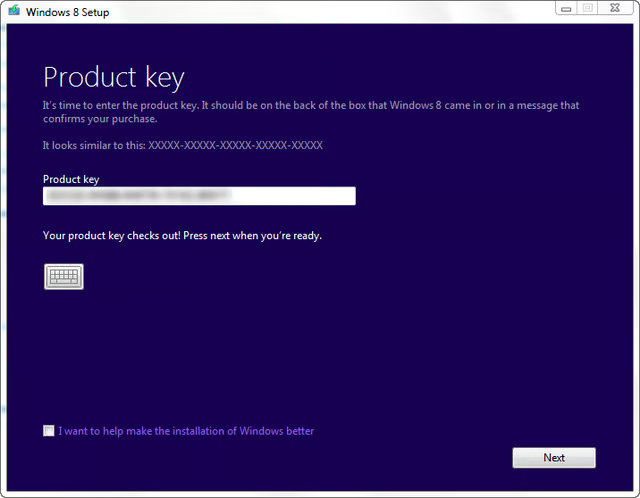
    Wait for your Windows 8 product key to be verified

    You’ll then see the first screen in the Windows 8 Setup\r\nwizard, which prompts you for a Product Key. At this point, enter your Windows\r\n8 product key and wait for it to be verified, as shown in Figure D

    \r\n\r\nCredit: Image by Greg Shultz for TechRepublic

  • e_gs_11-8.png

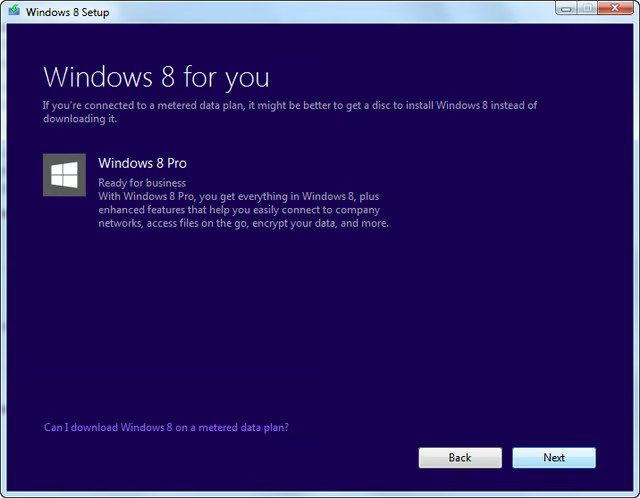
    You'll see the Windows 8 edition connected with your download

    To continue, click Next. The next screen in the Windows 8\r\nSetup wizard, will identify the edition of Windows 8, as shown in Figure E.

    \r\n\r\nCredit: Image by Greg Shultz for TechRepublic
  • f_gs_11-8.png

    Click the close button to abort the download

    Editor’s Note: Here is\r\nthe trick part.

    \r\n\r\n

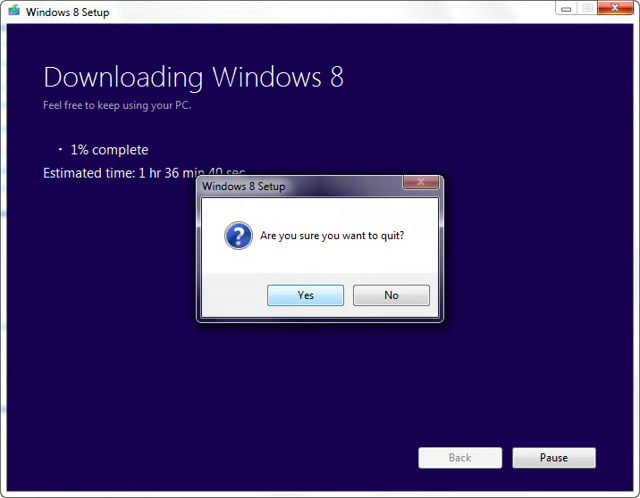
    When you click Next, the Windows 8 download will begin. As\r\nsoon as it passes the 1% mark, click the close button in the upper right corner\r\nof the screen. When you do, you’ll be prompted to confirm that you want to quit\r\nthe download operation, as shown in Figure\r\nF. To continue, click Yes.

    \r\n\r\nCredit: Image by Greg Shultz for TechRepublic

  • g_gs_11-8.png

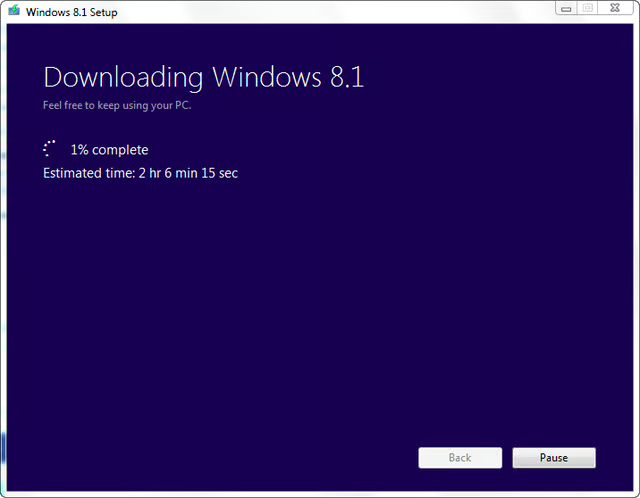
    The Windows 8.1 download will begin as soon as you click Run in the last Security Warning dialog box

    Downloading the Windows 8.1 ISO

    \r\n\r\n

    When you abort the Windows 8 download operation, you’ll\r\nreturn to the Upgrade Windows with only a product key site. At this point,\r\nclick the Install Windows 8.1 button. When you do, you’ll see two Security\r\nWarning dialog boxes similar to the ones shown earlier and will click Run in\r\nboth instances. You’ll then see the Windows 8.1 Setup windows and the download will\r\nbegin, as shown in Figure G.

    \r\n\r\nCredit: Image by Greg Shultz for TechRepublic
  • h_gs_11-8.png

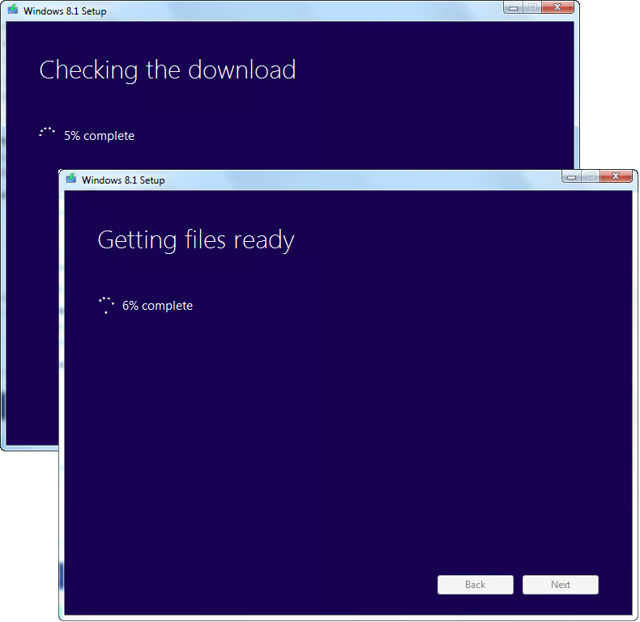
    As the download completes it will be checked and the files made ready

    As the operation nears completion, the download will be\r\nchecked and the files made ready, as shown in Figure H.

    \r\n\r\nCredit: Image by Greg Shultz for TechRepublic

  • i_gs_11-8.png

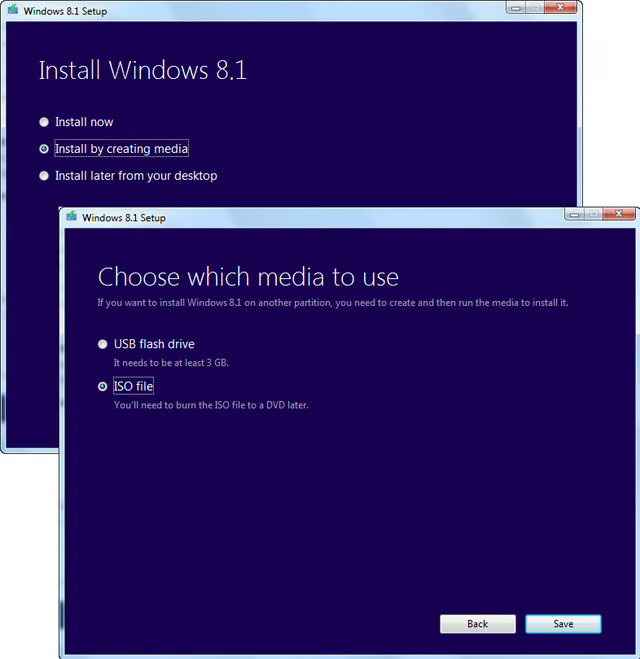
    You'll want to select the ISO file option

    Once the download is complete, checked, and the files are\r\nready, the Setup wizard will prompt you to choose how you want to install\r\nWindows 8.1. At this point, you’ll select the Install by creating media option,\r\nand click Next. You’ll then want to select the ISO File option. These two steps\r\nare illustrated in Figure I.

    \r\n\r\nCredit: Image by Greg Shultz for TechRepublic
  • j_gs_11-8.png

    After the ISO file is created, select Open DVD burner

    I recommend that you select the ISO File option even if you\r\nplan to use a USB Flash Drive to actually install Windows 8.1 on your system.\r\nCreating an ISO file will provide you the best result because it will allow you\r\nto burn a DVD, which will give you a backup, and because Windows 8 and Windows\r\n8.1 have the capability to natively mount an ISO file, you’ll be able to open\r\nthe ISO and copy the files it contains to an appropriately sized USB Flash\r\nDrive.

    \r\n\r\n

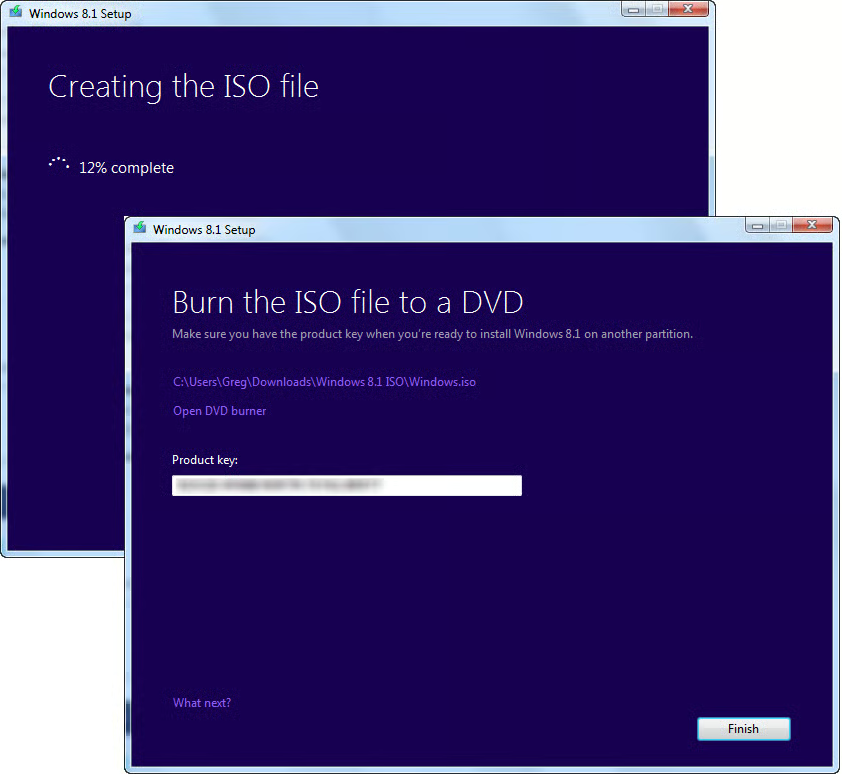
    After specifying a location on your hard disk to create the\r\nISO file, the Windows 8.1 Setup wizard will create the ISO file, remind you of\r\nthe Product key, and then prompt you to Open the DVD burner. These steps are\r\nillustrated in Figure J.

    \r\n\r\nCredit: Image by Greg Shultz for TechRepublic

  • k_gs_11-8.png

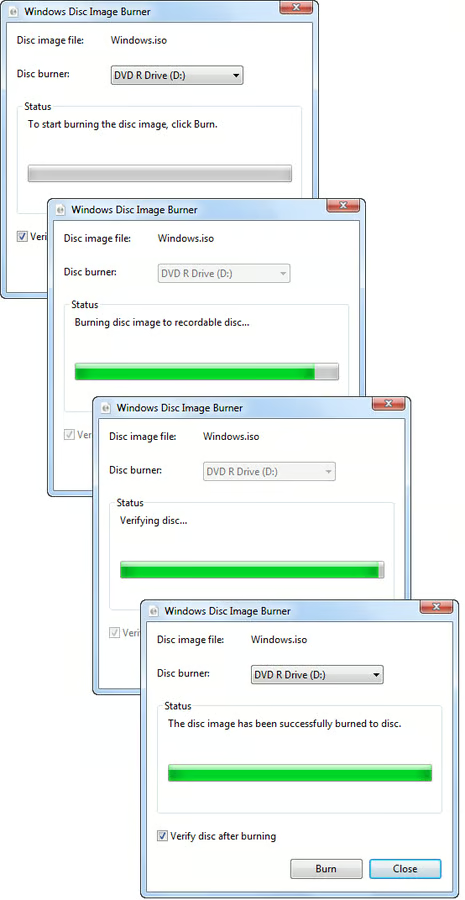
    Windows 7's Windows Disc Image Burner makes it easy to convert the ISO file to DVD

    Burn the ISO to DVD

    \r\n\r\n

    Burning the ISO to DVD in Windows 7 is an easy procedure\r\nwith the built-in Windows Disc Image Burner. When you see the Windows Disc\r\nImage Burner window, insert a DVD disc, and select the Verify disc after\r\nburning check box. Then click the Burn button. The burn operation will take a\r\nfew minutes to complete. These steps are illustrated in Figure K.

    \r\n\r\n

    What’s your take?

    \r\n\r\n

    Do you have two or more Windows 8 systems that you want to\r\nupgrade to Windows 8.1? If so, will you use this technique to create a Windows\r\n8.1 DVD? As always, if you have comments or information to share about this\r\ntopic, please take a moment to drop by the TechRepublic Community Forums and\r\nlet us hear from you.

    \r\n\r\n

    XXXXXX

    \r\n\r\n

    ZZZZZZ

    \r\n\r\n

    Also read:

    \r\n\r\n

    \r\n\r\nCredit: Image by Greg Shultz for TechRepublic
1 of 11
Greg Shultz

My first computer was a Kaypro 16 \"luggable\" running MS-DOS 2.11 which I obtained while studying computer science in 1986. After two years, I discovered that I had a knack for writing documentation and shifted my focus over to technical writing.