
This gallery is also available as a TechRepublic article.
I\r\nhave recently heard from a number of readers who have had difficulties running\r\nthe System Image tool built into Windows\r\n7 and Windows\r\n8. These readers have been encountering the error message shown in Figure A.
\r\n\r\n
Credit: Images by Greg Shultz for TechRepublic
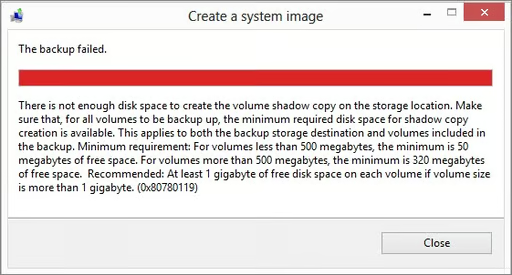
Because of the length of the error message and the specific number given, the error message is commonly referred to as “There is not enough disk space to create the volume shadow copy of the storage location (0x80780119).”
As you can see, the full error message is very confusing and more often than not, the shortened version is interpreted as meaning that there is not enough free space on the destination drive. However, in actuality it indicates a problem with the source drive. After investigating the problem in detail, I have discovered that there are two common causes for the problem – one cause in Windows 7 and a different cause in Windows 8. I have also discovered that there are two separate solutions that will ultimately allow you to successfully create a system image.
In this edition of the Windows Desktop Report, I will walk you through the steps I used to decipher the problem. Then, I’ll examine each of these solutions and show you how to implement them.
Credit: Images by Greg Shultz for TechRepublic

\r\n\r\n
Let’s begin with the details revealed in the error message\r\nitself. Let me start off by saying that this is a horribly written error\r\nmessage that is terribly confusing.
\r\n\r\n
The first sentence is the one that is the most misleading:
\r\n\r\n
There is not enough\r\nspace to create the volume shadow copy on the storage location.
\r\n\r\n
As you can imagine, this being the first sentence leads\r\npeople off to thinking that the cause of the problem is that there is not\r\nenough free space on the destination drive. However, if you read into the next\r\ntwo sentences and ignore the typos, you will see that there is a hint at the\r\nreal problem
\r\n\r\n
Make sure that, for\r\nall volumes to be backup up, the minimum required disk space for shadow copy\r\ncreation is available. This applies to both the back up storage destination and\r\nvolumes included in the back up.
\r\n\r\n
Looking at these sentences, we can see that the error can be\r\ncaused by not having enough free space on either the source or the destination.\r\nAnd, we can begin to see that the error message is referring to not having\r\nenough free space for the volume shadow\r\ncopy rather that the total amount space required for the full system image.
\r\n\r\n
The next three sentences spell out exactly how much free\r\nspace is required for the volume shadow\r\ncopy:
\r\n\r\n
Minimum requirement:
\r\n\r\n
\r\n
\r\n
\r\n\r\n
Recommended:
\r\n\r\n
\r\n
\r\n\r\n
At this point we begin to decipher the real problem. First,\r\njust about everyone who encounters this problem has tried creating the System\r\nImage on both DVDs and a large external hard disk with plenty of room to hold\r\nthe system image as well as the volume shadow copy, so we can eliminate the\r\ndestination drive as the cause of the problem. That leaves the source drive as\r\nthe location of the problem causing the error message. However, before we dig\r\ndeeper into the source drive, we need to take a closer look at the entity which\r\nwe need there to enough free space – the volume shadow copy.
\r\n\r\n
\r\n\r\n
As we discovered, the error message is referring to not\r\nhaving enough free space for the volume shadow copy rather that the total\r\namount space required for the full system image. So, what is the volume shadow\r\ncopy?
\r\n\r\n
In a nutshell, the Volume Shadow Copy feature runs in\r\nWindows as a Service and is designed to make snapshot-like backup copies of the\r\ndata on a volume. This snapshot technology is built into tools like System\r\nImage to allow it to create backups of data without it having to be concerned\r\nwith changes being made to the data while it is in the process of backing up\r\nthat data. So, when you launch System Image, it immediately takes a snapshot of\r\nall the data in a volume as it exists at that particular point in time. It then\r\nsaves this snapshot as a file on the volume. If there is more than one volume\r\non the hard disk, which is typically the case, System Image takes and saves a\r\nsnapshot of each volume. Once all the snapshots are taken, the System Image\r\ntool goes to work copying all these snapshots to the destination and assembling\r\nthem into a comprehensive image of the hard disk.
\r\n\r\n
\r\n\r\n
We’ve eliminated the destination as the cause of the problem\r\nand have shifted our focus to the source drive. With that in mind, let’s take a\r\ncloser look at the source.
\r\n\r\n
As you know, the image created by Windows’ System Image tool\r\nencompasses the entire hard disk and the hard disk can be divided up into\r\nmultiple partitions, which are also called volumes. A hard disk in the Windows\r\nenvironment will have at least two and maybe more partitions or volumes. Of\r\ncourse, there will be the main volume representing the C drive. There may also\r\nbe a volume labeled System Reserved, which doesn’t have a drive letter. The\r\nSystem Reserved volume is created during Setup and is designed to hold the\r\noperating system’s Boot Manager and the Boot Configuration Database. It is also\r\ndesigned to be used by the BitLocker Drive Encryption feature should you decide\r\nto implement it. In Windows 7, the System Reserved volume will be 100MB and in\r\nWindows 8, the System Reserved volume will be 350MB
\r\n\r\n
Now, if you purchased a computer with an OEM version of\r\nWindows preinstalled, there may be other volumes on your hard disk. For\r\nexample, there might be volumes labeled Recovery Partition, OEM Partition, or\r\nEFI System Partition. Depending on the OEM, these additional volumes could be\r\nany size in either MBs or GBs. In most cases, none of these additional volumes\r\nis assigned a drive letter. However, if you launch Windows’ Disk Management\r\ntool, you can take a look at all of the volumes that exist on your hard disk. To\r\ndo so in either Windows 7 or Windows 8, press [Windows] + R to access the Run\r\ndialog box. Then type diskmgmt.msc in the Open text box and click OK.
\r\n\r\n
\r\n\r\n
At this point, we now have enough information to go looking\r\nfor the source of the problem. Using the details provided in the last three\r\nsentences of the error message and the Disk Management tool, we can take a\r\ncloser look at each volume on the source drive and identify which one is the\r\ncause of the problem.
\r\n\r\n
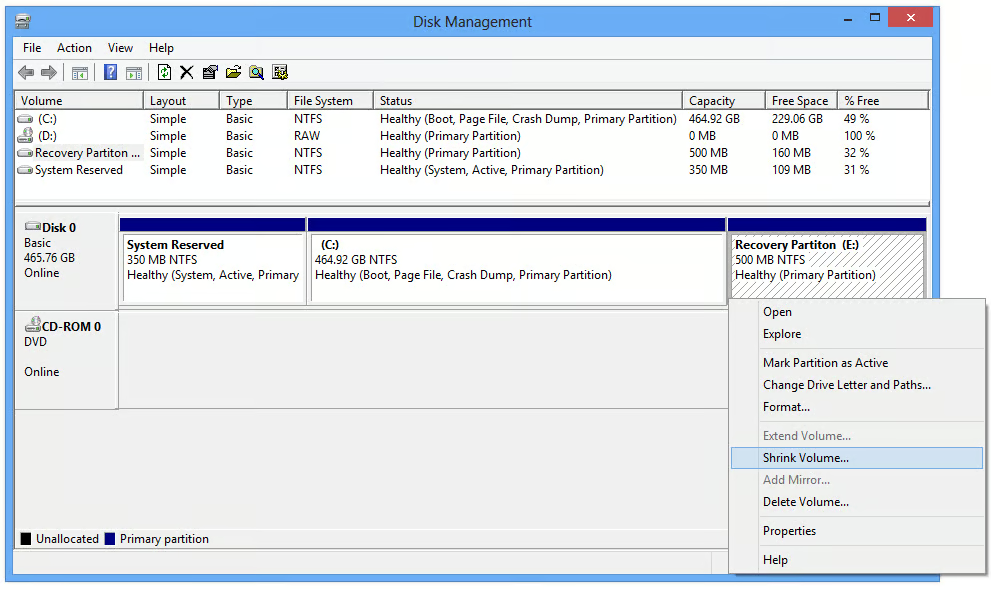
You’ll want to arrange the column headers in the top panel\r\nof Disk Management so that you can clearly read all the information, as shown\r\nin Figure B. Once you do, check the\r\nCapacity and Free Space columns of each volume on Disk 0 and see if they adhere\r\nto the specifications or rules laid out in the last three sentences of the\r\nerror message in order to be able to accommodate the Volume Shadow Copy\r\nsnapshot file. For your convenience, I’ve summarized the rules in Table A below.
\r\n\r\n
\r\n\r\n
| \r\n
If Volume size \r\n |
\r\n
Then free space\r\n must be at least \r\n |
| \r\n
< 500 MB \r\n |
\r\n
50 MB \r\n |
| \r\n
> 500 MB \r\n |
\r\n
320 MB \r\n |
| \r\n
> 1 GB \r\n |
\r\n
1 GB \r\n |
\r\n\r\n
The minimum and recommended space rules from the error\r\nmessage.
\r\n\r\n
If you identify a volume on your hard disk that violates\r\nthese rules, then you have discovered the source of the error message. How you go\r\nabout solving the problem will depend on how the offending volume is configured\r\nand how it will allow you to work with it. Let’s take a look.
\r\n\r\n
Credit: Images by Greg Shultz for TechRepublic
\r\n\r\n
In Windows 7, the most common cause of the problem will be\r\nthe System Reserved volume, which has expanded in size due to an anomaly in the\r\nChange\r\nJournal system. As you may know, in order to keep track of changes to\r\nfiles, the NTFS file system maintains a database called the Change Journal. Basically,\r\nwhen any change is made to a file or directory, the Change Journal is updated\r\nwith a new record that contains the name of the file or directory that was\r\nchanged along with a brief description of the change along. Then, an Update Sequence\r\nNumber (USN) is assigned to the record.
\r\n\r\n
Unfortunately, it turns out that a malfunction of some sort\r\noccurs in certain file or disk operations that can inadvertently cause Change Journal\r\nentries to be created on the System Reserved volume. Whatever the situation,\r\nthe buildup of entries on this volume uses up the space that the System Image\r\ncreation process needs to use to store the Volume Shadow Copy files.
\r\n\r\n
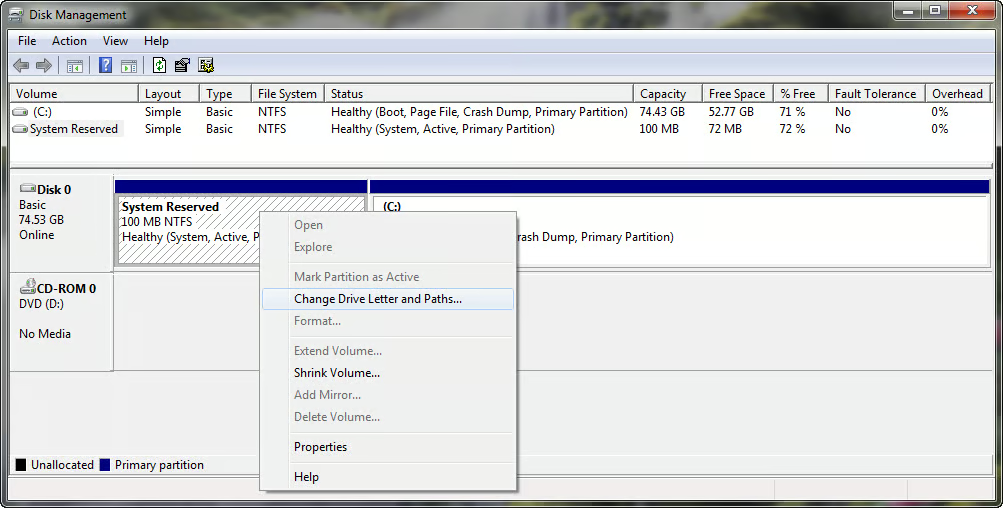
To fix this problem in Windows 7 requires three operations:\r\nFirst, you use Disk Management to assign a drive letter to the System Reserved\r\nvolume. Second, you use the FSUTIL command line tool to delete the Change\r\nJournal entries from the System Reserved volume. Third, you use Disk Management\r\nto remove the drive letter from the System Reserved volume.
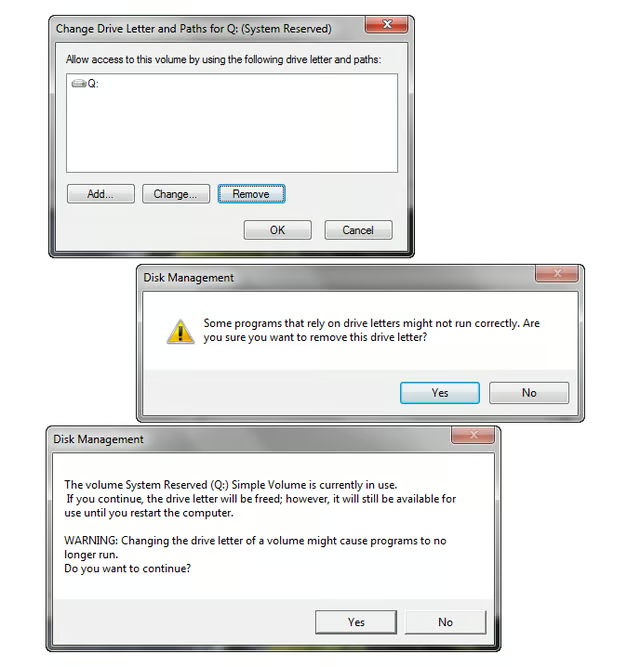
\r\n\r\nYou need to assign a drive\r\nletter to the System Reserved volume in order to be able to access it with the\r\nFSUTIL command line tool. To do so in Disk Management, right click on the\r\nSystem Reserved partition and select the Change Drive Letter and Paths command,\r\nas shown in Figure C.
\r\n\r\n
Credit: Images by Greg Shultz for TechRepublic
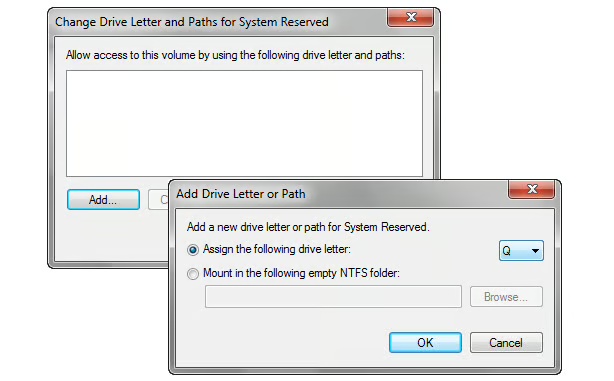
In\r\na moment, you’ll see the associated dialog box and will click the Add button.\r\nWhen you see the Add Drive Letter or Path dialog box, shown in Figure D, use the drop down menu to\r\npick a drive letter at the far end of the alphabet, something uncommon that\r\nwill stand out, such as Q.
\r\n\r\n
Credit: Images by Greg Shultz for TechRepublic
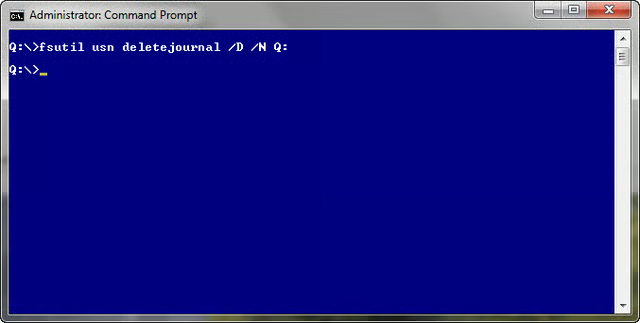
At this point, launch an Administrator\r\nCommand Prompt. When the Administrator Command Prompt windows appears, type\r\nthe following command, as shown in Figure\r\nE.
\r\n\r\n
fsutil usn\r\ndeletejournal /N /D Q:
\r\n\r\n
Credit: Images by Greg Shultz for TechRepublic
Use the FSUTIL command to delete the unnecessary Change\r\nJournal entries.
\r\n\r\n
Now, return to Disk Management, right click on the System\r\nReserved partition and select the Change Drive Letter and Paths command. When\r\nyou see the dialog box, click Remove and respond to the prompts, as shown in Figure F. Then, restart your system.
\r\n\r\nAfter you restart your\r\nsystem, you will be able to run System Image tool without encountering the\r\nerror.
\r\n\r\n
Credit: Images by Greg Shultz for TechRepublic
\r\n\r\n
In Windows 8, the most common cause will be an OEM Recovery\r\npartition. Some OEMs are creating Recovery partitions on the hard disk that are\r\n500MB or larger and these partitions don’t have enough required free space (320MB)\r\nto accommodate the volume shadow copy files. Apparently, these OEMs aren’t\r\nfamiliar with the rules and the amount of free space required running the\r\nSystem Image tool in Windows 8.
\r\n\r\n
For example, let’s assume that we have a Recovery partition\r\nthat is 500MB in size and that it contains 340MB of recovery data. That leaves\r\n160MB of free space, which is obviously less than the 320MB required to adhere\r\nto the rules specified in System Image’s error message. However, 160MB leaves\r\nsome room to work with. If you reduce the size of the Recovery partition to\r\njust under 500MB, then System Image will only need 50MB of free space for the volume\r\nshadow copy file. Fortunately, Disk Management allows you to resize volumes\r\nwith its Shrink Volume command.
\r\n\r\nTo do so in Disk\r\nManagement, right click on the Recovery partition and select the Shrink Volume\r\ncommand, as shown in Figure G.
\r\n\r\n
Credit: Images by Greg Shultz for TechRepublic
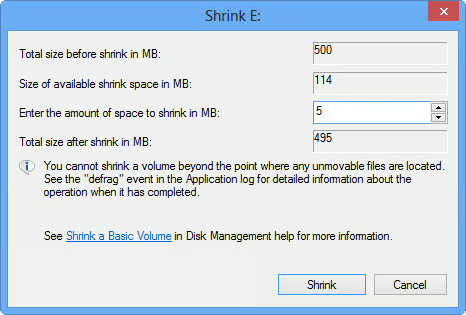
When\r\nyou see the Shrink dialog box, type a number in the available text box that\r\ntakes the Total size after shrink number just under 500MB. As you can see in Figure H, by typing a 5 in the text box\r\nI took the size of the recovery partition down to 495MB. To continue, click the\r\nShrink button.
\r\n\r\n
Credit: Images by Greg Shultz for TechRepublic
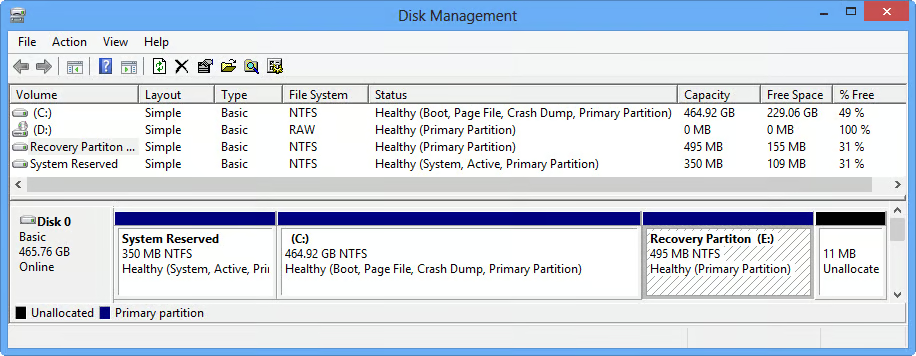
When the Shrink operation is complete, you can see that the\r\ncapacity of the partition is 495MB and the free space is at 155MB, as shown in Figure I. Now there is plenty of room\r\nfor the 50MB volume shadow copy file.
\r\n\r\n
After you restart your system, you will be able to run\r\nSystem Image tool without encountering the error.
\r\n\r\n
\r\n\r\n
Have you encountered the “There is not enough disk\r\nspace to create the volume shadow copy of the storage location (0x80780119)”\r\nerror message when attempting to run the system Image tool? Did one of these\r\nsolutions allow you to successfully run the System Image tool on your Windows 7\r\nor Windows 8 system? As always, if you have comments or information to share\r\nabout this topic, please take a moment to drop by the Discussion area and let\r\nus hear from you.
\r\n\r\n
\r\n\r\n
\r\n
\r\n
\r\n
\r\n\r\n
Credit: Images by Greg Shultz for TechRepublic

My first computer was a Kaypro 16 \"luggable\" running MS-DOS 2.11 which I obtained while studying computer science in 1986. After two years, I discovered that I had a knack for writing documentation and shifted my focus over to technical writing.


