This gallery is also available as a TechRepublic download and as a TechRepublic article.
Environment
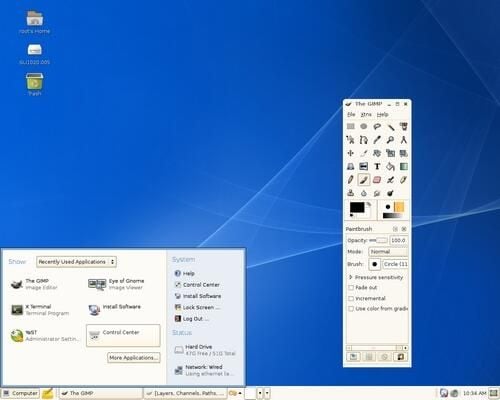
For this series, I will be setting up the services on an OpenSuSE 10.2 based machine with a GNOME Desktop Environment. This environment will remain constant through the series for simplicity. So part of the article will be dedicated to understanding where things are in GNOME 2.16.
The installation of OpenSuSE 10.2 was a fresh install on an older 1.5 GHz processor with roughly 256 MB of RAM. Even on this slower machine, the system was snappy. Since the system will be used primarily as a server environment, the somewhat sluggish GUI is tolerable.
The installation spanned the entire five disks (downloaded from the OpenSuSE Web site). The installation of the full range of tools and packages took some time to complete, but the end result made for a fairly easy setup. I won’t go through the installation of the OS in this article.
First Steps
Much to the chagrin of many Linux users, I am going to log into my SuSE 10.2 machine as root. I don’t do this often but it saves me from having to enter the root password every time I want to perform an administration task. This is okay for setting up a service like httpd, but once you are done setting up said service, log out! But until you do log out, let’s work as root.
The first thing you’ll want to do is to click on the Computer menu.
Now you can start administering Apache. Click on the HTTP Server button to open up the Apache Configuration tool.
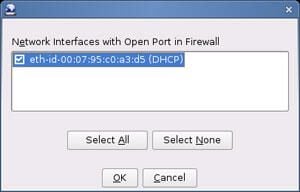
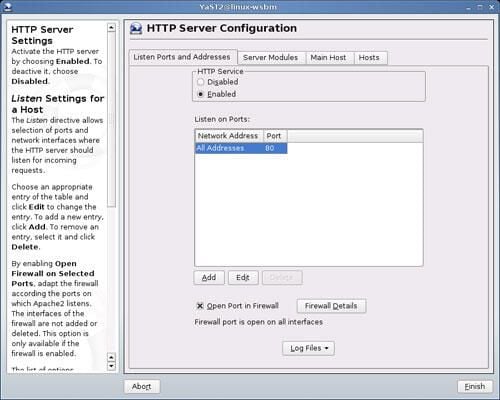
From the main configuration window, you’ll notice a number of options. One of those options is the Firewall Details. By default the http daemon is enabled and the port (80) is open in the firewall. From this screen you can’t do much with editing the firewall, you can only enable or disable the http port. If you click on the Firewall Details button a new window appears that allows you to select the interface assigned to the firewall.
From the main window there are four tabs. The default tab is the Listen Ports and Addresses tab. From this tab you can handle the action above as well as add additional ports for Apache to listen to as well as view access and error logs.
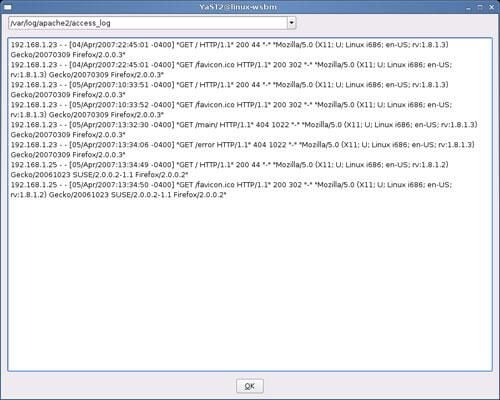
One of the first issues I came to was YaST not reading the access and/or error logs for Apache. By opening up a console and issuing the command less /var/log/apache2/access_log I was able to read the log file. In order to successfully be able to read the Apache log files go back to the YaST Control Center and select Miscellaneous and then View System Log. The View System Log window will open defaulting to /var/log/messages. If you click on the drop-down you will not see the Apache logs listed. What you will need to do is type out /var/log/apache2/access_log and the log will appear.

Server Modules
As well all know, Apache would be fairly useless without modules. Today’s web-site denizens have grown used to a much more robust content than days of old. With that in mind, let’s now take a look at the Server Modules tab within YaST’s Apache2 configuration window.
There are two configurations within this window: toggle a modules status (enable/disable) or add a module. Obviously everyone’s http needs are going to vary, so you’ll have to go through the module listing to decide what you need. If the module isn’t listed, click the Add Module button for a new window allowing you to select from a good number of modules ranging from auth_alias to version. When you add a new module it will be appended to the bottom of the module listing and its status will be enabled.
Once you add a module or change the status of a module you will need to reload Apache2 so the server will be made aware of the new module. To reload the service simply click the Finish button at the bottom right of the YaST window. Once the service is reloaded the YaST window will disappear.
Apache Hosts
The next tab is the Apache Main Host tab. From this window, the servers Apache information is listed (and can be edited). Like all of the YaST GUI tools, this tool edits the httpd.conf file directly. But from this window, that will be made quite obvious. As you can see in Figure I the listing in the GUI window already should look familiar to those of you who have taken a crack at editing an Apache conf file. The good news for those of you who haven’t…this makes it very easy.
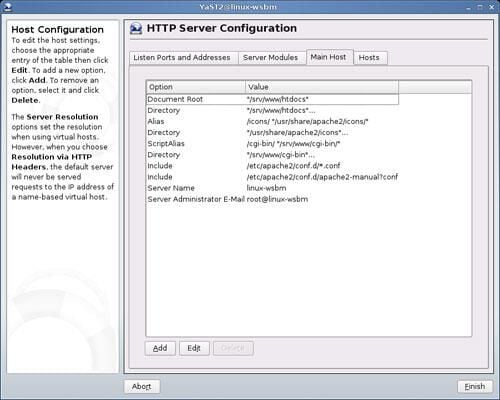
Most of the defaults should work for you. Of course there are special needs where you might have to edit one of the various entries. One entry you will for sure have to edit is the Server Administrator email entry. To do this highlight the entry and click the Edit button, enter the administrators email and click OK.
There is one really cool feature here called Server Resolution. What this enables you to do is set up virtual hosting based on either IP Address or HTTP headers. Let’s set up a virtual site using IP Address routing.
Click on the Add button and a new window with a drop down list will appear. Select Server Resolution and click OK. Now move on to the New Host tab. From in this tab you will then click the Add button and a new window will appear.
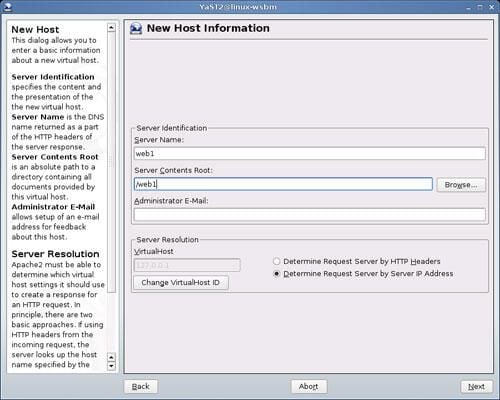
The information necessary is pretty obvious. But you will want to determine how the virtual host will be determined. I opted to determine requests by IP address. Click the appropriate check box and then click the Change VirtualHost ID button. The VirtualHost ID window will allow you to chose one of the IP addresses configured on your machine. If you have only one network attached device you will be given two addresses: the address of the configured device and the loopback address 127.0.0.1. Obviously the loopback address is only going to be good for that machine. That’s not such a bad thing if you are using the virtual host for testing purposes. The one problem you might face is if your firewall will not allow traffic on the loopback device. So we’ll configure ours on the 192.168.1.25 address to avoid the issue.
The next screen contains site-specific details such as CGI Options, SSL support, directory options, and enable public html. Chose the options your virtual site will need and then click Next. You are finally ready to finish the setup. Click finish to apply the changes and restart Apache. Voila! Virtual hosting made GUI.
The last thing you want to do is make sure you actually have an index.html (or some referencing file) in the directory you are hosting your virtual site. Without the index.html file your browser will not find the virtual site.
Final Thoughts
Until recently setting up an Apache server was left for those who knew how to edit .conf files. Fortunately, the gang at Novell (and SuSE of course) have helped the newer Linux fans to set up that web site with as much ease as pointing and clicking. And with a user-friendly GUI in front of the action, things just keep getting easier.

Jack Wallen is an award-winning writer for TechRepublic, The New Stack, and Linux New Media. He's covered a variety of topics for over twenty years and is an avid promoter of open source. For more news about Jack Wallen, visit his website jackwallen.com.


