\n\tThis gallery is also available as a post in the TechRepublic Windows and Office Blog.
\n
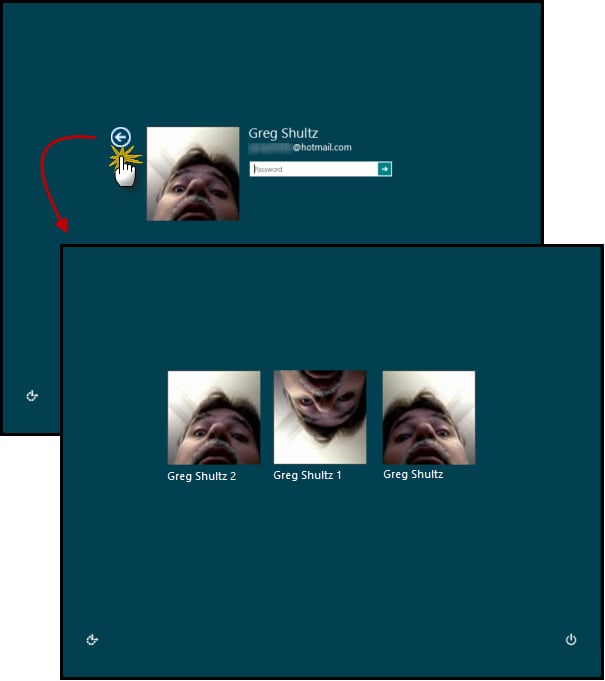
\n\tDo you have multiple accounts set up on your Windows 8 system? If so, then you know that each time that you start your system, the Windows 8 Sign on screen will display the account of the last person to sign on the system. If you want to login as a different user, then you must click the arrow to go back to a Sign on screen that displays all of the available user accounts.
\n
\n\tFor example, on my test system, I have three user accounts. When I start up Windows 8 and get to the Sign on screen, I see the user account that I used last. In this case Greg Shultz. If I want to sign in with one of the other accounts, I must click the arrow next to my account picture. As soon as I do, the Sign on screen will display all of my user accounts. This is illustrated in Figure A.
\n
\n\tWhile this is a simple procedure, I’ve heard quite a few complaints about not being able to immediately see all user accounts on the Sign on screen. They then cite the fact that Windows 7’s Log on screen always displayed all of the available user accounts.
\n
\n\tSo I set out to find a way make Windows 8 show all user accounts on the Sign on screen all the time. At first I thought that it would be as simple as changing a Group Policy or Security Policy setting, but that isn’t the case.
\n
\n\tI then turned to the registry and found a key containing a simple value I could change from a 0 to a 1 that would indeed do the trick. However, I discovered that it would only work once. I could change the registry value, restart the system, and the Sign on screen would show all user accounts. Restart again and the Sign on screen would show only the last used account. This would play out each time I changed the value.
\n
\n\tI then learned that Windows 8 considers that particular registry value to be a system setting and even though you are allowed to change it, the operating system automatically changes it back to the default value as soon as you sign on.
\n
\n\tSince you can change that value without any repercussions, I then set out to find a way to automate the process, such that the value would be changed every time you sign on or sign off. I then recalled a technique that I created for Windows Vista in which I used Task Scheduler to launch UAC restricted programs at startup. The Task Scheduler technique worked! Now, every time that I start Windows 8, the Sign on screen shows all user accounts.
\n
\n\tIn this edition of the Windows Desktop Report, I’ll show you how to implement the full technique from changing the registry value to employing Task Scheduler to automate the procedure. Keep in mind that while automating the procedure is the ultimate goal, I am going to delve into the registry so that you will understand what is happening in the background.
\n
\n\tNote:Keep in mind that the first account that you set up on your Windows 8 system is by default an Administrator account. When you set up additional accounts they will be, by default, set up as Standard user accounts. In order to perform the steps shown in this article, you must be signed in to an account that has Administrator privileges.
\n
\n\tCredit: Images by Greg Shultz for TechRepublic
\n\tEither way that you launch the Registry Editor, you’ll see a User Account Control dialog box and will need to click the Yes button. You’ll then see the Registry Editor.
\n
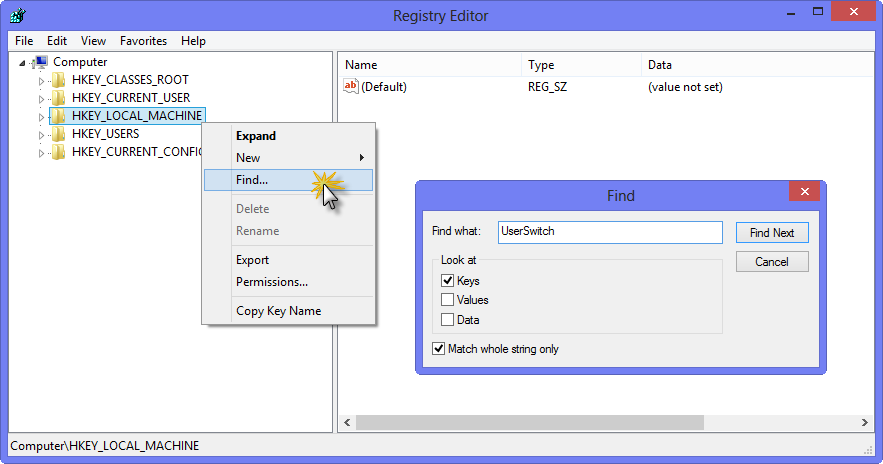
\n\tOnce you have the Registry Editor up and running, locate and right-click on HKEY_LOCAL_MACHINE key and select the Find command. When you see the Find dialog box, type UserSwitch in the text box and make sure that the Keys and the Match whole string only check boxes are selected, as shown in Figure C. To continue, click the Find Next button.
\n
\n\tCredit: Images by Greg Shultz for TechRepublic
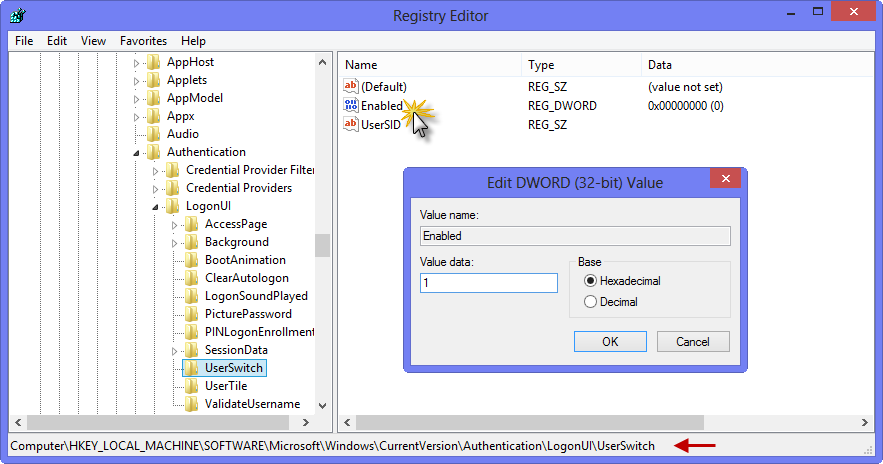
\n\tIn a moment, you will arrive at the HKEY_LOCAL_MACHINE\\SOFTWARE\\Microsoft\\Windows\\CurrentVersion\\Authentication\\LogonUI\\UserSwitchkey. (Check the Status bar to be sure.) You will now see the Enabled value in the UserSwitch key and notice that it is set to 0. Just double-click the Enable value and change the Value data to a 1. This process is illustrated in Figure D.
\n
\n\tTo continue, click OK and then close the Registry Editor. If you now restart your system, you will see that the Sign on screen displays all the available user accounts. However, if you sign in to an account and then restart your system again, you’ll see that the Sign on screen will now show only the last used account.
\n
\n\tCredit: Images by Greg Shultz for TechRepublic
\n
\n\tTo configure the system so that the sign on screen always shows all user accounts, you can automate the procedure of changing the Enabled value in the registry. Automating the procedure requires two steps: creating a good old fashioned batch file and then creating a task in Task Scheduler that runs the batch file.
\n
\n\tThe batch file that will launch the Reg.exe command along with a set of parameters that will perform the same registry edit shown above – change the UserSwitch\\Enabled value from a 0 to a 1. You will configure the task so that it will run that batch file whenever any user signs into Windows 8.
\n
\n
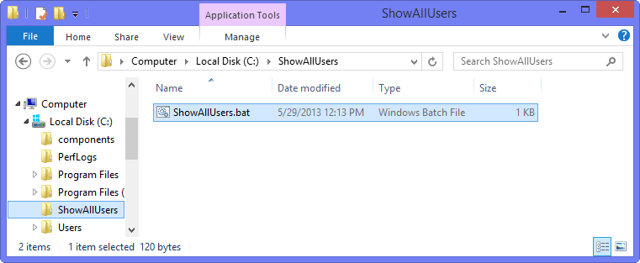
\n\tTo make the batch file accessible regardless of who is signing in to the system, I created a folder called ShowAllUsers in the root directory of drive C and then saved my batch file there, as shown in Figure E.
\n
\n\tCredit: Images by Greg Shultz for TechRepublic

\n\tTo create the batch file, just open Notepad and type the command line as shown in Figure F. Then save the file as ShowAllUsers.bat in the C:\\ShowAllUsers folder. Let’s take a closer look and the parameters in the command line.
\n
\n\t
\n\t
\n\t
\n\t
\n\t
\n
\n
\n\tCredit: Images by Greg Shultz for TechRepublic
\n
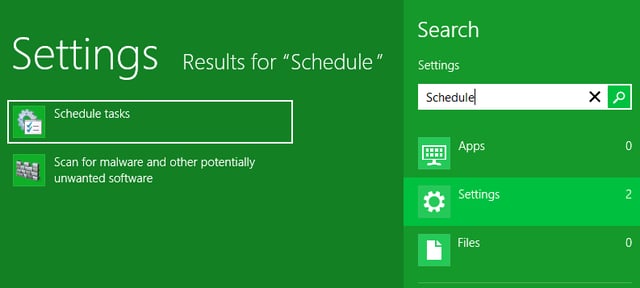
\n\tNow that you have the batch file created, you can create a task that will run it. To launch the Task Scheduler in Windows 8, use the [Windows] + W keystroke to access the Search Settings page. Then, type Schedule in the text box and click Schedule tasks, as shown in Figure G.
\n
\n\tCredit: Images by Greg Shultz for TechRepublic
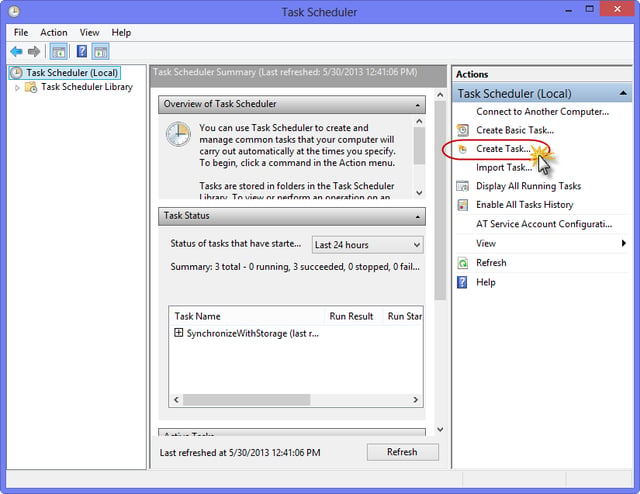
\n\tIn a moment, you’ll see the Task Scheduler window and will select Create Task item in the Actions panel, as shown in Figure H. When the Create Task dialog box appears, you’ll see that it has six tabs.
\n
\n\tCredit: Images by Greg Shultz for TechRepublic
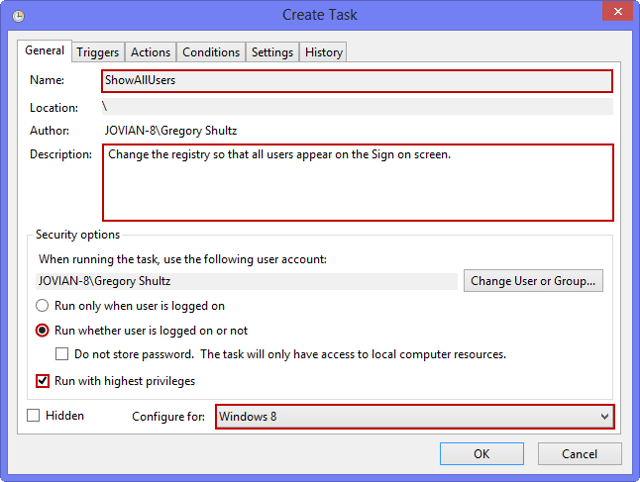
\n\tOn the General tab, you’ll assign the task a name in the Name box and type a description in the Description box. You’ll then move down to the Security options panel and select the Run whether user is logged on or not option and then select the Run with highest privileges check box. Next, select Windows 8 from the Configure for drop down menu. Your General tab should look like the one shown in Figure I.
\n
\n\tCredit: Images by Greg Shultz for TechRepublic

\n\tThe reason that you select the the Run whether user is logged on or not option is so this task will run for every user that signs on to the system. And, the reason that you select the Run with highest privileges check box is so that task will run for every user regardless of whether their account is set up with administrator or standard user privileges.
\n
\n\tNext, you’ll need to configure a Trigger. To do so, select the Triggers tab and then click the New button. When you see the New Trigger dialog box, select At log on from the Begin the task drop down menu and then select the Any user option. Leave all the other settings as they are. Your New Trigger dialog box should look like the one shown in Figure J.
\n
\n\tCredit: Images by Greg Shultz for TechRepublic
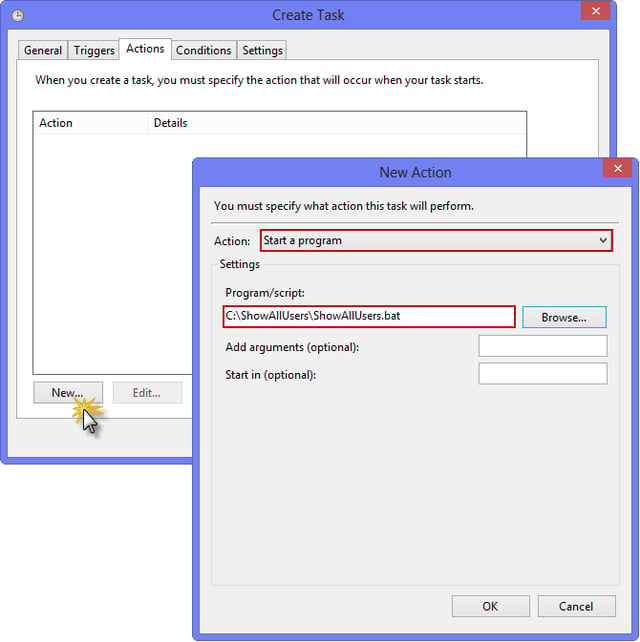
\n\tTo continue, click OK to close the New Trigger dialog box, select the Actions tab, and then select the New button. When you see the New Action dialog box, select Start a program from the Action drop down menu. Then in the Settings panel click the Browse button and locate the ShowAllUsers.bat file in the C:\\ShowAllUsers folder. Your New Action dialog box should look like the one shown in Figure K.
\n
\n\tCredit: Images by Greg Shultz for TechRepublic

\n\tTo continue, click OK to close the New Action dialog box. You don’t need to configure any settings on the Conditions or Settings tabs, so just click OK to close the Create Task dialog box. When you do, you’ll see a dialog box that prompts you to enter your password, as shown in Figure L. Entering your password will allow the settings you chose in the Security options panel on the General tab to function for all users.
\n
\n\tCredit: Images by Greg Shultz for TechRepublic
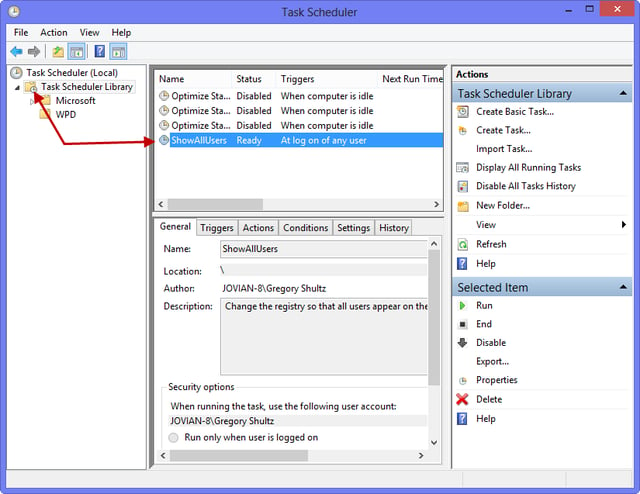
\n\tWhen you return to the Task Scheduler window, you can select Task Scheduler Library from the Console Tree and will find that the ShowAllUsers task is ready to run, as shown in Figure M. At this point you can close Task Scheduler.
\n
\n\tTo test your new task, just restart your system. When you do, you will see that all user accounts are displayed on the Sign on screen. Keep in mind that if you did not manually make the change to the registry that I showed you in the Edit the registry section above, you will need to sign in at least once before the Sign in screen will show all users.
\n
\n
\n\tIf you have multiple accounts set up on your Windows 8 system, chances are that you would like to have the Sign on screen show all user accounts rather than just the immediately displaying the last user account that was signed on to the system. In this article, I’ve shown you how to accomplish this with an automated procedure. Are you likely to use this procedure on your Windows 8 system? As always, if you have comments or information to share about this topic, please take a moment to drop by the TechRepublic Community Forums and let us hear from you.
\n
\n
\n\t
\n\t
\n
\n
\n\tCredit: Images by Greg Shultz for TechRepublic

My first computer was a Kaypro 16 \"luggable\" running MS-DOS 2.11 which I obtained while studying computer science in 1986. After two years, I discovered that I had a knack for writing documentation and shifted my focus over to technical writing.


