\n\tThis screenshot gallery is also available as a post in the TechRepublic Windows and Office Blog.
\n
\n\tIn the article Add a Shutdown menu to the Windows 8 desktop, I showed you how to add a Shutdown menu to the taskbar. While that technique works fine, I have never really been satisfied with it because the menu takes up so much space on the taskbar for something that I use so infrequently. Well, I was recently poking around on the Microsoft MSDN site and found a lot of information about working with context menus by editing the registry. Along the way, I learned how to add cascading menus to a context menu, such as the one you encounter when you right click on the desktop. That got me thinking about the possibility of adding the Shut Down menu to the Desktop context menu.
\n
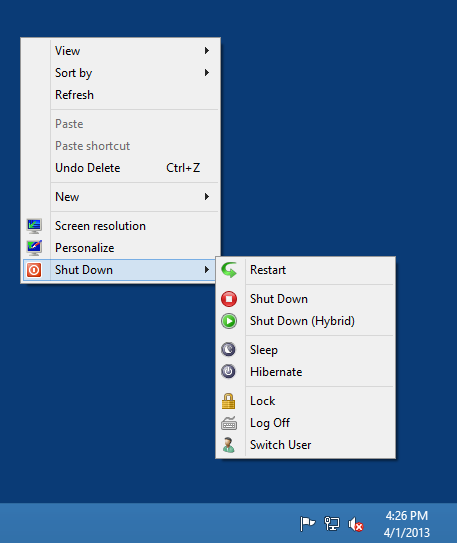
\n\tAfter a bit of experimentation, I was able to figure out how to make it work in Windows 8 and developed the Shut Down menu shown in Figure A.
\n
\n\tAs you can see, I went full bore and added every possible option to my Shut Down menu. I then grouped the options into functional categories, added separators to delineate the categories, and even included appropriate icons.
\n
\n\tAfter I was finished with my creation I showed it to several colleagues. While the overall consensus was that it was a great technique, a couple folks mentioned that they wouldn’t have used all of the options, and one guy said that he thought that the icons were overkill. All valuable input.
\n
\n\tCredit: Images by Greg Shultz for TechRepublic
\n\tSo as I was creating my article outline I decided to take into account that there would be folks who would want the whole menu as I have created it and there would be folks who would like to be able to customize the menu to their own liking. For the former, I have created a REG file that can be used to instantaneously add my full Shut Down menu to your Windows 8 system. For the latter group of folks, I’ll walk you, step-by-step, through the process of editing the registry to manually add the Shut Down menu to your Windows 8 system. Even if you opt to use the REG file method, I encourage you to read through the manual steps in case you later decide that you want customize the menu.
\n
\n
\n
\n\tBefore you begin, keep in mind that the Registry is vital to the operating system and changing it can be dangerous if you inadvertently make a mistake. As such, you should take a time to back up your system by creating a system image as I showed you in Restore Windows 8 with System Image Recovery. That way if anything goes awry, you can restore your system and get right back to work.
\n
\n
\n\tBefore we get started let’s take a generalized look at the procedure that we’ll be performing as we create a custom Shut Down menu on Windows 8’s Desktop context menu. To make this happen, we’ll be working in two different sections of the registry.
\n
\n\tYou’ll go to the HKEY_CLASSES_ROOT\\DesktopBackground\\Shell key and create a new subkey called Shut Down. You’ll then add several entries to this new subkey to configure it as a cascading menu on the Desktop’s context menu. Essentially, this new subkey will create an outline of the cascading menu.
\n
\n\tYou’ll then go to the HKEY_LOCAL_MACHINE\\SOFTWARE\\Microsoft\\Windows\\CurrentVersion\\Explorer\\CommandStore\\shell subkey. Here, you’ll define entries containing the command lines for each item that you want to add to the Shut Down menu.
\n
\n\tAs you may know, the registry in the Windows operating system is huge and navigating in it can be tricky. To make navigation easier, I’ll show you how to use two features in the Registry Editor: Find and Favorites. With this in mind, let’s jump in.
\n
\n
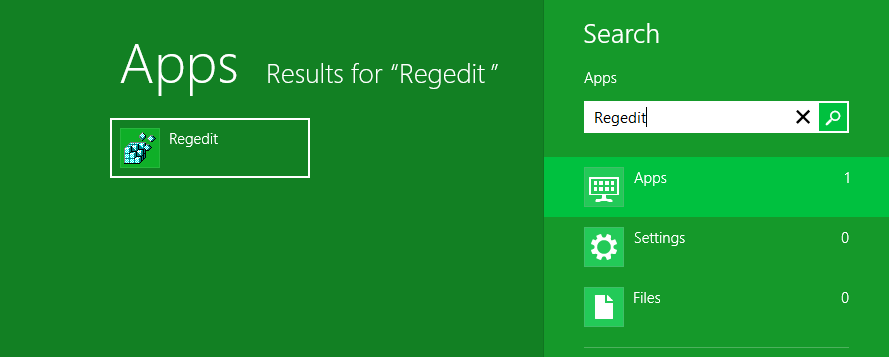
\n\tTo launch the Registry Editor in Windows 8, use the [Windows] + Q keystroke to access the Apps Search Settings page. Then, type Regedit in the text box and click Regedit.exe, as shown in Figure B. If you prefer, you can use the [Windows] + R keystroke to bring up the Run dialog box. Then, type Regedit in the Open text box and click OK.
\n
\n\tEither way that you launch the Registry Editor, you’ll see a User Account Control dialog box and will need to click the Yes button. You’ll then see the Registry Editor.
\n
\n\tCredit: Images by Greg Shultz for TechRepublic
\n
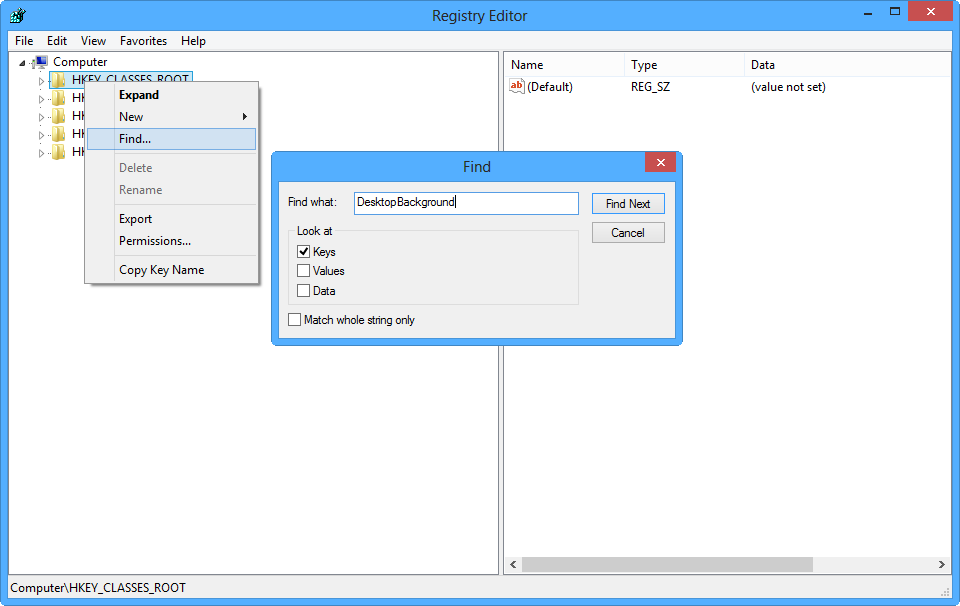
\n\tOnce you have the Registry Editor up and running, locate and right-click on HKEY_CLASSES_ROOT key and select the Find command. When you see the Find dialog box, type DesktopBackground in the text box and make sure that only the Keys check box is selected, as shown in Figure C. To continue, click the Find Next button.
\n
\n\tCredit: Images by Greg Shultz for TechRepublic
\n\tWhen you arrive at the HKEY_CLASSES_ROOT\\DesktopBackground key, double click on it to expand its tree. Then, double click on the Shell key to expand its tree. Now, pull down the Favorites menu, select the Add to Favorites command, type DesktopBackground in the text box, and click OK. Now, you can get back to the DesktopBackground key from the Favorites menu any time you need to while you are creating your cascading menu.
\n
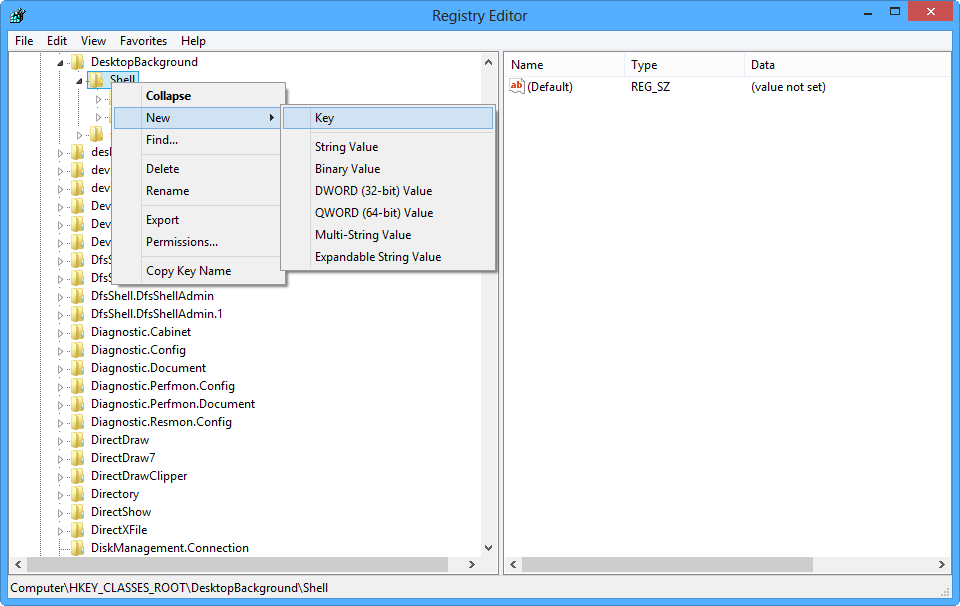
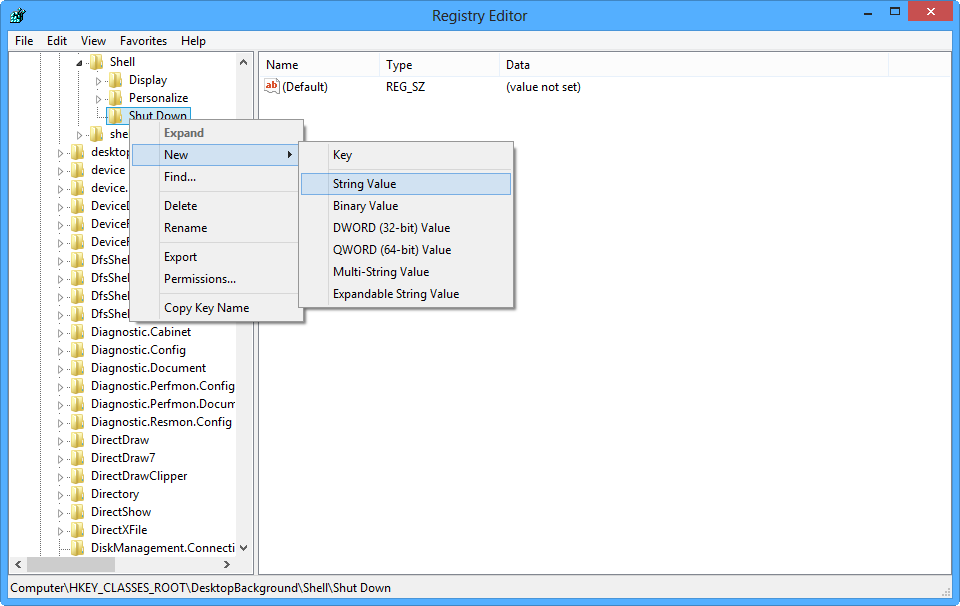
\n\tTo continue, right-click on the Shell key and then select the New | Key command as shown in Figure D. When you see the new key appear, name it Shut Down.
\n
\n\tCredit: Images by Greg Shultz for TechRepublic
\n\tAfter you create the Shut Down key, select it, and you’ll see that it contains a single string value called Default. Just leave that key as it is. To create the outline of the cascading menu, you’ll add four more string values to the Shut Down key. The Value name and Value data that you’ll add are listed in Table A.
\n
\n
| \n\t\t\t\t
\n\t\t\t\t\tValue name \n\t\t\t |
\n\t\t\t\t
\n\t\t\t\t\tValue data \n\t\t\t |
| \n\t\t\t\t
\n\t\t\t\t\tIcon \n\t\t\t |
\n\t\t\t\t
\n\t\t\t\t\tshell32.dll,215 \n\t\t\t |
| \n\t\t\t\t
\n\t\t\t\t\tMUIVerb \n\t\t\t |
\n\t\t\t\t
\n\t\t\t\t\tShut Down \n\t\t\t |
| \n\t\t\t\t
\n\t\t\t\t\tPosition \n\t\t\t |
\n\t\t\t\t
\n\t\t\t\t\tbottom \n\t\t\t |
| \n\t\t\t\t
\n\t\t\t\t\tSubCommands \n\t\t\t |
\n\t\t\t\t
\n\t\t\t\t\trestart;|;shutdown;hybridshutdown;|;sleep;hibernate;|;lock;logoff;switch \n\t\t\t |
\n
\n\tLet’s take a closer look at these string values. As we do, look back at the Shut Down cascading menu shown in Figure A. Obviously, the Icon value specifies which icon to use – the icon is in position 215 in the Shell32.dll file. Note that there are no blank spaces in this line and the items are separated by a coma. The MUIVerb value specifies the name to assign to the menu. The Position value, which is set to bottom, specifies that the new menu should appear at the bottom on the Desktop context menu.
\n
\n\tThe SubCommands value is a bit more elaborate. This line creates the outline for the cascading menu or more specifically specifies the order in which the items will appear on the menu. As you can see, there are no blank spaces in this line and each item is separated by a semicolon. The pipe symbols are used to insert separators in the menu. Also keep in mind that the items on this line refer to the keys in the CommandStore key not on the menu itself, which is why they are in lowercase and don’t match the names shown on the menu. (We’ll add these keys to the CommandStore key in the next section.)
\n
\n\tYou can customize your menu by changing the icon, using a different name for the menu, changing the position, or by eliminating some of the items from the SubCommands string.
\n
\n\tNow, to add each of these string values to the Shut Down key, right click on the Shut Down key and select the New | String Value command, as shown in Figure E. In the case of the first string value, when you see the new string value appear, name it Icon.
\n
\n\tCredit: Images by Greg Shultz for TechRepublic
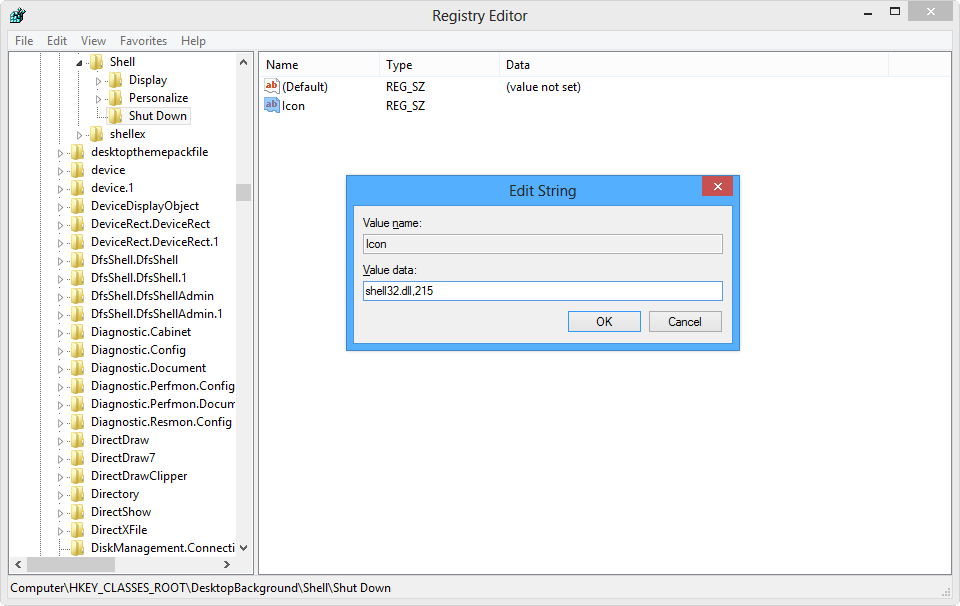
\n\tThen double click the Icon value. When the Edit String dialog box appears, type shell32.dll,215 in the Value data text box, as shown in Figure F. Then click OK.
\n
\n\tCredit: Images by Greg Shultz for TechRepublic
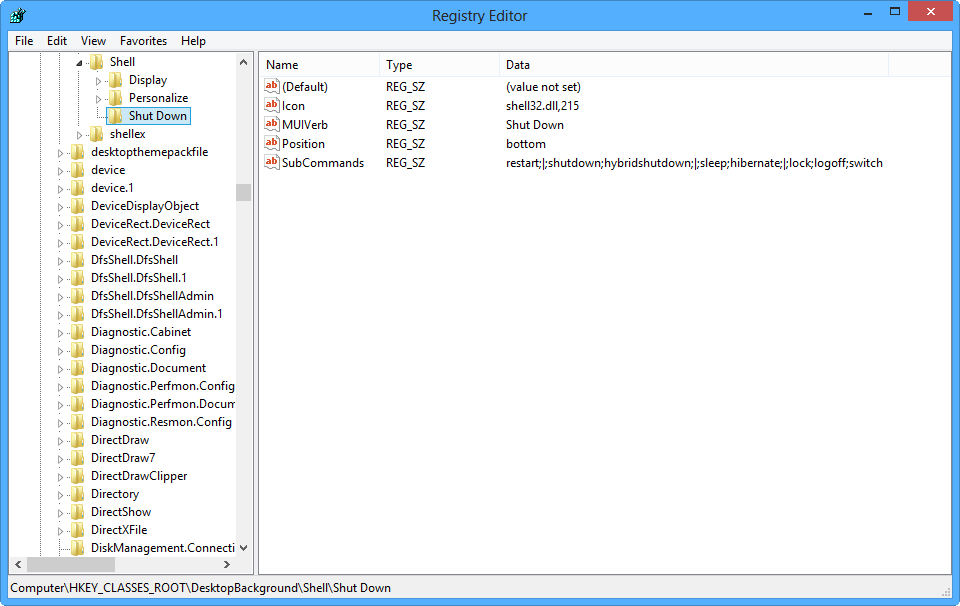
\n\tRepeat these steps to add the other three string values listed in Table A. When you are done, your Shut Down key should look like the one shown in Figure G.
\n
\n\tCredit: Images by Greg Shultz for TechRepublic
\n
\n\tNow that we have created our cascading menu structure, we’ll add the commands for each item on the menu. If you have chosen to eliminate some of the items from the SubCommands string above, you’ll adjust your steps accordingly.
\n
\n\tTo begin this portion of the technique, locate and right-click on HKEY_LOCAL_MACHINE key and select the Find command. When you see the Find dialog box, type CommandStore in the text box, make sure that only the Keys check box is selected, and then click the Find next button.
\n
\n\tWhen you arrive at the HKEY_LOCAL_MACHINE\\CommandStore key, double click on it to expand its tree. Then, double click on the shell key to expand its tree. Now, pull down the Favorites menu, select the Add to Favorites command, type CommandStore in the text box, and click OK. Now, you can get back to the CommandStore key from the Favorites menu any time you need to while you are creating your cascading menu.
\n
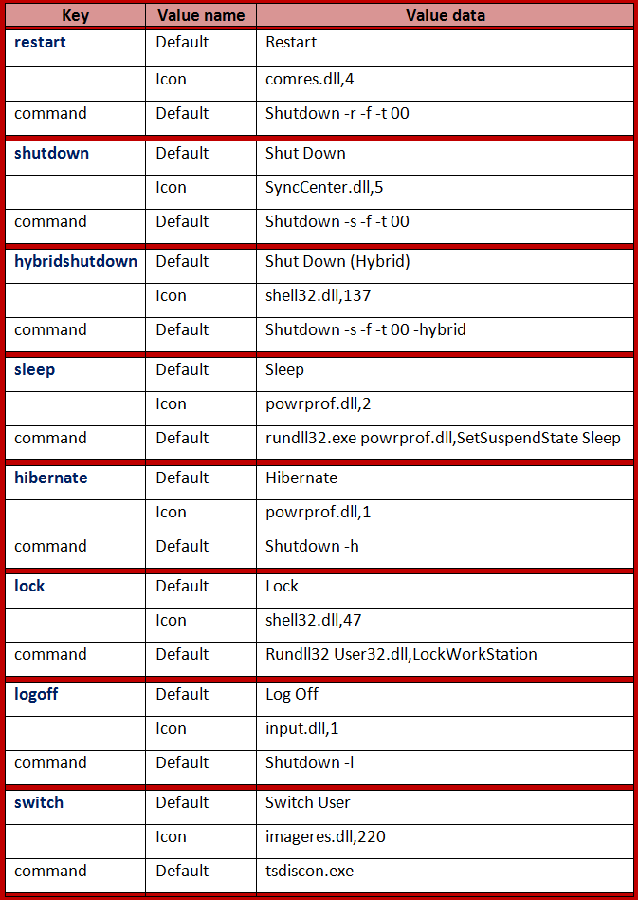
\n\tAt this point, you are going to add two keys to the shell key for each one of the commands that you want to appear on your menu. The first key will be a name from the SubCommands value in the Shut Down key. Inside this first key, you’ll then add two string values: Default and Icon. Below the first key, you’ll add a subkey named command. Inside this key, you’ll add one string value: Default. The keys that you will create and the string values that you will add are shown in table in Figure H. I know that this may sound confusing at first, but bear with me and it will become clearer as we work through an example.
\n
\n\tCredit: Images by Greg Shultz for TechRepublic
\n\tAs you can see, to make it easier to decipher the contents of this table, I’ve separated each set of keys and string values for each command you could add to the menu. The main key is in blue and a red border separates each key. Just add the keys that you specified earlier in the SubCommands value in the Shut Down key. If you decide that you don’t want to include the icons on your menu, simply omit the Icon string value.
\n
\n\tLet’s begin by creating the restart key. To do so, right-click on the shell key and select the New | Key command. When you see the new key appear, name it restart. This key name must be all lowercase!
\n
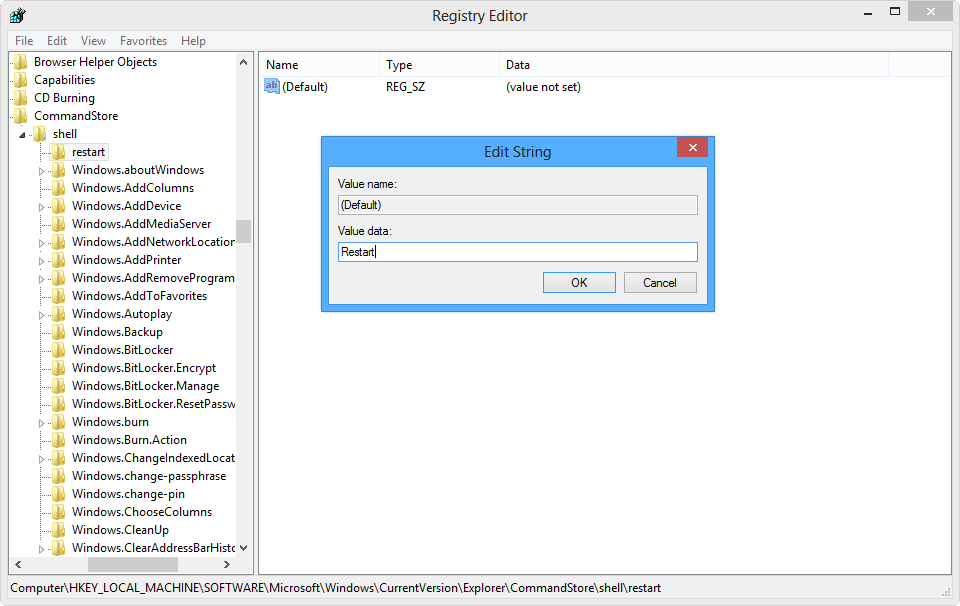
\n\tAfter you create the restart key, select it and you’ll see that it contains a single String Value called Default. Now, double click the Default value. When you see the Edit String dialog box, type Restart in the Value data text box, as shown in Figure I. Then click OK.
\n
\n\tCredit: Images by Greg Shultz for TechRepublic
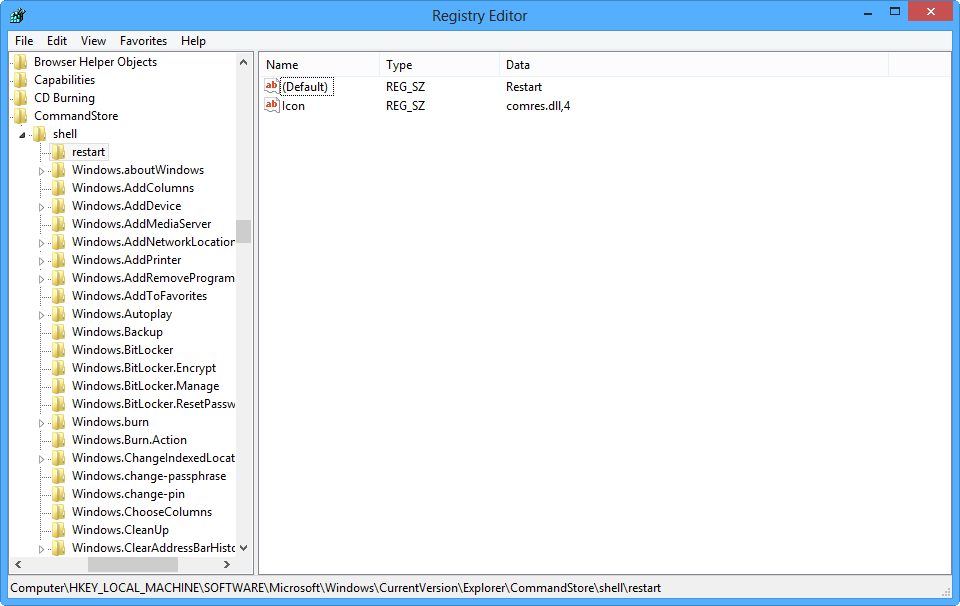
\n\tNow, right click on the restart key and select the New | String command. When you see the new string appear, name it Icon. Next, double click the Icon value. When you see the Edit String dialog box, type comres.dll,4 in the Value data text box and click OK. When you do, your restart key will look like the one in Figure J.
\n
\n\tCredit: Images by Greg Shultz for TechRepublic
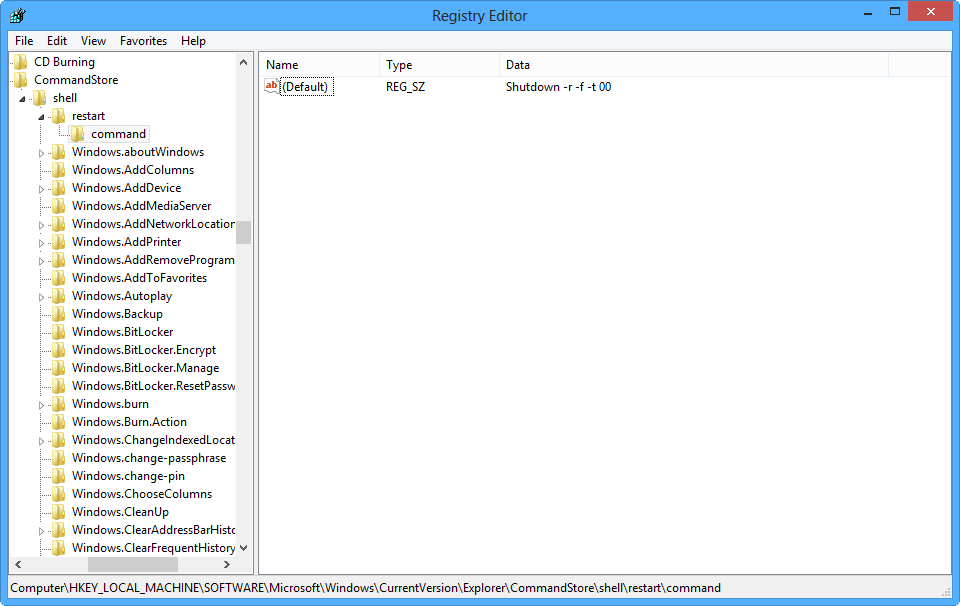
\n\tNow that you have created the Default and Icon string values in the restart key, you’ll need to add the command key. To do so, right click on the restart key and select the New | Key command. When you see the new key appear, name it command. This key name must be all lowercase! Now, double click the Default value inside the command key. When you see the Edit String dialog box, type Shutdown -r -f -t 00 in the Value data text box and click OK. When you do, your command key will look like the one in Figure K.
\n
\n\tCredit: Images by Greg Shultz for TechRepublic
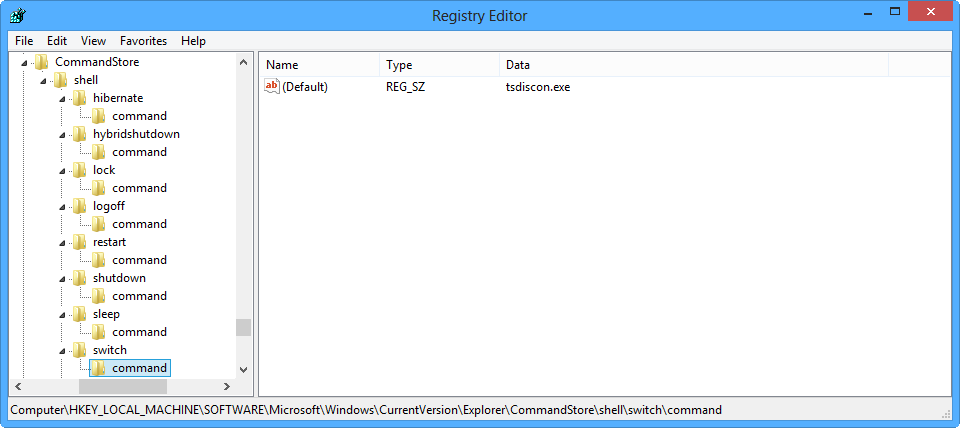
\n\tNow, you can repeat these steps and use the information in the table in Figure H to add any of the other commands that you want to put on your custom Shut Down menu. When you are done, your CommandStore\\shell key will look something like the one shown in Figure L. This screen shot shows the structure after adding each of the commands to the CommandStore\\shell key.
\n
\n\tCredit: Images by Greg Shultz for TechRepublic
\n\t
\n
\n
\n\tAs I mentioned, I created a REG file that can be used to instantaneously add my full Shut Down menu to your Windows 8 system. In addition, I have created a second REG file that will instantaneously remove the full Shut Down menu from your Windows 8 system. You can download both these files in the linked zip file. The files are named AddShutDownMenu.txt and RemoveShutDownMenu.txt. When you want to use them, you’ll need to rename the file extension from .txt to .reg.
\n
\n\tWhen you are ready to add the Shut Down menu to your Windows 8 system, just double click the AddShutDownMenu.reg file. When you do, you’ll see a UAC like the one shown in Figure M. Just go ahead and click Yes.
\n
\n\tCredit: Images by Greg Shultz for TechRepublic

\n\tYou’ll then be prompted to confirm that you want to allow the Reg file to update the registry, as shown in Figure N. Again, just go ahead and click Yes.
\n
\n\tCredit: Images by Greg Shultz for TechRepublic
\n\tOnce the changes have been added to the registry, you’ll see one more confirmation dialog box, shown in Figure O. Just click OK and you’ll be able to use the options on your new Shut Down menu.
\n
\n\tCredit: Images by Greg Shultz for TechRepublic
\n
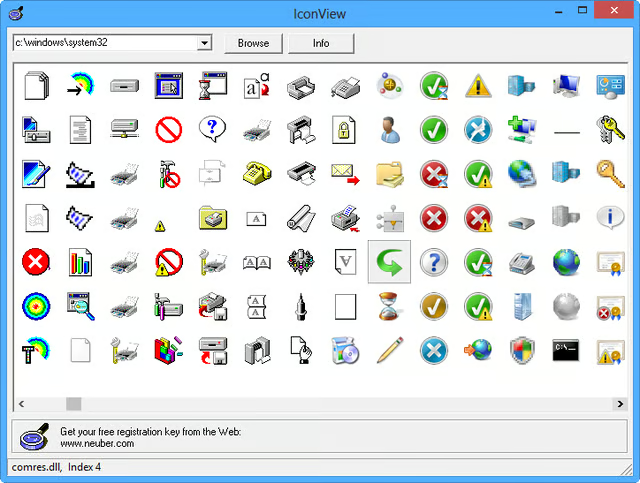
\n\tTo be able to find icons and determine their positions, I downloaded a very simple, standalone program called IconView, shown in Figure P, from Neuber Software. The program is Free and perfectly performs the task at hand.
\n
\n
\n\tWhat do you think about creating a Shut Down menu on Windows 8’s Desktop context menu? Will you try it? As always, if you have comments or information to share about this topic, please take a moment to drop by the TechRepublic Community Forums and let us hear from you.
\n
\n
\n\t
\n\t
\n
\n
\n\tCredit: Images by Greg Shultz for TechRepublic

My first computer was a Kaypro 16 \"luggable\" running MS-DOS 2.11 which I obtained while studying computer science in 1986. After two years, I discovered that I had a knack for writing documentation and shifted my focus over to technical writing.


