\n\tDo you have a video card along with a widescreen LCD monitor that has a native resolution that is so high that text and other graphical elements, such as icons, appear small? If so, chances are that you’ve lowered the resolution a couple of notches to make a bit easier to see. However, doing so isn’t an ideal solution because most of these setups don’t look all that great when configured at a setting that is lower than the LCD’s native resolution.
\n
\n\tFortunately, with Windows 7’s DPI Scaling tool, you can use your widescreen monitor at its native resolution and still make the text more easily readable and other graphical elements larger. In this edition of the Windows Desktop Report, I’ll show you how to get a better view by taking advantage of the DPI Scaling tool.
\n
\n
\n\tDPI stands for Dots Per Inch and is a measurement of resolution. While DPI is a more appropriate measurement for printing and PPI, which stands for Pixels Per Inch, is a more appropriate measurement for monitors, DPI is the more commonly used term.
\n
\n\tIn the case of monitors, DPI refers to the number of pixels present per inch of the screen. Of course, it is more common to think of monitors as having a screen resolution. For example, a screen resolution of 800 x 600 is made up of 480,000 pixels while a screen resolution of 1280 x 1024 is made up of 1.3 million pixels. Of course, the higher resolution renders a much better image than a lower resolution, but since the number of pixels per inch of screen is greater, graphical elements such as fonts or icons tend to be smaller.
\n
\n\tThe default DPI scale setting in Windows 7 is 96 DPI and it is an old standard. While this setting has served us well for a number of years, the higher resolutions now supported by widescreen monitors mean that the default setting of 96 DPI may not be an optimal setting. Widescreen monitors typically have a native pixel density of 120 DPI and 144 DPI.
\n
\n\tTo overcome this problem, Windows 7’s DPI Scaling tool will allow you to bump up the size of text and other graphical elements, like icons, so that they better fit the native DPI on widescreen monitors while retaining their higher resolution clarity.
\n
\n
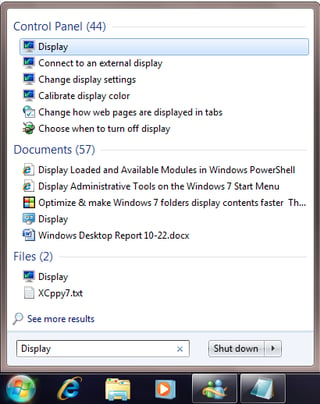
\n\tTo change the DPI Scaling setting, click the Start button, type Display in the Search box, and choose Display in the Control Panel section of the results, as shown.
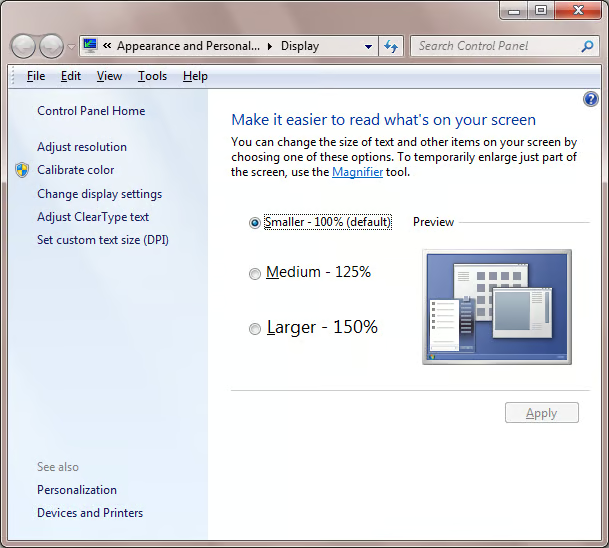
\n\tOnce you see the Display screen, you’ll notice that the default setting is at Smaller – 100%. You’ll also notice that there is a Preview image showing an approximation of how the screen looks at each one of the available settings.
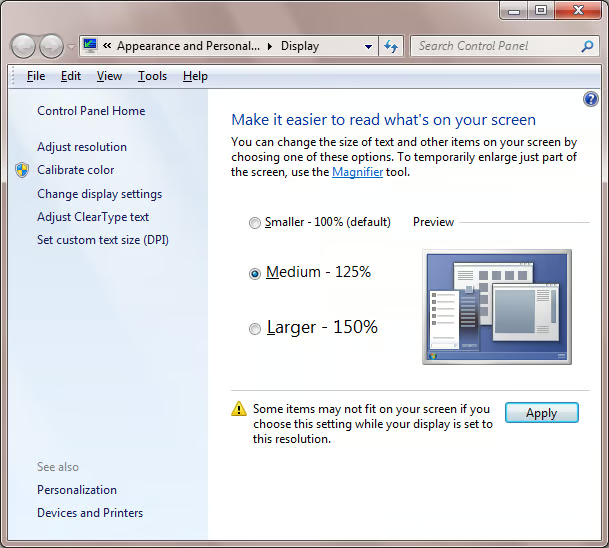
\n\tYou can select the Medium – 125% button to move up to 120 DPI or you can select the Larger – 150% button to boost the DPI to 144 DPI. The one that you select will depend on your video card and wide screen monitor. When you select a higher DPI scale, you’ll see a warning message appear at the bottom of the screen, as shown. Don’t worry though, if you don’t like it, you can easily change it back. When you click Apply, you’ll be prompted to log off and will have to log back on before the new DPI setting will take effect.
\n
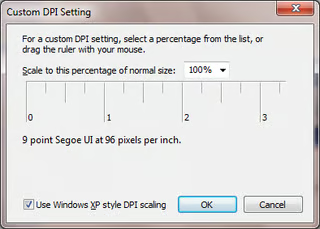
\n\tIf one of the available DPI settings doesn’t yield satisfactory results or if you just want to experiment a little, you can click Set custom text size (DPI). When you do, you’ll see the Custom DPI Setting dialog box, as shown.
\n
\n\tThere are several ways that you can create a custom DPI setting. First, you can use click the drop down arrow and select one of the preset percentages from the list, you can type a percentage value in the text box, or you can click and drag the ruler to increase the DPI to whatever percentage that you want. As you can see the default setting is 100% which is 96 DPI. At the bottom of the ruler you’ll see some example text that shows you what the 9-point Segoe UI font will look like at 96 pixels per inch – which essentially is 96 DPI. Table A lists all of the preset percentages in the drop down list and the accompanying DPI setting.
\n
\n
| \n\t\t\t\t
\n\t\t\t\t\tPercentage \n\t\t\t |
\n\t\t\t\t
\n\t\t\t\t\tDPI Setting \n\t\t\t |
| \n\t\t\t\t
\n\t\t\t\t\t100 \n\t\t\t |
\n\t\t\t\t
\n\t\t\t\t\t96 \n\t\t\t |
| \n\t\t\t\t
\n\t\t\t\t\t125 \n\t\t\t |
\n\t\t\t\t
\n\t\t\t\t\t120 \n\t\t\t |
| \n\t\t\t\t
\n\t\t\t\t\t150 \n\t\t\t |
\n\t\t\t\t
\n\t\t\t\t\t144 \n\t\t\t |
| \n\t\t\t\t
\n\t\t\t\t\t200 \n\t\t\t |
\n\t\t\t\t
\n\t\t\t\t\t192 \n\t\t\t |
\n
\n\tIt’s a good idea to give a couple of the preset percentages a try before you begin using the ruler method. Doing so will allow you to determine a baseline that you can then use to set your custom percentage.
\n
\n\tTo use the ruler method, just click on the number 1 and drag to the right. As you do, you’ll see the percentage increase and the example text changes to keep pace with the increase.
\n
\n\tKeep in mind that if you use a DPI setting higher than 96, the text and other graphical items in programs that are not designed to work with the DPI scaling engine might appear blurry. To compensate for those types of programs, Windows 7 incorporates a backward compatible DPI scaling feature that will kick in when you run those programs. As such, it is advisable that you leave the Windows XP style DPI scaling check box selected.

\n\tWhen you click OK, you’ll return to the main screen and you will see your custom setting. As I mentioned earlier, when you click Apply, you’ll be prompted to log off and will have to log back on before the new DPI setting will take effect.

My first computer was a Kaypro 16 \"luggable\" running MS-DOS 2.11 which I obtained while studying computer science in 1986. After two years, I discovered that I had a knack for writing documentation and shifted my focus over to technical writing.


