\n\tIn this edition of the Windows Desktop Report, Greg Shultz shows you how to create your own Classic Start Menu in Microsoft Windows 7 right alongside of the operating system’s new Start Menu.
\n\t
\n\tIn order to create your own Classic Start Menu in Windows 7, you’ll use the Toolbar feature. As you know, this feature has been a part of the Windows operating system for a long time and allows you to create Toolbars right on the Taskbar.
\n\t
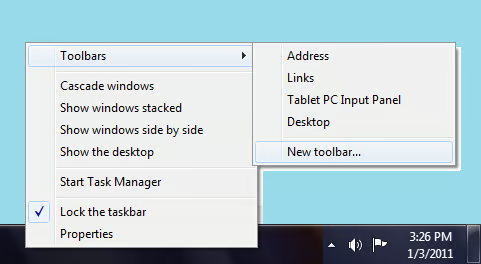
\n\tTo begin, right click an empty spot on the Taskbar, hover over Toolbars, and select the New Toolbar command, as shown. (Take note of the Lock the taskbar command, you’ll need to use it in the next step.)
\n\t
\n\tThis Slideshow Gallery is also available as an entry in the Windows Blog and in the PDF format as a TechRepublic Download. It was originally published January 2011.
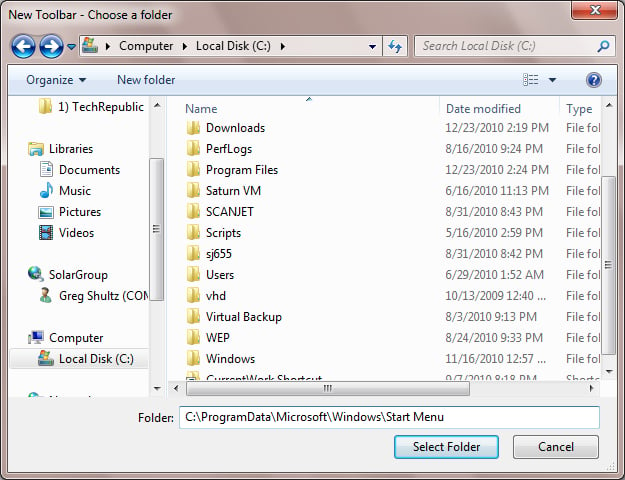
When you see the New Toolbar – Choose a folder dialog box; type the following path in the Folder text box.
C:\\ProgramData\\Microsoft\\Windows\\Start Menu
This Slideshow Gallery is also available as an entry in the Windows Blog and in the PDF format as a TechRepublic Download.

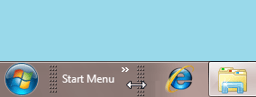
To continue, click the Select Folder button. You will then see the Start Menu Toolbar appear next to the Notification Area.
This Slideshow Gallery is also available as an entry in the Windows Blog and in the PDF format as a TechRepublic Download.

Now that you have created the Start Menu Toolbar, you’ll want to move it next to Windows 7’s Start button. To do so, right click on the Taskbar and select Lock the taskbar to remove the check mark. Once the Taskbar is unlocked, hover your mouse pointer over the Toolbar handle, just to the left of the S in Start Menu. When the pointer turns into a double headed arrow, just click and drag the Toolbar handle over towards to the Start button. As you do, drag the handle slightly under or over the icons on the Taskbar in order to get the Start Menu Toolbar to its new position.
This Slideshow Gallery is also available as an entry in the Windows Blog and in the PDF format as a TechRepublic Download.
When you position it, you’ll see all the folders inside of the Start Menu folder. To hide them, click and drag the Taskbar handle, just to the right of the u in Menu, to the left to cover up those folders.
This Slideshow Gallery is also available as an entry in the Windows Blog and in the PDF format as a TechRepublic Download.
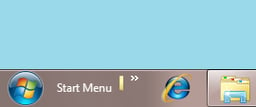
Now, right click on the Taskbar and select the Lock the taskbar command. When you do, you’ll see a slight side effect – just an edge of the folder icon appears. However, it is nothing to worry about.
This Slideshow Gallery is also available as an entry in the Windows Blog and in the PDF format as a TechRepublic Download.
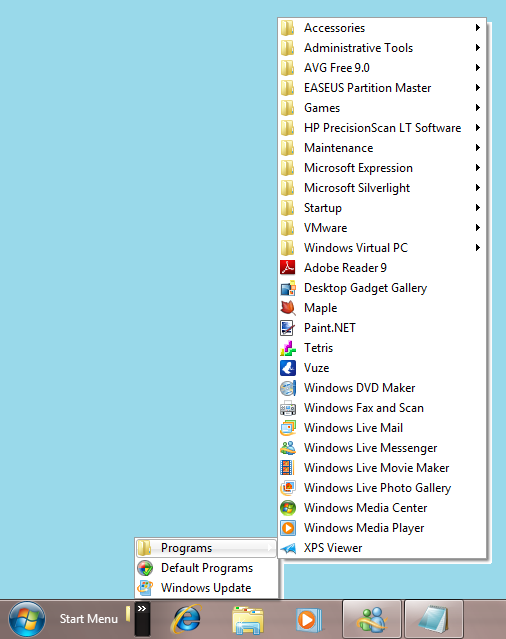
At this point, your Classic Start Menu contains the Programs menu and links to Default Programs and Windows Update.
In Beltchev’s Classic Shell, the Classic Start Menu contains these links as well as links to Documents, Settings, Search, Help and Support, Run, and Shutdown. Fortunately, you can populate your Classic Start Menu with all these links. To do so, you will need to create shortcuts on your desktop and then move them to the C:\\ProgramData\\Microsoft\\Windows\\Start Menu folder. Let’s take a closer look.
This Slideshow Gallery is also available as an entry in the Windows Blog and in the PDF format as a TechRepublic Download.
To begin, launch Windows Explorer and navigate to the C:\\ProgramData\\Microsoft\\Windows\\Start Menu folder. This folder is a special system folder and as such, you will not be able to create your shortcuts in it. So, minimize that window so you have access to the desktop.
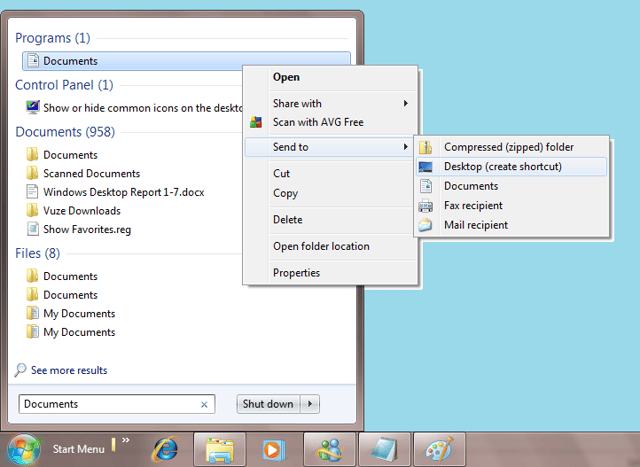
Documents – To create a shortcut to Documents, click the Windows 7 Start button, type Documents in the Search box, and when Documents appears in the results list, right click it. Then, select Send to | Desktop (create shortcut) command.
This Slideshow Gallery is also available as an entry in the Windows Blog and in the PDF format as a TechRepublic Download.
Control Panel – To create a shortcut to the Control Panel, click the Windows 7 Start button and this time, type Control Panel in the Search box. Then follow the above steps to create a shortcut on the Desktop. In keeping with the Classic Start Menu, you’ll want to rename this shortcut Settings.
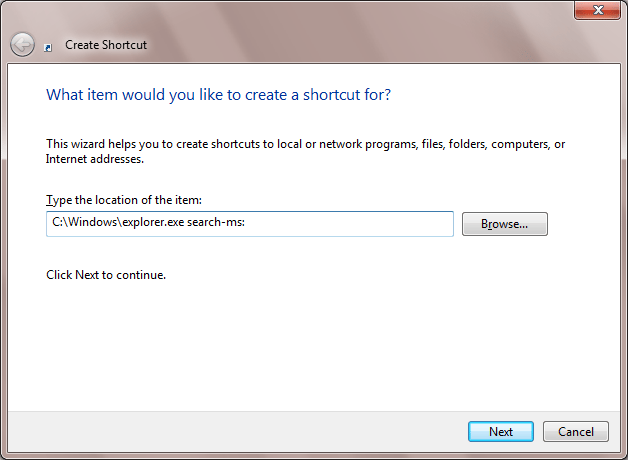
Search – To create a shortcut to Search, right click on the Desktop and select the New | Shortcut command. When you see the Create Shortcut dialog box, type the following command in the Location text box. Be sure to include the colon at the very end of the command.
indows\\explorer.exe search-ms:
To continue, click Next and save the shortcut with the name Search.
This Slideshow Gallery is also available as an entry in the Windows Blog and in the PDF format as a TechRepublic Download.
Help and Support – To create a shortcut to Help and Support, click the Windows 7 Start button, type Help in the Search box, and when Windows Help and Support appears in the results list, right click it. Then, select Send to | Desktop (create shortcut) command.
Run – To create a shortcut to the Run dialog box, click the Windows 7 Start button and, type Run in the Search box. Then follow the above steps to create a shortcut on the Desktop.
Shut Down – To create a shortcut to the Shut Down Command, right click on the Desktop and select the New | Shortcut command. When you see the Create Shortcut dialog box, type the following in the Location text box:
Shutdown.exe -s
To continue, click Next and save the shortcut with the name Shut Down.
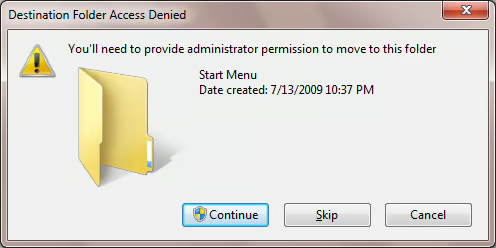
Now, restore Windows Explorer and move all the shortcuts from your Desktop to the Start Menu folder. Because this folder is a special system folder, you will see a Destination Folder Access Denied dialog box, and will have to click the Continue button to proceed with the Move operation.
This Slideshow Gallery is also available as an entry in the Windows Blog and in the PDF format as a TechRepublic Download.
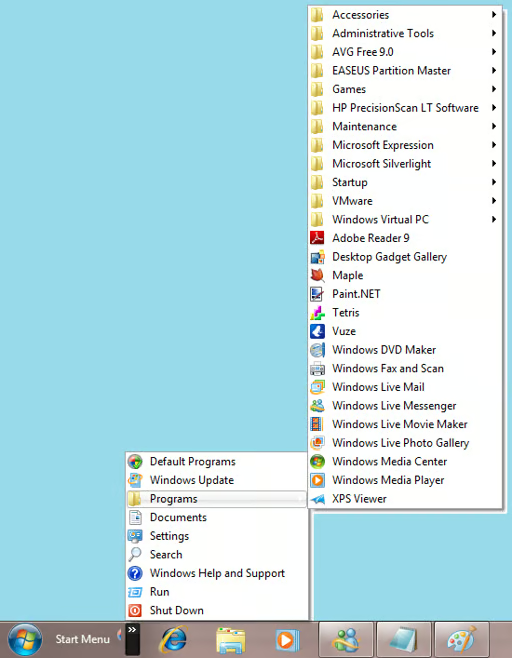
When you complete the operation, you will have your own Classic Start Menu in Windows 7, as shown, without having to use any third-party tool. As you can see, to match the original Classic Start Menu, I have changed some of the icons and used drag and drop to arrange the icons on the toolbar.
This Slideshow Gallery is also available as an entry in the Windows Blog and in the PDF format as a TechRepublic Download.

My first computer was a Kaypro 16 \"luggable\" running MS-DOS 2.11 which I obtained while studying computer science in 1986. After two years, I discovered that I had a knack for writing documentation and shifted my focus over to technical writing.


