\n\tIn a recent blog titled Recover data files in Windows 7 with Previous Versions, I showed you how to use the Previous Versions feature in Microsoft Windows 7 to recover data in the event that a file is inadvertently deleted or becomes corrupted or even if you simply want to instantly undo a vast amount of editing changes. As I explained, the Previous Versions feature uses the System Restore feature in order to work its magic.
\n
\n\tOver the weekend I was telling a friend about the Previous Versions feature in Windows 7 and he told me that it sounded like a tool that he has been using called System Restore Explorer, from developer Nic Bedford. I had not heard about this particular tool and ask him to show it to me. What he showed me was pretty impressive and so, being a big believer in the idea that the more tools you have at your disposal the better prepared you are in the event of a disaster, I decided that I would write about it. So, in this edition of the Windows Desktop Report, I’ll take a closer look at System Restore Explorer.
\n
\n\tThis slideshow is also available as a post in the TechRepublic Microsoft Windows Blog.
\n
\n
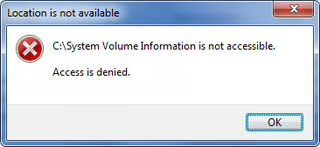
\n\tSystem Restore stores its backup on your hard disk in a hidden folder called System Volume Information that you are normally unable to access. If you attempt to access that folder, you’ll encounter the error message shown.
\n
\n\tHowever, System Restore Explorer provides you with the ability to access the System Volume Information folder and display the restore points. When you select a restore point, the System Restore Explorer will mount that restore point and then allow you to browse through the files and select those that you want restore. It’s a very slick operation.
\n\t
\n
\n
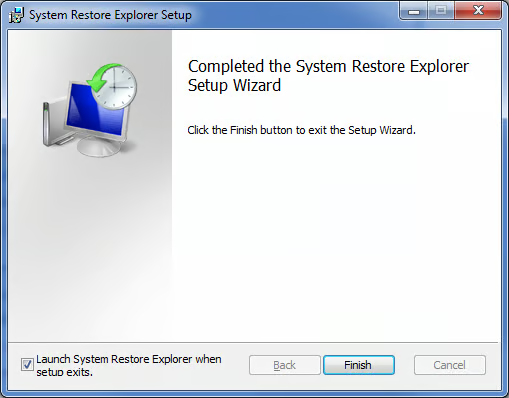
\n\tAfter you download System Restore Explorer, installing it is a snap. It comes as an MSI file (InstallSystemRestoreExplorer.msi) which launches an efficient setup wizard. Just a few steps and System Restore Explorer is installed.
\n
\n\tWhen the installation is complete, System Restore Explorer launches and you will have to pass through a User Access Control prompt. Once you do, System Restore Explorer immediately displays a list of all the available system restore points.
\n
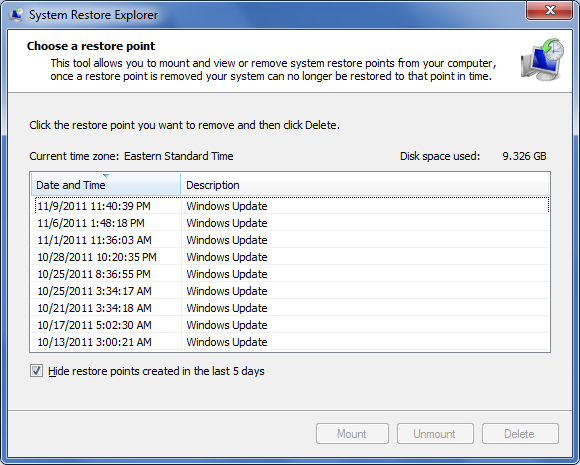
\n\tAs you can see, System Restore Explorer displays the date and time of creation, as well as the description of each restore point. You will also notice that the program shows you the amount of disk space used by all the system restore points. By default, System Restore Explorer hides any restore points created in the last five days. If you want to see those as well, simply clear the appropriate check box.
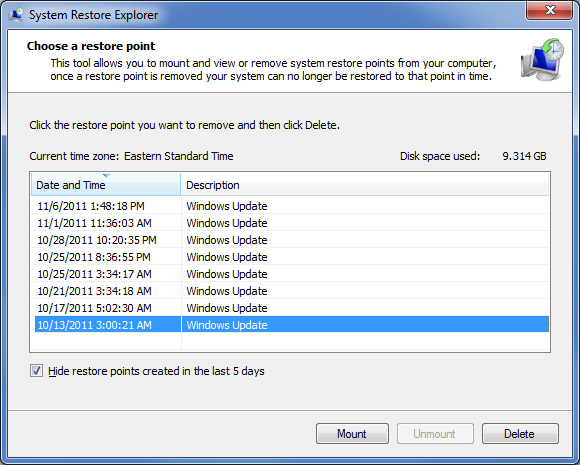
\n\tWhen you select a Restore point, the Mount button becomes available. The Delete button also becomes available, should you want to clean out some of your older restore points.

\n\tWhen you click the Mount button, System Restore Explorer mounts the restore point and creates a shortcut to it. It then passes that shortcut over to Windows Explorer so that you can see and access the files in the restore point just like you would any other drive.
\n
\n\tNotice that in the Address box the location is identified as HarddiskVolumeShadowCopy2. In my example, HarddiskVolumeShadowCopy2 is the name of the shortcut created by System Restore Explorer.

\n\tWhen you find the file that you want to restore, you can copy it to anywhere on your hard disk. As you can see. I like to use the Copy to Folder tool, which as you may know can be found on Windows Explorer’s Edit menu.
\n
\n\tAs soon as you copy the file(s) that you want, you should immediately close this version of Windows Explorer or immediately return to the System Restore Explorer interface and click the Unmount button. The reason it is so important that you do one of these operations is that once you begin navigating around the mounted restore point, the window bears no discernable difference from a standard version of Windows Explorer displaying the contents of your hard disk. If you forget that it is actually displaying the contents of the mounted restore point and attempt to perform other file operations, such as deleting or moving files, you could inadvertently damage the restore point.
\n
\n\tWhen you are finished, you just close System Restore Explorer.
\n
\n
\n\tUsing System Restore Explorer to restore files from a recent restore point is easy and can be a real life saver. Are you likely to use System Restore Explorer? Have you used it before?

My first computer was a Kaypro 16 \"luggable\" running MS-DOS 2.11 which I obtained while studying computer science in 1986. After two years, I discovered that I had a knack for writing documentation and shifted my focus over to technical writing.


