In response to my TechRepublic tutorial about Microsoft’s Remote Desktop Connection Manager, a number of members posted comments about which tool their organization uses for server administration.
One tool I decided to learn more about is visionapp Remote Desktop 2010 R2. The current version of visionapp Remote Desktop was born through the combination of the open source tool mRemote and the then current version of visionapp Remote Desktop. Since this conglomeration, the open source mRemote is no longer under development; all development activity is now focused squarely on the commercial visionapp Remote Desktop tool.
Available in free and pay editions, visionapp Remote Desktop 2010 R2 enables admins to connect to servers using these connection methods: RDP, ICA, VNC, SSH, HTTP, and Telnet. If you ever identify a need for an additional protocol, visionapp Remote Desktop 2010 R2 can be extended to support that new service, too.
What sets visionapp Remote Desktop 2010 R2 apart from some other tools is its ability to share connections between many desktops; it can also save all connection information into a database so that many people in the department can reuse the connection. With this feature, connections only need to be set up one time. The sharing feature is available only in the product’s pay edition. The free edition can be used by individual users in a standalone way and can manage up to three concurrent connections. This makes it somewhat limited but still useful.
In this tutorial, I will walk you through the process of installing and configuring visionapp Remote Desktop 2010 R2. I am working with a trial version of the product’s pay edition. visionapp Remote Desktop 2010 R2 starts at $99 and goes down in price as you add more administrators.
This TechRepublic gallery is also available as a Servers and Storage blog post.
Installation and initial configuration
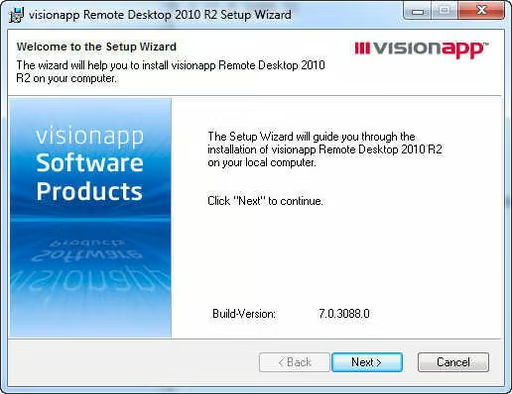
To start the installation process, double-click Remote Desktop 2010 R22010R2_withSqlExpr_inclPatch3.exe. You will get an installation screen like the one here. (I don’t display every program installation screen, since they’re all pretty much like any other installation.)
Note: If you prefer to install the product without shared database support, install using the Remote Desktop 2010 R22010R2_inclPatch3.exe executable instead. Bear in mind that this installs the program in a single-user mode that doesn’t allow connections.
Screenshot by Scott Lowe for TechRepublic
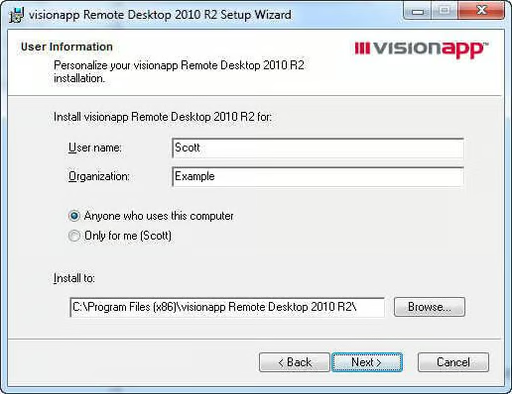
During the installation process, you’re asked to provide some user information and to decide where you’d like to install the program.
Screenshot by Scott Lowe for TechRepublic
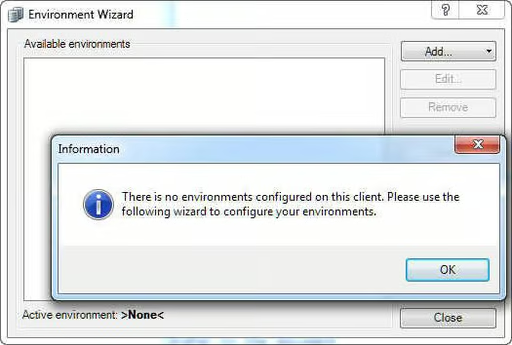
Once installation is complete, execute Remote Desktop 2010 R2 by going to Start | All Programs | visionapp Remote Desktop 2010 R2 | visionapp Remote Desktop 2010 R2. Upon this initial execution, you will see a screen that indicates there are no environments configured for the client. This is the first place where it becomes evident that the program’s dialog boxes have been translated from another language, as the grammar leaves something to be desired. That said, the program functionality is fantastic.
Screenshot by Scott Lowe for TechRepublic
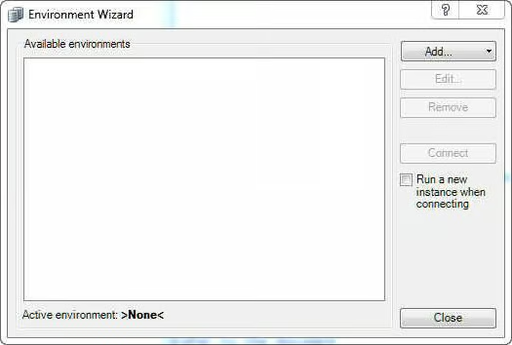
To add a new environment to visionapp Remote Desktop 2010 R2, click the Add button and, from the shortcut menu, choose Database. The database houses all of the details for an environment and allows visionapp Remote Desktop 2010 R2 environments and connections to be shared by multiple users. You can use the included SQL Server Express to store these environments, or you can use an existing SQL Server. Or, if you like, you can skip the database altogether and just use visionapp Remote Desktop 2010 R2 yourself. For this tutorial, I’m installing the SQL Express database.
Screenshot by Scott Lowe for TechRepublic
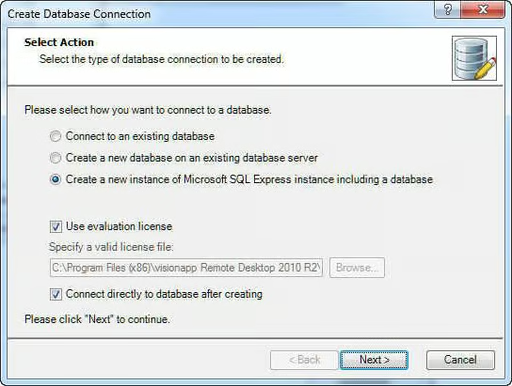
Adding a new database starts a Create Database Connection wizard. On the first screen of this new wizard, I selected the option to create a new instance of SQL Server Express, which includes a new database to house the visionapp Remote Desktop 2010 R2 environment. I also indicated that I want to use the evaluation license and that I’ll connect directly to the database after it’s created.
Screenshot by Scott Lowe for TechRepublic
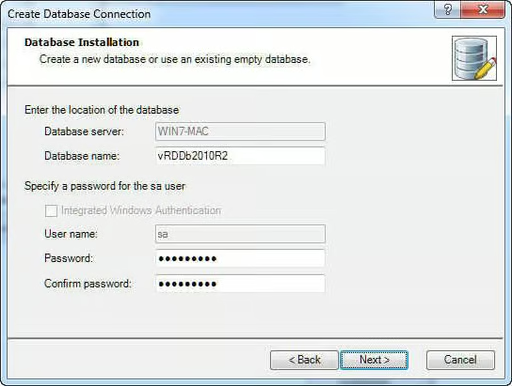
On the second page of the Create Database Connection wizard, provide the name of the database (the default is Remote Desktop 2010 R2Db2010R2 for this version) and the password that you want to use for the SQL Server Express sa account.
Screenshot by Scott Lowe for TechRepublic
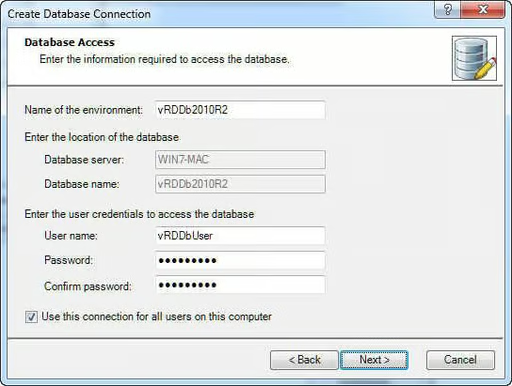
Once you provide overall database information, it’s time to drill into some of the details such as naming the visionapp Remote Desktop 2010 R2 environment and providing credentials that will allow the tool to access the database. I stuck with the defaults except when it comes to choosing a password.
Screenshot by Scott Lowe for TechRepublic
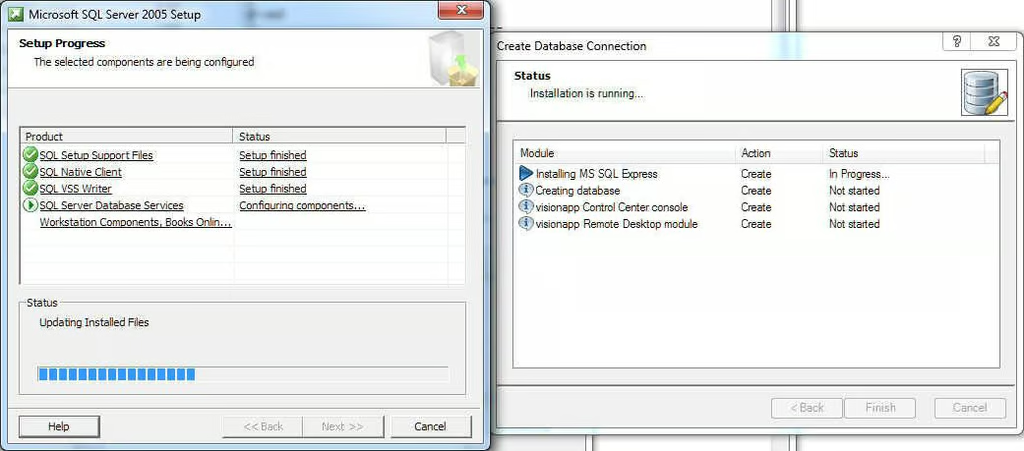
The Remote Desktop 2010 R2 database creation process installs SQL Server 2005 Express. This figure gives you a look at installation progress.
Screenshot by Scott Lowe for TechRepublic
Using visionapp Remote Desktop 2010 R2
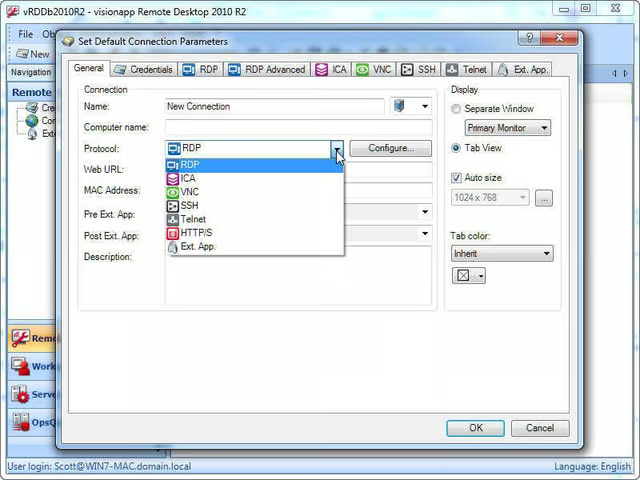
Like most tools in its class, visionapp Remote Desktop 2010 R2 requires administrators to create connections to individual servers in order to operate. visionapp Remote Desktop 2010 R2 natively supports the use of RDP, ICA, VNC, SSH, HTTP, and Telnet for server connections. In this figure, you see the General tab for the default connection parameters window on which you can choose a connection protocol and a number of other general connection parameters.
Screenshot by Scott Lowe for TechRepublic
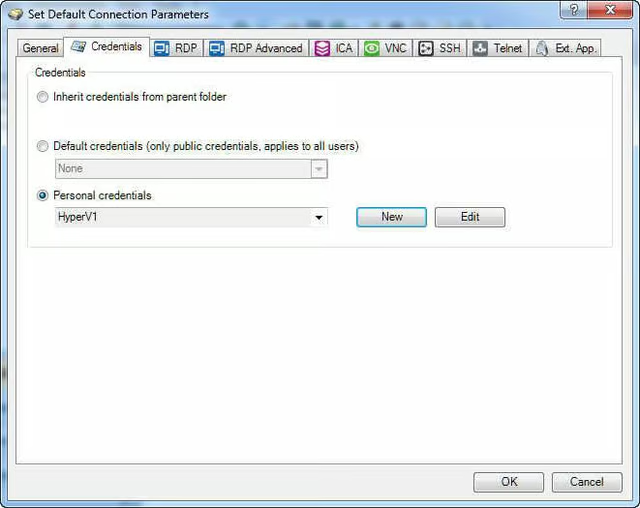
In the Credentials tab, you can provide login details for the server connection. In this figure, notice that I provided personal credentials named HyperV1 for this connection; I could also have simply reused parent folder or default credentials.
Screenshot by Scott Lowe for TechRepublic
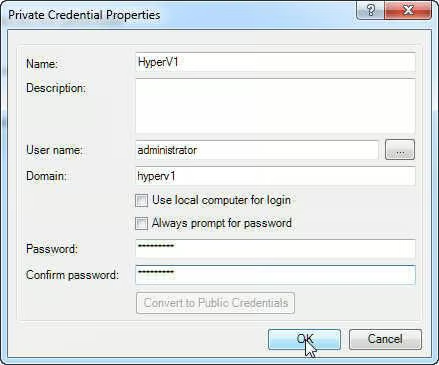
If you’re wondering where that credential named HyperV1 came from, here’s the answer: On the previous screen, I clicked the New button, which displayed the dialog box you see here. In this dialog box, I provided all of the information necessary to use this login credential, including user name, domain name, and password.
Screenshot by Scott Lowe for TechRepublic
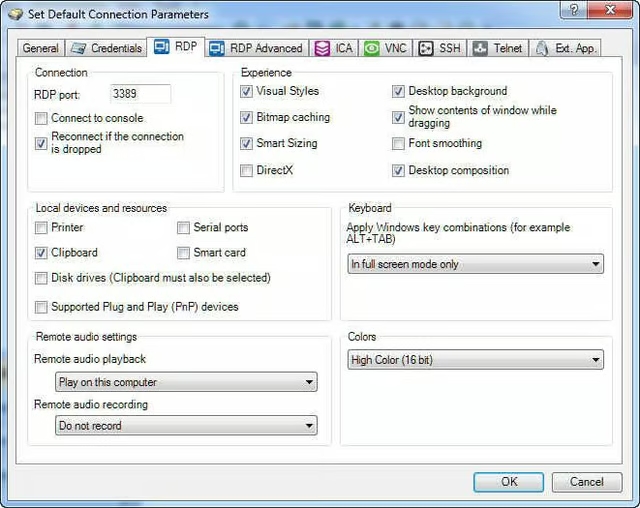
In this figure, you see that the RDP tab contains numerous configuration options. If you’ve used remote desktop connections to Windows servers, these options should look pretty familiar. On this tab, you can configure the RDP port, which defaults to 3389, the “experience,” which allows you to decide how much data you want to push down the RDP pipe, local device access, audio settings, color settings, and keyboard behavior.
Screenshot by Scott Lowe for TechRepublic
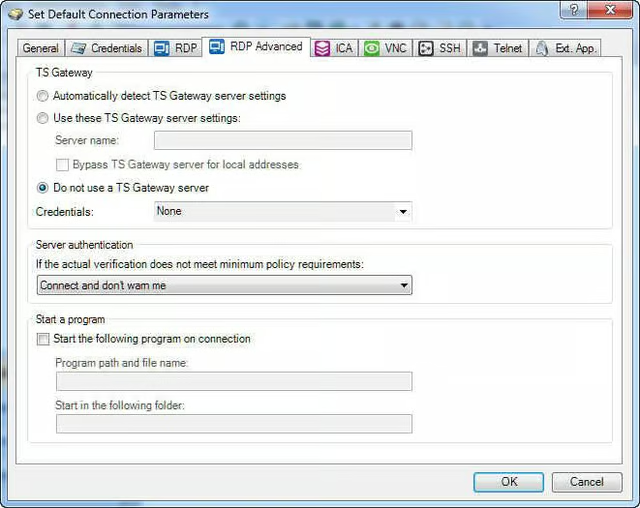
Many organizations use a Terminal Server Gateway to access desktop machines using RDP. If your organization does, then the RDP Advanced tab in this figure is for you. This is where you can configure your TS Gateway settings. On this tab, you also get to choose server authentication options. What do you want the client to do if authentication verification doesn’t meet policy?
Screenshot by Scott Lowe for TechRepublic
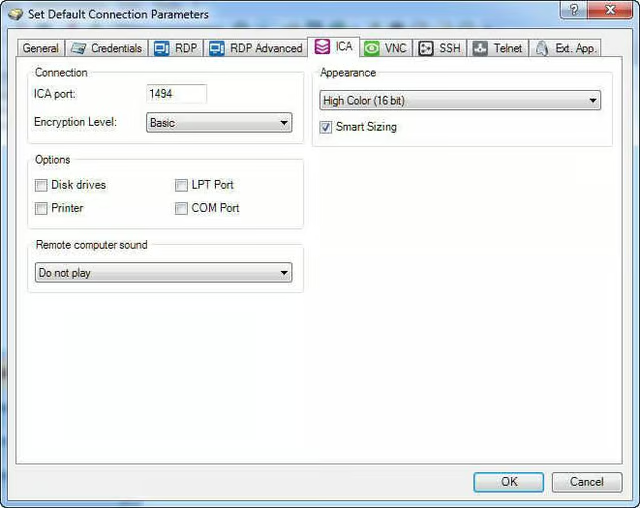
Since not every organization uses RDP, visionapp Remote Desktop 2010 R2 includes native support for other connection protocols such as Citrix ICA. If you have ICA servers in your environment, the ICA tab provides you with connectivity options, which include encryption level, appearance (color depth), and how you’d like to handle local devices and remote sound.
Screenshot by Scott Lowe for TechRepublic
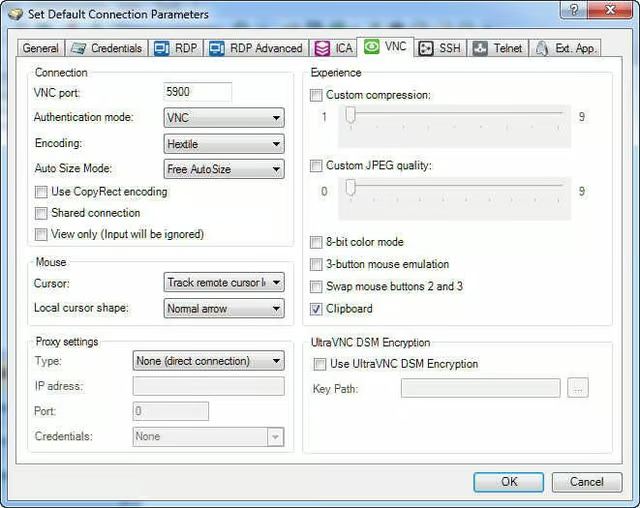
The VNC tool has been available for a long time and has become a very popular way to connect to remote resources. On the VNC tab in visionapp Remote Desktop 2010 R2, you can decide how you’d like to handle VNC connections to servers on which you’ve installed the VNC server software. Like the other protocols, you can configure VNC’s operating port, authentication options, color depth, and more.
Screenshot by Scott Lowe for TechRepublic
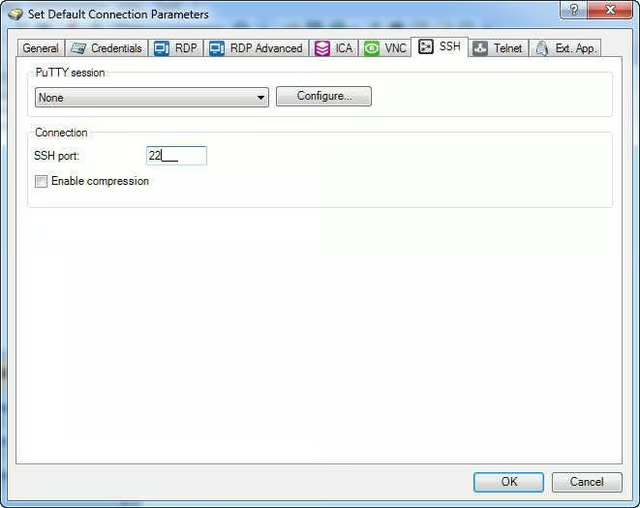
For Linux admins who are forced to use Windows desktops, visionapp Remote Desktop 2010 R2 doesn’t leave you out in the cold. SSH is a fully supported protocol with just a few configuration options, including SSH port and compression.
Screenshot by Scott Lowe for TechRepublic
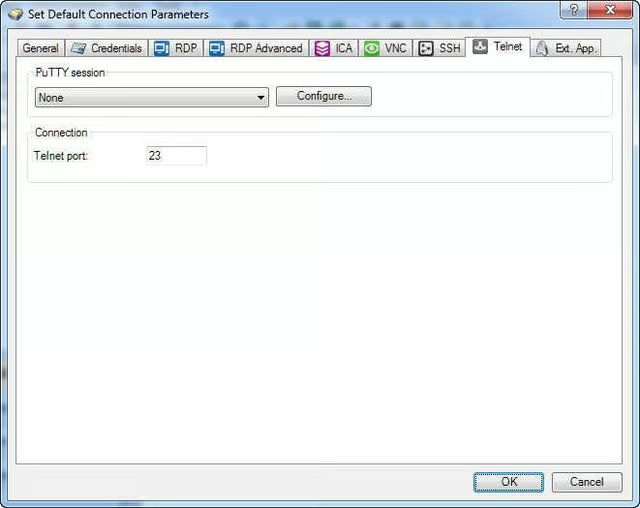
The Telnet tab is almost identical to the SSH tab and allows similar configuration of Telnet options.
Screenshot by Scott Lowe for TechRepublic
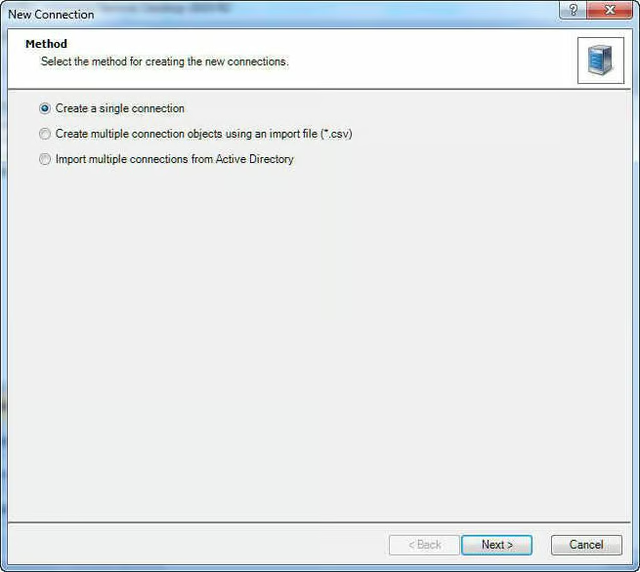
visionapp Remote Desktop 2010 R2 has the capability to import multiple connections from a CSV file or from Active Directory, or you can simply create a single connection to a single server. For this example, I create a single connection.
Screenshot by Scott Lowe for TechRepublic
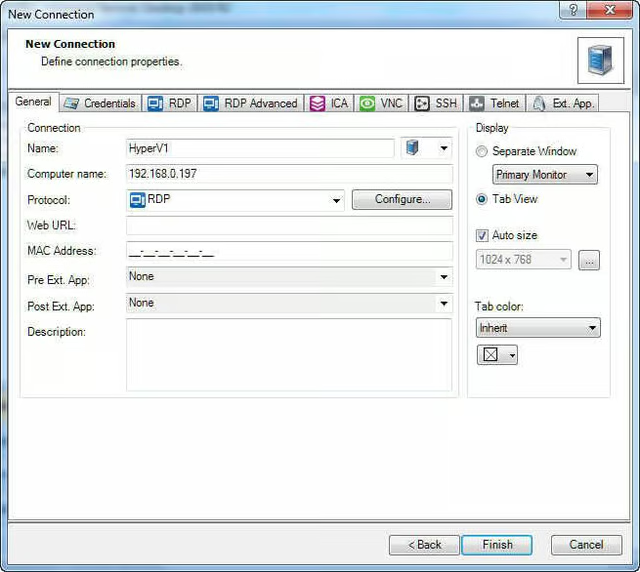
Although you created some default connection parameters earlier, you have a chance to override those properties on a per connection basis. You see that I provided the connection name, the server IP address (you can also use name), and the connection protocol.
Screenshot by Scott Lowe for TechRepublic
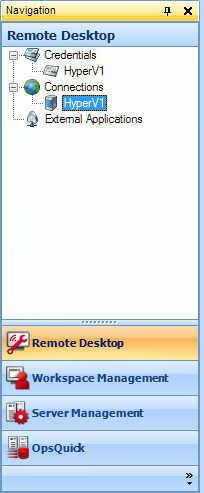
Once you create the connection, it appears in the navigation list on the left side of the Remote Desktop 2010 R2 window.
Screenshot by Scott Lowe for TechRepublic
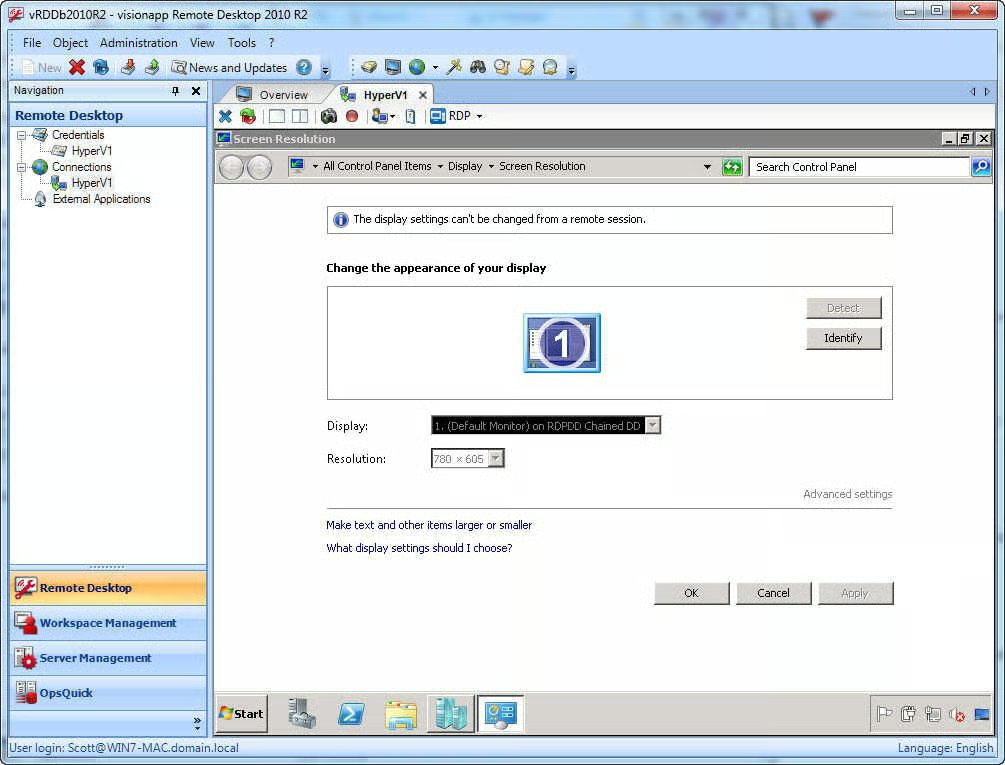
A connection is sized to fit the main window of the visionapp Remote Desktop 2010 R2 application. You can see that this window is 780×605.
Screenshot by Scott Lowe for TechRepublic
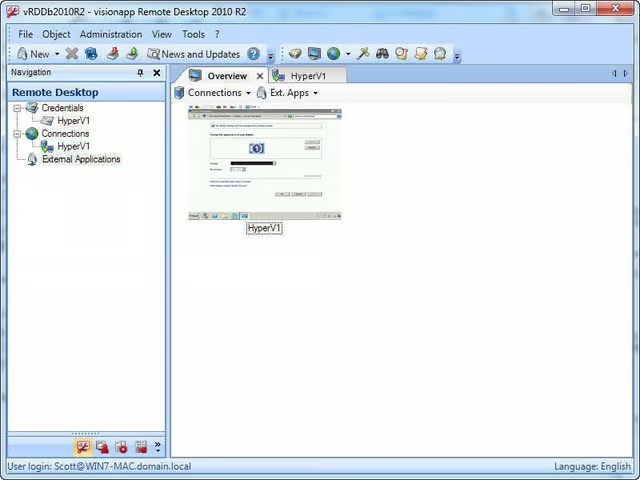
When you’re not actively using a connection, you can choose the Overview tab so that you can see all of your connections in a minimized state. Here is a look at this screen.
Screenshot by Scott Lowe for TechRepublic


