\n\tThis gallery is also available as post in the Windows and Office Blog.
\n\t
\n\tIn the article, Get the free 90-day evaluation of Windows 8 Enterprise, I showed you how to download and install the free 90-day evaluation copy of the final version of Windows 8 Enterprise so that you could begin experimenting with the new operating system. I recommended that you install Windows 8 Enterprise to a VHD and use it in a dual-boot configuration, as I showed you in the article titled Dual-boot Windows 7 and Windows 8 using a VHD. After experimenting with Windows 8 in a dual-boot configuration with Windows 7 for a while I decided that I wanted to expand my test bed a bit and rather than setting up another dual-boot system, I decided that I wanted to experiment with the operating system from within Windows 8’s Client Hyper-V tool.
\n
\n\tSo, I installed the Windows 8 Enterprise evaluation on a system, set up the Client Hyper-V tool, created a virtual machine, and then installed the Windows 8 Enterprise evaluation on that virtual machine. This new setup is working great and has not only allowed me to expand my Windows 8 test bed; it has also allowed me to experiment with all the great features in Windows 8’s Client Hyper-V. In this post I’ll show you how to setup and configure Windows 8’s Client Hyper-V. As I do, I’ll show you how to install see your virtual machine in the Hyper-V Manager on that virtual machine. Along the way, I’ll show you some of the neat features in Client Hyper-V.
\n
\n
\n
\n\tAs you may know, Microsoft has done away with Windows Virtual PC in favor of focusing on Hyper-V, which is also the main virtualization platform in Windows Server. Of course the server version of Hyper-V provides several advanced features that you won’t find in the client version. Advanced features aside, the client version provides the same powerful and feature rich virtualization platform, along with an identical user interface and functionality as the server version. For instance, Windows 8’s Client Hyper-V will allow you to simultaneously run multiple virtual machines and it can be used to run both 32- and 64-bit operating systems. Of course there is much more to Windows 8’s Client Hyper-V than I will be able to cover in one article. But rest assured I will cover this topic in more detail in the future.
\n
\n
\n\tWindows 8’s Client Hyper-V is only available in the 64-bit versions of Windows 8 Pro and Windows 8 Enterprise and of course that means that it will only run on computers with 64-bit CPUs. And, these 64-bit CPUs must incorporate Second Level Address Translation (SLAT) technology. While most current CPUs from AMD and Intel support SLAT, you can verify your system by running the Coreinfo command-line utility from Microsoft’s Windows Sysinternals site.
\n
\n\tYour system must have at least 4GB of memory. However, if you want to be able to comfortably run more than one virtual machines at a time, you’ll want more the 4GB.
\n
\n
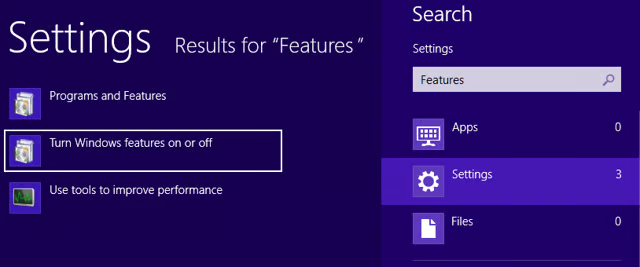
\n\tWindows 8’s Client Hyper-V isn’t enabled by default, but you can add it rather quickly from the Windows Features tool. To begin, just press the [Windows] key to bring up the Start Screen. Then, type Features, select Settings, and click Turn Windows features on or off.
\n
\n\tCredit images to Greg Shultz for TechRepublic
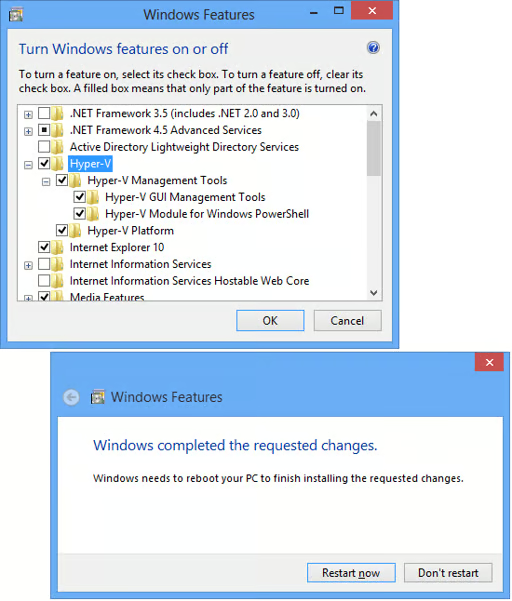
\n\tWhen you see the Windows Features dialog box, locate and select the Hyper-V related check boxes and click OK. When you do, Windows 8 will enable the Hyper-V client and then prompt you to restart your system to complete the installation.
\n\t
\n\tCredit images to Greg Shultz for TechRepublic
\n\tAs you can see, I have selected both the Hyper-V GUI Management Tools and the Hyper-V Module for Windows PowerShell. While the Hyper-V management console provides you with everything that you need to create, manage, and run virtual environments on your PC, having the PowerShell features available will allow you to experiment with scripting various Hyper-V features.
\n
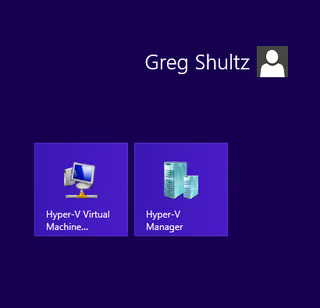
\n\tWhen you system restarts, you’ll find two tiles on the Start Screen for Hyper-V, as shown. The Hyper-V Virtual Machine Connection is a Remote Desktop-like tool that you will use to connect to your virtual machine after it is created and the Hyper-V Manager tile launches the management console that you’ll use to create and manage your virtual machine.
\n\t
\n\tCredit images to Greg Shultz for TechRepublic
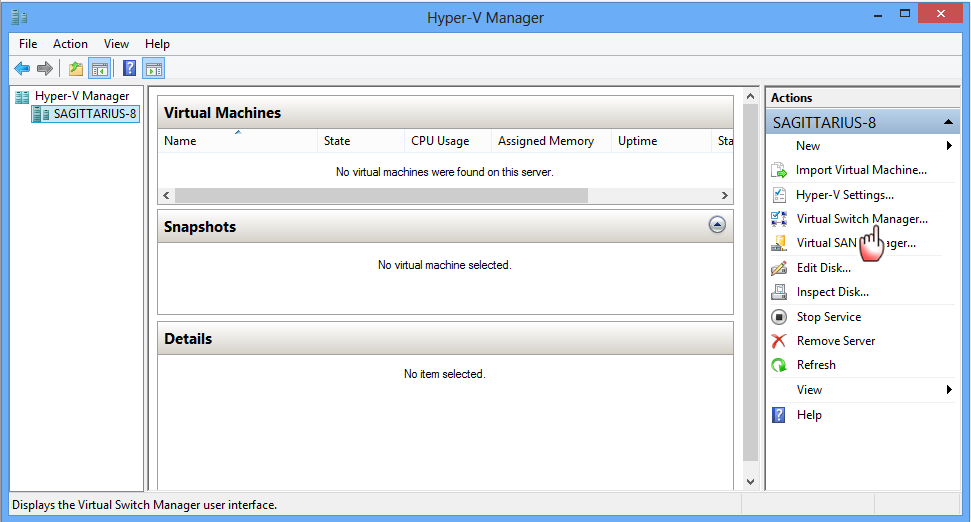
\n\tWhile you can create a virtual machine without a virtual network connection and then add it later, you’ll want to have it in place before create your first virtual machine. You’ll use the Virtual Switch Manager to create and configure how you want the virtual network connection to work.
\n
\n\tAfter you launch the Hyper-V Manager, navigate to the Actions pane and select the Virtual Switch Manager action.
\n\t
\n\tCredit images to Greg Shultz for TechRepublic
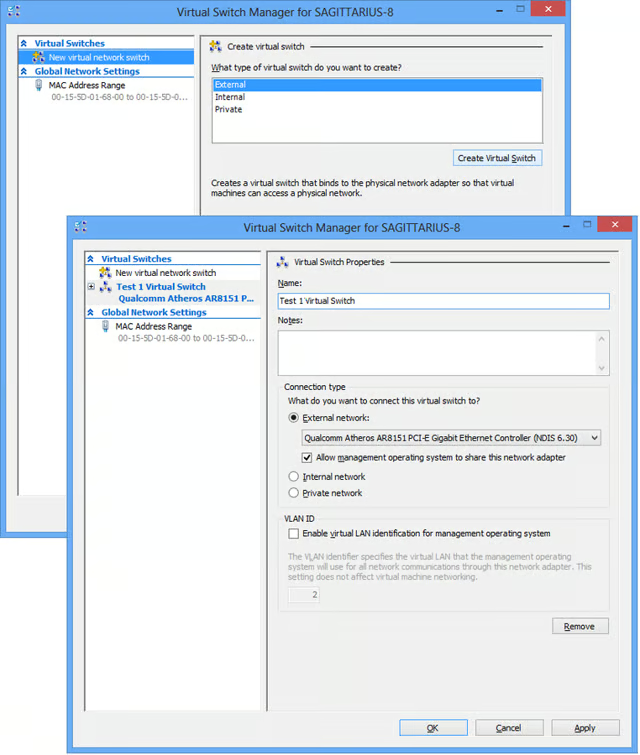
\n\tThe Virtual Switch Manager allows you to select several types of virtual switches: External, Internal, and Private. The one you choose will depend on how you want to use your virtual machine. If you want your virtual machine to be able to access resources available on your physical network, you’ll select External. If you only want a connection between the host and the virtual machine, you’ll select Internal. If you have more than one virtual machine running at one time and you only want a connection between your virtual machines, you select Private.
\n
\n\tFor the purposes of this example, I’ll select External and click Next. You’ll then be able to assign your virtual switch a name and select the network adapter. These two steps are illustrated.
\n\t
\n\tCredit images to Greg Shultz for TechRepublic
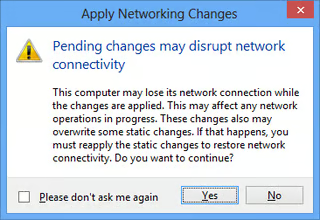
\n\tWhen you click OK, you’ll see the warning message shown. The reason for this warning is that during the virtual network connection procedure, your network may temporarily go offline.
\n
\n\tCredit images to Greg Shultz for TechRepublic
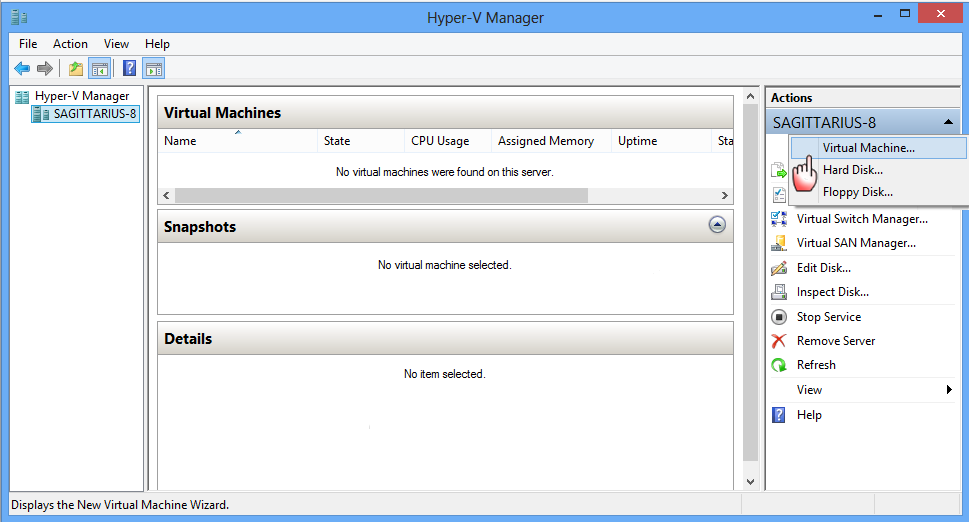
\n\tCreating a virtual machine is easy; to begin, go back to the Actions pane in the Hyper-V Manger and select the New | Virtual Machine command.
\n\t
\n\tCredit images to Greg Shultz for TechRepublic
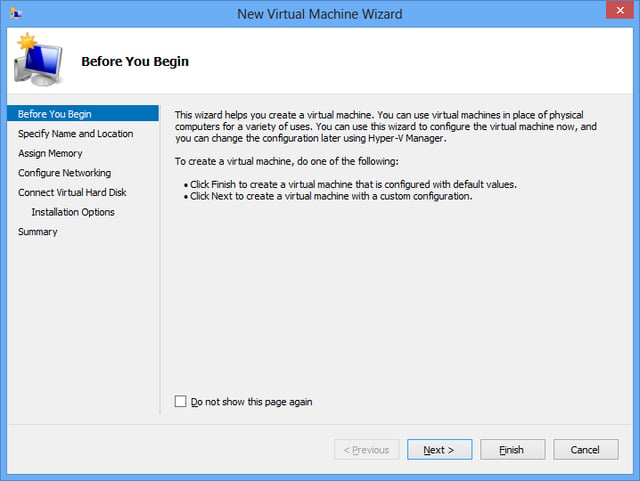
\n\tWhen the first screen of the New Virtual Machine Wizard appears, you’ll discover that you can quickly create a virtual machine using the preconfigured default settings or you can work through the wizard and create a custom configuration.
\n\t
\n\tCredit images to Greg Shultz for TechRepublic
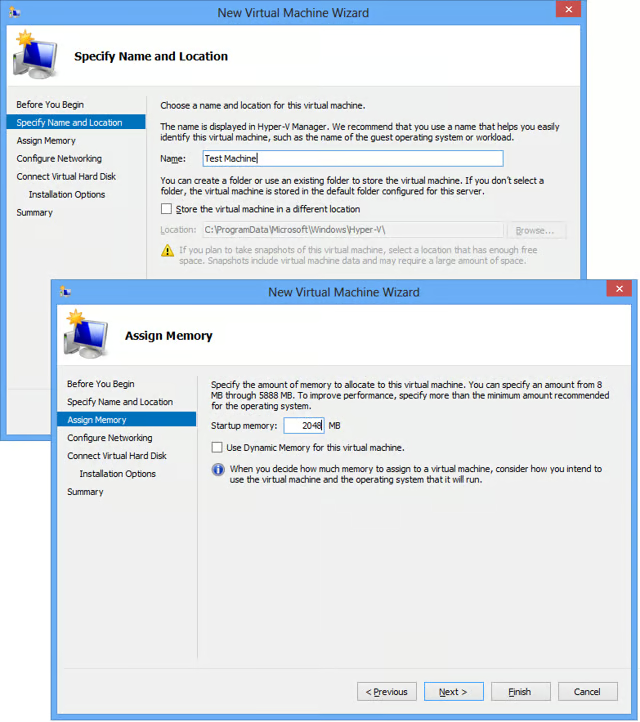
\n\tIf you want to use the preconfigured default virtual machine, just click Finish button. When you do you’ll get a basic configuration with 512MB of RAM and no network connection. Of course you can modify the configuration from the Settings page. However, if you want to create a customized virtual machine, click Next. On the next two screens in the New Virtual Machine Wizard, you’ll give your machine a name and specify the amount of RAM you want the virtual machine to have. These two screens are shown.
\n\t
\n\tCredit images to Greg Shultz for TechRepublic
\n\tAs you can see, in addition to naming the system, you can specify different location to store the virtual machine files. For instance, you could store the virtual machine file on an external drive or on a file server. Dynamic Memory is a memory management system designed to utilize the available physical memory more efficiently when you are running more than one virtual machine at a time. For the purposes of this example, I won’t enable or discuss Dynamic Memory in any more detail; however, you can learn more Microsoft’s Overview page.
\n
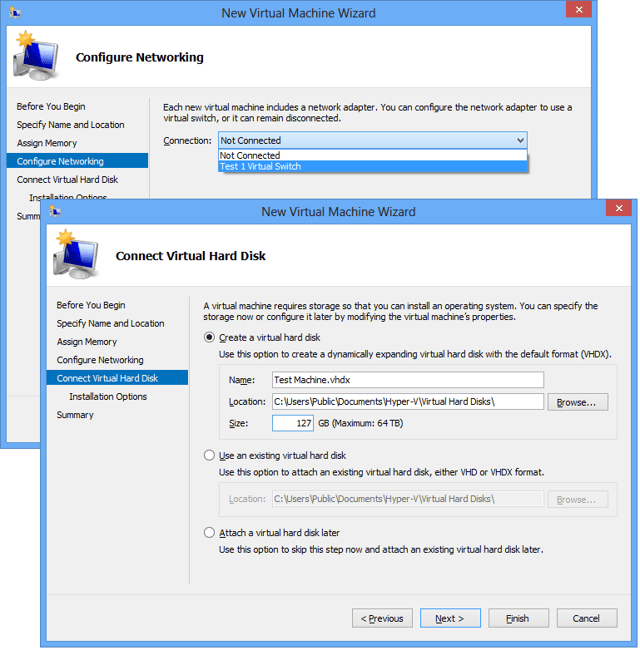
\n\tMoving ahead, you’ll link your virtual machine to the virtual switch that you created and specify the virtual hard disk. These two steps are shown.
\n\t
\n\tCredit images to Greg Shultz for TechRepublic
\n\tAs you can see, there are several options for specifying the virtual hard disk, you can create disk by giving it a name, specifying its location, and choosing its size. By default, the virtual hard disk has the same name as the virtual machine and is 127GB in size. If you have an existing virtual hard disk that you want to use for your virtual machine, you can connect it now or later.
\n
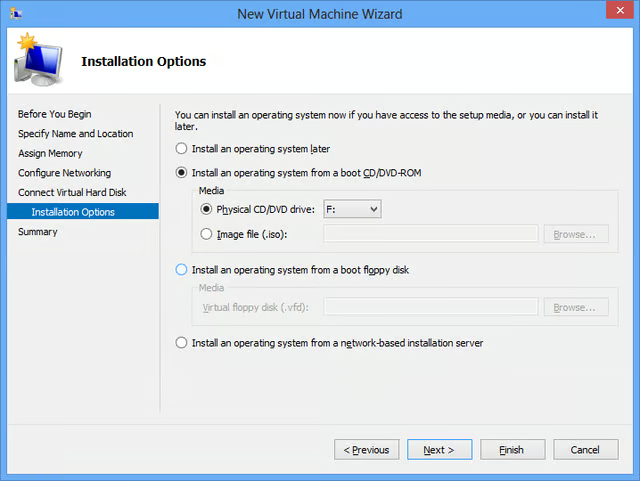
\n\tOn the Installation Options screen, you’ll specify when and how you will install an operating system on the virtual machine. As you can see, I’ve selected to install the operating system from the DVD drive, but I could also choose to install from an ISO file, a bootable virtual floppy disk, or a network installation server. I can also choose to install the operating system later.
\n
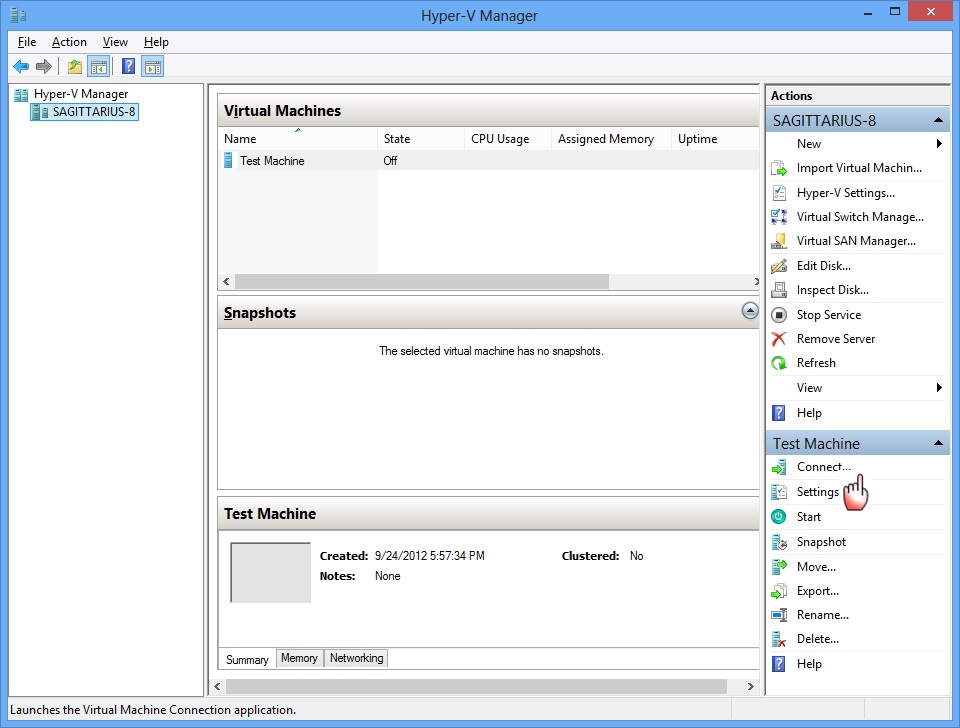
\n\tAt this point you can click Next to go to a Summary screen or you can just click Finish. When the Wizard closes, you’ll see your virtual machine in the Hyper-V Manager.
\n
\n\tCredit images to Greg Shultz for TechRepublic
\n
\n\tFor my example, I choose to have the operating system installed from a DVD. So, after you insert the DVD in the drive, go back to the Actions pane in the Hyper-V Manager, scroll down to the virtual machine section and click the Connect command.
\n\t
\n\tCredit images to Greg Shultz for TechRepublic
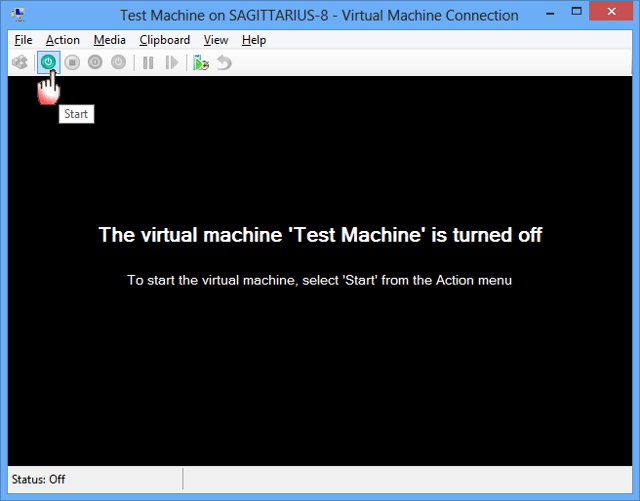
\n\tWhen you do, you’ll see a virtual machine window that tells you that the machine is turned off. At this point, just click the Start button on the menu bar.
\n\t
\n\tCredit images to Greg Shultz for TechRepublic
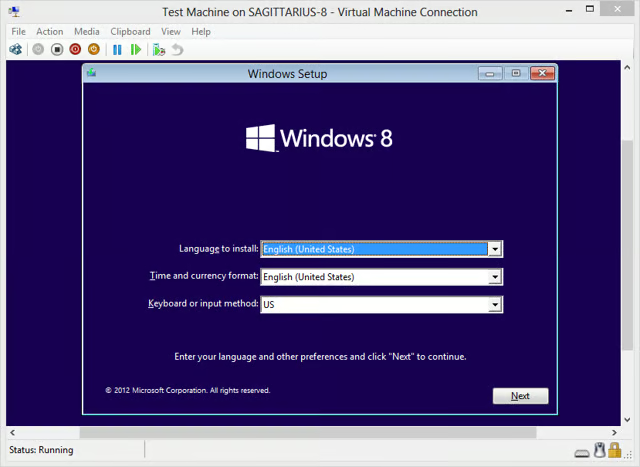
\n\tIn a moment, the virtual machine will boot off the DVD and begin the installation. The screeenshot shows the first screen in the Setup procedure of the Windows 8 Enterprise evaluation.
\n
\n\tOnce the installation was complete, I could begin experimenting with the Windows 8 Enterprise evaluation in my virtual machine.
\n
\n\tCredit images to Greg Shultz for TechRepublic

My first computer was a Kaypro 16 \"luggable\" running MS-DOS 2.11 which I obtained while studying computer science in 1986. After two years, I discovered that I had a knack for writing documentation and shifted my focus over to technical writing.


