Skip to content

TechRepublic

  • Top Products
  • AI
  • Developer
  • Payroll
  • Security
  • Project Management
  • Accounting
  • CRM
  • Academy
Resources
  • TechRepublic Premium
  • TechRepublic Academy
  • Newsletters
  • Resource Library
  • Forums
  • Sponsored
Go Premium
Popular Topics
  • Top Products
  • AI
  • Developer
  • Payroll
  • Security
  • Project Management
  • Accounting
  • CRM
  • Academy
  • Project Management
  • Innovation
  • Cheat Sheets
  • Big Data
  • Tech Jobs
View All Topics
Go Premium
Storage

VMware ESX Server step-by-step installation

By Bill Detwiler September 11, 2006, 1:19 AM PDT Bill Detwiler on Twitter billdetwiler

Image
1
of 9

VMware-ESX_5247640_A.gif
VMware ESX Server step-by-step installation

VMWare ESX Server Welcome screen

VMWare ESX Server Welcome screen

VMware ESX Server is mainframe-class virtual machine software that runs on a Linux kernel. It is a highly scalable platform that increases the efficiency of Intel-based hardware. In this screenshot gallery, Steven Warren shows you how to install ESX server.

VMware ESX Server has some hefty minimum hardware requirements:

  • Two CPUs (supports up to 16)
  • Processors must be at least 900 MHz Pentium III Xeon
  • 512 MB of RAM
  • At least one Ethernet card
  • SCSI, Fibre Channel, or RAID controller

These are minimums, so obviously you’ll need to have more power than that. VMware recommends lots of RAM, multiple Ethernet cards (some virtual machines may run best with dedicated cards), and a separate disk controller that is dedicated to hosting the virtual machines. For more on the system requirements, see this page from the VMware Web site. VMware has also published information on supported hardware.

If you have installed a Linux distribution such as Red Hat Linux, then you’ll notice that several parts of the ESX Server installation are very similar. That’s because ESX Server is built on a Linux kernel, as mentioned above. You will install ESX Server just like you would an operating system because it is a stand-alone operating system. Unlike VMware Workstation and VMware GSX Server, ESX Server does not have to be installed on top of an OS.

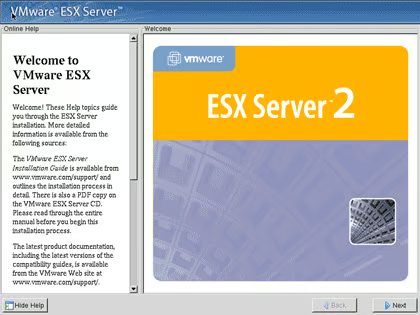
Put the ESX Server installation CD into the server’s tray and boot up the computer. You are presented with the ESX Server Welcome screen. Click Next and then keep the default installation option and choose Next again.

VMware ESX Server step-by-step installation

Memory Allocation

Memory Allocation

Your next two screens allow you to accept your license agreement and enter your serial numbers, one for VMware ESX Server and one for “Virtual SMP.” The Virtual SMP serial number allows your virtual machines to take advantage of multiple processors.

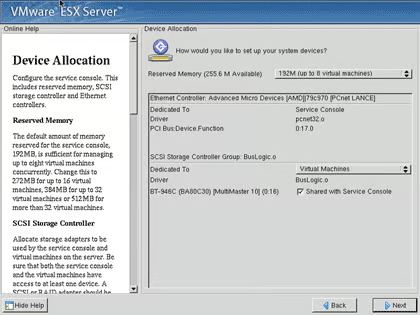
After you enter your serial numbers, you will then allocate the reserved memory to your virtual machines.

VMware ESX Server step-by-step installation

Chose a disk partition strategy

Chose a disk partition strategy

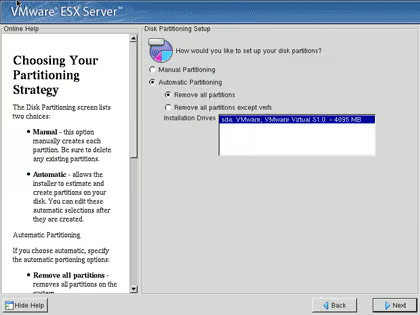
Next, you will partition your ESX Server.

VMware ESX Server step-by-step installation

Define disk partitions

Define disk partitions

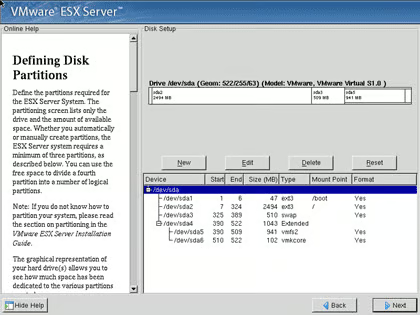
You can use the automatic partitioning or choose to manually partition your server.

VMware ESX Server step-by-step installation

Enter the IP addressing information

Enter the IP addressing information

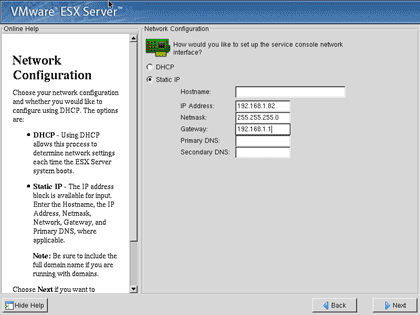
Now you are ready to enter your IP addressing information and set your Time Zone.

VMware ESX Server step-by-step installation

Setup passwords and accounts

Setup passwords and accounts

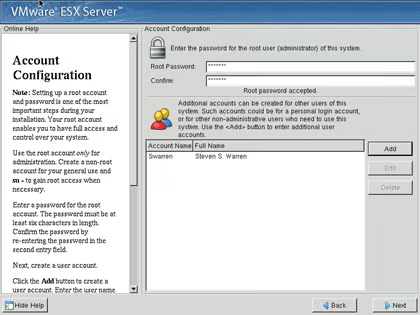
Next, set the “root” password and add any additional user accounts that you need to set up. Usually at least one user account should be added so that you don’t always have to log in as root.

The final screens allow you to simply complete the installation. Remember to reboot at the end.

VMware ESX Server step-by-step installation

VMWare Management Interface

VMWare Management Interface

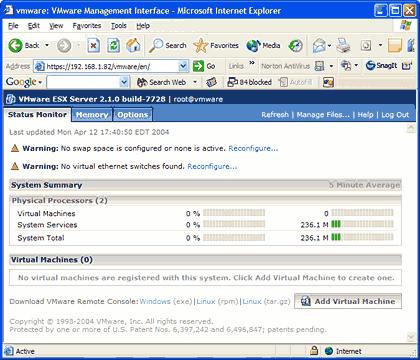
After the machine has rebooted, you can log in to the server with the IP address you specified. Simply open up Internet Explorer and type in the URL. After you log in, you are presented with the screen shown here.

VMware ESX Server step-by-step installation

Swap space configuration

Swap space configuration

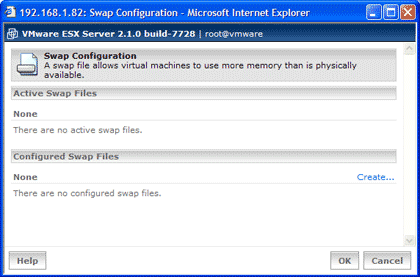
The first thing you need to do is to create a swap space file. Next to where it says “Warning: No swap space is configured or none is active,” click the Reconfigure link. A new window will pop up for Swap Configuration. Click the Create link and then follow the steps to set up the swap file.

VMware ESX Server step-by-step installation

Configure the virtual switch

Configure the virtual switch

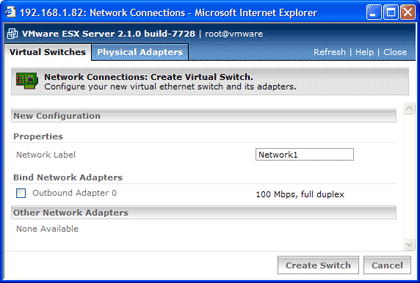
After you are finished with the swap file, you need to create a virtual switch. Next to where it says “Warning: No virtual Ethernet switches found,” click the Reconfigure link and you will be presented with the window shown here. Give the virtual adapter a name and then select the physical Ethernet card(s) to bind to it.

The core of ESX Server is now set up and ready to go. You can review and tweak your configuration by clicking on the Options tab or you can begin to install virtual machines from the Status Monitor tab.

  • Storage
  • Account Information

    Share with Your Friends

    VMware ESX Server step-by-step installation

    Your email has been sent

Share: VMware ESX Server step-by-step installation
Image of Bill Detwiler
By Bill Detwiler
Bill Detwiler is the Editor for Technical Content and Ecosystem at Celonis. He is the former Editor in Chief of TechRepublic and previous host of TechRepublic's Dynamic Developer podcast and Cracking Open, CNET and TechRepublic's popular online show.
  • Account Information

    Contact Bill Detwiler

    Your message has been sent

  • |
  • See all of Bill's content

Daily Tech Insider

If you can only read one tech story a day, this is it.

TechRepublic TechRepublic
  • TechRepublic on Facebook
  • TechRepublic on X
  • TechRepublic on LinkedIn
  • TechRepublic on YouTube
  • TechRepublic on Pinterest
  • TechRepublic RSS
Services
  • About Us
  • Newsletters
  • RSS Feeds
  • Site Map
  • Site Help & Feedback
  • FAQ
  • Advertise
  • Do Not Sell My Information
  • Careers
Explore
  • Downloads
  • TechRepublic Forums
  • Meet the Team
  • TechRepublic Academy
  • TechRepublic Premium
  • Resource Library
  • Photos
  • Videos
  • Editorial Policy
  • Legal Terms
  • Privacy Policy
© 2025 TechnologyAdvice. All rights reserved.
CLOSE

Create a TechRepublic Account

Get the web's best business technology news, tutorials, reviews, trends, and analysis—in your inbox. Let's start with the basics.

Already registered? Sign In
Use Facebook
Use Linkedin

* - indicates required fields

CLOSE

Sign in to TechRepublic

Not a member? Create an account
Use Facebook
Use Linkedin

Lost your password? Request a new password

CLOSE

Reset Password

Please enter your email adress. You will receive an email message with instructions on how to reset your password.

Check your email for a password reset link. If you didn't receive an email don't forgot to check your spam folder, otherwise contact support.

Back to login
1 Finish Profile
2 Newsletter Preferences
CLOSE

Welcome. Tell us a little bit about you.

This will help us provide you with customized content.

No thanks, continue without
1 Finish Profile
2 Newsletter Preferences
CLOSE

Want to receive more TechRepublic news?

Newsletter Name
Subscribe
Daily Tech Insider
Daily Tech Insider AU
TechRepublic UK
TechRepublic News and Special Offers
TechRepublic News and Special Offers International
Executive Briefing
Innovation Insider
Project Management Insider
Microsoft Weekly
Cloud Insider
Data Insider
Developer Insider
TechRepublic Premium
Apple Weekly
Cybersecurity Insider
Google Weekly
Toggle All
No thanks, continue without

You're All Set

Thanks for signing up! Keep an eye out for a confirmation email from our team. To ensure any newsletters you subscribed to hit your inbox, make sure to add [email protected] to your contacts list.

Back to Home Page
×