Copying or moving data is a common task for users in Excel workbooks. Copying data from one worksheet to another within the same workbook file is also pretty common and easy, especially if you’re copying template structure and expressions.
SEE: 30 Excel tips you need to know (TechRepublic Premium)
However, many users start to get flustered when they need to copy an entire worksheet from one Excel workbook to another workbook. The process sounds more complicated, but, in reality, Excel has a built-in feature that makes quick work of this task. And as usual, there’s more than one way to get the job done in Excel.
In this tutorial, I’ll show you Excel’s interface route for creating a copy of a worksheet within the same workbook and copying a worksheet to a different workbook. I’ll also show you how to do the latter with a simple drag-and-drop task.
I’m using Microsoft 365 Desktop on a Windows 10 64-bit system, but you can also use earlier versions of Excel. You can also copy worksheets in Excel’s web version.
You can download the Microsoft Excel demo file for this tutorial.
Excel terms to know for this tutorial
Without a doubt, you have seen and heard the terms “sheet,” “worksheet” and “spreadsheet” used interchangeably, and often, that’s fine. However, they do have specific meanings that can cause confusion if used incorrectly. Particularly for this tutorial, the differences between these terms are important.
Excel defines these three terms as follows:
- Sheet: Refers to the entire sheet element: Sheet 1, Sheet 2, Sheet 3 and so on. It is inclusive of all sheets, worksheets and chart sheets. Technically, there are five types, represented in VBA by the xlSheetType enumeration.
- Worksheet: Refers to a specific type of sheet in which you enter and manipulate values. Training documentation and users alike often use these terms interchangeably.
- Spreadsheet: Refers to the values, expressions, formatting and so on where you work. Training documentation and users often use “spreadsheet” and “worksheet” to mean the same thing.
Copying a worksheet within the same workbook
To copy data from one work area to another, you can use Windows copy and paste shortcuts, Ctrl + c and Ctrl + v, respectively. Alternatively, you can right-click the data you want to copy and select Copy then Paste from the menu that appears.
Copying an entire worksheet within the same workbook might sound a bit odd if you’ve never done so before. Users mostly use this technique when they’re trying to keep structure like labels, expressions and formatting standardized from one worksheet to another. For instance, you might have a template that you copy when you’re ready to create a new month of sales data.
If you need to create a copy of a worksheet within the same workbook, follow these steps:
- Right-click the sheet tab—the worksheet you want to copy.
- Choose Move Or Copy from the resulting submenu (Figure A). You will click the sheet’s tab to identify the worksheet you want to copy.
Figure A

- Check the Create A Copy option (Figure B). If you don’t check this option, Excel will move the sheet and not create a copy.
Figure B
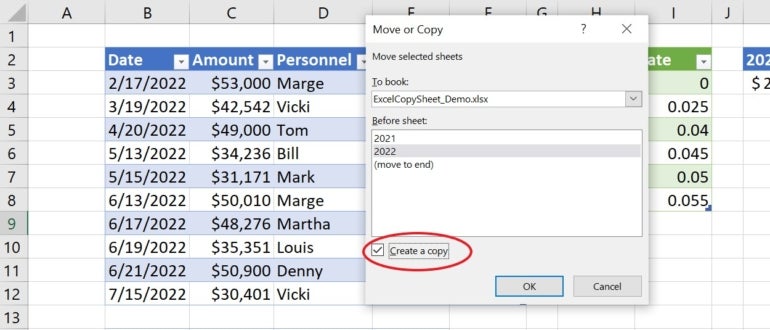
- Click OK.
Figure C

As you can see in Figure C, you now have a copy of the first worksheet. At this point, you’ll likely want to change the default sheet name and start entering new data. You can use the same right-click route to move a sheet instead of creating a copy by not checking the Create A Copy option in step #3.
Now, let’s learn how to copy the same worksheet to a completely different Excel workbook.
Copying a worksheet to a new workbook
Let’s assume that you want to copy the same worksheet to an entirely different Excel workbook file. There are two ways you can do this: 1) You can use the interface or 2) You can drag the worksheet from one file to another. Let’s work through an example using the interface first.
Copy an Excel worksheet to a new workbook with Excel’s user interface
To copy a worksheet from one Excel workbook to another using Excel’s user interface, do the following:
- Open the source and the target workbook. The source workbook contains the worksheet you want to copy or move; you’ll be moving or copying the source worksheet to the target workbook. Both workbook files must be open. Use the demonstration file as the source workbook to follow along. Open a second workbook to act as the target. Any workbook file will do, even if it’s a new blank workbook.
- In the source workbook, navigate to the sheet you want to copy or move.
- Right-click the sheet tab in the source workbook and choose Move Or Copy from the resulting shortcut menu, as you did in the last section.
- In the Move Or Copy dialog, choose the target sheet from the To Book dropdown. Excel will display only open workbooks in this list.
- If you want to copy rather than move the sheet, click the Create A Copy option at the bottom of the dialog (Figure D).
Figure D
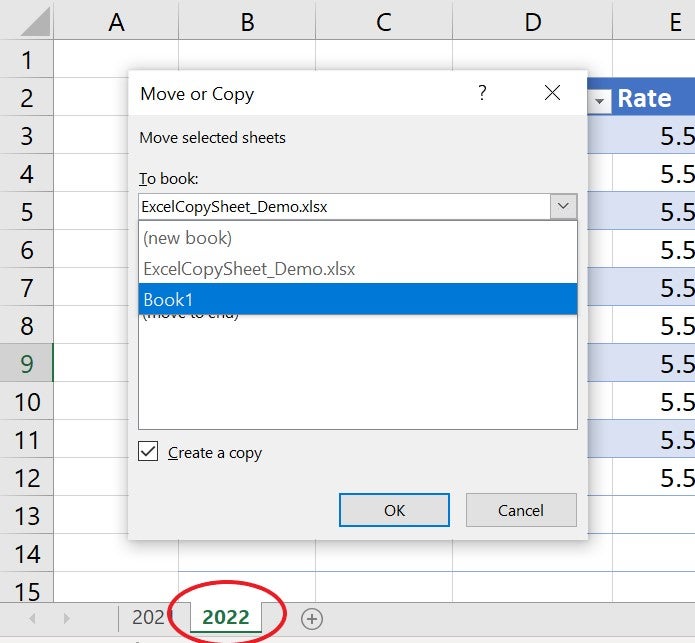
- Click OK, and Excel will move or copy the sheet to the target workbook.
If you move to the target workbook file, which is still open, you will find a copy of the source worksheet.
Copy an Excel worksheet by dragging it from one file to a new workbook
Now, let’s try a different technique to do the same thing. I won’t call it a shortcut, but it’s always great to have options. With both the source and target workbooks open, do the following:
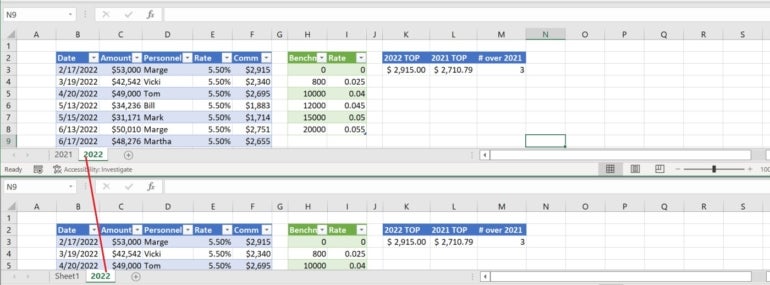
- Click the View tab and choose View Side By Side in the Window group. Excel will split the screen horizontally between the two workbooks.
- Click the sheet tab in the source workbook and drag it to the target workbook while holding down the Ctrl key. As you drag, Excel will display the “can’t drop” cursor. Once you reach the sheet tab area of the target workbook, that cursor will return to the normal drag-and-drop cursor. At this point, you can release the sheet tab. If you don’t hold down the Ctrl key, Excel will move the worksheet to the target workbook instead of creating a copy in the target workbook.
As you can see in Figure E, both workbooks have a copy of the source worksheet.
Figure E
How to remove formatting when copying an Excel worksheet
You might have noticed that Excel keeps the formatting as you copy a worksheet, which is convenient. On occasions when you don’t want to keep the formatting, you’ll have to remove the formatting after the copy task.
To remove the formatting after the copy task, do the following:
- Click the sheet selector. That’s the small gray square at the intersection of the row and column header cells. Doing so will select the entire worksheet.
- Click the Home tab.
- In the Editing group, click the Clear dropdown option.
- From the resulting dropdown, choose Clear Formats (Figure F).
Figure F

A bonus Microsoft Excel tip for creating templates
If you’re finding that you spend an exorbitant amount of time copying Excel sheets from one workbook to another—especially for business processes that you repeat on a regular basis—there may be a better way to set up your new workbooks for success.
SEE: The Complete Microsoft Office Master Class Bundle (TechRepublic Academy)
Excel’s defaults are adequate for some or even most users, but if you find yourself resetting things every time you start a new workbook file, stop. Instead, open a blank workbook, change those settings, and save the file as a template. Then, base new workbook files on the template instead of Excel’s built-in template, or you can even consider altering the default workbook.
Read next: The best project management software and tools (TechRepublic)


