


On a regular basis, I reference the hosts file in Linux and assume everyone knows what it is. But every so often I receive a question that reminds me some are new to Linux and need help with the basics.
SEE: 40+ open source and Linux terms you need to know (TechRepublic Premium)
The hosts file is a great place to start, as it is not only very useful, it can help new-to-Linux users get up to speed on a few important concepts. With that in mind, I’m going to introduce you to the hosts file and walk you through every step of editing it.
Open source: Must-read coverage
- Debian vs Ubuntu: Which Linux Distro Fits Your Needs Best?
- Ubuntu Server: A Cheat Sheet
- Llama 3 Cheat Sheet: A Complete Guide for 2024
- CISA Report Finds Most Open-Source Projects Contain Memory-Unsafe Code
Are you ready for this? Let’s do it.
What you’ll need
To work with the hosts file, you’ll need a running instance of Linux (it doesn’t matter which distribution) and a user with sudo privileges.
Find out how Scala Hosting can help you host your applications and websites with Managed VPS
What is the hosts file in Linux?
Simply put, the hosts file is a way to map hostnames to IP addresses. This is very important with certain setups and to make networking on Linux a bit easier. In a sense, the hosts file acts as a local DNS server.
Let’s say you’ve deployed the InvoicePlane invoice management system on a Linux machine within your local LAN. The IP address of the machine hosting InvoicePlane is 192.168.1.11, and to get to the service, users have to type 192.168.1.11/invoiceplane. Now, what if you could map that IP address to a more standard address (say www.invoiceplane.net), so your users don’t have to type out the IP address (which most people have a harder time remembering)?
Or, say you’re deploying a Kubernetes cluster. Part of the process of deploying such a cluster is mapping the controller and nodes in the hosts file.
Let’s dig into the hosts file to see how it works.
How to open the hosts file for editing in Linux
The first thing to do is open the hosts file for editing. We’re going to do this from the command line, so either log into your Linux server or open a terminal window on your Linux desktop. We’ll use the nano editor (as that is the simplest tool for this purpose). Because the hosts file lives in the /etc/ directory it’s protected, so we must elevate our user’s privilege with the sudo command. To open the file for editing issue the command:
sudo nano /etc/hosts
You will be prompted for your user password. Upon successfully typing your user password, you’ll see the hosts file opened and ready for editing (Figure A).
Figure A
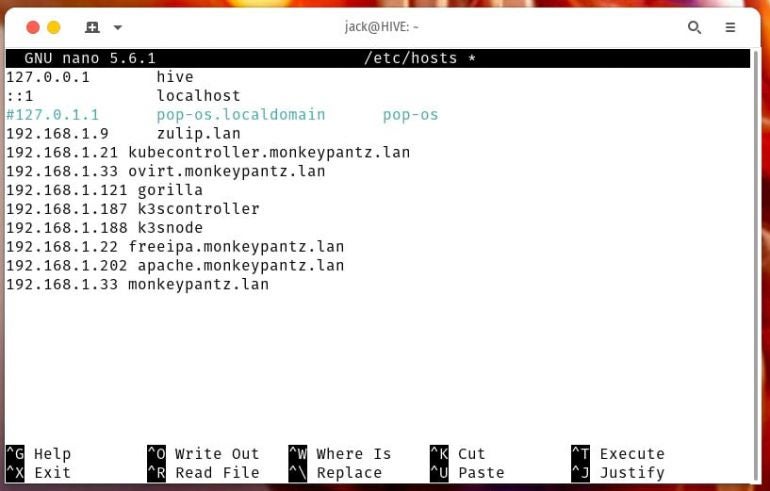
The first entries in the hosts file are always dedicated to the localhost, which is the local machine. In my example, localhost is represented in two different ways:
127.0.0.1 hive
::1 localhost
127.0.0.1 is referred to as either the localhost or loopback address and is used on every computer (Linux, macOS and Windows). The first line (127.0.0.1 localhost) maps the loopback address to the name localhost. Because of this, you could ping the local machine with either ping 127.0.0.1 or ping localhost. Since we’ve mapped the address in hosts, both of those commands would ping the local machine. And since we’ve mapped the IPv6 address ::1 to localhost, the same thing holds true.
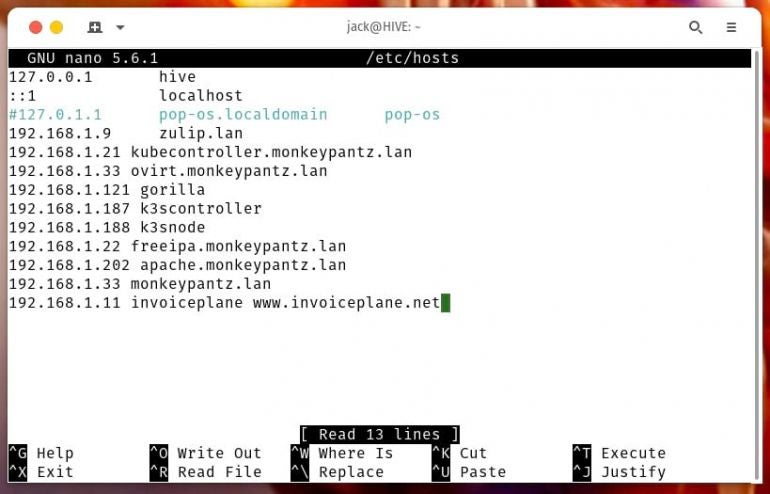
Now, let’s create a new entry. We’ll use one of the examples mentioned above. What we’ll do is map the IP address 192.168.1.11 to the hostname invoiceplane and the FQDN www.invoiceplane.net. It should be noted that I do not own the domain invoiceplane.net, nor does it resolve to anything. You could use invoiceplane.lan, but that causes problems with web browsers.
At the bottom of the hosts file, add the following line (modifying to an IP address/server you have on your LAN):
192.168.1.11 invoiceplane www.invoiceplane.net
The finished file will look like that in Figure B.
Figure B
To save and close the file, hit the Ctrl+X keyboard combination and answer y to save.
Let’s test out our changes. From the terminal, ping the server with the following (modifying to an IP address/server you have on your LAN):
ping 192.168.1.11
ping invoiceplane
ping www.invoiceplane.net
The results should be the same and your local machine should be able to reach the remote machine on your lan, regardless of which address you use.
You can also open your web browser and, instead of typing the IP address, type the mapped address www.invoiceplane.net (modifying according to what you’ve added to the hosts file). In my case, I could enter www.invoiceplane.net/invoiceplane (because my instance of InvoicePlane is being served up from the invoiceplane directory in the Apache document root) in my browser address bar and reach my instance of InvoicePlane. One thing to note is that once you hit Enter on your keyboard, you’ll probably see the address automatically change from www.invoiceplane.net/invoiceplane to 192.168.1.11/invoiceplane. That’s expected behavior. The only point of the hosts file is to map host/domain names to IP addresses. Once the address resolves, it’ll change in the address bar.
You can add as many address mappings as needed in the Linux hosts file. As long as you stick to the formula, everything should work just fine.
And that’s how you work with the Linux hosts file. Happy mapping!
Subscribe to TechRepublic’s How To Make Tech Work on YouTube for all the latest tech advice for business pros from Jack Wallen.